Epson P6000 - Multimedia Photo Viewer, User Manual
The Epson P6000 - Multimedia Photo Viewer is an innovative device that allows users to view and share their photos and multimedia content with ease. For a thorough understanding of its features and functionality, download the Basics Manual from our website for free.
Share
Download


Reviews:
No comments
Related manuals for P6000 - Multimedia Photo Viewer
iPF710 - imagePROGRAF Color Inkjet Printer
Brand: Canon Pages: 238

image Prograf iPF780 Series
Brand: Canon Pages: 326
1040 Series
Brand: CalComp Pages: 4
EXPERT 24 LX
Brand: GCC Technologies Pages: 140
632
Brand: Wang Pages: 139
Expert Pro Series
Brand: GCC Technologies Pages: 58
FC8600-100
Brand: GRAPHTEC Pages: 152

SPL-450
Brand: Sekonic Pages: 28
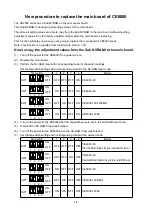
CE6000 SERIES
Brand: GRAPHTEC Pages: 4
J5-160-P
Brand: GCC Technologies Pages: 66
S CLASS
Brand: Summa Pages: 89
GD-188
Brand: Furuno Pages: 201

FP?8000 XL
Brand: Mega Pages: 27
Craft ROBO CC200
Brand: GRAPHTEC Pages: 44

Enduracut
Brand: SignWarehouse.com Pages: 24

J5 Series
Brand: GCC Technologies Pages: 59
CG-100AR
Brand: MIMAKI Pages: 184

axidraw
Brand: Evil Mad Scientist Pages: 39


