background image

PowerLite

®

 400W

Multimedia Projector

User’s Guide

Summary of Contents for PowerLite 400W

Page 1: ...PowerLite 400W Multimedia Projector User sGuide ...

Page 2: ...duct Epson is not responsible for any use of this information as applied to other products Neither Seiko Epson Corporation nor its affiliates shall be liable to the purchaser of this product or third parties for damages losses costs or expenses incurred by purchaser or third parties as a result of accident misuse or abuse of this product or unauthorized modifications repairs or alterations to this...

Page 3: ... the Projector 16 Whiteboard Installation 18 Other Installations 19 Connecting to a Computer 20 Connecting with the VGA Cable 20 Connecting with a VGA 5BNC Cable 22 Connecting an External Monitor 23 Playing Sound Through the Projector 24 Connecting External Speakers 25 Connecting to Video Sources 26 Connecting a Composite Video Source 27 Connecting an S Video Source 28 Connecting an RGB Video Sour...

Page 4: ...jector 44 3 Using the Remote Control 45 Controlling the Picture and Sound 46 Switching Between Picture Sources 46 Adjusting the Color Mode 47 Turning Off the Picture and Sound 48 Stopping Action 48 Zooming Your Image 49 Changing the Image s Aspect Ratio 49 Replacing the Batteries 51 4 Fine tuning the Projector 53 Using the Projector s Menu System 54 Changing Menu Settings 55 Adjusting Colors and C...

Page 5: ...r 74 Replacing the Lamp 76 Resetting the Lamp Timer 79 Transporting the Projector 80 6 Solving Problems 81 Using On Screen Help 82 What To Do When the Lights Flash 82 Solving Problems with the Image or Sound 84 Solving Password Problems 89 Solving Problems with the Remote Control 90 Solving Network Problems 91 Where To Get Help 91 Speak to a Support Representative 92 7 Monitoring the Projector Ove...

Page 6: ...ng a Browser to Monitor the Projector 103 A Technical Specifications 105 General 105 Projection Lamp 106 Remote Control 106 Dimensions 106 Electrical 106 Environmental 107 Safety and Approvals 107 Compatible Video Formats 108 Compatible Computer Display Formats 109 B Notices 111 Important Safety Instructions 111 FCC Compliance Statement 113 Index 115 ...

Page 7: ...teractive whiteboard IWB or another projection surface And its powerful 10 W speaker and crisp 500 1 contrast ratio ensure your presentations are seen and heard at their best You can connect the projector to a wide range of computers including IBM compatible PCs and laptops Apple PowerPC and Intel Core Macintosh computers PowerBook computers and many iMac and iBook series systems With Epson s pate...

Page 8: ... or other computer If you want to connect the projector to a laptop or desktop computer see page 20 For additional presentation control you can connect an external monitor to view the presentation on your computer simultaneously Connecting to video sources You can connect a DVD player VCR HDTV camcorder digital camera and other video sources to your projector See page 26 for instructions Using the...

Page 9: ... for setting up your projector Here s where you can look for help www presentersonline com Includes a library of articles covering presentation tips tricks and technology The site provides templates clip art and sound clips as well as Presenters Services to use on the road Even more resources and services are available if you register to join the Presenters Club and it s free Built in help system ...

Page 10: ... the registration form that came with your projector and mail it to Epson Or register your product online using your projector CD or at http www epson com webreg Registering also lets you receive special updates on new accessories products and services Unpacking the Projector After unpacking the projector make sure you have all these items Save the protective pad attached to the lens cover and all...

Page 11: ...port output only Computer 1 and 2 VGA Component Video ports S Video port Video port LAN port Remote control sensor Speaker Audio L R input ports Rear adjustable foot Power inlet RS 232C serial port Audio 1 and 2 input ports Audio Out port Mounting bracket holes Rear adjustable feet Security lock slot Front Back Bottom Lens Lens cover Air filter Mounting bracket hole Mounting bracket hole ...

Page 12: ...13 Some older PowerBooks and Macintosh desktop models may need a Macintosh video adapter see your computer dealer Older iMac systems may need a special VGA adapter and newer iMac MacBook and PowerBook systems may need a mini DVI to VGA adapter see your computer dealer To receive an audio signal you need a commercially available audio cable see your computer or electronics dealer Control Panel Indi...

Page 13: ...ow Projector Wall Mount Projector Wall Mount Security Module Interactive Whiteboard Retrofit Installation Module ELPMSTPW ELPMSECM ELPMIWBM 50 inch portable screen 4 3 aspect ratio 60 inch portable pop up screen 4 3 aspect ratio 80 inch portable pop up screen 4 3 aspect ratio 83 6 inch hanging pull down screen 4 3 aspect ratio Duet Ultra Portable Projector screen 4 3 and 16 9 aspect ratio ELPSC06 ...

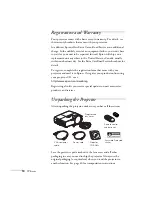
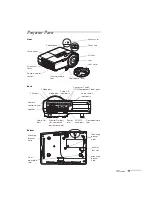
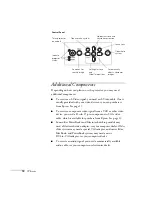
Page 14: ...14 Welcome ...

Page 15: ...d connect it to a computer or video source You can connect up to four devices simultaneously four video sources or two computer and two video sources You ll find instructions for the following in this chapter Positioning the projector Connecting to a computer Connecting to video sources ...

Page 16: ...ge Image size can vary depending on how you adjust the zoom and other settings note You can download the Projection Distance Calculator program from the Drivers Downloads section of Epson s website www epson com support Center of lens Center of lens 16 10 aspect ratio Screen size Projection distance A Wide to Tele Offset B Wide to Tele 50 inches 127 cm 21 to 29 inches 54 to 73 cm 4 to 10 inches 10...

Page 17: ...ches 99 cm 7 2 inches 18 cm 90 inches 229 cm 44 inches 112 cm 8 1 inches 21 cm 97 inches 246 cm 48 inches 122 cm 8 7 inches 22 cm 16 9 Aspect Ratio Screen size Projection distance A Wide to Tele Offset B Wide to Tele 49 inches 124 cm 21 to 29 inches 54 to 73 cm 5 3 to 12 inches 13 to 30 cm 60 inches 152 cm 26 to 36 inches 67 to 91 cm 6 5 to 14 7 inches 17 to 38 cm 70 inches 178 cm 31 to 42 inches ...

Page 18: ... in front of the center of the screen facing it squarely If the projector isn t positioned this way the image will be keystone shaped or instead of rectangular If you re projecting from a table or other flat surface you may need to tilt the projector up by extending the front adjustable foot as described on page 41 This causes the image to lose its rectangular shape You can adjust the shape using ...

Page 19: ... Installations You can also project from behind the screen or from the ceiling with the projector mounted upside down To project from the ceiling you ll need the optional ceiling mount See page 13 for ordering information You ll also need to select Front Ceiling or Rear Ceiling for the Projection option in the Extended menu To project from the rear select Rear See page 62 for details Front ceiling...

Page 20: ...ector so you can view your presentation close up as well as on screen not necessary if you re using a laptop see page 23 Connect the projector to your computer with a commercially available audio cable to play computer audio see page 24 Connecting with the VGA Cable Follow these instructions to connect to your computer with the VGA cable that came with your projector Before you start make sure you...

Page 21: ... display simultaneously on your computer monitor and the projector screen see Connecting an External Monitor on page 23 5 To play audio from your computer through the projector speaker see Playing Sound Through the Projector on page 24 6 Tighten the screws on the connectors If you don t need to make any other connections you can plug in your projector and turn it on See page 36 for instructions If...

Page 22: ...ter s BNC ports 4 If you want to view the display simultaneously on your computer monitor and the projector screen see Connecting an External Monitor on page 23 5 To play audio from your computer through the projector speaker see Playing Sound Through the Projector on page 24 6 Tighten the screws on the VGA connector If you don t need to make any other connections you can plug in your projector an...

Page 23: ...n the screen Simultaneous display is possible only when the computer is connected to the projector s Computer1 port Make sure the projector and computer are off Then connect the monitor s cable to the projector s Monitor Out port as shown If you don t need to make any other connections you can plug in your projector and turn it on See page 36 for instructions note Some LCD monitors may not be able...

Page 24: ...onics dealer 1 Connect one end of the 3 5 mm stereo mini jack audio cable to the corresponding Audio1 or Audio2 jack on the projector 2 Connect the other end of the audio cable to your laptop s headphone jack or audio out jack or your desktop s speaker or audio out port If you don t need to make any other connections you can plug in your projector and turn it on See page 36 for instructions 3 5 mm...

Page 25: ...appropriate cable to connect your speakers Depending on your speakers you may be able to use a commercially available audio cable with a stereo mini jack connector on one end and pin jacks on the other end For some speakers you may have to purchase a special cable or use an adapter 2 Connect the stereo mini jack end of the audio cable to the Audio Out port on the projector 3 Connect the other end ...

Page 26: ...eo source For composite video use a commercially available RCA A V cable See page 27 For S Video use the S Video cable supplied with your video device or order one from Epson See page 28 For RGB video use the VGA computer cable included with the projector See page 29 For component video you ll need the optional Epson component to VGA video cable See page 30 After connecting your video device to th...

Page 27: ...s yellow Video port 2 Connect the yellow plug on the other end of the cable to the video out port on your video source 3 To play sound through the projector follow the instructions beginning on page 31 If you don t need to make any other connections you can plug in your projector and turn it on See page 36 for instructions If more than one device is connected to the projector select the correct so...

Page 28: ... or other video source are turned off 1 Insert one end of the S Video cable into the projector s S Video port and the other end into the S Video output port of your video source 2 To play sound through the projector follow the instructions beginning on page 31 If you don t need to make any other connections you can plug in your projector and turn it on See page 36 for instructions If more than one...

Page 29: ... computer cable to the Computer1 or Computer2 port on the projector 2 Connect the other end to the video port on your player 3 To play sound through the projector follow the instructions beginning on page 31 If you don t need to make any other connections you can plug in your projector and turn it on See page 36 for instructions If more than one device is connected to the projector select Computer...

Page 30: ...o cable to the projector s Computer1 or Computer2 port 2 Insert the three component ends of the component to VGA video cable into the color coded video output ports on your video source usually labelled Y Pb Pr or Y Cb Cr 3 To play sound through the projector follow the instructions beginning on page 31 If you don t need to make any other connections you can plug in your projector and turn it on S...

Page 31: ...e audio output port In this case use a commercially available RCA type audio cable to connect the projector to your video source 1 Connect one end of the RCA audio cable to the L Audio R jacks on the projector 2 Connect the red and white plugs on the other end of the RCA audio cable to the corresponding color coded audio output port on your video source If you don t need to make any other connecti...

Page 32: ...ercially available stereo mini jack audio adapter cable 3 5 mm stereo miniplug to two male RCA plugs to connect to the projector 1 Connect one end of the audio adapter cable to the L Audio R jacks on the projector 2 Connect the other end of the audio adapter cable to your video device s audio output port If you don t need to make any other connections you can plug in your projector and turn it on ...

Page 33: ...eakers Depending on your speakers you may be able to use a commercially available audio cable with a stereo mini jack connector on one end and pin jacks on the other end For some speakers you may have to purchase a special cable or use an adapter 3 Connect the stereo mini jack end of the audio cable to the Audio Out port on the projector 4 Connect the other end of the cable to your speakers The pr...

Page 34: ...34 Setting Up the Projector ...

Page 35: ...resentation Although you can operate the projector without it the remote control lets you use additional features See Chapter 3 for instructions on using the remote This chapter covers the following Turning on the projector and other equipment Adjusting the image Adjusting the volume Shutting down the projector ...

Page 36: ... displays the image source If you turn on the projector first or have multiple pieces of connected equipment you may have to select the image source manually See page 38 Turning On the Projector Follow these steps to plug in and turn on the projector 1 Remove the lens cover 2 Connect one end of the power cord to the projector s power inlet then connect the other end to an electrical outlet The P P...

Page 37: ...nd play monitor click Cancel If you re projecting a video you may need to press the Source Search button on the projector or remote control to switch to your video source Then press the Play button on your DVD player or other device If you are prompted to enter a password see page 70 To focus and adjust the image see page 40 If a projected image fails to appear see What To Do If You See a Blank Sc...

Page 38: ...e cables are connected correctly as described in Chapter 1 Make sure the P Power light is green and not flashing and the lens cover is removed Make sure you ve selected the correct image source see the previous section Allow a few seconds for the projector to sync up after pressing the button Check the Signal menu to make sure the correct input source is selected See page 58 If you re using a PC l...

Page 39: ...y brand you may need to click a Monitor tab then make sure the external Monitor port is set as your primary display and or enabled See your computer s documentation or online help for details If you re using a Macintosh laptop with OS X You may need to set up your system to display on the projector screen as well as the LCD screen Follow these steps 1 From the Apple menu select System Preferences ...

Page 40: ...age brightness see page 42 If a computer image displays incorrectly see page 43 You can make many other adjustments to the image such as changing the brightness contrast and aspect ratio using the projector s menu system See Chapter 4 for more information Focusing and Zooming Your Image Rotate the focus ring to sharpen the image Press the Wide button on the projector to enlarge the image or the Te...

Page 41: ...he image is too high or low you can correct it by adjusting the projector s front and or rear feet 1 To adjust the front foot stand behind the projector Press up on the blue foot release lever and lift the front of the projector to extend the front adjustable foot 2 Once the image is positioned where you want release the lever to lock the foot in position 3 To adjust the rear feet rotate the feet ...

Page 42: ...e or buttons on the projector to correct the shape of the image After correction your image will be slightly smaller You can also make keystone adjustments using the projector s Settings menu See page 60 Adjusting the Brightness The brightness of an image depends on the source you are projecting and the amount of light in the room If the image is too bright or not bright enough here are two ways y...

Page 43: ...image for this button to have any effect Additionally if the Auto Setup option in the Signal menu is set to Off the Auto function will not work See page 59 Adjusting the Volume You can use the Vol and Vol buttons on the remote control to increase or decrease the volume for the projector s built in speaker A volume gauge appears on the screen while the volume is being adjusted note You can also adj...

Page 44: ...rning off the projector 4 Press up on the blue foot release lever and lower the projector to retract the front adjustable foot 5 Attach the lens cover 6 Unplug the power cord 7 Turn off and disconnect any equipment plugged into the projector 8 If you won t be using the projector for awhile attach the lens cover s protective pad Then store it in a protective case note When the projector has not rec...

Page 45: ...stem The projector menus let you adjust many projector settings see Chapter 4 When using the remote control stand within 20 feet 6 m of the projector Point the remote control either at the front or back of the projector or at the screen the projector s front sensor can detect signals bounced off the screen Press the button for the function you want to use This chapter covers the following informat...

Page 46: ...nected any equipment as described in Chapter 1 Switching Between Picture Sources If you ve connected your projector to more than one computer and or video source you can use the Source Search button on the projector or remote control to switch between the different sources After you select a source the screen goes dark for a moment before the image appears The name of the selected source such as C...

Page 47: ...You can also use the projector menu system to change the color mode in the Image menu see page 57 Color mode Description Game Brightest mode best for playing video games in a bright room Presentation Use when you re projecting a full color presentation in a bright room Text Use when you re projecting a black and white presentation in a bright room Theatre Use when projecting movies in a dark room ...

Page 48: ... turn the image and sound back on press the button again You can create an image such as a company logo or a picture to display on the screen whenever you press the A V Mute button See page 67 for more information Stopping Action Press the Freeze button to stop the action in your video or computer image and keep the current image on the screen The sound will continue however Also because the sourc...

Page 49: ...hanging the Image s Aspect Ratio You can use the Aspect button on the remote control to change the aspect width to height ratio depending on the input signal Auto video images only Automatically sets the aspect ratio according to the input signal 4 3 ratio images display at 4 3 squeeze recorded signals display at 16 9 and letterbox signals display at Zoom ratio described below Normal Displays imag...

Page 50: ...ction area but does not retain the aspect ratio 4 3 ratio images are elongated horizontally Through Displays images as is aspect ratio and resolution are maintained Black bands appear if the resolution is 1280 800 or less images are cut off if the resolution is over 1280 800 Press the Aspect button repeatedly to cycle through the available options You can also change the aspect ratio using the pro...

Page 51: ...e the batteries as soon as they run out If a battery leaks wipe away battery fluid with a soft cloth If fluid gets on your hands wash them immediately Do not expose batteries to heat or flame Dispose of used batteries according to local regulations Remove the batteries if you won t be using the remote control for a long period of time note The remote control automatically shuts off when it detects...

Page 52: ...52 Using the Remote Control ...

Page 53: ...ther features This chapter covers the following information Using the menu system Adjusting image colors and clarity Adjusting the input signal Customizing projector features Selecting projector setup options Selecting projector network settings Viewing lamp usage and other information Using the projector s security features Restoring the default settings ...

Page 54: ...igh or low control use of the remote control receivers project a test pattern for adjustments and disable buttons on the projector while you are projecting See page 60 The Extended menu lets you customize the way you set up the projector Among the options you can select the menu language set rear or ceiling projection and record a custom image or logo to be displayed as the startup screen or whene...

Page 55: ... to scroll through the menu list When you ve highlighted the desired menu press the Enter button on the projector or the remote control to select it The highlight moves to the first option for that menu 3 Use the up and down arrow buttons on the projector or remote control to scroll through the list of options The options available depend on which source is selected 4 After highlighting the option...

Page 56: ...o the previous menu or to close the menu system if you are at the main menu Your changes are saved automatically however you may be prompted to restart the projector to activate some settings 6 Press the Menu button to exit the menu system Adjusting Colors and Clarity The Image menu lets you make adjustments to the colors of the projected image and fine tune brightness contrast and sharpness The o...

Page 57: ... Text For black and white presentations in a bright room Theatre For optimizing movie images with natural color in a dark room the default for video or S Video display Photo For projecting still images with vivid color in a bright room Computer input only sRGB For standard sRGB computer displays the default when projecting from a computer with analog video Blackboard Fixed color mode for projectin...

Page 58: ...or Menu Adjusting the Input Signal Although the projector normally detects and optimizes the input signal automatically you can use the Signal menu to manually select it You can also change the position of the projected image correct tracking and sync and change the aspect ratio to widescreen format 1 Press the Menu button You see the Image menu 2 Select the Signal menu You see one of the followin...

Page 59: ... 88 for more information Position Use the arrow buttons to move the image on the screen left right up or down Progressive Leave this setting On when viewing S Video or composite video so that interlaced to progressive conversion is carried out best for fast moving pictures If you notice flickering while viewing still images or you are using a component with a 480i signal switch this setting to Off...

Page 60: ...inished press Esc or Menu Customizing Projector Features The Settings menu lets you customize the way you use the projector from adjusting lamp brightness and speaker volume to applying security controls 1 Press the Menu button 2 Select the Settings menu 3 Press Enter Then use the up and down arrow buttons and the Enter button to set the following options Keystone Adjusts a distorted image from a ...

Page 61: ...electricity consumption and fan noise Select High to project the maximum brightness Also check the Brightness setting in the Image menu see page 57 Volume Adjusts the volume for the projector s speaker Remote Receiver Deactivates the projector s front and or back sensors that detect signals from the remote control This may be necessary to prevent interference from bright fluorescent lights Test Pa...

Page 62: ...hen use the up and down arrow buttons and the Enter button to set the following options Display Messages Lets you turn screen messages on or off Display Background Sets the screen background to Black Blue or Logo when no image signal is available Startup Screen Enables or disables display of the startup screen when the projector is turned on A V Mute Sets the screen background to Black Blue or Log...

Page 63: ... has not received any input signals for a period of time as defined in the Sleep Mode Timer setting Sleep Mode Timer When Sleep Mode is on you can set the period of time before the projector turns off automatically from 1 to 30 minutes High Altitude Mode When using the projector at an altitude above 4 921 feet 1 500 m turn this setting on to ensure that the internal temperature of the projector is...

Page 64: ...sage and Other Information Use the Info menu to view information about the display settings of your computer and the number of hours the lamp has been used 1 Press the Menu button 2 Select the Info menu You see one of the following menus note You can make changes to many of the signal settings on the Signal menu See page 58 for details Computer analog RGB digital RGB RGB Video Component video Vide...

Page 65: ...ponent video Displays the input signal setting Resolution computer RGB video and component video Displays the input resolution Video Signal composite and S Video Displays the video signal format Refresh Rate computer RGB video and component video Displays the refresh rate Sync Info computer RGB video and component video Provides information that may be needed by the service technician Status Displ...

Page 66: ...hould it be stolen If you assign the projector a password a screen appears requesting the password whenever the projector is turned on If you enter the password incorrectly three times in succession the projector s operation is locked and you ll need to disconnect the power cord then reconnect it to redisplay the password screen If an incorrect password is entered 30 times in a row the projector i...

Page 67: ...and select the Extended menu 3 Use the down arrow button and press Enter to select User s Logo 4 When you see a message asking if you want to use the present image as a user s logo select Yes and press Enter A selection box displays over the image 5 Use the arrow buttons on the projector or remote control to select the area of the image you want to use Once you have selected the area press Enter 6...

Page 68: ... Mute and Logo and press Enter 10 When you re finished press Menu to exit the menus Setting a Password 1 Press the Freeze button on the remote control for about five seconds until you see the Password Protect menu 2 Select Password and press Enter note The default setting for the Startup Screen option menu is On If the Startup Screen is set to Off the logo will not display at startup If the User s...

Page 69: ...lect Power On Protect and press Enter Select On then press Esc 3 To enable your screen logo select User s Logo Protect and press Enter Select On then press Esc When this feature is on the logo appears whenever the projector is turned on if the Startup Screen is enabled in the Extended menu see page 62 and as the A V Mute screen if you selected the Logo as the Display Background in the Extended men...

Page 70: ...ssage The projector s operation will be locked Request code xxxxx and the projector switches to standby mode for approximately 5 minutes Write down the request code Then disconnect the projector s power cord from the electrical outlet reconnect it and turn the projector back on When you see the Password Protect Release screen again you can try to enter the correct password If you enter an incorrec...

Page 71: ... disable all the buttons or Partial Lock to disable all except the P Power button Then press Enter 5 Select Yes and press Enter to confirm the setting 6 Press the Menu button Installing Security Locks You can install two different types of security locks on the projector You can use the security slot on the base of the projector to install a Kensington Microsaver Security System See page 13 You ca...

Page 72: ... button to display the confirmation screen Select Yes to reset all the default settings or No to cancel note The Computer Input 1 and 2 User s Logo Network menu settings Lamp Hours and Language settings do not return to their defaults when you select Reset All To reset the computer inputs use the Reset option on the Signal menu see page 58 for details To reset the network settings use the Reset op...

Page 73: ...part needs replacing contact your dealer or a qualified servicer This chapter covers the following Cleaning the lens Cleaning the projector case Cleaning and replacing the air filter Replacing the lamp Resetting the lamp timer Transporting the projector warning Before you clean any part of the projector turn it off and unplug the power cord Never open any cover on the projector except the lamp and...

Page 74: ...ld detergent Then wipe the case Do not use wax alcohol benzene paint thinner or other chemical detergents These can damage the case Cleaning and Replacing the Air Filter Your projector includes an air filter to ensure the best performance If dust collects on the air filter or vent on the side of the projector clean them as described below Dust clogs prevent proper ventilation and can cause overhea...

Page 75: ...eaner designed for computers and other office equipment If you don t have one gently clean them using a very soft brush such as an artist s paintbrush You can remove the air filter to clean both sides If the dirt is difficult to remove or if the filter is torn replace it Contact your dealer or call Epson at 800 463 7766 to obtain a new one part number V13H134A13 3 If you need to clean or replace t...

Page 76: ...our dealer or call Epson at 800 463 7766 for a replacement lamp Request part number V13H010L42 Follow these steps to replace the lamp 1 Press the P Power button twice to turn off the projector When you hear the projector beep twice unplug the power cord 2 If the projector has been on allow it to cool down for at least an hour or until the lamp is cool note Air filters contain polycarbonate ABS res...

Page 77: ...d on top of the projector 4 Slide the cover out then lift it off 5 Use the screwdriver to loosen the two screws holding the lamp in place You can t remove the screws 6 Hold the lamp as shown and pull it straight out note The lamp s in this product contain mercury Please consult your state and local regulations regarding disposal or recycling Do not put in the trash Don t remove these screws ...

Page 78: ...lace The opening should be almost covered and the top of the cover should be flush with the top of the projector Then slide the cover closed and tighten the screw 10 Reset the lamp timer as described in the next section caution Do not touch the glass portion of the lamp assembly Touching the glass could result in premature lamp failure note Be sure to seat the lamp fully and secure the lamp cover ...

Page 79: ...e Menu button on the remote control or projector and select the Reset menu Then press Enter 3 Select Reset Lamp Hours and press Enter You see a confirmation screen 4 Select Yes and press Enter 5 Press Esc to return to the main menu or the Menu button to exit the menu system note Do not reset the lamp timer if you have not replaced the lamp If you do the Lamp Hours will not accurately reflect the n...

Page 80: ...ctor for repairs use the original packaging material if possible If you do not have the original packaging use equivalent materials placing plenty of cushioning around the projector When transporting the projector as freight or checked luggage first put it in a carrying case then pack it in a firm box using cushioning around the case Make sure the shipping carrier is equipped to handle fragile equ...

Page 81: ... can t solve yourself This chapter explains the following Using the projector s on screen help system What to do when the projector s status lights flash Solving problems with the image or sound Solving password problems Solving problems with the remote control Solving problems monitoring the projector over a network Contacting technical support ...

Page 82: ...on s 3 Press Esc to view another topic or press Help to exit If none of the suggestions solves your problem see additional solutions to problems in the following sections What To Do When the Lights Flash The lights on top of the projector indicate the projector s status and let you know when a problem occurs If the projector is not working correctly first turn it off and unplug it Then plug the po...

Page 83: ...he projector at an altitude above 4921 ft 1500 m turn on High Altitude Mode as the Operation setting in the Extended menu see page 62 Also clean the air filter and air vents see page 74 If it continues to overheat you may need to replace the air filter Red Flashing red Off The lamp is burned out broken or not installed correctly or the lamp cover is open Close the cover or replace or reseat the la...

Page 84: ...ack screen saver Try pressing a key on the computer If the power was switched off and then on again wait until the P Power light stops flashing and remains orange Then press the P Power button again Check the Video Signal Computer1 Input or Computer2 Input setting in the Signal menu to make sure it is correct for the selected source See page 58 for more information Messages may have been turned of...

Page 85: ...tton on the projector or the remote control to select the correct source Allow a few seconds for the projector to sync up after pressing the button If you ve connected a laptop computer make sure it s set to display on an external monitor See page 38 The message Not Supported is displayed Make sure your computer s resolution doesn t exceed WXGA and the frequency is supported by the projector see p...

Page 86: ...or s native resolution If this option isn t available select another compatible video format See page 109 Windows Right click the desktop select Properties click the Settings tab and select a different resolution Macintosh OS X On the Apple menu choose System Preferences then click Display or Displays Select a different resolution You also may need to modify existing presentation files if you crea...

Page 87: ...60 Also make sure the Progressive setting is On See page 60 for details Make sure the cables are securely connected at both ends Select the correct resolution see Compatible Video Formats on page 108 If you re projecting from a computer press the Enter Auto button on the remote control or the Enter button on the projector to adjust tracking and sync automatically If that doesn t work try adjusting...

Page 88: ...See page 57 for instructions If you re displaying video adjust the Color Saturation and Tint settings on the Image menu See page 57 for instructions Adjust the Brightness Contrast and Color Adjustment settings on the Image menu See page 57 Make sure the input signal setting on the Signal menu matches the signal from the connected device See page 58 for details If the image is too purple and you ve...

Page 89: ... the volume control on your computer is not turned all the way down or muted Make sure the audio cable is securely connected to both the projector and your computer See page 24 The wrong source may be selected Press the Source Search button on the projector or the remote control Solving Password Problems You have forgotten the password Write down the request code that appears in the Password Prote...

Page 90: ...rectly or may be low on power Replace the batteries as described on page 51 Dim the room lights and turn off any fluorescent lights Make sure the projector is not in direct sunlight Strong lighting especially fluorescent lights may affect the projector s infrared receivers If you still have trouble using the remote control disable one of the remote receivers using the Settings menu to block interf...

Page 91: ...over the network when a projector problem occurs Make sure that Standby Mode in the projector s Extended menu is set to Network On see page 62 Make sure that you ve connected the projector to the network and configured it correctly see page 95 Make sure you set up projector e mail alerts correctly in the Network menu see page 97 or in EMP Monitor see page 102 Where To Get Help Epson provides these...

Page 92: ...hrough Friday Days and hours of support are subject to change without notice Toll or long distance charges may apply Before you call please have the following information ready Product name PowerLite 400W Product serial number located on the bottom of the projector Proof of purchase such as a store receipt and date of purchase Computer or video configuration Description of the problem Purchase Sup...

Page 93: ... the mail notification function to receive e mail alerts about possible problems To use the software to manage your projectors first install EMP Monitor Then connect and configure the projector you want to monitor as described here This chapter covers the following information Installing the network software Connecting your projector to a network Selecting network settings Monitoring and controlli...

Page 94: ...ements Microsoft Windows 98SE Me or 2000 SP4 Windows XP or Windows Vista IBM compatible PC with at least a Pentium III 1 2 GHz processor At least 256MB of RAM 512 recommended At least 128MB of free hard disk space XGA 1024 768 or better display adapter and monitor 16 bit color or higher Installing the Software on a Windows System 1 Insert the network software CD ROM in your computer s CD ROM or DV...

Page 95: ...s to connect the projector to your network and configure it with an IP address 1 Connect the projector to your network using a commercially available 100BaseTX or 10BaseT network cable Connect the cable to the LAN port on the projector 2 Press the projector s P Power button to turn it on ...

Page 96: ...ired LAN If your network assigns addresses automatically turn on the DHCP setting If your network does not assign addresses automatically turn off DHCP and enter the projector s IP Address Subnet Mask and Gateway Address as needed To enter numbers use the numeric buttons on the remote control PJLink Password Lets you enter a password for using the PJLink protocol to control the projector Web Contr...

Page 97: ...iscovery enabled software if you are using it on your network Using Projector E mail Alerts When this feature is enabled the projector sends you an e mail alert if it has any problems 1 Press the Menu button select the Network menu and press Enter 2 Select Mail and press Enter 3 Select the following settings as necessary Mail Notification Select On to enable sending of an e mail if there is a prob...

Page 98: ...re using EMP Monitor make sure you ve installed the software available for Windows only as described on page 94 The computer you re using to monitor the projector should already be connected to your network Opening and Closing EMP Monitor To start EMP Monitor click Start Programs or All Programs EPSON Projector EMP Monitor If you ve added the program to the Startup programs folder it may already b...

Page 99: ...e Register button 7 Repeat steps 2 through 5 to register any additional projectors on the network 8 When you re done adding the projector click Cancel You see a screen with a list of all registered projectors Monitoring Your Projector The EMP Monitor screen lets you monitor your projector status and check if a problem has occurred For the most current status click the Refresh button note If the pr...

Page 100: ...nitor password was entered when you registered the projector or an incorrect password was entered Monitoring disabled Right click the icon and select Monitoring Enabled to monitor the projector Data is currently being updated Network error projector is not connected to the network the power cable is disconnected or Network Off is selected as the Standby Mode setting in the Extended menu see page 6...

Page 101: ...rning The lamp is nearing the end of its life High temperature warning The projector is getting too hot but continues to operate Replace air filter No air filter The air filter is not installed or installed incorrectly Low air flow The air filter needs to be cleaned or replaced Air flow sensor error Contact Epson as described on page 91 Lamp cover open Close the lamp cover Lamp out The lamp has re...

Page 102: ...ill be sent 8 When you re done click the OK button If a projector experiences a problem EMP Monitor sends an e mail message to each of the addresses you entered in the Set mail notification function window The subject line and body of the message includes the projector s name and the warning or error similar to the those listed on page 99 When the problem has been fixed EMP Monitor sends a message...

Page 103: ... turn the projector on and select Wired LAN from the Network menu to display the IP address of the projector See page 96 You see a login screen 4 Do one of the following If you didn t set a Web Control Password in the Network menu click OK If you set a Web Control Password in the Network menu enter it in the Password box then click OK You see a screen displaying the settings you can change 5 Selec...

Page 104: ...104 Monitoring the Projector Over a Network ...

Page 105: ...lion colors Brightness ANSI 1800 lumens High brightness mode 1420 lumens Low brightness mode Contrast ratio 500 1 Image size 44 to 110 inches 1 1 to 2 8 m Projection distance 21 to 48 inches 0 53 to 1 22 m Projection methods Front rear ceiling Focus adjustment Manual Zoom adjustment Digital Internal sound system 10 W monaural Optical aspect ratio 16 10 horizontal vertical Zoom ratio 1 1 35 ...

Page 106: ...e Control Range 20 feet 6 m Batteries 2 Alkaline AA Dimensions Height 6 2 inches 157 mm Width 12 9 inches 327 mm Depth 10 7 inches 272 mm Weight 7 9 lb 3 6 kg Electrical Rated frequency 50 60 Hz Power supply 100 to 120 VAC 2 8 A 200 to 240 VAC 1 2 A Power consumption Operating 251 W Standby 4 2 W network off 4 9 W network on note Lamp life results will vary depending upon mode selected environment...

Page 107: ...rating 20 to 80 RH non condensing Storage 10 to 90 RH non condensing Altitude Up to 4 900 feet 1 500 m Up to 7 500 feet 2 286 m with High Altitude Mode enabled see page 62 Safety and Approvals United States FCC Part15B Class B DoC UL60950 1 Canada ICES 003 Class B CSA C22 2 No 60950 1 Pixelworks DNX ICs are used in this projector ...

Page 108: ...composite video S Video component video and RGB video and it automatically senses the video format HDTV SDTV NTSC PAL or SECAM The projector supports these international video standards Mode Refresh Rate Hz NTSC NTSC 4 3 PAL M PAL N PAL PAL60 SECAM 60 60 50 60 50 60 50 TV525i TV625i SDTV 480p and 480i SDTV 576p and 576i HDTV720p HDTV720p HDTV1080i HDTV1080i 60 50 60 50 60 50 60 50 ...

Page 109: ...ector see the following table for compatible formats For best results the computer s resolution should be set to match the projector s native resolution 1280 800 If this resolution isn t available select one of the other compatible formats Windows Right click the desktop select Properties click the Settings tab and select a compatible resolution For a notebook displaying through an external monito...

Page 110: ... 75 SVGA 85 56 60 72 75 85 800 600 800 450 800 600 800 450 800 600 800 450 800 600 800 450 800 600 800 450 XGA 60 XGA 70 XGA 75 XGA 85 60 70 75 85 1024 768 1024 576 1024 768 1024 576 1024 768 1024 576 1024 768 1024 576 WXGA60 1 60 1280 768 WXGA60 2 60 1360 768 WXGA 60 75 85 1280 800 1280 800 1280 800 WXGA 60 75 85 1440 900 1440 900 1440 900 WSXGA 60 60 1680 1050 SXGA60 60 1280 960 1280 1024 iMAC V...

Page 111: ...for the plug Failure to comply with these precautions could result in sparks or fire Do not insert the plug into an outlet with dust present Insert the plug firmly into the outlet Do not overload wall outlets extension cords or integral convenience receptacles This can cause fire or electric shock Do not place the projector where the cord can be walked on This may result in fraying or damage to th...

Page 112: ...r recycling Do not put in the trash Unplug the projector during lightning storms or when it will not be used for extended periods Do not place the projector and or remote control on top of heat producing equipment or in a hot location If you use the projector in a country other than where you purchased it use the correct power cord for that country Do not stand on the projector or place heavy obje...

Page 113: ...enna Increase the separation between the equipment and receiver Connect the equipment into an outlet on a circuit different from that to which the receiver is connected Consult the dealer or an experienced radio TV technician for help WARNING The connection of a non shielded equipment interface cable to this equipment will invalidate the FCC Certification or Declaration of this device and may caus...

Page 114: ...114 Notices ...

Page 115: ...er monitoring projector with 103 Buttons disabling projector 61 71 C Cables 10 to 13 92 Camcorder connecting to 26 to 33 Carrying case optional 80 Ceiling mount 13 19 projection 19 63 Cleaning air filter and vents 74 to 76 lens 74 projector case 74 Closed Caption setting 62 Color adjusting 47 56 to 58 problems 88 specifications 105 Color Adjustment setting 58 Color Mode 47 57 Color Saturation sett...

Page 116: ...ng 40 Foot release lever 41 Freeze button 48 Front projection 16 to 18 63 Front Ceiling setting 19 63 Full Lock setting 61 71 G Game color mode 47 57 Game console connecting to 26 to 33 H Height of image adjusting 41 Help 9 91 to 92 Help system using 82 High Altitude Mode setting 63 107 High brightness 42 76 84 105 I iBook connecting to 20 to 21 iMac connecting to 12 20 to 22 Image capturing and s...

Page 117: ...96 to 98 Reset 54 72 Settings 54 60 to 61 Signal 54 58 to 60 User s Logo 67 to 68 using 54 to 56 Messages setting 62 Monitor external 23 Monitoring projector e mail notifications 97 to 98 102 EMP Monitor 98 to 102 with browser 103 Moving projector 80 N Network connecting to 95 managing projector remotely 93 to 103 menu 54 64 96 to 98 problems 91 settings 64 96 to 98 99 system requirements 94 Netwo...

Page 118: ...ck Setup sheet 9 R Raising image 41 RCA A V cable 26 to 27 Rear projection 19 63 Registration 10 Remote control problems 90 receivers disabling 61 84 90 replacing 13 92 replacing batteries 51 specifications 106 using 45 to 51 Remote Receiver setting 61 84 90 Replacing air filter 74 to 76 lamp 76 to 79 remote control 13 92 remote control batteries 51 Request code password 70 Reset menu 54 72 Resolu...

Page 119: ...ransporting projector 80 Troubleshooting color 88 cut off image 43 86 image quality 87 to 88 image shape 86 network problems 91 no image 84 to 85 no sound 89 password 89 remote control problems 90 Turning off audio 48 picture 48 projector 44 Turning on password 69 projector 36 to 37 User s Logo 63 69 Typing the password 70 U Unpacking projector 10 User s Logo creating 67 to 68 displaying 68 to 69 ...

Page 120: ......

Reviews: