background image

Printing on CDs and DVDs

23

Inserting a CD or DVD

Make sure the data, music, or video is burned on your ink jet-printable CDs or 
DVDs before you print. Otherwise, dirt or scratches on the surface may cause 
errors when you burn the data. If you plan to print a large number of CDs or 
DVDs, it’s a good idea to print a small sample, then wait a day and check the 
quality to make sure it’s satisfactory.

If you want to check the print position, or color, see the instructions for 
“Adjusting the Print Position” on page 28 and “Adjusting the Print Density” on 
page 29.

Before you insert a CD or DVD, make sure the printer is turned on. Otherwise, 
the disc may not be positioned correctly. Then follow these steps:

1. Push in the output tray extension, but leave the tray open. 

2. Open the printer cover and pull down the CD/DVD tray guide.

R220.book  Page 23  Sunday, August 7, 2005  3:41 PM

Summary of Contents for R220 - Stylus Photo Color Inkjet Printer

Page 1: ...Epson Stylus Photo R220 Printer Basics R220 book Page 1 Sunday August 7 2005 3 41 PM ...

Page 2: ... consumable products other than those designated as Original Epson Products or Epson Approved Products by Seiko Epson Corporation Responsible Use of Copyrighted Materials Digital cameras scanners and ink jet printers like conventional photocopiers and cameras can be misused by improper copying or printing of copyrighted material While some countries laws permit limited copying of copyrighted mater...

Page 3: ...inting on CDs and DVDs 22 Cleaning the Rollers 22 Inserting a CD or DVD 23 Designing CDs and DVDs 25 Printing Your Design 27 Adjusting the Print Position 28 Adjusting the Print Density 29 Maintaining Your Printer 31 Cleaning the Print Head 31 Running the Head Cleaning Utility 31 Replacing an Ink Cartridge 33 Checking the Ink Supply 33 Purchasing Ink Cartridges 35 Ink Cartridge Precautions 35 Remov...

Page 4: ...blems With Paper Feeding 50 CD DVD Printing Problems 51 Miscellaneous Printout Problems 52 Uninstalling Printer Software 53 Windows 53 Macintosh 54 Where To Get Help 54 Requirements and Notices 57 Windows System Requirements 57 Macintosh System Requirements 57 Important Safety Instructions 58 Ink Cartridge Safety Instructions 59 FCC Compliance Statement 60 Declaration of Conformity 61 ENERGY STAR ...

Page 5: ... letter size papers A standard rear USB port plus a front USB port for quick connection to your laptop Note The front USB port does not support digital cameras or other USB devices Exif Print The Exif Exchangeable Image File Print format includes information about your digital camera settings in JPEG TIFF files so your printer and application can use them to create accurate print settings Most dig...

Page 6: ... printer and solving basic problems For more information about your printer double click the SPR220 Reference Guide icon on your desktop Please follow these guidelines throughout Warning Warnings must be followed carefully to avoid bodily injury Caution Cautions must be observed to avoid damage to your equipment Note Notes contain important information about your printer Tip Tips contain hints for...

Page 7: ...r your printer For example your photos will look great printed on Epson Ultra Premium Glossy Photo Paper See Selecting the Correct Paper Type on page 17 for more information Follow these steps to load paper in your printer 1 Open the output tray and its extension 2 Insert paper printable side up against the right edge guide behind the tab 3 Slide the left edge guide against the paper but not too t...

Page 8: ...er as you load it in the sheet feeder To load Epson ink jet papers follow these guidelines Paper Type Loading Capacity Premium Bright White Paper Photo Quality Ink Jet Paper 100 sheets Photo Quality Ink Jet Cards 30 cards Matte Paper Heavyweight Glossy Photo Paper ColorLife Photo Paper Ultra Premium Glossy Photo Paper Premium Glossy Photo Paper Premium Semigloss Photo Paper Premium Luster Photo Pa...

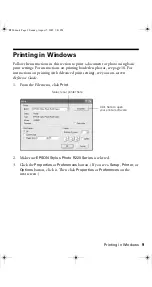
Page 9: ...ting with Advanced print settings see your on screen Reference Guide 1 From the File menu click Print 2 Make sure EPSON Stylus Photo R220 Series is selected 3 Click the Properties or Preferences button If you see a Setup Printer or Options button click it Then click Properties or Preferences on the next screen Select your printer here Click here to open your printer software R220 book Page 9 Sunda...

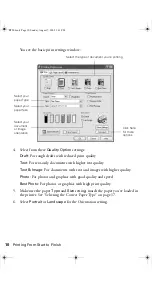
Page 10: ...s and graphics with good quality and speed Best Photo For photos or graphics with high print quality 5 Make sure the paper Type and Size settings match the paper you ve loaded in the printer See Selecting the Correct Paper Type on page 17 6 Select Portrait or Landscape for the Orientation setting Select the type of document you re printing Select your paper Type Click here for more options Select ...

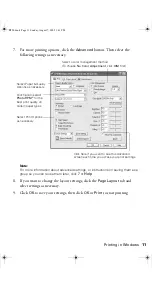
Page 11: ...lick the Page Layout tab and select settings as necessary 9 Click OK to save your settings then click OK or Print to start printing Click here if you want to see this Advanced screen each time you access your print settings Select Print Options as necessary Click here to select Photo RPM for the best print quality on certain paper types Select Paper Quality Options as necessary Select a color mana...

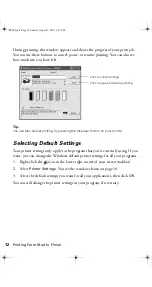
Page 12: ...ttings only apply to the program that you re currently using If you want you can change the Windows default printer settings for all your programs 1 Right click the icon in the lower right corner of your screen taskbar 2 Select Printer Settings You see the window shown on page 10 3 Select the default settings you want for all your applications then click OK You can still change the printer setting...

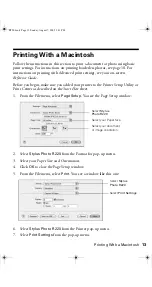
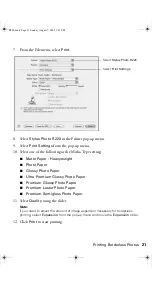
Page 13: ... as described on the Start Here sheet 1 From the File menu select Page Setup You see the Page Setup window 2 Select Stylus Photo R220 from the Format for pop up menu 3 Select your Paper Size and Orientation 4 Click OK to close the Page Setup window 5 From the File menu select Print You see a window like this one 6 Select Stylus Photo R220 from the Printer pop up menu 7 Select Print Settings from t...

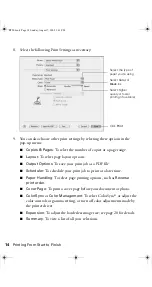
Page 14: ... Paper Handling To select page printing options such as Reverse print order Cover Page To print a cover page before your document or photo ColorSync or Color Management To select ColorSync or adjust the color controls or gamma setting or turn off color adjustments made by the printer driver Expansion To adjust the borderless image size see page 20 for details Summary To view a list of all your sel...

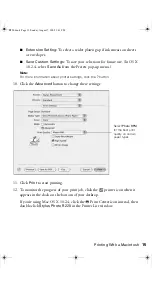
Page 15: ...ngs click the button 10 Click the Advanced button to change these settings 11 Click Print to start printing 12 To monitor the progress of your print job click the printer icon when it appears in the dock on the bottom of your desktop If you re using Mac OS X 10 2 4 click the Print Center icon instead then double click Stylus Photo R220 in the Printer List window Select Photo RPM for the best print...

Page 16: ...s Tip You can also cancel printing by pressing the paper button on your printer 13 When you re finished close the printer window or Print Center Select the print job Cancel printing Pause printing Resume printing R220 book Page 16 Sunday August 7 2005 3 41 PM ...

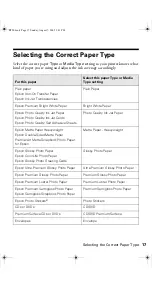
Page 17: ...uality Ink Jet Paper Epson Matte Paper Heavyweight Epson Double Sided Matte Paper PremierArt Matte Scrapbook Photo Paper for Epson Matte Paper Heavyweight Epson Glossy Photo Paper Epson ColorLife Photo Paper Epson Glossy Photo Greeting Cards Glossy Photo Paper Epson Ultra Premium Glossy Photo Paper Ultra Premium Glossy Photo Paper Epson Premium Glossy Photo Paper Premium Glossy Photo Paper Epson P...

Page 18: ... inches Letter 8 5 11 inches Matte Paper Heavyweight PremierArt Matte Scrapbook Photo Paper Letter 8 5 11 inches Matte Paper Heavyweight Epson Glossy Photo Paper 4 6 inches Letter 8 5 11 inches Glossy Photo Paper Epson ColorLife Photo Paper Letter 8 5 11 inches Glossy Photo Paper Epson Ultra Premium Glossy Photo Paper 4 6 inches Letter 8 5 11 inches Ultra Premium Glossy Photo Paper Epson Premium G...

Page 19: ...ries is selected then click Properties or Preferences You see the following window 4 Select Photo or Best Photo as the Quality Option setting 5 Select one of the following as the paper Type setting Matte Paper Heavyweight Photo Paper Glossy Photo Paper Ultra Premium Glossy Photo Paper Premium Glossy Photo Paper Select Photo or Best Photo Click here for more settings Click here for photos without w...

Page 20: ... Select your paper Size setting 8 Select your photo orientation 9 Click OK to save your settings then click OK or Print to start printing Macintosh 1 Start your photo program and open your photo 2 From the File menu select Page Setup You see the Page Setup window 3 Select Stylus Photo R220 from the Format for pop up menu 4 Select a borderless Paper Size 5 Select your photo orientation 6 Click OK t...

Page 21: ... Glossy Photo Paper Ultra Premium Glossy Photo Paper Premium Glossy Photo Paper Premium Luster Photo Paper Premium Semigloss Photo Paper 11 Select Quality using the slider Note If you need to adjust the amount of image expansion necessary for borderless printing select Expansion from the pop up menu and move the Expansion slider 12 Click Print to start printing Select Stylus Photo R220 Select Prin...

Page 22: ...inter Follow the steps in these sections to print on CDs or DVDs Cleaning the Rollers below Inserting a CD or DVD on page 23 Designing CDs and DVDs Printing Your Design on page 27 Adjusting the Print Position on page 28 Adjusting the Print Density on page 29 Cleaning the Rollers Before you print on CDs or DVDs it s a good idea to clean the rollers inside your printer You can do this by feeding and...

Page 23: ... wait a day and check the quality to make sure it s satisfactory If you want to check the print position or color see the instructions for Adjusting the Print Position on page 28 and Adjusting the Print Density on page 29 Before you insert a CD or DVD make sure the printer is turned on Otherwise the disc may not be positioned correctly Then follow these steps 1 Push in the output tray extension bu...

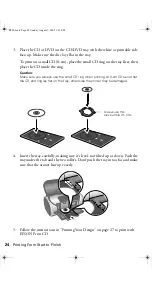
Page 24: ...he small CD ring when printing on 8 cm CDs and that the CD and ring lay flat on the tray otherwise the printer may be damaged 4 Insert the tray carefully making sure it s level not tilted up or down Push the tray under the tab and the two rollers Don t push the tray in too far and make sure that the arrows line up exactly 5 Follow the instructions in Printing Your Design on page 27 to print with E...

Page 25: ...round icon You see the following window 3 To select a background image do one of the following Windows Click the File tab then click Browse to locate the folder your images are stored in and click OK You see thumbnail images of all the files in the folder Select your image and click OK Macintosh Click Select Background locate the folder your images are stored in select the one you want then click ...

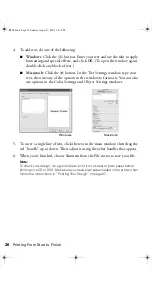
Page 26: ... options in the Color Settings and Object Settings windows 5 To curve a single line of text click the text in the main window then drag the red handle up or down Then adjust it using the other handles that appear 6 When you re finished choose Save as from the File menu to save your file Note To check your design it s a good idea to print it on a sheet of plain paper before printing on a CD or DVD ...

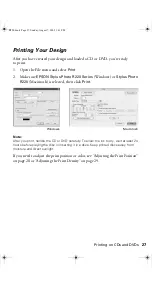
Page 27: ...intosh is selected then click Print Note After you print handle the CD or DVD carefully To allow the ink to dry wait at least 24 hours before playing the disc or inserting it in a drive Keep printed discs away from moisture and direct sunlight If you need to adjust the print position or color see Adjusting the Print Position on page 28 or Adjusting the Print Density on page 29 Windows Macintosh R2...

Page 28: ...it into the printer as described on page 23 2 Start EPSON Print CD 3 Select Print from the File menu 4 Make sure EPSON Stylus Photo R220 Series Windows or Stylus Photo R220 Macintosh is selected then click Print Position Confirmation Pattern Windows or Print Position Check Pattern Macintosh 5 Click Print The confirmation pattern is printed on the check disk or CD 6 Remove the check disk or CD and ...

Page 29: ...adjust the color saturation or ink density CDs from different manufacturers may absorb ink differently so you may need to adjust the density for each type of disc Follow these instructions to print a color saturation check pattern and then make adjustments as necessary 1 Insert a test CD or DVD for printing as described on page 23 2 Start EPSON Print CD 3 Select Print from the File menu 4 Make sur...

Page 30: ...djust the setting then repeat steps 4 through 6 selecting Second or Second Time to print the second pattern 8 If you want to try a third Color Correction setting you can repeat steps 4 through 6 again and select Third or Third Time 9 Remove the CD or DVD and let it dry for at least 24 hours Then check the saturation levels again You can also use the Brightness and Contrast settings in EPSON Print ...

Page 31: ...in good print quality Running the Head Cleaning Utility 1 Make sure the printer is turned on but not printing and the red H ink light is off If the H ink light is flashing or on you need to replace a cartridge see page 33 for details 2 Do one of the following Windows Right click the icon on your taskbar in the lower right corner of your screen Select Head Cleaning Macintosh Open the Applications f...

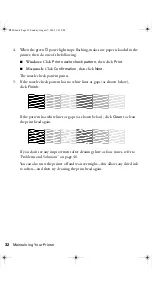
Page 32: ...ints 5 If the nozzle check pattern has no white lines or gaps as shown below click Finish If the pattern has white lines or gaps as shown below click Clean to clean the print head again If you don t see any improvement after cleaning three or four times refer to Problems and Solutions on page 46 You can also turn the printer off and wait overnight this allows any dried ink to soften and then try c...

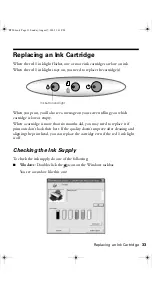
Page 33: ... is low or empty When a cartridge is more than six months old you may need to replace it if printouts don t look their best If the quality doesn t improve after cleaning and aligning the print head you can replace the cartridge even if the red H ink light is off Checking the Ink Supply To check the ink supply do one of the following Windows Double click the icon on the Windows taskbar You see a wi...

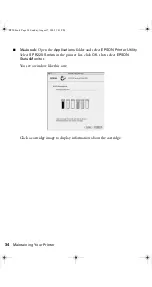
Page 34: ...der and select EPSON Printer Utility Select SP R220 Series in the printer list click OK then select EPSON StatusMonitor You see a window like this one Click a cartridge image to display information about the cartridge R220 book Page 34 Sunday August 7 2005 3 41 PM ...

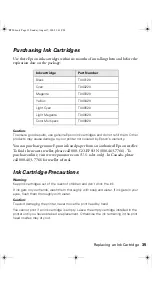
Page 35: ...da please call 800 463 7766 for reseller referral Ink Cartridge Precautions Warning Keep ink cartridges out of the reach of children and don t drink the ink If ink gets on your hands wash them thoroughly with soap and water If ink gets in your eyes flush them thoroughly with water Caution To avoid damaging the printer never move the print head by hand You cannot print if an ink cartridge is empty ...

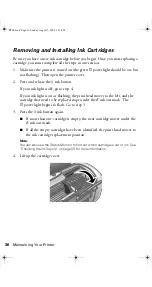
Page 36: ...s on or flashing the print head moves to the left and the cartridge that need to be replaced stops under the _ ink out mark The Ppower light begins to flash Go to step 3 3 Press the H ink button again If more than one cartridge is empty the next cartridge moves under the _ ink out mark If all the empty cartridges have been identified the print head moves to the ink cartridge replacement position N...

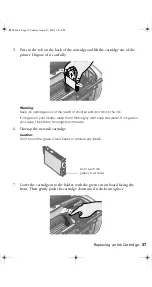
Page 37: ...on your hands wash them thoroughly with soap and water If ink gets in your eyes flush them thoroughly with water 6 Unwrap the new ink cartridge Caution Don t touch the green circuit board or remove any labels 7 Lower the cartridge into the holder with the green circuit board facing the front Then gently push the cartridge down until it clicks into place Don t touch the green circuit board R220 boo...

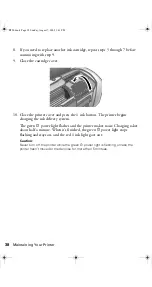
Page 38: ...ins charging the ink delivery system The green P power light flashes and the printer makes noise Charging takes about half a minute When it s finished the green P power light stops flashing and stays on and the red H ink light goes out Caution Never turn off the printer while the green P power light is flashing unless the printer hasn t moved or made noise for more than 5 mintues R220 book Page 38...

Page 39: ... icon on your taskbar in the lower right corner of your screen Select Print Head Alignment Macintosh Open the Applications folder and select EPSON Printer Utility Select SP R220 Series in the printer list click OK then select Print Head Alignment 4 Follow the instructions on the screen to print the alignment pattern You see a window like this one 5 On the test page select the square without any vi...

Page 40: ...llow the instructions on the screen to print the next test page You see a window like this one 8 On the test page select the square without any visible bands You may need to use a magnifying glass or loupe 9 Select one square each for rows 1 to 4 then enter the number of the best square in the corresponding boxes on the screen Then click Finish If you can t find a square without visible bands choo...

Page 41: ...ter cover closed to prevent water from getting inside 4 If ink accidentally gets inside of the printer wipe it off with a damp cloth in the area shown Warning Don t touch the gears or any other parts inside the printer Caution Never use a hard or abrasive brush or benzine alcohol or paint thinner for cleaning they can damage the printer components and case Don t get water on the printer components...

Page 42: ...any paper from the printer then push down the paper support extension and close the paper support 4 Make sure the CD DVD tray guide is closed then push in the output tray extension and close the tray 5 Open the printer cover Secure the ink cartridge holder to the printer with tape then close the printer cover 6 Repack the printer and its attachments in the original box using the protective materia...

Page 43: ...you cannot solve the problem see Where To Get Help on page 54 Printer Parts Paper support extension Sheet feeder Edge guide Front USB port Outputtray Output tray extension Ink button and light Power button and light Paper support Paper button and light Power connector Rear USB port R220 book Page 43 Sunday August 7 2005 3 41 PM ...

Page 44: ... to eject the jammed paper If the light is still flashing open the cover and remove all paper including any jammed or torn pieces Then reload paper and press the paper button to continue printing When printing on CDs or DVDs the CD DVD tray is jammed in the printer Pull out the CD DVD tray and press the paper button Red H ink light flashes One or more cartridges are low on ink Check the message th...

Page 45: ... guide was left open when you turned on the printer or when printing on paper Close the CD DVD tray guide Green P power light is off red paper and red H ink lights flashing Paper may be blocking movement of the print head Turn off the printer then open the cover and remove any jammed paper or other foreign objects Turn the printer back on again If the lights are still flashing contact Epson as des...

Page 46: ...nk cartridges the printer must charge its print head for about two minutes Wait until charging finishes before you turn off the printer or it may charge improperly and use excess ink the next time you turn it on Make sure the ink cartridge cover is closed completely and no packing material remains in the printer Turn off the printer wait a moment then turn it back on to clear the error You re havi...

Page 47: ...contact your computer manufacturer If you re printing over a network see your on screen Reference Guide for instructions on configuring your printer for use on a network Printer Problems The printer is on but nothing prints Make sure the USB cable is connected securely and that the cable meets the system requirements on page 57 Run a printer check as described on page 45 If the check page prints m...

Page 48: ...s Set the Quality Option to Draft Windows or the Quality Speed slider to Speed Macintosh In the Advanced options turn MicroWeave off Macintosh only and turn High Speed on If your printer is connected to a hub disconnect USB devices that you re not using Note Borderless printing takes longer especially near the edges of the paper Print Quality Problems You see banding light lines The print head noz...

Page 49: ...uctions in the paper package You may need to use an included support sheet or load your paper one sheet at a time Use Epson papers to ensure proper saturation and absorption of genuine Epson inks Make sure your paper meets the specifications listed in the on screen Reference Guide Run the Print Head Alignment utility see page 39 for instructions Remove each sheet from the output tray after printin...

Page 50: ...artridges may be old or low on ink see page 33 Try turning off PhotoEnhance Also check if you re using a special effect that alters image colors like Sepia Try changing the Gamma setting see your on screen Reference Guide for more information Your printed colors can never exactly match your on screen colors However you can use a color management system to get as close as possible You can also use ...

Page 51: ...jams frequently Use new smooth high quality paper loaded printable side up Don t load paper above the arrow mark on the left edge guide Place the paper against the right edge and slide the left edge guide against it but not too tight Store paper flat to prevent curling CD DVD Printing Problems Images and text are not centered on the CD DVD Adjust the Print position as described on page 28 Ink smea...

Page 52: ...Printer Setup Utility or Print Center Macintosh The print head nozzles may need cleaning see page 31 The margins are incorrect Make sure the paper settings are correct for your paper size Make sure the paper is positioned all the way to the right of the sheet feeder Slide the left edge guide against the paper See your software documentation for instructions on choosing the correct margins for your...

Page 53: ...u upgrade your operating system You don t need to uninstall EPSON Print CD or your on screen Reference Guide Note Do not turn off or disconnect the printer while you are uninstalling the software Windows 1 Double click the My Computer icon on your desktop If you re using Windows XP click Start then click My Computer 2 Select the Control Panel icon 3 Select Add Remove Programs 4 Click EPSON Printer...

Page 54: ...Monday through Friday and 7 AM to 4 PM Saturday Canada 905 709 2567 6 AM to 6 PM Pacific Time Monday through Friday Toll or long distance charges may apply Service Access World Wide Web From the Internet you can reach Epson Support at http support epson com At this site you can download drivers and other files look at product documentation access troubleshooting information and receive technical a...

Page 55: ...eipt and date of purchase Computer configuration and operating system version Description of the problem You can purchase genuine Epson ink and paper from an authorized Epson reseller To find the nearest reseller please call 800 GO EPSON 800 463 7766 To purchase online visit www epsonstore com U S sales only In Canada please call 800 463 7766 for reseller referral R220 book Page 55 Sunday August 7...

Page 56: ...56 Solving Problems R220 book Page 56 Sunday August 7 2005 3 41 PM ...

Page 57: ...ware A Windows compliant USB port A shielded USB AB cable up to 6 5 feet 2 meters long Macintosh System Requirements To use your printer and its software your system should have An Apple iMac series eMac Power Macintosh G3 G4 or G5 PowerBook or iBook with a built in USB port Macintosh OS X 10 2 4 or later Macintosh OS X 10 2 4 or later recommended At least 256MB RAM 512MB Recommended At least 200M...

Page 58: ...s not exceed the wall outlet s ampere rating Keep your printer and computer system away from potential sources of electromagnetic interference such as loudspeakers or cordless telephone base units Avoid locations that are subject to rapid changes in heat or humidity shocks or vibrations or dust Leave enough room around the printer for sufficient ventilation Do not place the printer near a radiator...

Page 59: ...ity Do not use an ink cartridge beyond the date printed on the package For best results use up the ink cartridges within six months of first installing them Store ink cartridges in a cool dark place After bringing an ink cartridge inside from a cold storage site allow it to warm up at room temperature for at least three hours before using it Do not shake an ink cartridge this can cause leakage Do ...

Page 60: ...orient or relocate the receiving antenna Increase the separation between the equipment and receiver Connect the equipment into an outlet on a circuit different from that to which the receiver is connected Consult the dealer or an experienced radio TV technician for help WARNING The connection of a non shielded equipment interface cable to this equipment will invalidate the FCC Certification of thi...

Page 61: ...thin the variation accepted due to quantity production and testing on a statistical basis as required by 47CFR 2 909 Operation is subject to the following two conditions 1 this device may not cause harmful interference and 2 this device must accept any interference received including interference that may cause undesired operation Trade Name Epson Type of Product Ink Jet Printer Model B261A ENERGY...

Page 62: ...king days of receipt of the replacement Epson requires a debit or a credit card number to secure the cost of the replacement printer in the event that you fail to return the defective one If your printer is being repaired Epson will direct you to send your printer to Epson or its authorized service center where the printer will be fixed and sent back to you You are responsible for packing the prin...

Page 63: ...S APPLY THEN ALL EXPRESS AND IMPLIED WARRANTIES ARE LIMITED TO THE WARRANTY PERIOD IDENTIFIED ABOVE UNLESS STATED HEREIN ANY STATEMENT OR REPRESENTATIONS MADE BY ANY OTHER PERSON OR FIRM ARE VOID EXCEPT AS PROVIDED IN THIS WRITTEN WARRANTY NEITHER EPSON AMERICA INC NOR ITS AFFILIATES SHALL BE LIABLE FOR ANY LOSS INCONVENIENCE OR DAMAGE INCLUDING DIRECT SPECIAL INCIDENTAL OR CONSEQUENTIAL DAMAGES R...

Page 64: ...64 Requirements and Notices R220 book Page 64 Sunday August 7 2005 3 41 PM ...

Page 65: ...problems 51 to 52 Characters incorrect 53 Checking printer 45 to 46 Cleaning print head 31 to 32 printer 41 rollers 22 sheets 41 Color problems 50 ColorSync 14 Controlling printing Windows 12 Copies setting Macintosh 14 D Default printer settings 12 DVDs see CDs E Edge to edge printing 18 to 21 Epson accessories 55 help 54 to 55 ink 35 papers 8 17 18 Print CD 27 to 30 Store 55 F Faint images 49 to...

Page 66: ...ns incorrect 52 Media Type setting 17 MicroWeave setting 48 Mirror image 52 Monitoring ink level Macintosh 34 Windows 33 Moving printer 42 N Noise printer 48 Nozzle check 32 P Page Setup Macintosh 13 Paper Epson 8 17 18 feeding problems 50 to 51 loading 7 to 8 orientation 10 13 size 10 13 Paper Type setting 10 17 Premium Glossy Photo Paper 17 Print CD software 27 to 30 Print dialog box Macintosh 1...

Page 67: ...to 59 Self Adhesive Sheets 17 Semigloss Photo Paper 17 Slow printing 48 Software Print CD 27 to 30 problems solving 46 to 47 uninstalling 53 to 54 Stopping printing Windows 12 System requirements 57 T Transparencies 17 Transporting printer 42 Troubleshooting 43 to 55 Type setting 10 U Uninstalling software 53 to 54 USB 57 Utilities Head Cleaning 31 to 32 Nozzle Check 32 Print Head Alignment 39 to ...

Page 68: ...68 Index R220 book Page 68 Sunday August 7 2005 3 41 PM ...

Page 69: ...041054 Epson Glossy Photo Paper Borderless 4 x 6 inches S041809 4 x 6 inches perforated edges S041134 S041671 Letter 8 5 x 11 inches S041141 S041649 S041272 S041271 Epson ColorLife Photo Paper Letter 8 5 x 11 inches S041500 Epson Matte Paper Heavyweight Borderless 8 x 10 inches S041467 Letter 8 5 x 11 inches S041457 Epson Double Sided Matte Paper Letter 8 5 x 11 inches S041568 Epson Ultra Premium ...

Page 70: ...041054 Epson Glossy Photo Paper Borderless 4 x 6 inches S041809 4 x 6 inches perforated edges S041134 S041671 Letter 8 5 x 11 inches S041141 S041649 S041272 S041271 Epson ColorLife Photo Paper Letter 8 5 x 11 inches S041500 Epson Matte Paper Heavyweight Borderless 8 x 10 inches S041467 Letter 8 5 x 11 inches S041457 Epson Double Sided Matte Paper Letter 8 5 x 11 inches S041568 Epson Ultra Premium ...

Reviews: