background image

EPSON Stylus

®

 Photo R300 Series

User’s Guide

Pbasics.book  Page 1  Tuesday, June 1, 2004  1:31 PM

Summary of Contents for R300 - Stylus Photo Color Inkjet Printer

Page 1: ...EPSON Stylus Photo R300 Series User s Guide Pbasics book Page 1 Tuesday June 1 2004 1 31 PM ...

Page 2: ... A Note Concerning the Responsible Use of Copyrighted Materials Digital cameras and scanners like photocopiers conventional cameras and ink jet printers can be misused by improper copying and reprinting of copyrighted material While some countries laws permit limited copying of copyrighted material in certain circumstances those circumstances may not be as broad as some people assume EPSON encoura...

Page 3: ... Printing Without a Computer 17 Using Your Camera s Print Settings 18 Using PRINT Image Matching 18 Using DPOF or PictBridge 18 Getting Photos into the Printer 19 Inserting a Memory Card 19 Removing a Memory Card 20 Connecting a Digital Camera or Storage Device 20 Choosing Basic Mode or Advanced Mode 22 Selecting Photos for Printing 22 Printing an Index 23 Selecting One Photo 24 Selecting a Set of...

Page 4: ...h Device With Your Printer 41 Connecting the Bluetooth Photo Print Adapter 41 Disconnecting the Bluetooth Photo Print Adapter 42 Printing With Bluetooth 43 Choosing Bluetooth Settings 44 Resetting Default Settings 46 Printing From Your Computer 47 Copying Photos to Your Computer 48 Configuring PhotoStarter 49 Removing a Memory Card 50 Basic Printing in Windows 50 Selecting Default Settings 52 Basi...

Page 5: ...op 82 Maintaining Your Printer 87 Cleaning the Print Head 88 Examining the Nozzle Check Pattern 89 Replacing an Ink Cartridge 89 Removing and Installing Ink Cartridges 90 Aligning the Print Head 93 Cleaning the Printer 94 Transporting the Printer 95 Problem Solving 97 Diagnosing Problems 97 Control Panel Messages 98 Running a Printer Check 100 Setup or Software Installation Problems 101 Printer Pr...

Page 6: ...ices 113 Windows System Requirements 113 Macintosh System Requirements 113 Important Safety Instructions 114 Ink Cartridge Safety Instructions 115 Energy Star Compliance 116 FCC Compliance Statement 116 Declaration of Conformity 117 Epson America Inc Limited Warranty 118 Index 121 Pbasics book Page 6 Tuesday June 1 2004 1 31 PM ...

Page 7: ... Management RPM technology optimizes the number and placement of ink droplets on a variety of papers for superior photo quality and performance with manageable print file sizes Three built in memory card slots support CompactFlash Type I and II Secure Digital MultiMediaCard xD Picture Card SmartMedia Sony Memory Stick Memory Stick Pro Memory Stick DUO and IBM Microdrive An extra USB port on the fr...

Page 8: ...t highlight point and color balance The camera saves this information in each JPEG image file and TIFF files from P I M II enabled cameras Your printer along with P I M enabled software such as EPSON Software Film Factory or the P I M II Plug in for Adobe Photoshop uses the information to ensure the most accurate image reproduction But don t worry if your camera doesn t include PRINT Image Matchin...

Page 9: ...ied to your computer automatically and even open one of your photo editing programs whenever you insert a memory card in your printer These programs are installed automatically with your printer driver P I M II Plug in for Adobe Photoshop lets you retain PRINT Image Matching and Exif Print image quality when you import JPEG or TIFF files from your P I M P I M II or Exif Print enabled digital camer...

Page 10: ... carefully to avoid bodily injury Cautions must be observed to avoid damage to your equipment Notes contain important information about your printer Tips contain additional hints for better printing Viewing Your On Screen Reference Guide Your printer CD ROM includes an on screen Reference Guide You need a browser such as Microsoft Internet Explorer 4 0 or later Netscape Navigator 3 0 or later or S...

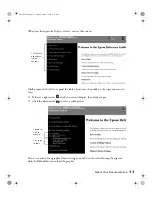
Page 11: ...f there s a right arrow click it to view subtopics then click a topic Click the down arrow to close a subtopic list If you see an icon for a graphic when viewing your Reference Guide in Netscape Navigator click the Reload button to load the graphic Click here to expand the table of contents Closed list click to expand Click to go to topic Pbasics book Page 11 Tuesday June 1 2004 1 31 PM ...

Page 12: ...12 Welcome Pbasics book Page 12 Tuesday June 1 2004 1 31 PM ...

Page 13: ...the special EPSON papers listed on the inside back cover Use the EPSON paper and ink designed for your printer If you use incompatible paper you may not get the results you expect Select a paper size and layout to get the photos you want When the printer is used in Advanced stand alone mode without connecting it to a computer it automatically resizes your photos to fit the layout you choose from l...

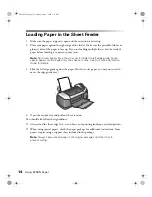
Page 14: ...loaded only one sheet at a time See your online Reference Guide for details 3 Slide the left edge guide against the paper For letter size paper you may not need to move the edge guide over 4 Open the output tray and pull out the extension You should also follow these guidelines Always load the short edge first even when you re printing landscape oriented pictures When using special papers check th...

Page 15: ...ults press each envelope flat before loading it or load one envelope at a time 2 Select these settings in your printer software For the paper Type Media Type select Plain Paper For the Size Paper Size select the size of your envelopes For the Orientation select Landscape in Macintosh OS X click the icon See page 50 Windows page 53 Macintosh OS X or page 56 Macintosh OS 8 6 to 9 x for more informat...

Page 16: ... display EPSON recommends that prints be framed under glass or a protective plastic sleeve to protect them from atmospheric contaminants like humidity cigarette smoke and high levels of ozone As with all photographs keep your prints away from high temperatures and humidity and out of direct sunlight For proper storage EPSON recommends that you keep prints in a photo album or plastic photo storage ...

Page 17: ...ow the instructions in these sections Using Your Camera s Print Settings on page 18 Getting Photos into the Printer on page 19 Choosing Basic Mode or Advanced Mode on page 22 Selecting Photos for Printing on page 22 Printing Your Selected Photos on page 26 Touching Up Your Photos on page 29 Cropping and Sizing Your Photos on page 31 Adding Photo Information on page 32 Printing Special Layouts on p...

Page 18: ...RINT Image Matching commands are read and applied this ensures the most faithful possible reproduction of the images taken by your camera A special icon is displayed on the control panel to remind you that your photos contain PRINT Image Matching data If you don t want to use PRINT Image Matching you can turn it off as described on page 29 You can also use PRINT Image Matching when printing from y...

Page 19: ...the image files meet these requirements JPEG files or uncompressed Tiff files only Resolutions ranging from 160 160 to 4600 4600 pixels No more than 999 images although you may have additional images on your card or storage device the printer can read only the first 999 Inserting a Memory Card Your printer works with many types of memory cards Follow these guidelines to insert your memory card 1 M...

Page 20: ...selected drives see http support epson com for a list of compatible drives USB 2 0 high speed drives are recommended 100 or 250MB Iomega Zip drive AC or USB powered Memory cards with a commercially available USB adapter such as the MicroTech ZiO MO Magneto Optical drives Note If you re not sure about your camera or drive you can try connecting it If it s not compatible you ll see a screen saying t...

Page 21: ...as require a special USB cable if so be sure to use the one that came with the camera 3 Turn on the printer and your camera or data storage device After a moment the printer reads and counts the number of images on your device When it s done you see a screen similar to this on the printer s control panel and your images are available for printing Note If you ve backed up your images on Zip disk CD...

Page 22: ...er See page 19 If you have the EPSON Stylus Photo R300 printer start by printing an index so you can select your photos by number See page 23 for details If you have the EPSON Stylus Photo R300M printer you can use the preview monitor to easily select your photos Once you know which photos are available for printing you can select a single photo page 24 a set of photos page 24 a range of photos pa...

Page 23: ...ess OK to select it 4 Press the and buttons to highlight Paper Type then press OK to enter the Paper Type menu 5 Highlight the type of paper you ve loaded then press OK If you re not sure about the paper type see the table on page 27 Note It s important to select the correct Paper Type setting for the paper you re using or the print quality may not be what you expect 6 Enter the Paper Size menu th...

Page 24: ...rints additional pages as needed using the same layout If your printer doesn t have the preview monitor first print an index to identify the photos on the memory card see page 23 1 Highlight Select Photo then press OK Note To print all your photos select All To print a range of photos see page 25 2 Use the button to highlight Individual then press OK If you have the preview monitor it displays the...

Page 25: ...s and press OK then use the and buttons to select the desired number of copies and press OK 8 Continue with Printing Your Selected Photos on page 26 to finish laying out your photos and setting up your print job Using DPOF or PictBridge to Select Your Photos If your camera supports DPOF or PictBridge you can use it to select photos for printing see your camera s instruction manual for details When...

Page 26: ...the paper Prints one photo per sheet with borders around the edges Prints a photo on the top half of the sheet Prints two photos per sheet Prints four photos per sheet Prints eight photos per sheet Prints 20 photos per sheet the photo number and date are also printed with each photo Good for printing larger size index prints Prints an index of your photos 80 photos are printed on letter size paper...

Page 27: ...n about storing and displaying your pictures Selecting the Correct Paper Type When printing be sure to select the correct Paper Type setting This tells the printer what kind of paper you re using so it can adjust the ink coverage accordingly Here are the settings you should choose from your printer s control panel when not using your computer to print For this paper Select this Paper Type setting ...

Page 28: ... hold the Custom button for at least three seconds until you see a message saying that your settings have been saved When you want to print press the Custom button to recall your settings Make sure the correct paper is loaded then press Print Tip If you adjust any settings after pressing the Custom button any additional changes you make affect only the current print job and are not saved with your...

Page 29: ...djustments for the type of environment in which your photos were taken Manual adjustments see page 30 If your photos are too light or too dark you can adjust their brightness or control the saturation and sharpness If you want you can make manual adjustments while P I M Exif Print or PhotoEnhance are turned on in order to fine tune your automatic settings Automatically Adjusting Your Photos When y...

Page 30: ... settings are saved when you turn off the printer or choose a different set of photos so remember to turn off the settings when you re done To make manual adjustments in addition to the automatic ones follow the steps in the next section Manually Adjusting Your Photos 1 Press the button to highlight More Options then press OK 2 Highlight Contrast Brightness Saturation Sharpness or Filter then pres...

Page 31: ...if you select 1 5 it zooms in to 1 5 times the original size A higher zoom level results in more of the image being cropped out of the photo If you re using the preview monitor you see a yellow border around the cropped area shown above in black Use the border only as a rough guide since it is not exact Note The entire photo still appears on the preview monitor after choosing a crop setting and do...

Page 32: ...orner of your photos 1 Highlight More Options then press OK 2 To print the date highlight Date then press OK Highlight a month date and year formatting option then press OK 3 To print the time highlight Time then press OK Highlight 12 hour system or 24 hour system and press OK 4 To print your camera s exposure time shutter speed F stop aperture and ISO speed highlight Photo Information then press ...

Page 33: ...o order EPSON paper contact your dealer or call the EPSON Store at 800 873 7766 or visit our web site at www epsonstore com U S sales only In Canada please call 800 463 7766 for dealer referral You can order ink jet printable CDs and DVDs from your local retailer or from several websites including www pcmall com www cdw com www warehouse com www zones com www macconnection com and www pcconnection...

Page 34: ...loaded with the cut corner in the upper right 3 Highlight Paper Type then press OK 4 Highlight Greeting then press OK 5 To print without borders around your image make sure Fit to Frame is set to On see page 32 If your image is not the same shape as the card a portion of it will print beyond the perforation marks and get cut off 6 Optionally you can adjust the color or image quality before printin...

Page 35: ...age 22 2 Follow the instructions in the paper package to load a sheet of transfer paper Make sure the paper is loaded with the cut corner in the upper right 3 Highlight Paper Type then press OK 4 Highlight Iron on then press OK 5 Optionally you can adjust the color or image quality before printing see page 29 or crop or size your photos see page 31 6 Press the Print button Your transfer image begi...

Page 36: ...CDs or DVDs it s a good idea to clean the roller inside the printer You can do this by feeding and ejecting several sheets of plain paper 1 Make sure the printer is turned on and letter size paper is loaded 2 Press the button on your printer to choose More Options and press OK 3 Press the button to highlight Paper Feed Paper Eject and press OK 4 Press OK to feed paper into the printer 5 Make sure ...

Page 37: ...e it is satisfactory Before you insert a CD or DVD make sure the printer is turned on Otherwise the disc may not be positioned correctly Then follow these steps to load CDs and DVDs into your printer Caution If you don t insert the tray correctly you may damage the printer or tray 1 Lift the printer lid and push in the output tray extension 2 Lower the CD DVD tray guide 3 Your LCD panel displays a...

Page 38: ...ighlight Select Photo and press OK 8 Select the photo or photos to print on your disc 9 Press the Print button when you are ready to print Your CD or DVD prints 10 When printing is complete slide the CD DVD tray out from the printer and carefully remove the CD or DVD holding it by the edges Don t touch the surface of the disc 11 Set the CD or DVD aside and let it dry for 24 hours 12 Close the CD D...

Page 39: ...ave a computer you can save the image files that are in your camera s memory card on a Zip disk or CD R This lets you delete the images on your memory card and reuse it without losing your original images Once your images are stored on a disk or CD you can retrieve them at any time for printing To back up images you need a 100 or 250MB Iomega Zip drive or CD R RW drive with a USB connection availa...

Page 40: ...e printer screen All the photos on your card are copied to your Zip disk or CD R Depending on how many photos there are this may take several minutes Caution Once the backup starts do not disconnect the cable or interrupt the process or you may lose data If you need to stop the backup press the Stop button To print images saved on your Zip disk or CD R follow the instructions in Connecting a Digit...

Page 41: ...on range of this product is approximately 33 feet 10 meters however this may vary depending on conditions including obstacles between devices signal quality magnetic fields static electricity and electromagnetic interference software operating system reception sensitivity and antenna performance The following profiles are available Basic Imaging Profile BIP Hardcopy Cable Replacement Profile HCRP ...

Page 42: ...e USB connector as shown below Caution Do not remove the adapter while it is communicating with another device or while the printer is printing while the blue light is flashing Doing so may cause the printer to malfunction Do not remove the adapter by pulling on the upper section Doing so may damage the product Hold this section Pbasics book Page 42 Tuesday June 1 2004 1 31 PM ...

Page 43: ...tails 3 Select the photo you want to print from your Bluetooth device and send it to the printer Make sure you are within about 30 feet of the printer Printing will start automatically using the settings you chose Note Available settings may vary among Bluetooth enabled devices For more information refer to your device s documentation If you are using Windows you must use the software included wit...

Page 44: ... same communication range you can distinguish them by assigning each a unique number from 0 through 9 To make the Device Name Setting take effect turn the printer off and then back on BT Communication Mode Public This mode allows Bluetooth enabled devices to freely discover the printer and send print jobs Private This mode prevents unknown devices from discovering the printer To print in Private m...

Page 45: ...y Setting Any four digit number Default 0000 Bluetooth PIN The Passkey Setting allows you to set the four digit Passkey that must be entered into a device before printing if Bonding Pairing is selected as the Communication Mode or if Encryption is On BT Device Address Set at the factory Example 11 11 11 11 11 11 Displays the unique Bluetooth Device Address of the printer Menu Item Settings Descrip...

Page 46: ...tic Correction P I M Small Image Enhancer Off Contrast Standard Brightness Standard Saturation Standard Sharpness Standard Date None Time None Photo Information None Fit to Frame On Quality High Bidirectional Printing On Memory Card Overwrite Enable Platen Gap Normal Print Mode Advanced Print Mode Paper Type Prem Glossy Premium Glossy Photo Paper Paper Size 4 x 6 Layout Borderless Pbasics book Pag...

Page 47: ... your computer just by inserting the camera s memory card in your printer s memory card slot See page 48 for more information If your digital camera supports PRINT Image Matching P I M or P I M II or Exif Print you can use these technologies to ensure the most accurate reproduction of your photographs See page 78 For all types of printing follow the instructions in these sections Copying Photos to...

Page 48: ... you see a screen like this You can choose any supported programs or options to open view or print your photos On a Macintosh with Mac OS X or Mac OS 9 x you see a drive icon appear on your desktop You can open the drive and copy your photos to your computer If you have iPhotoTM and you have it set to open when a digital camera is connected it will open when you insert a memory card In Windows 200...

Page 49: ...work The default settings do the following whenever you insert a memory card PhotoStarter copies your pictures to the Photos folder on your desktop The pictures are stored in folders by date Film Factory opens automatically Note Film Factory lets you view modify and print photos from your computer quickly and easily To learn more about this program see page 78 3 Change any of the settings you want...

Page 50: ...n your operating system you may need to do one of the following On a Macintosh drag the memory card icon from your desktop to the trash If you re using Windows XP or 2000 click the Unplug or Eject Hardware icon on the taskbar In Windows XP click Safely Remove USB Mass Storage Device In Windows 2000 click Stop USB Mass Storage Device 2 To remove a card pull it straight out of the slot Basic Printin...

Page 51: ...and images with higher quality Photo For photos and graphics with good quality and speed Best Photo For photos or graphics with high print quality Note The Quality Type settings on this screen give you the best combination of quality and speed for most prints For the highest quality Photo RPM on selected papers click the Advanced button on the Main tab Then see Customizing Windows Print Settings o...

Page 52: ...or resume printing You can also see how much ink you have left Selecting Default Settings Your printer settings only apply to the program you re currently using If you want you can change the Windows default printer settings for all your programs 1 Right click the printer icon in the lower right corner of your screen taskbar 2 Select Printer Settings You see the window shown in Basic Printing in W...

Page 53: ...s Photo R300 printer See page 62 for details about printing borderless photos 3 Select the correct paper size from the Paper Size menu Caution When printing with borders using a custom paper size make sure the selected size matches the paper you loaded and is within the printable area for the printer For example never choose a size wider than the printer s sheet feeder or longer than the paper See...

Page 54: ...ary Tip For more information about printer settings click Help Click here and select Print Settings Select the same printer feature you chose in the Format for menu on the Page Setup window Select Quality or Speed for faster printing Select your paper type see page 61 Select Automatic mode Select Color for color documents and black and white photographs or Black for black text documents Pbasics bo...

Page 55: ... monitor the progress of your print job click the Print Center icon when it appears in the dock Then double click your printer name Stylus Photo R300 You see a screen like this 13 Monitor the progress of your print job or do one of the following Click the print job then click Delete to delete the job Click the print job then click Hold to pause printing Click a print job marked Hold and click Resu...

Page 56: ...ee page 62 To print double sided pages refer to your on screen Reference Guide see page 10 4 From the File menu select Print You see a window like the following The most important thing to remember is to set the correct Media Type for the paper you re using Make sure you see SP R300 Series Select your paper size Select the orientation of your document Select higher quality or faster printing Selec...

Page 57: ...ground printing and schedule print jobs Click to change the Print button to Preview You can then click it to preview your printout Click to check your ink levels Tip For more information about printer settings click the button 6 Click Print to start printing If you turned on background printing you can open the EPSON MonitorIV window by selecting it in the Application menu in the upper right corne...

Page 58: ...owing advanced settings as necessary Note For the highest print quality select Photo RPM Please note that printing will take longer in this mode For more information about advanced settings or instructions on saving them as a group so you can reuse them later click the or Help button If you want to use the Advanced screen each time you access your printer settings select the Show this screen first...

Page 59: ...inue with step 5 to select layout options 4 Select the following page layout settings as necessary Note For more information on page layout settings click the or Help button 5 Click OK to save your settings then click OK or Print Select multi page document options here and here Select image resizing and image position options here these affect only your printed image Add a watermark to printed pag...

Page 60: ...ing on your selected paper type 3 Adjust any Color Management settings if necessary Mac OS X Select Color Management from the Print Settings menu 4 Select any other advanced settings you want to use For details click the button 5 Mac OS X Click Print Mac OS 8 6 to 9 x Click OK to save your settings then click Print Select a higher print quality select Photo RPM for the best print quality on photo ...

Page 61: ... Ink Jet Paper EPSON Photo Quality Ink Jet Cards EPSON Photo Quality Self Adhesive Sheets Photo Quality Ink Jet Paper EPSON Matte Paper Heavyweight EPSON Double Sided Matte Paper PremierArt Matte Scrapbook Photo Paper for Epson Matte Paper Heavyweight EPSON Photo Paper Photo Paper EPSON Glossy Photo Paper EPSON Photo Quality Glossy Paper EPSON Glossy Photo Greeting Cards Glossy Photo Paper EPSON P...

Page 62: ...ter and mar future printouts Paper name Sizes Paper type or Media Type setting EPSON Matte Paper Heavyweight Letter 8 5 11 inches 8 10 Matte Paper Heavyweight EPSON Glossy Photo Paper Letter 8 5 11 inches 4 6 Glossy Photo Paper EPSON Premium Glossy Photo Paper Letter 8 5 11 inches 4 6 5 7 8 10 Premium Glossy Photo Paper EPSON Premium Semigloss Photo Paper Letter 8 5 11 inches Premium Semigloss Pho...

Page 63: ...ighter than the other side Load premium papers up to 20 sheets at a time Check the paper package for additional loading instructions Windows Follow these steps to print borderless photos 1 Start your photo program and open your photo 2 Open the File menu and click Print Then click Properties or Preferences Insert paper against the right edge Slide the left edge guide against the paper Pbasics book...

Page 64: ...aper Premium Glossy Photo Paper Premium Luster Photo Paper Premium Semigloss Photo Paper 6 Click the Borderless checkbox Read the message and click OK 7 Select your paper Size setting 8 Select Portrait or Landscape as the orientation setting Click OK then click OK or Print Select the type of document you re printing Select your paper Type Select your paper Size Select your document or image orient...

Page 65: ...thin the printable area for the printer For example never choose a size wider than the printer s sheet feeder or longer than the paper See the Reference Guide for printer specifications 4 Click OK 5 Select Print from the File menu 6 Open the Printer pull down menu and select Stylus Photo R300 Sheet Feeder Borderless the same borderless option you chose in the Format for menu on the Page Setup wind...

Page 66: ...menu You see this window 2 Select the correct Paper Source and Paper Size and check the Borderless box 3 Click OK 4 Select Print from the File menu and then click Print Click this box for borderless printouts Choose the paper size and source Pbasics book Page 66 Tuesday June 1 2004 1 31 PM ...

Page 67: ...ure you purchase CDs and DVDs that have an ink jet printable surface Follow the steps in these sections Cleaning the Roller below Designing CDs and DVDs on page 68 Inserting a CD or DVD on page 70 Printing Your Design on page 72 Adjusting the Print Position on page 75 Adjusting the Print Density on page 77 Cleaning the Roller Before you print on CDs or DVDs it s a good idea to clean the roller ins...

Page 68: ...ocate the folder where your images are stored and click OK You see thumbnail images of all the files in the folder Select your image and click OK Macintosh Click Select Background locate the folder where your images are stored select the one you want and then click Open Note In Windows if you have already chosen a background you see a different screen Click Select Image to choose a new background ...

Page 69: ...e following Windows Click the text button to add a text block on the CD image Enter your text and use the tabs to apply formatting and special effects then click OK To open the window again double click any block of text Macintosh Click the text button to add a block of text Select the block of text then use any of the options on the Text Settings palette You can also modify the text with any of t...

Page 70: ...s before you print Otherwise dirt or scratches on the surface may cause errors when you burn the data If you plan to print large numbers of CDs or DVDs it s a good idea to print a small sample then wait a day and check the quality to make sure it is satisfactory If you want to check the print position or color see the instructions for Adjusting the Print Position on page 75 and Adjusting the Print...

Page 71: ...he tray To print on a small CD 8 cm place the small CD ring on the tray first then place the CD inside the ring Caution Make sure you always use the small CD ring when printing 8 cm CDs and that the CD and ring lay flat on the tray otherwise the printer may be damaged Lower tray guide Always use this piece with 8 cm CDs Pbasics book Page 71 Tuesday June 1 2004 1 31 PM ...

Page 72: ...gn below to print with EPSON Print CD Printing Your Design After you have created your design and loaded a CD or DVD you re ready to print 1 Open the File menu and select Printer Settings Windows or Page Setup Macintosh 2 Do one of the following Windows Make sure Stylus Photo R300 is selected the Paper Source is set to Manual and the Paper Size is set to A4 Line up arrows Keep tray level Load tray...

Page 73: ...t to A4 Macintosh OS 9 Make sure Stylus Photo R300 is selected the Paper Source is set to Manual Feed and the Paper Size is set to A4 3 Click OK 4 Open the File menu and select Print Then do one of the following Windows When you see the screen below click OK Pbasics book Page 73 Tuesday June 1 2004 1 31 PM ...

Page 74: ...sh OS 9 When you see the screen below click Print 5 Click OK Windows or Print Macintosh Note After you print handle the CD or DVD carefully To allow the ink to dry fully wait at least 24 hours before playing the disc or inserting it in a drive Keep printed discs away from moisture and direct sunlight Choose Print Settings Choose CD DVD Pbasics book Page 74 Tuesday June 1 2004 1 31 PM ...

Page 75: ...heck the position before you print on a CD or DVD 1 Place the position check disk or an extra CD on the CD tray and insert it into the printer as described on page 70 2 Start EPSON Print CD 3 Follow the instructions in Printing Your Design on page 72 to make sure your EPSON Stylus Photo R300 Series printer is selected and the Paper Source is set to Manual or Manual Feed 4 Select Print from the Fil...

Page 76: ... and B as shown You ll need a metric ruler with millimeters for these measurements 8 Open the File menu and select Adjust Print Position You see a screen like this 9 Make sure Enter Values or Value Entry is checked then input the A distance in the Height Top or Top Space box Enter the B distance in the Width Right or Right Space box 10 Click OK to save the measurements to the EPSON Print CD progra...

Page 77: ...ity Confirmation or Check Pattern In Mac OS X select EPSON Print CD from the pop up menu then choose Print Density Confirmation 6 Click OK Windows or Print Macintosh 7 After the pattern is printed examine the print and make the Print Color Correction or Color Correction setting lighter or darker as necessary You can print three density patterns on one disc Each pattern is printed in a different lo...

Page 78: ...II Plug in for Adobe Photoshop as described on page 82 Using Film Factory If your digital camera supports PRINT Image Matching or Exif Print you can use these technologies when you print with Film Factory to ensure the most accurate image reproduction Printing with P I M isn t complicated and it provides the color corrections right from your P I M image file so you don t have to correct them yours...

Page 79: ...RINT Image Matching photo the P I M logo may not appear 5 Click the photo you want to print or click the All button at the top of the screen to select all the photos in a roll Then go to step 6 6 To import a photo into Film Factory click the Import button then Click From File to import a photo from your computer s hard drive Click From Removable Media to import a photo from a disk or CD ROM Click ...

Page 80: ...gs such as brightness and color your P I M or Exif Print data and image quality will be lost To ensure you keep P I M or Exif Print data and image quality in your original photo file make a copy of the photo before you edit Then make edits only to your copy When you re ready to print continue with the steps in the next section Printing Your Photos 1 When you re ready to print click the Print Assig...

Page 81: ...tton on the left side of the screen You see more options 1 Make sure your printer is selected 2 Select Sheet Feeder or Sheet Feeder No Margins for borderless printing 3 Select your paper size 4 Select the Media Type 1 Make sure your printer is selected 2 Select Standard or Sheet Feeder Borderless for borderless printing 3 Select your paper size 4 Select the Media Type Select the number of copies y...

Page 82: ... I M P I M II or Exif Print enabled digital camera The P I M II Plug in works with Photoshop 7 0 6 0 and Photoshop Elements 1 0 and 2 0 You ll also need to use the ICC profiles for your printer that are installed with the plug in Windows or the printer driver Macintosh Photoshop doesn t retain the PRINT Image Matching or Exif Print information separately in the header file when you import your P I...

Page 83: ...an import option PRINT Image Matching II enables the greatest range of image enhancements and effects It also supports the EPSON RGB expanded color space which is similar to the Adobe RGB color space and is required for PRINT Image Matching image quality prints This setting is available only for P I M and P I M II images Exif Print enables Exif 2 2 effects and allows for an expanded color space Th...

Page 84: ...r original file you will lose all P I M header information Printing a P I M Image P I M images are converted into the EPSON RGB 2001 color space To retain P I M quality and enhancements don t change the color space 1 Open the File menu then Photoshop 7 0 or Elements Select Print Preview Print Options or Print with Preview Then click Show More Options Color Management Photoshop 6 0 Select Print You...

Page 85: ...the Advanced button You see the Advanced screen 6 Select Photo Best Photo or Photo RPM as the Print Quality 7 Windows Select No Color Adjustment and click OK Macintosh OS X Select Color Management from the pop up menu Select No Color Adjustment Macintosh 8 6 to 9 x Select No Color Adjustment and click OK 8 Continue clicking OK Windows or click Print Macintosh to print your photo No Color Adjustmen...

Page 86: ...86 Printing From Your Computer Pbasics book Page 86 Tuesday June 1 2004 1 31 PM ...

Page 87: ...t Head on page 93 Cleaning the Printer on page 94 Transporting the Printer on page 95 Note You can also maintain your printer from the Maintenance tab on your driver Windows or from the EPSON Printer Utility Macintosh For details read your on screen Reference Guide described on page 10 The steps in this chapter must be performed with the printer set to Advanced mode Press the mode button to choose...

Page 88: ...nter s control panel 1 Make sure the printer is turned on but not printing and the red b error light is off If the red light is flashing or on you may need to replace the ink cartridge see page 89 for details 2 Press the button to highlight More Options then press OK 3 Use the or button to highlight Head Cleaning then press OK 4 To begin cleaning press OK While cleaning the printer makes noise and...

Page 89: ...es by looking at the icons on the control panel Press the button to scroll down to More Options The level of ink shown on the icons indicates the approximate amount of ink remaining If an ink cartridge is low the red b error light flashes This is a good time to make sure you have a new cartridge If an ink cartridge is empty the red b error light remains on and you see a message on the display tell...

Page 90: ...dge replacement procedure you must complete all the steps in one session 1 Make sure the printer is turned on and not printing then open the printer cover 2 Do one of the following If the red b error light is on cartridge is empty press the b maintenance button If the red b error light is flashing cartridge is low press the b maintenance button You see Ink Cartridge Replacement highlighted in the ...

Page 91: ...arning Keep ink cartridges out of the reach of children and do not drink the ink If ink gets on your hands wash them thoroughly with soap and water If ink gets in your eyes flush them thoroughly with water 6 Unwrap the new ink cartridge Caution Don t touch the green circuit boards or remove any labels Don t touch this part Pbasics book Page 91 Tuesday June 1 2004 1 31 PM ...

Page 92: ...rtridge repeat steps 5 through 7 before continuing with step 9 9 Close the cartridge cover 10 Press the left front corner of the cartridge cover forward to lock the cover into place 11 Press OK and close the printer cover The printer begins charging the ink delivery system 12 When you see a message that charging is complete after about a minute press OK to finish Pbasics book Page 92 Tuesday June ...

Page 93: ...ad alignment Follow these steps to align the print head using the control panel 1 Make sure the printer is turned on but not printing and letter size paper is loaded 2 Press the button to highlight More Options then press OK 3 Press the or button until Print Head Alignment is highlighted then press OK 4 Press OK to print the alignment pattern 5 Once the pattern is done printing examine the first r...

Page 94: ...ay and preview monitor Do not use liquid or chemical cleaners on these parts 5 If ink has spilled inside the printer wipe it off with a soft damp cloth Caution Be careful not to wipe away lubricating grease inside the printer Don t touch the gears inside the printer Never use a hard or abrasive brush or alcohol or thinner for cleaning they can damage the printer components and case Don t get water...

Page 95: ...support 5 Open the printer cover Secure the ink cartridge holder to the printer with tape as shown then close the printer cover 6 Make sure the CD DVD tray guide is closed then push in the output tray extension and close the output tray 7 If your printer has a preview monitor disconnect the cable from the printer and lift the monitor off of the printer 8 Repack the printer and its attachments in t...

Page 96: ...96 Maintaining Your Printer Pbasics book Page 96 Tuesday June 1 2004 1 31 PM ...

Page 97: ...et Help on page 111 Diagnosing Problems Your EPSON Stylus Photo R300 Series printer includes a number of ways to help you diagnose problems To identify the most common problems check for messages on the control panel display and follow the instructions provided If you re not sure whether the problem is coming from your printer or the computer run a printer check as described on page 100 Check for ...

Page 98: ...e maintenance button to eject the jammed paper Ink cartridges cannot be recognized Black T0481 Cyan T0482 Magenta T0483 Yellow T0484 Light Cyan T0485 Light Magenta T0486 The genuine EPSON ink cartridges listed above are recommended for replacement Reinstall the cartridge shown Service required Parts inside your printer are at the end of their service life See your printer s documentation for detai...

Page 99: ...pter from the printer then reconnect it Disconnect the adapter then reconnect to the printer System error Simultaneously press and hold the Power and Stop button for 7 seconds to turn off the printer Turn the printer off and after a few seconds turn it on again If the error is not cleared contact your dealer Ink icon blinks The printer is low on ink Obtain a replacement ink cartridge Communicating...

Page 100: ...to print the nozzle check 8 The printer prints a page showing a nozzle check pattern If the pattern has gaps you need to clean the print head see page 88 If the check page printed the problem probably lies in your memory card software settings interface cable or computer or your software may not be installed correctly If the check page did not print you may have a problem with your printer Try the...

Page 101: ...ding any screen savers and virus protection software and install again If your printer icon SP R300 Series doesn t appear in the Macintosh Chooser you may have too many items in the Chooser Delete any unused items and check the Chooser again If you are using Macintosh OS X and you do not see the printer name or borderless printer option in the Format for menu under Page Setup you may need to set u...

Page 102: ...all directions Your printer makes noise when you turn it on or after it has been sitting for awhile Your printer is performing routine maintenance The preview monitor and control panel respond too slowly When you have lots of photos or large files on your memory card it takes longer for the preview monitor to process them This causes the monitor and control panel to respond more slowly Try deletin...

Page 103: ...isplay and that the photos are in JPEG or Uncompressed Tiff format and taken with a DCF compliant digital camera Make sure you follow the instructions on the Start Here sheet to install the software including the card utilities Card Monitor and PhotoStarter Check your PhotoStarter settings See page 49 for instructions If you access the card from your computer and delete files the card may not work...

Page 104: ...t sheet or load your paper one sheet at a time Make sure your paper meets the specifications listed in the on screen Reference Guide Run the Print Head Alignment utility See page 93 for instructions Remove each sheet from the output tray after printing especially when you re printing on transparencies If the options above don t work try using the Thick paper and envelopes setting Windows From the ...

Page 105: ...Ink setting is set to Color for color images or black and white prints and your software is set for color printing The print head nozzles may need cleaning see page 88 for instructions The ink cartridges may be old or low on ink To replace an ink cartridge see page 89 Try turning off PhotoEnhance Also check if you re using a special effect that alters image colors like Sepia Try changing the Gamma...

Page 106: ...inst the paper If multiple pages feed at once remove the paper from the sheet feeder fan the edges to separate the sheets and carefully reload it If paper jams press the b maintenance button to clear the jam If that doesn t resolve the paper jam open the cover and remove any jammed paper including small pieces that may have torn off Reload the paper and press the b maintenance button If your paper...

Page 107: ...inting from a computer The CD or DVD won t feed into the printer Make sure you hold the CD DVD tray level as you load it into the tray guide without tilting it up or down Don t push in the tray too far but line up the arrows exactly as described on page 37 stand alone printing or page 70 printing from a computer Miscellaneous Printout Problems The image is inverted Turn off the Flip Horizontal set...

Page 108: ... not match the width height proportions aspect ratio of the paper size or layout you re using Images may be cropped to fit the paper and layout You see incorrect characters Make sure the USB cable is securely connected and meets the system requirements on page 113 Then try printing again Make sure your printer is selected in your software or is set as the active printer in the Print Center or Maci...

Page 109: ...o R300 Series printer icon is selected and click OK Then follow the on screen instructions 5 In Windows 98 or Me click EPSON USB Printer Devices in the program list and click the Add Remove button If you are using Windows XP or 2000 go to step 9 6 When you see the prompt asking if you want to reboot click No 7 Click EPSON PhotoStarter3 0 in the program list and click the Add Remove button Then fol...

Page 110: ...Reference Guide and you won t see the license agreement Macintosh OS 8 6 to 9x 1 Close all applications 2 Insert the printer software CD ROM 3 In the EPSON window scroll down and double click the Drivers folder 4 Double click the OS 8 9 folder 5 Double click the SPR300 icon and click Continue 6 In the Installer dialog box select Uninstall from the pull down menu and click the Uninstall button Foll...

Page 111: ...ON provides technical assistance 24 hours a day through the electronic support services and automated telephone services listed below To speak to a technical support representative dial U S 562 276 7282 6 AM to 8 PM Pacific Time Monday through Friday and 7 AM to 4 PM Saturday Canada 905 709 2567 6 AM to 6 PM Pacific Time Monday through Friday Toll or long distance charges may apply Service Access ...

Page 112: ...e back of the printer Proof of purchase such as a store receipt and date of purchase Computer configuration Description of the problem You can purchase ink cartridges paper manuals and accessories from the EPSON Store at 800 873 7766 or visit www epsonstore com U S sales only In Canada please call 800 463 7766 for dealer referral Pbasics book Page 112 Tuesday June 1 2004 1 31 PM ...

Page 113: ...sing an improperly shielded USB cable especially a cable more than 6 5 feet 2 meters long may cause the printer to malfunction Macintosh System Requirements An Apple iMac series Power Macintosh G3 G4 or G5 PowerBook iBook or eMac Mac OS 8 6 through 9 x or OS X 10 2 x 64MB of available RAM 128MB for OS X more recommended 200MB or more available hard disk space recommended VGA display or better CD R...

Page 114: ...ns that are subject to rapid changes in heat or humidity shocks or vibrations or dust Leave enough room around the printer for sufficient ventilation Do not place the printer near a radiator or heating vent or in direct sunlight Place the printer on a flat stable surface that extends beyond the printer base in all directions The printer will not operate properly if it is tilted or at an angle Turn...

Page 115: ... the printer Install the ink cartridge immediately after you remove it from its package Leaving the cartridge unpacked for a long time before use can result in reduced print quality Do not use an ink cartridge beyond the date printed on the package For best results use up the ink cartridges within six months of first installing them Store ink cartridges in a cool dark place After bringing an ink c...

Page 116: ... interference to radio and television reception which can be determined by turning the equipment off and on the user is encouraged to try to correct the interference by one or more of the following measures Reorient or relocate the receiving antenna Increase the separation between the equipment and receiver Connect the equipment into an outlet on a circuit different from that to which the receiver...

Page 117: ...tal device Each product marketed is identical to the representative unit tested and found to be compliant with the standards Records maintained continue to reflect the equipment being produced can be expected to be within the variation accepted due to quantity production and testing on a statistical basis as required by 47CFR 2 909 Operation is subject to the following two conditions 1 this device...

Page 118: ...n or its authorized service center where the printer will be fixed and sent back to you You are responsible for packing the printer and for all costs to and from the Epson authorized service center When warranty service involves the exchange of the printer or a part the item replaced becomes Epson property The replacement printer or part may be new or refurbished to the Epson standard of quality a...

Page 119: ...CA INC NOR ITS AFFILIATES SHALL BE LIABLE FOR ANY LOSS INCONVENIENCE OR DAMAGE INCLUDING DIRECT SPECIAL INCIDENTAL OR CONSEQUENTIAL DAMAGES RESULTING FROM THE USE OR INABILITY TO USE THE EPSON PRODUCT WHETHER RESULTING FROM BREACH OF WARRANTY OR ANY OTHER LEGAL THEORY In Canada warranties include both warranties and conditions Some jurisdictions do not allow limitations on how long an implied warr...

Page 120: ...120 Notices Pbasics book Page 120 Tuesday June 1 2004 1 31 PM ...

Page 121: ...g printing from control panel 27 Macintosh 55 Windows 52 CD case inserts 39 CD R RW drive 20 20 to 21 CDs adjusting print density 77 adjusting print position 75 to 76 backing up files on 39 to 40 designing 68 to 70 inserting in printer 37 to 38 70 to 72 ordering 33 67 printing on 37 to 38 67 to 77 saving memory card files on 39 to 40 Characters incorrect 108 Checking printer 100 Cleaning print hea...

Page 122: ... setting 58 Glossy Photo Paper 62 64 Grainy prints 104 Greeting cards 34 H Head Cleaning utility 88 to 89 Help EPSON 111 to 112 High Speed setting 103 I ICM Image Color Management setting 58 Incorrect characters 108 Incorrect colors 105 Index printing without a computer 23 Ink cartridge level of ink in 52 57 89 ordering 90 replacing 90 to 92 safety instructions 91 115 Ink Jet Transparencies 61 Ink...

Page 123: ...g CDs and DVDs 72 73 Windows 64 Paper Type setting 23 26 27 52 PhotoCenter EPSON 9 Photographs displaying and storing 16 PhotoStarter 49 PictBridge 18 Preview monitor 7 31 to 32 102 Previewing printout 57 Print CD software 68 to 70 72 to 77 Print dialog box 56 Print head aligning 93 cleaning 88 to 89 Print Head Alignment utility 93 PRINT Image Matching description 8 plug in for Photoshop 9 82 to 8...

Page 124: ...5 Saving files from memory cards 39 to 40 SD card 19 48 Secure Digital card 19 48 Self adhesive sheets 61 Slow printing 102 SmartMedia card 19 48 Smeared printout 107 Software Print CD 68 to 70 72 to 77 problems solving 101 summary 9 uninstalling 109 to 111 Stopping printing 27 Storing photos 16 System requirements 113 T Transferring photos to computer 48 to 50 Transparencies 61 Transporting print...

Reviews: