Maintenance 8. DMB (Drive Main Board)
RC420 Rev.9
133
(7) Turn over the Controller again.
(8) Remove the six mounting screws of the Top Cover and remove the Top Cover
(9) Remove the two DMB mounting screws on the back of the Controller as shown
below.
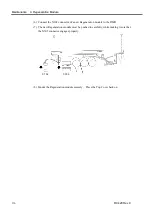
(10) As shown below, remove the mounting screws for the motor drivers for four axes in
the Controller.
Axis
#1
Axis
#3
Axis
#4
Axis
#2
(11) If a Regeneration module is installed, remove it by following the steps, (4) and (5), in
the section
Maintenance 9.2 Replacing a Regeneration Module
.
(12) Keep a written record of the corresponding axis number, CT data, and wattage for
each module so that the modules can later be re-installed correctly.
(13) Pull each Motor Driver module up and disconnect the cables from the back.
Compress the projections on both sides of the connector to disconnect the cable.
Summary of Contents for RC420
Page 1: ...Rev 9 EM073C1492F ROBOT CONTROLLER RC420 ...
Page 2: ...ROBOT CONTROLLER RC420 Rev 9 ...
Page 12: ...Setup Operation ...
Page 20: ...Setup Operation 1 Safety 10 RC420 Rev 9 ...
Page 30: ...Setup Operation 2 3 Controller Part Names and Functions 20 RC420 Rev 9 ...
Page 50: ...Setup Operation 5 5 Circuit Diagrams EMERGENCY Connector 40 RC420 Rev 9 ...
Page 58: ...Setup Operation 6 3 Pin Assignments STANDARD I O Connector 48 RC420 Rev 9 ...
Page 114: ...Setup Operation 10 UPS Uninterruptible Power Supply 104 RC420 Rev 9 ...
Page 115: ...97 Maintenance This manual contains maintenance procedures for the RC420 Robot Controller ...
Page 116: ...Maintenance RC420 Rev 9 106 ...
Page 138: ...Maintenance 6 Motor Driver Module 128 RC420 Rev 9 ...
Page 170: ...Maintenance 12 Recovering the HDD 160 RC420 Rev 9 ...

