background image

5. General Maintenance 


Safety and Installation (RC90-B / EPSON RC+ 7.0) Rev.4 

95


5. General Maintenance 

This chapter describes  maintenance inspections and procedures.  Performing 
maintenance  inspections  and procedures  properly is essential for  preventing 
trouble and ensuring safety.   
Be sure to perform the maintenance inspections in accordance with the schedule. 


5.1  Schedule for Maintenance Inspection 

5.1.1  Manipulator 

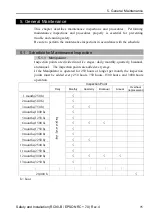
Inspection points are divided into five stages: daily, monthly, quarterly, biannual, 
and annual.    The inspection points are added every stage. 
If the Manipulator is operated for 250 hours or longer per month, the inspection 
points  must  be added every 250 hours, 750 hours, 1500 hours, and 3000 hours 
operation. 


Inspection Point


Daily 

Monthly 

Quarterly 

Biannual 

Annual 

Overhaul 

(replacement) 

  1 month   (250 h) 

In

sp

ect

 ev

er

y d

ay


  2 months (500 h) 


  3 months (750 h) 


  4 months (1000 h) 


  5 months (1250 h) 


  6 months (1500 h) 


  7 months (1750 h) 


  8 months (2000 h) 


  9 months (2250 h) 


10 months (2500 h) 


11 months (2750 h) 


12 months (3000 h) 


13 months (3250 h) 


20,000 h  


h = hour   


Summary of Contents for RC90-B

Page 1: ...Robot Controller RC90 B Programming Software EPSON RC 7 0 Manipulator LS B series LS20 B LS10 B LS6 B LS3 B Robot System Safety and Installation Read this manual first Rev 4 EM196B3937F ...

Page 2: ...Robot System Safety and Installation RC90 B EPSON RC 7 0 Rev 4 ...

Page 3: ...Safety and Installation RC90 B EPSON RC 7 0 Rev 4 i Robot System Safety and Installation RC90 B EPSON RC 7 0 Rev 4 Copyright 2018 2019 SEIKO EPSON CORPORATION All rights reserved ...

Page 4: ... of your region for warranty period information However customers will be charged for repairs in the following cases even if they occur during the warranty period 1 Damage or malfunction caused by improper use which is not described in the manual or careless use 2 Malfunctions caused by customers unauthorized disassembly 3 Damage due to improper adjustments or unauthorized repair attempts 4 Damage...

Page 5: ...indows 8 and Windows 10 refer to above respective operating systems In some cases Windows refers generically to Windows 7 Windows 8 and Windows 10 NOTICE No part of this manual may be copied or reproduced without authorization The contents of this manual are subject to change without notice Please notify us if you should find any errors in this manual or if you have any comments regarding its cont...

Page 6: ...olutions Otto Hahn Str 4 D 40670 Meerbusch Germany TEL 49 0 2159 538 1800 FAX 49 0 2159 538 3170 E MAIL info rs epson de URL www epson de robots China Epson China Co Ltd Factory Automation Division 4F Tower 1 China Central Place 81 Jianguo Road Chaoyang District Beijing 100025 PRC TEL 86 0 10 8522 1199 FAX 86 0 10 8522 1120 Taiwan Epson Taiwan Technology Trading Ltd Factory Automation Division 15F...

Page 7: ...em 1 HarbourFront Place 03 02 HarbourFront Tower One Singapore 098633 TEL 65 0 6586 5696 FAX 65 0 6271 3182 India Epson India Pvt Ltd Sales Marketing Factory Automation 12th Floor The Millenia Tower A No 1 Murphy Road Ulsoor Bangalore India 560008 TEL 91 80 3051 5000 FAX 91 80 3051 5005 Japan Epson Sales Japan Corporation Factory Automation Systems Department 29th floor JR Shinjuku Miraina Tower 4...

Page 8: ...s Pb Cd or Hg indicates if these metals are used in the battery This information only applies to customers in the European Union according to DIRECTIVE 2006 66 EC OF THE EUROPEAN PARLIAMENT AND OF THE COUNCIL OF 6 September 2006 on batteries and accumulators and waste batteries and accumulators and repealing Directive 91 157 EEC and legislation transposing and implementing it into the various nati...

Page 9: ...ment PC and RC90 B with the USB cable If RC90 B and the development PC are connected without installing the EPSON RC 7 0 to the development PC Add New Hardware Wizard appears If this wizard appears click the Cancel button Concerning the security support for the network connection The network connecting function Ethernet on our products assumes the use in the local network such as the factory LAN n...

Page 10: ...1 Ver 7 4 2 or later OK OK Compatible All functions of the EPSON RC 7 0 and the Controller are available Compatible Connection is OK We recommend using EPSON RC 7 0 Ver 7 4 2 or later LS6 B RC90 B controller firmware Ver 7 4 3 1 or later EPSON RC 7 0 Before Ver 7 4 2 Ver 7 4 3 or later OK OK Compatible All functions of the EPSON RC 7 0 and the Controller are available Compatible Connection is OK W...

Page 11: ...密封填料 油封 密封脂 垫片 O型环 润滑脂 电缆 M C电缆 连接电缆 散热片 LED指示灯 电路板 外罩 滚珠丝杠花键 制动解除开关 伸缩罩 扎带 气管接头 选 件 相机安装板 本表格依据SJ T 11364的规定编制 表示该有害物质在该部件所有均质材料中的含量在GB T 26572规定的限量要求以下 表示该有害物质至少在该部件的某一均质材料中的含量超出GB T 26572规定的限量要求 本产品中含有的有害物质的部件皆因全球技术发展水平限制而无法实现有害物质的替代 产品环保使用期限的使用条件 关于适用于在中华人民共和国境内销售的电器电子产品的环保使用期限 在遵守该产品的安全及使用注意 事项的条件下 从生产日期开始计算 在标志的年限内 本产品中含有的有害物质不会对环境造成严重污 染或对人身 财产造成严重损害 附注 本表格及环保使用期限标志依据中国的有关规定而制定 中国以外的国家 地区则无...

Page 12: ...交换机 USB选件密钥 VRT 本表格依据SJ T 11364的规定编制 表示该有害物质在该部件所有均质材料中的含量在GB T 26572规定的限量要求以下 表示该有害物质至少在该部件的某一均质材料中的含量超出GB T 26572规定的限量要求 本产品中含有的有害物质的部件皆因全球技术发展水平限制而无法实现有害物质的替代 产品环保使用期限的使用条件 关于适用于在中华人民共和国境内销售的电器电子产品的环保使用期限 在遵守该产品的安全及使用注 意事项的条件下 从生产日期开始计算 在标志的年限内 本产品中含有的有害物质不会对环境造成严 重污染或对人身 财产造成严重损害 附注 本表格及环保使用期限标志依据中国的有关规定而制定 中国以外的国家 地区则无需关注 Note This sheet and environmental protection use period label are based...

Page 13: ...tor 26 1 7 Safety Features 31 1 8 Lockout Tagout 34 Installing the Lockout Attachment 34 Padlock Size and Weight 35 Safety Precautions 35 1 9 Manipulator Specifications 36 1 10 Motion Range Setting by Mechanical Stops 43 1 11 End User Training 44 2 Installation 45 System Example 46 2 1 Outline from Unpacking to Operation of Robot System 47 2 2 Unpacking 48 2 3 Transportation 49 2 3 1 Transportatio...

Page 14: ...roller 73 2 9 Power on 74 2 9 1 Power on Precautions 74 2 9 2 Power ON Procedure 75 2 10 Saving Default Status 75 3 First Step 76 3 1 Installing EPSON RC 7 0 Software 76 3 2 Development PC and Controller Connection 79 3 2 1 About Development PC Connection Port 79 3 2 2 Precaution 80 3 2 3 Software Setup and Connection Check 80 3 2 4 Backup the initial condition of the Controller 81 3 2 5 Disconnec...

Page 15: ... Inspection 95 5 1 1 Manipulator 95 5 1 2 Controller 98 5 2 Overhaul Parts Replacement 99 5 3 Tightening Hexagon Socket Head Cap Bolts 101 5 4 Greasing 102 5 5 Handling and Disposal of Batteries 104 6 Manuals 106 Software 106 Software Options 106 Controller 107 Controller Options 107 Manipulator 107 7 Directives and Norms 108 ...

Page 16: ...Table of Contents xiv Safety and Installation RC90 B EPSON RC 7 0 Rev 4 ...

Page 17: ...fety considerations are indicated throughout the manual by the following symbols Be sure to read the descriptions shown with each symbol WARNING This symbol indicates that a danger of possible serious injury or death exists if the associated instructions are not followed properly WARNING This symbol indicates that a danger of possible harm to people caused by electric shock exists if the associate...

Page 18: ... without understanding the safety requirements is extremely hazardous and may result in serious bodily injury and or severe equipment damage to the robot system The Manipulator and the Controller must be used within the environmental conditions described in their respective manuals This product has been designed and manufactured strictly for use in a normal indoor environment Using the product in ...

Page 19: ...op after following a path that is different from its normal movement path The layout design should provide enough margins for safety Refer to the manuals for each manipulator and ensure that the layout secures ample space for maintenance and inspection work When designing a robot system to restrict the area of motion of the robots do so in accordance with the methods described in each manipulator ...

Page 20: ...ally dangerous zone Ensure that an interruption to the power supply power shutoff of peripheral equipment does not lead to a dangerous situation Take measures that not only prevent a work piece held from being released as mentioned in End effector Design but that also ensure peripheral equipment other than the robots can stop safely Verify equipment safety to ensure that when the power shuts off t...

Page 21: ... added during operation and forces from the surrounding environment When designing the safeguard system make sure that it is free from sharp corners and projections and that the safeguard system itself is not dangerous Make sure that the safeguard system can only be removed by using a tool There are several types of safeguard devices including safety doors safety barriers light curtains safety gat...

Page 22: ...y installing a presence sensing device however perform a satisfactory risk assessment and pay thorough attention to its dependability Here are precautions that should be noted Design the system so that when the presence sensing device is not activated or a dangerous situation still exists that no personnel can go inside the safeguard area or place their hands inside it Design the presence sensing ...

Page 23: ...nside the safeguarded area The robot system can be operated in the mode for teaching even when someone is inside the safeguarded area The motion of the Manipulator is always in restricted status low speed and low power to secure the safety of an operator However operating the robot system while someone is inside the safeguarded area is extremely hazardous and may result in serious safety problems ...

Page 24: ... electric shock and or malfunction of the robot system CAUTION Whenever possible only one person should operate the robot system If it is necessary to operate the robot system with more than one person ensure that all people involved communicate with each other as to what they are doing and take all necessary safety precautions Joint 1 2 and 4 If the joints are operated repeatedly with the operati...

Page 25: ...es from natural oscillation frequency of the Arm and can be controlled by following measures Changing Manipulator speed Changing the teach points Changing the end effector load Manipulator may be warmed up due to motor heat or similar causes Do not touch the Manipulator until temperature falls Also make sure the temperature of the Manipulator falls and is not hot when you touch it Then perform tea...

Page 26: ...rial Robots and Robot Systems Safety Requirements EN ISO 12100 Safety of machinery General principles for design Risk assessment and risk reduction EN ISO 13849 1 Safety of machinery Safety related parts of control systems Part 1 General principles for design EN ISO 13850 Safety of machinery Emergency stop function Principles for design EN ISO 13855 Safety of machinery Positioning of safeguards wi...

Page 27: ... 3 LED 4 Fan Filter 5 Signature label 6 Controller Number label 7 Connection Check label 8 M C POWER connector 9 M C SIGNAL connector 10 EMERGENCY connector 11 TP port 12 Development PC connection port 13 Memory port 14 Trigger Switch 15 LAN Ethernet communication port 16 I O connector 17 Standard RS 232C port 18 Option slot 19 Cable Clamp 20 Battery Mounted inside the controller ...

Page 28: ...int cannot be moved up down by hand until the electromagnetic brake applied to the joint has been released Move the joint up down while pressing the brake release switch Joint 4 The shaft cannot be rotated by hand until the electromagnetic brake applied to the shaft has been released Move the shaft while pressing the brake release switch The brake release switch affects both Joints 3 and 4 When th...

Page 29: ...joint cannot be moved up down by hand until the electromagnetic brake applied to the joint has been released Move the joint up down while pressing the brake release switch Joint 4 The shaft cannot be rotated by hand until the electromagnetic brake applied to the shaft has been released Move the shaft while pressing the brake release switch The brake release switch affects both Joints 3 and 4 When ...

Page 30: ...emergency mode push the arm or joint of the Manipulator by hand as shown below Arm 1 Push the arm by hand Arm 2 Push the arm by hand Joint 3 The joint cannot be moved up down by hand until the electromagnetic brake applied to the joint has been released Move the joint up down while pressing the brake release switch Joint 4 LS3 B Rotate the shaft by hand LS6 B The shaft cannot be rotated by hand un...

Page 31: ...ng and rotating while the brake release switch is pressed because the shaft may be lowered by the weight of an end effector 1 3 3 Operation Modes The operation mode is defined as the single control point for the controller therefore you cannot use more than one operation mode at the same time There are four operation modes for the controller AUTO PROGRAM TEACH and TEST AUTO operation modes allow y...

Page 32: ...cribed in this manual Maintenance of the Manipulator manual and Maintenance of the Controller manual Improper removal of parts or improper maintenance may not only cause improper function of the robot system but also serious safety problems Keep away from the Manipulator while the power is ON if you have not taken the training courses Do not enter the operating area while the power is ON Entering ...

Page 33: ...ables Do not put heavy objects on the cables Do not bend or pull the cables forcibly The unnecessary strain on the cables may result in damage to the cables disconnection and or contact failure Damaged cables disconnection or contact failure is extremely hazardous and may result in electric shock and or improper function of the robot system CAUTION Carefully use alcohol liquid gasket and adhesive ...

Page 34: ...then see a doctor immediately If grease gets into your mouth If swallowed do not induce vomiting See a doctor immediately If grease just gets into your mouth wash out your mouth with water thoroughly If grease gets on your skin Wash the area thoroughly with soap and water Manipulator may be warmed up due to motor heat or similar causes Do not touch the Manipulator until temperature falls Also make...

Page 35: ...for instructions on how to wire the Emergency Stop switch circuit Do not turn OFF the Controller while the Manipulator is operating If you attempt to stop the Manipulator in emergency situations such as Safeguard Open make sure to stop the Manipulator using the E STOP switch of the Controller If the Manipulator is stopped by turning OFF the Controller while it is operating following problems may o...

Page 36: ... motors Therefore the brake does not function For the Safeguard system do not use the circuit for E STOP For details of the Safeguard system refer to the following manuals EPSON RC User s Guide 2 Safety Installation and Design Precautions Safeguard System Safety and Installation 2 6 Connection to EMERGENCY Connector To check brake problems refer to the following manuals Manipulator Manual Maintena...

Page 37: ...cel Weight of work piece Speed Operating pose etc Approximate time and distance of the free running are as follow LS20 B Conditions for Measurement LS20 B 4 Accel Setting 100 Speed Setting 100 Load kg 20 Weight setting 20 Joint 1 Stop point Point where the emergency stop signal is input Target point Start point of operation Joint 2 Controller RC90 B Manipulator LS20 B804 LS20 BA04 Free running tim...

Page 38: ...g 10 Joint 1 Stop point Point where the emergency stop signal is input Target point Start point of operation Joint 2 Controller RC90 B Manipulator LS10 B60 LS10 B70 LS10 B80 Free running time Joint 1 Joint 2 s 0 7 0 9 0 7 Joint 3 s 0 2 Free running angle Joint 1 deg 35 75 65 Joint 2 deg 115 105 55 Joint 1 Joint 2 deg 120 135 90 Free running distance Joint 3 mm 50 ...

Page 39: ...ing 6 3 Joint 1 Stop point Point where the emergency stop signal is input Target point Start point of operation Joint 2 Controller RC90 B Manipulator LS6 B502 LS6 B602 LS6 B702 LS3 B401 Free running time Joints 1 2 s 0 4 0 7 0 7 0 4 Joint 3 s 0 2 0 1 Free running angle Joint 1 deg 42 100 85 110 Joint 2 deg 42 45 50 20 Joints 1 2 deg 84 130 135 130 Free running distance Joint 3 mm 90 20 ...

Page 40: ... homing the robot It also shows status for Emergency Stop Safeguard Motors and Power 1 6 Labels Labels are attached around the locations of the Controller and Manipulator where specific dangers exist Be sure to comply with descriptions and warnings on the labels to operate and maintain the Robot System safely Do not tear damage or remove the labels Use meticulous care when handling those parts or ...

Page 41: ...wer before performing maintenance and repair C TP port of RC90 B is for the Teach Pendant TP1 and TP2 Do not connect the followings to TP port of RC90 Connecting to the followings may result in malfunction of the device OPTIONAL DEVICE dummy plug OP500 OP500RC JP500 TP 3 series and OP1 Refer to 4 3 Connection of Option Teaching Pendant D Hazardous voltage exists while the Manipulator is ON To avoi...

Page 42: ... is extremely hazardous and may result in serious safety problems C Hazardous voltage exists while the Manipulator is ON To avoid electric shock do not touch any internal electric parts D You can catch your hand or fingers between the shaft and cover when bringing your hand close to moving parts Manipulators with bellows do not have this label for no danger of your hand or fingers being caught E O...

Page 43: ... 7 0 Rev 4 27 F Be careful of the shaft falling and rotating while the brake release switch is pressed because the shaft may be lowered by the weight of the end effector Location Signature plate Note G Manipulator s serial No LS20 B Figure LS20 B804S ...

Page 44: ... the operation area while the Manipulator is moving The robot arm may collide against the operator This is extremely hazardous and may result in serious safety problems C Hazardous voltage exists while the Manipulator is ON To avoid electric shock do not touch any internal electric parts D You can catch your hand or fingers between the shaft and cover when bringing your hand close to moving parts ...

Page 45: ...1 Safety Safety and Installation RC90 B EPSON RC 7 0 Rev 4 29 LS10 B Figure LS10 B702S LS6 B Figure LS6 B602S ...

Page 46: ...1 Safety 30 Safety and Installation RC90 B EPSON RC 7 0 Rev 4 LS3 B Figure LS3 B401S ...

Page 47: ... the Emergency Stop switches Pressing any Emergency Stop switch can shut off the motor power immediately and the robot system will enter the Emergency Stop condition Stop category of Emergency Stop input Category 0 refer to Safety Standard IEC60204 1 Safety Door Input In order to activate this feature make sure that the Safety Door Input switch is connected to the EMERGENCY connector at the Contro...

Page 48: ... CPU memory check sum error and overheat condition inside the Motor Driver Module Motor Overload Detection The dynamic brake circuit is activated when the system detects that the load on the motor has exceeded its capacity Irregular Motor Torque out of control manipulator Detection The dynamic brake circuit is activated when irregularity with motor torque motor output is detected in which case the...

Page 49: ...ted Overheat Detection at the Motor Driver Module The dynamic brake circuit is activated when the temperature of the power device inside the Motor Driver module is above the nominal limit Relay Deposition Detection The dynamic brake circuit is activated when relay deposition is detected Over Voltage Detection The dynamic brake circuit is activated when the voltage of the Controller is above the no...

Page 50: ... and tagout using the following procedure Use the lockout attachment for RC90 B Installing the Lockout Attachment 1 Turn OFF the POWER switch and place the lockout attachment on the POWER switch Insert the pin in the holes under the retractable actuator Push the pin in the direction of arrows and insert the pin in the holes POWER switch Lockout Attachment Hole Pin 2 Turn the lockout attachment 3 I...

Page 51: ...adlock can be a maximum of 45 g Make sure the padlock weight does not exceed 45 g otherwise the POWER switch may be damaged Applicable Padlock Safety Precautions When using the padlock do not use the controller where it is subject to vibration or shock otherwise failure or damage may result Do not apply force of more than 50N on the lockout attachment otherwise the lockout attachment will be damag...

Page 52: ... 4 allowable moment of inertia 2 Rated 0 05 kg m2 Max 1 00 kg m2 Resolution Joint 1 0 000275 deg pulse Joint 2 0 000439 deg pulse Joint 3 0 00148 mm pulse Joint 4 0 001046 deg pulse Hand Shaft diameter ø 25 mm Through hole ø 18 mm Mounting hole 200 200 mm 4 ø16 Weight cables not included 48 kg 105 8 lb 51 kg 112 5 lb Driving method All joints AC servo motor Motor rated capacity Joint 1 750 W Joint...

Page 53: ... 80 no condensation Noise level 4 LAeq 70 dB A or less Assignable Value Default values Speed 1 5 100 Accel 5 1 10 120 SpeedS 1 50 2000 AccelS 1 200 10000 Fine 0 1250 65535 Weight 0 450 10 450 20 450 Safety standard CE Mark EMC Directive Machinery Directive KC Mark KCs Mark ANSI RIA R15 06 2012 NFPA 79 2007 Edition Item LS20 B804S LS20 BA04S LS20 B804C LS20 BA04C Max motion range Joint 1 132 deg Jo...

Page 54: ...int 2 0 000439 deg pulse Joint 3 0 000740 mm pulse Joint 4 0 001674 deg pulse Hand Shaft diameter ø 25 mm Through hole ø 18 mm Mounting hole 150 150 mm 4 M8 Weight cables not included 22 kg 48 5lb 22 kg 48 5lb 23 kg 50 7lb Driving method All joints AC servo motor Motor rated capacity Joint 1 520 W Joint 2 520 W Joint 3 200 W Joint 4 150 W Option Installation environment Cleanroom 3 Joint 3 down fo...

Page 55: ...0 SpeedS 1 50 2000 AccelS 1 200 25000 Fine 0 1250 65535 Weight 0 375 5 375 10 375 Safety standard CE Mark EMC Directive Machinery Directive KC Mark KCs Mark ANSI RIA R15 06 2012 NFPA 79 2007 Edition Item LS10 B 2S LS10 B 2C LS10 B 3S LS10 B 3C Max motion range Joint 1 132 deg Joint 2 150 deg Joint 3 200 mm 170 mm 300 mm 270 mm Joint 4 360 deg Max pulse range Joint 1 152918 808278 Joint 2 341334 Jo...

Page 56: ...1 deg Payload Load Rated 1 kg 2 kg Max 3 kg 6 kg Joint 4 allowable moment of inertia 2 Rated 0 005 kg m2 0 01 kg m2 Max 0 05 kg m2 0 12 kg m2 Resolution Joint 1 deg pulse 0 000439 0 000275 Joint 2 deg pulse 0 000439 0 000439 Joint 3 mm pulse 0 000799 0 000814 Joint 4 deg pulse 0 001927 0 001465 Hand Shaft diameter ø 16 mm ø 20 mm Through hole ø 11 mm ø 14 mm Mounting hole 120 120 mm 135 120 mm Eit...

Page 57: ...ity 10 to 80 no condensation Noise level 4 LAeq 70 dB A or less Assignable Value Default values Speed 1 4 100 1 5 100 Accel 5 1 10 120 1 10 120 SpeedS 1 50 2000 1 50 2000 AccelS 1 200 25000 1 200 25000 Fine 0 1250 65535 0 1250 65535 Weight 0 175 1 175 3 175 0 275 2 275 6 275 Safety standard CE Mark EMC Directive Machinery Directive KC Mark KCs Mark ANSI RIA R15 06 2012 NFPA 79 2007 Edition Item LS...

Page 58: ...le emission may exceed the specified maximum level Cleanliness level Class ISO 4 ISO14644 1 Exhaust System Exhaust port diameter Inner diameter ø12 mm Exhaust tube Polyurethane tube Outer diameter ø12 mm Inner diameter ø8 mm Recommended exhaust flow rate approx 1000 cm3 s Normal 4 Conditions of Manipulator during measurement as follows Operating conditions Under rated load 4 joints simultaneous mo...

Page 59: ...can be set to any length less than the maximum stroke LS3 B LS6 B LS10 B Mechanical stop of Joint 2 Fixed Mechanical stop of Joint 1 Adjustable Mechanical stop of Joint 3 Lower limit mechanical stop Do not move the upper limit mechanical stop Mechanical stop of Joint 1 Fixed Mechanical stop of Joint 2 Adjustable LS20 B Mechanical stop of Joint 2 Mechanical stop of Joint 1 Adjustable Mechanical sto...

Page 60: ...g should include at least the following Study of regulation safety procedures and safety related recommendations by robot manufacturers and system designers Clear explanation of the work involved Description of all control equipment required for the work and their functions Explanation of potential hazards involved in the work Work safety procedures and specific methods of avoiding potential hazar...

Page 61: ... precautions for safe and accurate installation of the robot system The workflow for installing the robot system is described in 2 1 Outline from Unpacking to Operation of Robot System For unpacking transportation and installation refer to the respective section and the Manipulator and Controller manuals ...

Page 62: ...0 Pro EPSON RC 7 0 Ver 7 2 0 or later Operation panel Motion Controller RC90 B Expansion I O Board Fieldbus PROFIBUS DP DeviceNet CC Link EtherNet IP PROFINET EtherCAT RS 232C Board Windows 1 PC EPSON RC 7 0 Software Option USB 2 0 or Ethernet TP2 Option Standard I O Remote I O Ethernet RS 232C Requires preparation by users LS B series PLC Sequencer Option Standard TP1 Option Analog I O Board PG B...

Page 63: ...ortation Unpacking Error Installation Power on Yes No Procedures to install EPSON RC 7 0 to the development PC and enable the operation of the robot system Manual information to connect or setup the equipment and options 2 Installation Procedures to install the Robot system and turn ON the power properly 4 Second Step 3 First Step ...

Page 64: ...unauthorized personnel it is extremely hazardous and may result in serious bodily injury and or severe equipment damage to the robot system Vibration at transportation Avoid excessive vibration or shock during Manipulator transporting Excessive vibration or shock may cause equipment damage to and or malfunction of the Manipulator Anchor bolt When removing the anchor bolts support the Manipulator t...

Page 65: ... equipment damage to the robot system Vibration at transportation Avoid excessive vibration or shock during Manipulator transporting Excessive vibration or shock may cause equipment damage to and or malfunction of the Manipulator Anchor bolt When removing the anchor bolts support the Manipulator to prevent falling Removing the anchor bolts without supporting the Manipulator may get hands fingers o...

Page 66: ...02 approx 17 kg 37 5 lb LS6 B602 approx 17 kg 37 5 lb LS6 B702 approx 18 kg 39 7 lb LS10 B60 approx 22 kg 48 5 lb LS10 B70 approx 22 kg 48 5 lb LS10 B80 approx 23 kg 50 7 lb LS20 B To transport the Manipulator secure it to the delivery equipment or have at least 2 people to hold it by hand Also do not hold the bottom of the base the shaded area in the figure Holding the area by hand is extremely h...

Page 67: ...ce so that a tool or a work piece on the end effector does not reach a wall or a safeguard when the Manipulator extends its arm fully while holding a work piece Installing the Manipulator at a location with insufficient space is extremely hazardous and may result in serious bodily injury and or severe equipment damage to the robot system as a tool or a work piece may collide with a wall and a safe...

Page 68: ...cks or vibrations Keep away from sources of electric noise Manipulators are not suitable for operation in harsh environments such as painting areas etc When using Manipulators in inadequate environments that do not meet the above conditions please contact us Special Environmental Conditions The surface of the Manipulator has general oil resistance However if your requirements specify that the Mani...

Page 69: ...For details refer to the Controller manual CAUTION When cleaning the Manipulator do not rub it strongly with alcohol or benzene It may lose luster on the coated face 2 4 3 Noise level Noise level by movement of manipulator LS B series manipulators LAeq 70 dB A or less Operating conditions Rated load 4 joints simultaneous motion maximum speed maximum acceleration and duty 50 Measurement point Rear ...

Page 70: ...ion force produced by the movement of the Manipulator are as follows LS20 B LS10 B LS6 B LS3 B Max Reaction torque on the horizontal plate 1000 N m 550 N m 350 N m 250 N m Max Horizontal reaction force 7500 N 3200 N 1700 N 1000 N Max Vertical reaction force 2000 N 1500 N 1500 N 1000 N The threaded holes required for mounting the Manipulator base are as follows LS3 B LS6 B LS10 B M8 LS20 B M12 Use ...

Page 71: ...have equipment damaged by a fall of the Manipulator LS3 B401 approx 14 kg 31 lb LS6 B502 approx 17 kg 37 5 lb LS6 B602 approx 17 kg 37 5 lb LS6 B702 approx 18 kg 39 7 lb LS10 B60 approx 22 kg 48 5 lb LS10 B70 approx 22 kg 48 5 lb LS10 B80 approx 23 kg 50 7 lb 1 Secure the base to the base table with four bolts Use bolts with specifications conforming to ISO898 1 Property Class 10 9 or 12 9 Tighten...

Page 72: ...e equipment damaged by a fall of the Manipulator LS20 B804 approx 48 kg 105 8 lb LS20 BA04 approx 51 kg 112 5 lb 1 Secure the base to the base table with four bolts Use bolts with specifications conforming to ISO898 1 Property Class 10 9 or 12 9 Tightening torque 73 5 N m 750 kgf cm 18 5 mm Screw Hole depth 20 mm or more 4 M12 40 Spring Washer Plane Washer 2 Using nippers cut off the wire tie bind...

Page 73: ... 4 57 3 Remove the screw for fixing the arm The removed screw will be necessary when transporting the Manipulator Keep it with the arm lock which is supplied at shipment Be careful not to lose the screw Do not remove the mechanical stop M10 65 Mechanical stop NOTE ...

Page 74: ...sure to install it in the proper enclosure with adequate ventilation and cooling Installation procedure Before performing any installation procedure turn OFF the Controller and related equipment and then disconnect the power plug from the power source Performing any replacement procedure with the power ON is extremely hazardous and may result in electric shock and or malfunction of the robot syste...

Page 75: ... transient burst noise 2 kV or less Power supply wire 1 kV or les Signal wire Electrostatic noise 4 kV or less Base table Use a base table that is at least 100 mm off the floor Placing the Controller directly on the floor could allow dust penetration leading to malfunction If the Controller must be used in an environment that does not fulfill the conditions mentioned above take adequate countermea...

Page 76: ...urface such as wall floor and controller box in the direction shown in A to C A Flat mounting B Upright mounting C Rack mounting The rubber foot needs to be replaced Rack mount plate is required For Controller installation to the Controller box or the base table process screw hole drilling as follows 133 35 mm 463 mm NOTE ...

Page 77: ...ther equipment or walls as below 50 mm 50 mm 100 mm Excluding the installation side such as base table Air flow of the Fan 100 mm 200 mm Air with higher temperature than the ambient air about 10 C is blown out from the exhaust port of the Controller Do not place the heat sensitive devices near the exhaust port Route the cables to pull out from the front side of the Controller ...

Page 78: ...switch or Emergency Stop switch to the Controller EMERGENCY connector for safety When nothing is connected to the EMERGENCY connector Controller does not operate normally CAUTION Before connecting the connector make sure that the pins are not bent Connecting with the pins bent may damage the connector and result in malfunction of the robot system EMERGENCY connecter 2 6 1 Safety Door Switch and La...

Page 79: ...e Safety Door is called a Safety Door switch Connect the Safety Door switch to the Safety Door input terminal on the EMERGENCY connector The Safety Door switch has safety features such as temporary hold up of the program or the operation prohibited status that are activated whenever the Safety Door is opened Observe the following in designing the Safety Door switch and the Safety Door For the Safe...

Page 80: ... cancels the latched conditions Open The latch release switch latches conditions that the safety door is open or the operation mode is TEACH Closed The latch release switch releases the latched conditions When the latched TEACH mode is released while the safety door is open the status of Manipulator power is operation prohibited because the safety door is open at that time To execute a Manipulator...

Page 81: ...ion close the safety door and then close the safety door latch release input Open The latch release switch latches condition that the safety door is open Closed The latch release switch does not latch the condition that the safety door is open The latch release input also functions to acknowledge the change of TEACH mode In order to change the latched condition of the TEACH mode turn the mode sele...

Page 82: ...ntroller before checking the function Once the Emergency Stop switch is connected to the EMERGENCY connector continue the following procedure to make sure that the switch functions properly For the safety of the operator the Manipulator must not be powered ON until the following test is completed 1 Turn ON the Controller to boot the controller software while pressing the Emergency Stop switch 2 Ma...

Page 83: ...nput values from the Safety Door 1 and Safety Door 2 are different for two or more seconds They must be connected to the same switch with two sets of contacts 3 A critical error occurs if the input values from the Emergency Stop switch contact 1 and Emergency Stop switch contact 2 are different for two or more seconds They must be connected the same switch with two sets of contacts 4 Do not apply ...

Page 84: ...put 2 Latch release input Latch release input Close Latch off Open Latch on Main Circuit Control AC Input Emergency Stop switch of an Operation Unit TP External 24V GND External Emergency Stop switches Motor Driver Controller 9 10 22 23 1 2 14 15 3 16 4 17 11 12 24 25 7 8 20 21 18 19 Emergency Stop detection NOTE 24V GND 5V GND Be careful of the direction of voltage application ESTOP1 ESTOP2 ESTOP...

Page 85: ... safety relay The above diagram is simplified for representation External 24V GND 24V 5V Safety Door input 1 Safety Door input 2 Latch Release input AC Input Motor Driver External 24V Fuse External 24V Controller 9 10 22 23 1 2 14 15 3 16 4 17 11 12 24 25 7 8 20 21 18 19 Main Circuit Control Emergency Stop switch of an Operation Unit TP Emergency Stop detection External 24V Latch release input Clo...

Page 86: ...A LS3 B 1 0 kVA Refer to the Manipulator manual for rated capacity of the Manipulator motor Peak Current When power is turned ON approximately 70 A 2 ms When motor is ON approximately 50 A 2 ms Leakage Current Max 10 mA Ground Resistance 100 Ω or less Install an earth leakage circuit breaker or a circuit breaker in the AC power cable line at 15 A or less rated electric current Both should be a two...

Page 87: ...upply The equipment must be grounded properly at all times to avoid the risk of electric shock Always use a power plug or a disconnecting device for power connecting cable Never connect the Controller directly to the factory power supply Select the plug or a disconnecting device which conform safety standards for nations Item Specification AC power wire 2 cables Black Black or Black White Ground w...

Page 88: ... 7 0 Rev 4 2 7 3 M C Power Cable Connection 1 Mount the M C Power Cable as shown in the picture and form the cables 2 Set the M C Power Cable in the clamp for the M C Power Cable 3 Mount the cover for the M C Power Connector 4 Secure the cover with the screw ...

Page 89: ...ot bend or pull the cables forcibly The unnecessary strain on the cables may result in damage to the cables disconnection and or contact failure Damaged cables disconnection or contact failure is extremely hazardous and may result in electric shock and or improper function of the robot system Connection When connecting the Manipulator and the Controller make sure that the serial numbers on each eq...

Page 90: ... the robot system Shipping bolts and jigs check before turning ON Before turning ON the power after installation be sure to remove the shipping bolts and jigs from the Manipulator Turning ON the power while the shipping bolts and jigs are attached may result in equipment damage to the Manipulator Power activation Anchor the Manipulator before turning ON the power to or operating the Manipulator Tu...

Page 91: ...0 seconds after Controller starts up normally If the ERROR LED is turned ON or blinking check connection in step 1 to 5 and turn ON the power again If the ERROR LED is still ON or blinking contact the supplier in your region 7 6 1 2 3 4 5 2 10 Saving Default Status The Controller is already setup with the purchased robot s at shipment However just in case we recommend saving the default controller...

Page 92: ...nt PC and Controller with a USB Make sure that the Robot system is installed safely by following the description in 1 Safety and 2 Installation Then operate the Robot system in the following procedures 3 1 Installing EPSON RC 7 0 Software The EPSON RC 7 0 software needs to be installed on your development PC 1 Insert the EPSON RC 7 0 Setup DVD in the DVD drive 2 The following dialog will be displa...

Page 93: ...ion RC90 B EPSON RC 7 0 Rev 4 77 3 Enter your user name and company name and click Next 4 Select the drive where you want to install EPSON RC 7 0 and click Next The installation directory is called EpsonRC70 This cannot be changed NOTE ...

Page 94: ... Windows Installer and Microsoft NET Framework 3 5 on your system This may take several minutes Adobe Reader needs to be installed on your PC in order to view the EPSON RC 7 0 manuals If the installer cannot find Adobe Reader on your system it will be installed at this time Follow the instructions in the Adobe installer Do not restart the system after the Adobe Reader installation has completed 8 ...

Page 95: ...w Hardware Wizard appears If this wizard appears click the Cancel button 3 2 1 About Development PC Connection Port Development PC connection port supports following USB USB2 0 HighSpeed FullSpeed Speed auto selection or FullSpeed mode USB1 1 FullSpeed Interface Standard USB specification Ver 2 0 compliant USB Ver 1 1 upward compatible Connect the Controller and development PC by a USB cable to de...

Page 96: ...ot allow unnecessary strain on the cable When development PC and the Controller is connected do not insert or remove other USB devices from the development PC Connection with the Controller may disconnect 3 2 3 Software Setup and Connection Check The following is the steps of connecting the development PC and the Controller 1 Make sure that the EPSON RC 7 0 is installed on the Controller connected...

Page 97: ...ent PC and the Controller is completed Now robot system can be used from EPSON RC 7 0 3 2 4 Backup the initial condition of the Controller Backup the Controller data configured before shipment Project and system configuration backup procedure 1 From the Project menu select Copy 2 Change the Destination Drive to an arbitrary drive 3 Click OK The project will be copied to the external media 4 From t...

Page 98: ...oved If the USB cable is removed while the Controller and the development PC are connected the Manipulator stops Be sure to click the Disconnect button in the PC to Controller Communications dialog before removing the USB cable 3 2 6 Moving the Robot to Initial Position Robot can be operated by the following methods other than creating and executing the program Manual operation Jog motion by the T...

Page 99: ...B Command execution from the EPSON RC Move the robot by exciting the robot motors and executing the command Following explains the example of moving all joints to the 0 pulse positions by specifying the pulse for each joint 1 Start the EPSON RC 7 0 Double click the EPSON RC 7 0 icon on the desktop 2 Open the command window EPSON RC 7 0 menu Tools Command Window 3 Execute the following command in C...

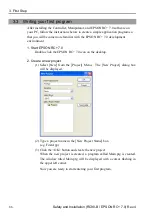
Page 100: ...dow of the EPSON RC 1 Start the EPSON RC 7 0 Double click the EPSON RC 7 0 icon on the desktop 2 Create a new project 1 Select New from the Project Menu The New Project dialog box will be displayed 2 Type a project name in the New Project Name box e g FirstApp 3 Click the OK button and create the new project 3 Open the robot manager EPSON RC 7 0 menu Tools Robot Manager ...

Page 101: ...k that the Control Panel tab is open Click the MOTOR ON button 5 Move the manipulator with Jog motion 1 Select Jog Teach tab 2 Select Joint in Jogging Mode 3 Move the manipulator by joint by clicking J1 J4 jog keys Manipulator can be moved by setting to other modes or setting the jog distance ...

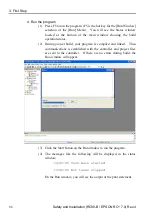
Page 102: ...nt environment 1 Start EPSON RC 7 0 Double click the EPSON RC 7 0 icon on the desktop 2 Create a new project 1 Select New from the Project Menu The New Project dialog box will be displayed 2 Type a project name in the New Project Name box e g FirstApp 3 Click the OK button and create the new project When the new project is created a program called Main prg is created The window titled Main prg wil...

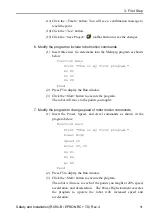
Page 103: ...3 First Step Safety and Installation RC90 B EPSON RC 7 0 Rev 4 87 3 Edit the program Type the following program lines in the Main prg edit window Function main Print This is my first program Fend ...

Page 104: ...atus 2 During project build your program is compiled and linked Then communications is established with the controller and project files are sent to the controller If there are no errors during build the Run window will appear 3 Click the Start button on the Run window to run the program 4 The messages like the following will be displayed in the status window 19 32 45 Task main started 19 32 45 Al...

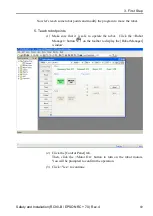
Page 105: ... move the robot 5 Teach robot points 1 Make sure that it is safe to operate the robot Click the Robot Manager button on the toolbar to display the Robot Manager window 2 Click the Control Panel tab Then click the Motor On button to turn on the robot motors You will be prompted to confirm the operation 3 Click Yes to continue ...

Page 106: ...p jogging Move the robot until it reaches the middle of the work envelope 7 Click the Z button to lower the Z axis of the robot 8 Select P1 in the Point P dropdown list which is next to the Teach button The current point is set to P1 9 Click the Teach button You will see a confirmation message to teach the point 10 Click the Yes button 11 Click the X button to jog the robot in the X direction 12 S...

Page 107: ... to display the Run window 3 Click the Start button to execute the program The robot will move to the points you taught 7 Modify the program to change speed of robot motion commands 1 Insert the Power Speed and Accel commands as shown in the program below Function main Print This is my first program Power High Speed 20 Accel 20 20 Go P1 Go P2 Go P0 Fend 2 Press F5 to display the Run window 3 Click...

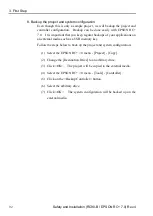
Page 108: ...ackups of your applications on an external media such as a USB memory key Follow the steps below to back up the project and system configuration 1 Select the EPSON RC 7 0 menu Project Copy 2 Change the Destination Drive to an arbitrary drive 3 Click OK The project will be copied to the external media 4 Select the EPSON RC 7 0 menu Tools Controller 5 Click on the Backup Controller button 6 Select t...

Page 109: ...peration 12 I O Remote Set Up I O EPSON RC 7 0 User s Guide I O Setup ROBOT CONTROLLER RC90 RC90 B EPSON RC 7 0 manual Setup Operation 11 I O Connector Setup Operation 13 2 Expansion I O Board Option Fieldbus I O Option ROBOT CONTROLLER RC700 RC90 Option Fieldbus I O Board 4 1 2 Ethernet EPSON RC 7 0 User s Guide Ethernet Communication ROBOT CONTROLLER RC90 RC90 B EPSON RC 7 0 manual Setup Operati...

Page 110: ...OT CONTROLLER RC90 RC90 B EPSON RC 7 0 manual Setup Operation 7 LAN Ethernet Port 4 3 Connection of Option Teaching Pendant Robot Controller RC90 RC90 B EPSON RC 7 0 manual Setup Operation 8 TP Port ROBOT CONTROLLER RC700 RC90 Option Teach Pendant TP1 Function Installation 3 Installation ROBOT CONTROLLER RC700 RC90 Option Teach Pendant TP2 Function Installation 3 Installation ...

Page 111: ...spection points are divided into five stages daily monthly quarterly biannual and annual The inspection points are added every stage If the Manipulator is operated for 250 hours or longer per month the inspection points must be added every 250 hours 750 hours 1500 hours and 3000 hours operation Inspection Point Daily Monthly Quarterly Biannual Annual Overhaul replacement 1 month 250 h Inspect ever...

Page 112: ...nspection Point Inspection Place Daily Monthly Quarterly Biannual Annual Check motion range Each joint Check whether unusual sound or vibration occurs Whole Measure the accuracy repeatedly by a gauge Whole Turn ON and OFF the Brake Release switch and check the sound of the electromagnetic brake If there is no sound replace the brake Brake ...

Page 113: ...olts Bolts screws around shaft Bolts screws securing motors reduction gear units etc Check looseness of connectors If the connectors are loosen push it securely or tighten External connectors on Manipulator on the connector plates etc Manipulator cable unit Visually check for external defects Clean up if necessary External appearance of Manipulator External cables Check for bends or improper locat...

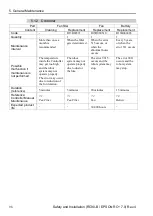
Page 114: ...r when the error 511 occurs Possible malfunction if maintenance is not performed The temperature inside the Controller may get too high and the robot system may not operate properly The error may occur due to reduction of the fun rotation The robot system may not operate properly due to dust or the like The error 9015 occurs and the robot system may stop The error 9011 occurs and the robot system ...

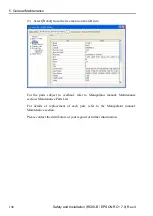
Page 115: ...nd maximum acceleration deceleration in continuous operation However it may vary depending on usage condition and the load applied on the Manipulator The recommended replacement time for the parts subject to maintenance motors reduction gear units and timing belts can be checked in the Maintenance dialog box of the EPSON RC 7 0 For details refer to the following manual Robot Controller RC90 RC90 B...

Page 116: ...the tree menu on the left side For the parts subject to overhaul refer to Manipulator manual Maintenance section Maintenance Parts List For details of replacement of each part refer to the Manipulator manual Maintenance section Please contact the distributors of your region for further information ...

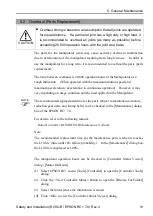
Page 117: ...es as shown below Bolt Tightening Torque M2 5 1 4 N m 14 kgf cm M3 2 0 N m 21 kgf cm M4 4 0 N m 41 kgf cm M5 8 0 N m 82 kgf cm M6 13 0 N m 133 kgf cm M8 32 0 N m 326 kgf cm M10 58 0 N m 590 kgf cm M12 100 0 N m 1 020 kgf cm Refer below for the set screw Set Screw Tightening Torque M3 0 7 N m 7 1 kgf cm M4 2 5 N m 26 kgf cm M5 3 9 N m 40 kgf cm The bolts aligned on a circumference should be fastene...

Page 118: ...tions below If grease gets into your eyes Flush them thoroughly with clean water and then see a doctor immediately If grease gets into your mouth If swallowed do not induce vomiting See a doctor immediately If grease just gets into your mouth wash out your mouth with water thoroughly If grease gets on your skin Wash the area thoroughly with soap and water Greasing part Greasing Interval Joint 1 Re...

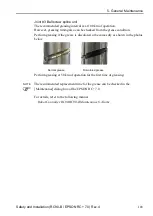
Page 119: ...he grease condition Perform greasing if the grease is discolored or becomes dry as shown in the photos below Normal grease Discolored grease Perform greasing at 50 km of operation for the first time of greasing The recommended replacement time for the grease can be checked in the Maintenance dialog box of the EPSON RC 7 0 For details refer to the following manual Robot Controller RC90 RC90 B Maint...

Page 120: ...f the terminal contacts with the other metals it may short and result in heat generation leakage explosion or inflammation WARNING Do not connect or disconnect the motor connectors while the power to the robot system is turned ON Connecting or disconnecting the motor connectors with the power ON is extremely hazardous and may result in serious bodily injury as the Manipulator may move abnormally a...

Page 121: ... loss Make sure to use the designated lithium battery The recommended replacement time for the battery can be checked in the Maintenance dialog box of the EPSON RC 7 0 For details refer to the following manual Robot Controller RC90 RC90 B Maintenance 6 Alarm The battery may run out if it passes the recommended replacement time Be sure to use the designated lithium battery Be sure to set the correc...

Page 122: ...ment software Safety Robot System Operation and Configuration Operation of Program Development Software EPSON RC GUI SPEL Language and Application Configuration of Robot I O Communication EPSON RC 7 0 SPEL Language Reference This manual contains information on the SPEL programming language Details of the commands Error Messages Precaution of EPSON RC 4 0 5 0 6 0 Compatibility Software Options Foll...

Page 123: ...and Setup Backup and Restore Maintenance Verifying Robot System Operation Error Codes Controller Options This manual indicates descriptions of the Controller option PG Motion System Fieldbus I O Teach Pendant TP1 Teach Pendant TP2 Manipulator SCARA ROBOT LS B series manipulators The manipulator manuals contain information on SCARA robots LS20 B LS10 B LS6 B LS3 B series manipulators Safety Specifi...

Page 124: ...ion RC90 B EPSON RC 7 0 Rev 4 7 Directives and Norms These products conform to the following directives and norms For more details of controller and manipulator please refer to each manual Product Name Model Controller RC90 B Manipulator LS B series ...

Page 125: ...n EN ISO 10218 1 2011 Robots and robotic devices Safety requirements for industrial robots Part 1 Robots EN 60204 1 2006 A1 2009 Safety of machinery Electrical equipment of machines Part 1 General requirements EN ISO 13849 1 2015 Safety of machinery Safety related parts of control systems Part 1 General principles for design EN ISO 13850 2015 Safety of machinery Emergency stop function principles ...

Page 126: ...7 Directives and Norms 110 Safety and Installation RC90 B EPSON RC 7 0 Rev 4 ...
Reviews: