background image

Appendix

Options and Consumable Products

The following options and consumable products are available for use with your printer. (As of December, 2013)

For the latest information, see the Epson Web site.

Ink cartridges

*

Printer model

Product name

Product number

SC-F2000

Ink cartridges
(600 ml)

Black

T7251

Cyan

T7252

Magenta

T7253

Yellow

T7254

White

T725A

Ink cartridges
(250 ml)

Black

T7301

Cyan

T7302

Magenta

T7303

Yellow

T7304

White

T730A

SC-F2080

Ink cartridges
(600 ml)

Black

T7261

Cyan

T7262

Magenta

T7263

Yellow

T7264

White

T726A

Ink cartridges
(250 ml)

Black

T7311

Cyan

T7312

Magenta

T7313

Yellow

T7314

White

T731A

* Epson recommends the use of genuine Epson ink cartridges. Epson cannot guarantee the quality or reliability of
non-genuine ink. The use of non-genuine ink may cause damage that is not covered by Epson’s warranties, and under
certain circumstances, may cause erratic printer behavior. Information about non-genuine ink levels may not be
displayed, and use of non-genuine ink is recorded for possible use in service support.

SC-F2000 Series     User’s Guide

Appendix

87

Summary of Contents for SC-F2000 Series

Page 1: ...User s Guide CMP0006 02 EN ...

Page 2: ...umable products other than those designated as Original Epson Products or Epson Approved Products by Seiko Epson Corporation SeikoEpsonCorporationshallnotbeheldliableforanydamageresultingfromelectromagneticinterferencethatoccursfromtheuseofanyinterfacecables other than those designated as Epson Approved Products by Seiko Epson Corporation EPSON EPSON EXCEED YOUR VISION EXCEED YOUR VISION and their...

Page 3: ...ot be Printed 31 Notes on Transmitting and Receiving Data 31 From Photoshop Illustrator 32 From other software applications 32 Load the T shirt media 32 Replacing the Platen 32 Loading on the Platen 33 Adjusting the Height 35 Starting and Canceling Printing 37 Starting 37 Canceling 37 Post treatment 38 Removing the T shirt 38 Fixating the Ink 38 Other Printing Methods Printing from a USB Memory St...

Page 4: ...s 87 Notes When Moving or Transporting the Printer 89 Preparing to Move 89 Setting up the Printer After Moving 90 Transporting the Printer 90 System Requirements 91 Specifications Table 91 Standards and Approvals 93 Where To Get Help Technical Support Web Site 94 Contacting Epson Support 94 Before Contacting Epson 94 Help for Users in North America 95 Help for Users in Europe 95 Help for Users in ...

Page 5: ...r the base units of cordless telephones Use only the type of power source indicated on the product s label Use only the power cord that comes with this product Use of another cord may result in fire or electric shock Do not use a damaged or frayed power cord If you use an extension cord with this product make sure the total ampere rating of the devices plugged into theextension cord doesnot exceed...

Page 6: ...lugs unnecessary but care is needed to prevent the ink from staining items that the cartridge touches Do not touch the ink supply port or surrounding area Note on this Guide Meaning of Symbols Warning Warnings must be followed to avoid serious bodily injury Caution Cautions must be followed to avoid bodily injury cImportant Important must be followed to avoid damage to this product Note Notes cont...

Page 7: ...Replacing and Shaking Cartridges on page 58 D Platen A plate for loading T shirts In addition to the one supplied with the printer three more sizes are available as options U Options and Consumable Products on page 87 E Movable base Moves backwards and forwards when printing starts or when you press the button F Parallel adjustment plate A plate that supports the platen Insert the platen here SC F...

Page 8: ...usting the angle of the fixing lever on page 36 I Cartridge cover right Open when replacing or shaking ink cartridges U Replacing and Shaking Cartridges on page 58 J Tool storage space Stores tools such as the supplied tweezers Do not place anything in here when moving or transporting the printer K Ink cartridges Install ink cartridges into all slots L Control panel U Control panel on page 13 SC F...

Page 9: ...gmaintenanceandsoon otherwise amalfunction could occur C Flushing pad The ink is ejected to here during flushing The flushing pad is a consumable product Replace it if a message is displayed U Replacing the Head Cleaning Set on page 52 D Air filter The air from the printer passes through this filter during operation Replace it if a message is displayed U Cleaning the scale and replacing the filter...

Page 10: ...d U Replacing the Head Cleaning Set on page 52 G Suction cap Sucks out the ink during head cleaning to unclog the nozzles H Wiper unit Wipes the ink from the print head nozzles The wiper unit is a consumable product Replace it if a message is displayed U Replacing the Head Cleaning Set on page 52 SC F2000 Series User s Guide Introduction 10 ...

Page 11: ...holder A holder to fix the waste ink bottle to the printer E Waste ink bottle A bottle for collecting waste ink When the waste ink reaches the line on the bottle replace it with a new waste ink bottle F Waste ink tube Insert this into the waste ink outlet and the waste ink bottle Make sure this is always attached to the printer and inserted into the waste ink bottle when using the printer G Waste ...

Page 12: ...nected Flashing Receiving data J Status light Indicates the network transmission speed by the color of the light Green 10Base T Red 100Base T K USB port Connect the USB cable here L Air inlet Lets in the air to cool down the printer Do not block the air inlet SC F2000 Series User s Guide Introduction 12 ...

Page 13: ...ect Yes and then press the Z button If you press this button while a message or menu is displayed the message or menu is closed and you are returned to the Standby screen D Screen Displays the printer s status menus error messages and so on U Screen View on page 15 E button Operate movable base button Movesthemovablebasebackwardsandforwards Themovementdirectiondependsonthepositionofthebasebefore t...

Page 14: ... order menu setting item setting value U Menu Operations on page 69 J USB memory port Connect the USB memory stick here K x button Start button Starts printing L x light Start light Indicates if the printer is ready by lighting or flashing On The printer is ready to print Flashing Printing M button Maintenance button If you press this button the Maintenance menu is displayed You can perform a Nozz...

Page 15: ...ndicatorcorresponds to the remaining capacity The waste ink bottle is almost full Prepare a new waste ink bottle The waste ink bottle is full Replace the waste ink bottle with a new one F Ink cartridge status Displays the ink cartridge status and the approxi mate level of ink remaining The display changes as follows when the ink is low or an error occurs Normal Warning or Error 1 2 1 Status indica...

Page 16: ...ncrease productivity This reduces the time needed to replace ink cartridges You can also select 250 ml cartridges depending on the printer usage U Options and Consumable Products on page 87 High Reliability Ink circulation system A built in ink circulation system prevents malfunctions due to sedimentation of ink particles in the White ink tube Stable ink supply and print quality have been achieved...

Page 17: ...e specialized for pigment ink textile printing to achieve high quality output The easy to use graphical user interface increases efficiency To print on dark colored T shirts you need to print the white base first however the specialized software creates the base data automatically according to the simulated image for easy printing You can even calculate the basic costs by performing a simulation u...

Page 18: ...t stored correctly you may not be able to print properly the next time it is used As well as the following there are additional points to note when using White ink Check the following points U Notes on Handling White Ink on page 19 If the printer is not used for a long time with the power off perform the prolonged storage operation using the separately sold Cleaning cartridge If the printer is lef...

Page 19: ...ormation such as the remaining levels is managed by the IC chip to allow the cartridge to be continuously used after being removed and re installed If you remove an ink cartridge before it is empty wipe off any ink that is stuck on the ink supply port using the cleaning stick in the supplied maintenance kit If ink dries on the supply port it may leak when it is reinstalled Make sure that the suppl...

Page 20: ...surface may soften and stick Do not use a tumble drier Do not dry clean Turn the T shirt inside out before washing and then let it dry while inside out Do not use bleach It may cause discoloration Do not iron directly on the printed surface Do not expose to direct sunlight for extended periods of time Do not use organic solvents such as alcohol Do not rub the printed surface against vinyl chloride...

Page 21: ...o update the printer s firmware U Using EPSON LFP Remote Panel 2 on page 22 Epson Driver and Utilities Windows only Installs the Epson communication driver EPSON SC F2000 Series Comm Driver TheEpsoncommunicationdriverisnottheprinterdriver Ifyouconnecttheprintertoacomputer usingaUSBcablewithoutinstallingtheEpsoncommunicationdriver theprinter sstatusmaynot be displayed in Garment Creator or software...

Page 22: ...ications Windows The Epson communication driver is used as an example of uninstalling EPSON LFP Remote Panel 2 A Turn off the printer and unplug the interface cable B Click Programs Uninstall a program on the Control Panel C Select the software you want to remove and then click Uninstall Change or Change Remove Select EPSON SC F2000 Series Comm Driver Printer Uninstall to remove the Epson communic...

Page 23: ...apply the heat press to remove it U Pre treatment on page 26 Creating and transmitting data Create the data you want to print with a commercially available application and so on and then send it to the printer U Creating and transmitting data on page 31 Loading the T shirt media Load the T shirt on the printer U Load the T shirt media on page 32 Printing Check that the x light is on before you sta...

Page 24: ...Post treatment Fixate the ink to the T shirt U Post treatment on page 38 SC F2000 Series User s Guide Basic Printing 24 ...

Page 25: ...e pre treatment liquid to the T shirt U Options and Consumable Products on page 87 Pure water commercially available Pure water such as distilled and purified water is used to dilute the pre treatment liquid Pre treatment liquid roller option or commercially available This is used to apply pre treatment liquid to the T shirts Choose a roller with the roller section made of short polyester fiber wi...

Page 26: ...r Consult a physician if the skin appears irritated or is discolored If fluid enters your eyes rinse immediately with water Failure to observe this precaution could result in bloodshot eyes or mild inflammation If problems persist consult a physician If any enters your mouth consult a physician immediately Iffluidisswallowed donotforcethepersonto vomit and consult a physician immediately If the pe...

Page 27: ...ing the tap A Cut the cardboard along the perforations and then remove the tap from inside B Pull the cap section out of the hole in the cardboard cImportant Make sure you pull the cap section out of the hole in the cardboard If the cap is opened without being pulled out the pre treatment liquid may spill out C Remove the cap D Remove the tap from the bag and check that the hole is visible If you ...

Page 28: ...occurs after fixating the ink If you do not dilute the pre treatment liquid or make it too strong the liquid leaves noticeable traces or the printed surface cracks after washing the washing fastness deteriorates On the other hand if the pre treatment liquid is too weak White ink does not stay on the fabric and the whiteness cannot be achieved while traces from the pre treatment liquid become less ...

Page 29: ...eatment liquid evenly over the print surface We recommend applying to an area larger than the target print area Note You can apply the liquid evenly if you run the roller over the area after spraying C Fixate the pre treatment liquid with the heat press U Fixating the Pre treatment Liquid Heat Press on page 29 Note You need to press the fibers flat to produce even whiteness Use a heat press to fix...

Page 30: ...e pre treatmentliquid Whiteinkmaysinkinthewet sections and cause unevenness in color If the T shirt is left for an extended period of time in such conditions press for 5 to 10 seconds to dry it just before printing Note If traces of the pre treatment liquid are visible try washing in water however the effects depend on the material of the T shirt Preparing the Printer Check the printer s status be...

Page 31: ... Area L size platen 16 x 20 inch 406 x 508 mm M size platen 14 x 16 inch 356 x 406 mm S size platen 10 x 12 inch 254 x 305 mm Sleeve platen 4 x 4 inch 102 x 102 mm Notes on Transmitting and Receiving Data Note the following points when sending or receiving data You can only send data when the printer is not operating Only the following operations are possible while receiving data Turning off the p...

Page 32: ...ator The followingfileformats can be printedfromGarment Creator TIFF JPEG PNG BMP Load the T shirt media This section explains how to load a T shirt media into the printer This section explains how to load all platens except for sleeve platens For the method of loading sleeve platens see the manual supplied with the option Replacing the Platen There are four types of platen sizes The M size platen...

Page 33: ... front D Smooth out the print surface so that it is flat E Attach the platen frame again cImportant There may be lint on the T shirt if you have not applied pre treatment liquid Remove the lintusingthestickytapeorrollerandpressthe fibersflatusingthehardroller Lintandfibers may stick to the print head and stain other areas F Smooth out any creases and slack to make the printing surface flat SC F200...

Page 34: ...nd the frame so that it does not drape over the movable base If the height sensor reacts while printing If pre treatment liquid is not completely dry under certain printing conditions or with some T shirt materials the print surface may swell due to the absorbed ink and the height sensor may react in the middle of printing If this happens try placing the T shirt over the platen as shown in the fol...

Page 35: ...Start Height Adjustment T shirts From label 3 Thick material From label 8 To adjust the height again move the height adjustment lever to change the recommended position Note Labels are no longer displayed if you remove the labeled round part to print on thick fabrics U Removing the Labeled Round Part on page 41 D Tighten the fixing lever and then secure the height adjustment lever You can adjust t...

Page 36: ...Error is displayed under the following conditions label 2 is the appropriate height Label Position Platen Height Error Display P Error displayed 1 Error displayed 2 Error not displayed optimum height 3 Error not displayed cImportant If the print surface is too far from the print head the print quality declines and ink may smear on the inside of the printer Adjust the platen to its optimum height A...

Page 37: ...ess the button B Press the u d buttons to highlight Yes and then press the Z button Printing stops immediately when the button is pressed and data is deleted Canceling from a computer You can cancel from the printer s Garment Creator software However you cannot cancel once the computer has finished sending data to the printer Cancel from the printer See the Garment Creator online help for more det...

Page 38: ...ting color ink only If you are printing with only color ink the size of the printed area does not matter When using White ink to print an under base make sure the conditions for fixating White ink are met Temperature Time Pressure 1 170 C 45 secs 4 2 N cm2 1Theoptimumconditionsvarydependingonthetypeofheat press such as themanual adjustmenttype Besure to testthe ink fixation result in advance to fi...

Page 39: ... 180 C the T shirt and the print surface may change color Fixating White ink Type of Oven Temperature Time Batch type 160 C 5 minutes Conveyor type 160 C 4 5 minutes Temperature of the fixating surface of the T shirt Not the internal temperature Ifthe surface ofthe T shirtexceeds 180 C the T shirt and the print surface may change color SC F2000 Series User s Guide Basic Printing 39 ...

Page 40: ...o security functions such as encryption or passwords Memory capacity Up to 128 GB Partitions 1 Requirements for supported data Data name Up to 255 single byte characters Data size Up to 4 GB Number of data items Up to 256 prn files only Save the data in the root folder on the USB memory If thedataissavedinasub folder itisnotdisplayedevenif the USB memory stick is connected to the printer Data in t...

Page 41: ... for the number of copies displayed on the control panel To print different data click to cancel printing the current data Deleting To delete data from a USB memory stick select Delete Print File in step 4 from the Printing procedure and thenpresstheu dbuttonstoselectthedatayouwantto delete Follow the on screen instructions to continue Printing on Thick Material Media You can lower the height of t...

Page 42: ...t and must not be dropped G Remove the three screws inside the height adjustment lever Keep the removed screws in a safe place H Remove the height adjustment lever I Remove the labeled round part attached underneath the height adjustment lever cImportant After removing the labeled round part the current height position is not displayed When loading media follow the height adjustment procedure to a...

Page 43: ...stalling the Labeled Round Part Follow the steps for removing the labeled round part in reverse order and this time attach the round part and secure it with the screw When attaching the labeled round part align the protruding section on the round section with the hole as shown in the following illustration If this is not installed in the correct direction the height adjustment lever does not move ...

Page 44: ... page 45 Use light or medium for normal cleaning Use heavy cleaning if you could not clear the clogged nozzle after cleaning with light or medium several times Correcting the print misalignment Align the print head or adjust the platen feed if the printed results are misaligned or grainy U Correcting the print misalignment on page 46 Checking for clogged nozzles To maintain optimum print quality w...

Page 45: ...ress the u d buttons to highlight Nozzle Check and then press the r button D Press the Z button E Check that paper is loaded and then press the Z button again The check pattern is printed F Check the check pattern Because the Cleaning liquid rows are difficult to see in color ink mode it does not need to be checked Example of clean nozzles There are no gaps in the check pattern Example of clogged ...

Page 46: ...nd then press the r button Selected Nozzles Select this option when you have observed faint ormissingpartsinaspecificpattern nozzlerow in the check pattern You can select multiple nozzle rows All Nozzles Select this option when you have observed faint or missing parts in all patterns Go to step 5 after selecting All Nozzles D Select nozzle rows for cleaning Press the u d buttons to highlight the n...

Page 47: ...e Settings menu C Press the u d buttons to highlight Printer Setup and then press the r button D Press the u d buttons to select Head Alignment and then press the r button E Press the u d buttons to highlight the size of the installed platen and then press the r button F Press the Z button G Check that T shirt is loaded and then press the Z button again The check pattern is printed H Look at the p...

Page 48: ...ot necessary Only when the print result is not improved after repeating head cleaning several times U Tube Washing on page 56 Caps Cleaning When it is time to clean the suction cap a message is displayed on the control panel Suction cap When a message is displayed U Cleaning Caps on page 51 Scale cleaning When it is time to clean the carriage scale a message is displayed on the control panel When ...

Page 49: ...s If fluid adheres to your skin immediately wash it off using large volumes of soapy water Consult a physician if the skin appears irritated or inflamed If fluid enters your eyes rinse immediately with water Failure to observe this precaution could result in bloodshot eyes or mild inflammation If problems persist consult a physician If any enters your mouth consult a physician immediately Iffluidi...

Page 50: ... avoid storing in locations subject to high temperatures high humidity and direct sunlight A Remove the lid and the airtight seal from the ink cleaner B Pour an appropriate amount of ink cleaner into the cup supplied with the maintenance kit C Let the ink cleaner soak into the cleaning stick or cleaning cloth Makesurethatinkcleanerdoesnotdripfromthe cleaning stick or cleaning cloth D Wipe the part...

Page 51: ...ght Yes and then press the Z button When you press the Z button the platen and theprintheadmovetothemaintenanceposition D Open the printer cover E If there is a lump or film of waste liquid stuck to the suction cap remove it with the supplied pair of tweezers cImportant Do not rub the cap section hard If the cap is damaged air may leak and the print head may dry or become difficult to clean Do not...

Page 52: ...d on the control panel Prepare a new head cleaning set U Options and Consumable Products on page 87 Read the safety datasheet beforeuse Youcandownload the safety data sheet from the Epson Web site URL http www epson com cImportant Do not move the print head or the platen manually A malfunction may occur The printer has a built in system that warns you when the head cleaning set is running low Howe...

Page 53: ...ace the parts in the following order wiper unit anti drying caps and then flushing pad U Replacing the wiper unit anti drying caps on page 53 U Flushing pad on page 55 Replacing the wiper unit anti drying caps A Open the printer cover B Unpack the new wiper unit C Putontheglovessuppliedwiththeheadcleaning set D Place your fingers into the groove at the back of the wiper unit and raise it a little ...

Page 54: ...l you hear it click into place After installing the wiper unit replace the anti drying cap I Unpack the new anti drying cap and then remove the cover J Press the lever towards you and then lift the anti drying cap to remove it K Attach the cover to the old anti drying cap and then put it into the bag of the new anti drying cap U Disposing of Used Consumables and Optional Parts on page 50 L Press t...

Page 55: ... and wait until the waste ink stops dripping from the flushing pad If any waste ink drips into the printer make sure you clean it up E When the waste ink stops dripping put the flushingpad into the bagof thenewflushingpad U Disposing of Used Consumables and Optional Parts on page 50 F Attach the new flushing pad Insert the two teeth at the end of the pad into the holes in the printer and then pres...

Page 56: ...g on the remaining amount We also recommend having a new waste ink bottle ready because a message may prompt you to replace the waste ink bottle if there is not enough free space in the current bottle U Options and Consumable Products on page 87 Required new cartridges vary depending on the settings color and the printer s mode White ink mode Setting color New cartridge White ink White ink x2 Clea...

Page 57: ...intermaybecomeunable to print properly H Holding the cartridge with the label side facing out slide it all the way into the slot I Close the cartridge cover J Press the Z button Press the Z button to start charging the cleaning liquid K When the message on the control panel screen changes from indicating the cleaning is in progress to prompting you to open the cartridge cover follow the on screen ...

Page 58: ...ink cartridges Epson cannot guarantee the quality or reliability of nongenuine ink The use of non genuine ink may cause damage that is not covered by Epson s warranties and under certain circumstances may cause erratic printer behavior Information about non genuine ink levels may not bedisplayed anduseofnon genuineinkisrecorded for possible use in service support A Make sure the printer is on B Op...

Page 59: ... need to replace or shake another ink cartridge repeat steps 3 to 5 cImportant Installinkcartridgesinto allslots Theprinter cannot print unless ink cartridges are installed in all slots F Close the cartridge cover Disposing of Waste Ink When to dispose of waste ink When the following message is displayed on the control panel we recommend replacing the waste ink bottle as soon as possible Prepare e...

Page 60: ...ink bottle while printing cleaning the print head or carrying out the following maintenance procedures Waste ink may leak Tube Washing Replace White Ink Prolonged Storage The printer calculates the amount of waste ink and displays a warning message when it is close to the limit If the waste ink bottle is filled up while printing replace it with a new waste ink bottle and then press the Z button as...

Page 61: ...on If you replace the bottle before the replacement message is displayed on the control panel press the button and reset the Waste Ink Counter U Using the Control Panel Menu on page 69 F Check once again that the new waste ink bottle is installed correctly Press the Z button to clear the waste ink counter Cleaning the scale and replacing the filter Whenitistimetocleanthecarriagescaleandreplacethe ...

Page 62: ...ed by the print head cImportant Do not pull the carriage scale with excessive force If it is pulled with too muchforce therightsectionmaydetach Make sure that ink cleaner does not drip into the printer If any cleaner does drip wipe it with a dry cleaning cloth Only use the cleaningcloth supplied with the air filter to wipe away ink Do not use another cloth Do not rub the carriage scale too hard If...

Page 63: ...orming cap cleaning fibers such as lint may have accumulated around the print head nozzles cImportant Do not move the print head or the platen manually A malfunction may occur Buttons that are used in the following operations A Let theinkcleanersoakintoanew largecleaning stick U Using ink cleaner on page 50 B Confirm that the printer is on and then press the button The Maintenance menu is displaye...

Page 64: ... shown below with the cleaning stick A malfunction may occur 1 Wipe the edges at the front and rear of the nozzle surface 2 Wipe the parts on the left and right of the nozzle surface H Once fibers have been wiped away remove the tray or paper that you placed on the movable base I Close the printer cover and then press the Z button When the print head returns to its normal position the Settings men...

Page 65: ...ccur Immediately turn off the printer and disconnect the power cable from the electrical outlet and contact your local dealer cImportant Do not move the print head or the platen manually A malfunction may occur A Check that the platen is inside the printer If it is not inside press the button to move the platen into the printer B Turn off the printer C Open the printer cover D Wipe the border of t...

Page 66: ...ed in the following operations A Confirm that the printer is on and then press the button The Maintenance menu is displayed B Press the d u buttons to highlight Replace White Ink and then press the r button C Press the d u buttons to highlight Yes and then press the Z button D See the ink cartridge replacement procedure and replacetheWhiteinkwiththeCleaningliquid or the Cleaning liquid with the Wh...

Page 67: ...hen press the button The Maintenance menu is displayed B Press the d u buttons to highlight Prolonged Storage and then press the r button C Press the d u buttons to highlight Yes and then press the Z button D See the ink cartridge replacement procedure and replace color ink or White ink with Cleaning liquid U Replacing and Shaking Cartridges on page 58 E When the replacement is complete a message ...

Page 68: ...d thescreen has turned off and then unplug the power cable from the electrical outlet C Use a soft clean cloth to carefully remove any dust or dirt If there is a serious dirt problem clean it using a soft clean cloth dampened with water and a smallamountofdetergentandwrungtight Then wipe off moisture with a dry soft cloth cImportant Never use any volatile liquid such as benzene thinners or alcohol...

Page 69: ...nu The Maintenance Mode is not displayed by using the menu operations mentioned above Menu operations after starting are the same as the above Starting Hold downthe button andthen holddown thePbutton When theP light islit release the P buttononly Release the button when the Maintenance Mode menu is displayed Ending Maintenance Mode ends when you turn off the printer SC F2000 Series User s Guide Us...

Page 70: ...ected Nozzles Execute Light Execute Medium Execute Heavy All Nozzles Execute Light Execute Medium Execute Heavy Tube Washing White Ink Color Ink Head Cleaning Set Yes No Caps Cleaning Yes No Cleaning around head Yes No Waste Ink Counter Replace White Ink Yes No Prolonged Storage Yes No Printer Setup U Printer Setup on page 74 Head Alignment 14 16 10 12 16 20 Offset Head Alignment 10 to 10 Feed Adj...

Page 71: ...SM DG Print Status Sheet Print Restore Settings Yes No Preferences Date Time YY MM DD HH MM MM DD YY HH MM Language Japanese English French Italian German Portuguese Spanish Dutch Russian Korean Chinese Unit Length m ft in Reset All Settings Yes No Menu Setting Item Setting Maintenance Mode U Maintenance Mode on page 77 Custom XXX Sleep Mode OFF 5 to 180 minutes later Reset All Settings Yes No SC ...

Page 72: ...gisperformedaccordingtothesettingsinthe software When Uni Directional is selected the print head prints in one direction only Print quality improves but print speed decreases Try using Uni Directional if you notice any print misalignments or unevenness in color and so on Uni Directional Delete Print File If the data on the connected USB memory stick is supported the name of the data file is displa...

Page 73: ...ge U Tube Washing on page 56 Color Ink Head Cleaning Set Yes Movestheplatenandprintheadtothemaintenanceposition Make sure you select this menu before replacing the head cleaning set If you replace without using this menu the remaining amount in the head cleaning set is not displayed correctly Problems can also occur if you move the print head manually U Replacing the Head Cleaning Set on page 52 N...

Page 74: ... 0 1 Use this setting if you want to print without performing Head Alignment when you cannot adjust the height of the platen correctly because of an uneven print surface such as a pocket 3 is the equivalent adjustment value to lowering the platen s height by one step with the height adjustment lever Perform Head Alignment to further correct misalignment in the image The setting you make in this op...

Page 75: ...he remaining amount for each color The level of remaining ink is reset automatically when you replace an ink cartridge Head Cleaning Set Displays the remaining amount for the head cleaning set Firmware Version xxxxxxx x xx xxxx Displays the printer s firmware version Print Status Sheet Print Prints a list of the current setting statuses for the printer Choose this option to view settings at a glan...

Page 76: ...ed to the printer If connected data may be overwritten or the print results may not be as expected See the following for information on loading paper U Loading paper on page 44 Restore Settings Yes Reverts all setting values for Network Setup to their default values No 1 Preferences Date Time YY MM DD HH MM MM DD YY HH MM Set the printer s built in clock The time is used when printing the job log ...

Page 77: ...when there are noerrors noprintjobsbeingreceived andnocontrolpanelor other operations are performed for the selected period Use this option to choose the period before the printer enters sleep mode When the printer enters sleep mode the control panel s screen turns off and the internal motors and other parts switch off to consume less power The screen display returns if a button is pressed on the ...

Page 78: ...ns and Consumable Products on page 87 Headcleaningsetisnearingendof life Itisnearlytimetoreplacetheheadcleaningset wiperunit anti dryingcaps andflushing pad Although you can continue printing make sure you have a new head cleaning set ready U Options and Consumable Products on page 87 Head Cleaning Set Life Replace head cleaning set ZPress Z to move platen back then start replacement It is time to...

Page 79: ...gain contact your dealer or Epson Support Command Error Check print settings on RIP Press the button and cancel the print job Check that the installed RIP software is compatible with the printer Information Some time has passed since operation began Finish task quickly nozzle check is recommended once task is complete 10 minutes or more has passed since you started cap cleaning or head cleaning se...

Page 80: ...occurs When a call for service has occurred the printer automatically stops printing Turn off the printer disconnect the power cable both from the outlet and from the printer and then reconnect Turn the printer on and off several times If the same call for service is displayed on the LCD panel contact your dealer or Epson Support for assistance Tell them the call for service code is XXXX SC F2000 ...

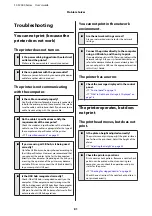
Page 81: ... hub is recognized correctly on the computer If the computer correctly recognizes the USB hub disconnect all USB hubs from the computer and connect the printer directly to the computer s USB port Contact the USB hub manufacturer to find out more about USB hub operations You cannot print in the network environment o Are the network settings correct Ask your network administrator for the network set...

Page 82: ...times does not clear the problem U Cleaning the platen path for the print head on page 65 Print results are not what you expected Print quality is poor uneven too light or too dark or there are lines in the prints o Are the print head nozzles clogged If the nozzles are clogged the corresponding colors donotfireandtheprintqualitydeclines Printanozzle check pattern U Checking for clogged nozzles on ...

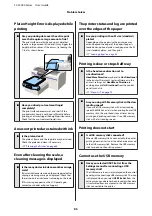
Page 83: ...ktoremainonthesurface of the T shirt misalignment appears as lines in Auto bi directional printing depending on the unevenness of the T shirt surface If this occurs perform Head Alignment U Correcting the print misalignment on page 46 If the problem is not cleared even after performing HeadAlignment changetheprintheadmovementto uni directional from the printer s Garment Creator software or the con...

Page 84: ...nded period dry it for several seconds in the heat press before printing U Fixating the Pre treatment Liquid Heat Press on page 29 o Have you optimized the temperature and pressure of the heat press The temperature of the heat press decreases when you press a T shirt that has had pre treatment liquid applied When pressing several T shirts one after another check that the temperature of the heat pr...

Page 85: ...y extend beyond the edges of the paper if paper is loaded on an optional platen Load paper on the M size standard platen and then print U Loading paper on page 44 Printing is slow or stops half way o Is the head move direction set to uni directional HeadMove Direction may be set to Uni Directional in the printer s Garment Creator software or in the printer s settings Set Head Move Direction to any...

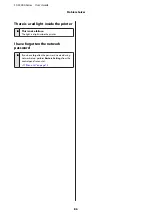
Page 86: ...light is a light inside the printer I have forgotten the network password o If you have forgotten the password created during network setup perform Restore Settings from the control panel s menu list U Menu List on page 70 SC F2000 Series User s Guide Problem Solver 86 ...

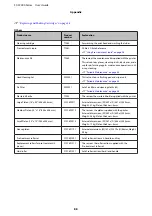
Page 87: ...SC F2080 Ink cartridges 600 ml Black T7261 Cyan T7262 Magenta T7263 Yellow T7264 White T726A Ink cartridges 250 ml Black T7311 Cyan T7312 Magenta T7313 Yellow T7314 White T731A Epson recommends the use of genuine Epson ink cartridges Epson cannot guarantee the quality or reliability of non genuine ink The use of non genuine ink may cause damage that is not covered by Epson s warranties and under c...

Page 88: ...ge 48 Waste Ink Bottle T7240 Thesameasthewasteinkbottlesuppliedwiththeprinter Large Platen 16 x 20 406 x 508 mm C12C890911 External dimensions W 439 x D 541 x H 52 mm Weight 3 7 kg Platen thickness 8 mm Medium Platen 14 x 16 356 x 406 mm C12C890912 The same as the platen supplied with the printer External dimensions W 389 x D 439 x H 50 mm Weight 2 6 kg Platen thickness 8 mm Small Platen 10 x 12 2...

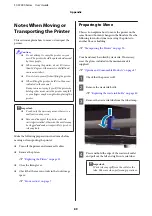
Page 89: ...ations in advance before moving or transporting the printer Turn off the printer and remove all cables Remove the platen U Replacing the Platen on page 32 Close the fixing lever Check that there are no tools in the tool storage space U Front section on page 7 Preparing to Move This section explains how to move the printer on the samefloorwithoutanychangesinthefloorlevel Seethe following for instru...

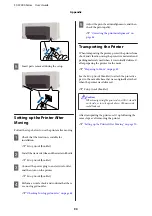
Page 90: ...ecting the print misalignment on page 46 Transporting the Printer When transporting the printer protect the printer from shock and vibration using the protective materials and packing materials used when it was initially delivered after preparing the printer for the move U Preparing to Move on page 89 See the Setup Guide booklet to attach the protective part to the movable base that were originall...

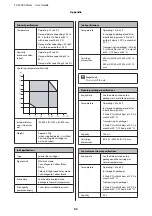
Page 91: ...d USB Compati ble with the USB 2 0 Specification Rear for connecting with a com puter Front for a USB memory de vice Ethernet 10BASE T 100BASE TX Display resolution XGA 1024 x 768 or higher Specifications Table Printer Specifications Printing method On demand ink jet Nozzle configuration White ink mode White 720 nozzles x 2 Color 360 nozzles x4 colors Color ink mode 360 nozzles x4 colors High spee...

Page 92: ... C In storage in package and after installation in printer 20 to 40 C within 4 days at 20 C a month at 40 C Transporting in package 20 to 60 C within 4 days at 20 C a month at 40 C 72 hours at 60 C Cartridge dimensions 600 ml W 40 x D 305 x H 110 mm 250 ml W 40 x D 200 x H 110 mm cImportant Do not refill the ink Cleaning cartridge specifications Expiry date See the date printed on the package at n...

Page 93: ... at 40 C 72 hours at 60 C Capacity 150 ml Standards and Approvals Safety UL 60950 1 CAN CSA C22 2 No 60950 1 Low Voltage Directive 2006 95 EC EN 60950 1 EMC FCC part 15 subpart B Class A CAN CSA CEI IEC CISPR 22 Class A AS NZS CISPR 22 Class A EMC Directive 2004 108 EC EN 55022 Class A EN 55024 EN 61000 3 2 EN 61000 3 3 Warning This is a class A product In a domestic environment this product may c...

Page 94: ...atingproperly andyou cannot solve the problem using the troubleshooting information in your product documentation contact Epson support services for assistance If Epson support foryourareaisnotlistedbelow contactthedealerwhere you purchased your product Epson support will be able to help you much more quickly if you give them the following information Product serial number Theserialnumberlabelisus...

Page 95: ...ore com U S sales or http www epson ca Canadian sales Help for Users in Europe Check your Pan European Warranty Document for information on how to contact Epson support Help for Users in Australia Epson Australia wishes to provide you with a high level of customer service In addition to your product documentation we provide the following sources for obtaining information Your Dealer Don t forget t...

Page 96: ... services are World Wide Web http www epson co th Information on product specifications drivers for download Frequently Asked Questions FAQ and e mail are available Epson Hotline Phone 66 2685 9899 Our Hotline team can help you with the following over the phone Sales enquiries and product information Product usage questions or problems Enquiries on repair service and warranty Help for Users in Vie...

Page 97: ...n Product information Answers to Frequently Asked Questions FAQs Latest versions of Epson product drivers Users can access our World Wide Web home page at http www epson com hk Technical Support Hotline You can also contact our technical staff at the following telephone and fax numbers Phone 852 2827 8911 Fax 852 2827 4383 Help for Users in Malaysia Contacts for information support and services ar...

Page 98: ...M 9PM This is aToll free number For Service CDMA Mobile Users 3900 1600 9AM 6PM Prefix local STD code Help for Users in the Philippines To obtain technical support as well as other after sales services users are welcome to contact the Epson Philippines Corporation at the telephone and fax numbers and e mail address below Trunk Line 63 2 706 2609 Fax 63 2 706 2665 Helpdesk Direct Line 63 2 706 2625...

Page 99: ...red owned by or assigned to Apple and ii that cover subject matter contained in the Original Code but only to the extent necessary to use reproduce and or distribute the Original Code without infringement and b in the case where You are the grantor of rights i claims of patents that are now or hereafter acquired owned by or assigned to You and ii that cover subject matter in Your Modifications tak...

Page 100: ... in the Original Code that refer to this License and b You must include a copy of this License with every copy of Source Code of Covered Code and documentation You distribute or Externally Deploy and You may not offer or impose any terms on such Source Code that alter or restrict this License or the recipients rights hereunder except as permitted under Section 6 2 2 Modified Code You may modify Co...

Page 101: ...lf of Apple or any Contributor You must obtain the recipient s agreement that any such Additional Terms are offered by You alone and You hereby agree to indemnify defend and hold Apple and every Contributor harmless for any liability incurred by or claims asserted against Apple or such Contributor by reason of any such Additional Terms 7 Versions of the License Apple may publish revised and or new...

Page 102: ...odifications under this License or on different terms from those contained in this License or may choose not to license them at all 12 Termination 12 1 Termination This License and the rights granted hereunder will terminate a automatically without notice from Apple if You fail to comply with any term s of this License and fail to cure such breach within 30 days of becoming aware of such breach b ...

Page 103: ...r other dispute resolution between You and Apple relating to this License shall take place in the Northern District of California and You and Apple hereby consent to the personal jurisdiction of and venue in the state and federal courts within that District with respect to this License The application of the United Nations Convention on Contracts for the International Sale of Goods is expressly ex...

Page 104: ...above copyright notice definition disclaimer and this list of conditions in documentation and or other materials provided with the distribution The sole exception to this condition is redistribution of a standard UnZipSFX binary including SFXWiz as part of a self extracting archive that is permitted without inclusion of this license as long as the normal SFX banner has not been removed from the bi...

Reviews: