background image

User's Guide

CMP0208-00 EN

Summary of Contents for SC-F500 Series

Page 1: ...User s Guide CMP0208 00 EN ...

Page 2: ...son Approved Products by Seiko Epson Corporation SeikoEpsonCorporationshallnotbeheldliableforanydamageresultingfromelectromagneticinterferencethatoccursfromtheuseofanyinterfacecables other than those designated as Epson Approved Products by Seiko Epson Corporation EPSON EPSON EXCEED YOUR VISION EXCEED YOUR VISION and their logos are registered trademarks or trademarks of Seiko Epson Corporation Mi...

Page 3: ...ving Roll Paper 29 Loading and Removing Paper from the Auto Sheet Feeder 31 Installing and removing the paper stacker 31 Loading paper into the auto sheet feeder 31 Removing paper from the auto sheet feeder 33 Loading and Removing Cut Sheet 1 sheet 34 Loading Cut Sheet 1 sheet 34 Removing Cut Sheet 1 Sheet 34 Setting Loaded Paper 35 For Roll Paper 35 For Auto Sheet Feeder Cut Sheet 1 sheet 37 Opti...

Page 4: ...ng 118 You cannot print because the printer does not work 118 The printer operates but nothing prints 120 The prints are not what you expected 121 Feeding or ejecting problems 125 Others 128 Appendix Options and Consumable Products 129 Epson Special Media 129 Ink bottles 129 Others 129 Supported Media 131 Epson Special Media Table 131 Printable area 132 Roll Paper 132 Cut sheets Auto sheet feeder ...

Page 5: ... below You can view the PDF manuals using Adobe Acrobat Reader or Preview Mac Setup Guide booklet Provides information on how to setup the printer after unpackingitfromthebox Make sure you read this manual to perform operations safely Operator s Guide PDF Provides selected information on how to use the printer and frequently used features of the printer General Information PDF Provides important s...

Page 6: ...lbar For Mac Select Find in the Edit menu to open the search toolbar F To enlarge the text in the display that is too small to see well click Click to reduce the size To specify a part of an illustration or screenshot to enlarge do the following For Windows Right click on the page in the PDF manual and select Marquee Zoom in the menu that is displayed The pointer changes to a magnifying glass use ...

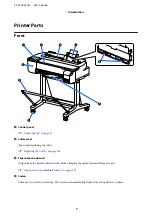
Page 7: ...ter on page 114 C Paper basket optional Output from the printer collects in this basket keeping the media clean and free of creases U Options and Consumable Products on page 129 D Casters There are two casters on each leg The casters are normally kept locked once the printer is in place SC F500 Series User s Guide Introduction 7 ...

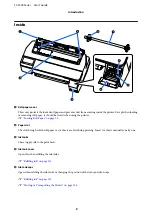
Page 8: ...n angle G Auto Sheet Feeder You can load multiple cut sheets of A4 to A3 paper The loaded paper is fed automatically allowing you to print continuously U Loading paper into the auto sheet feeder on page 31 H Cut sheet cover Open when using the auto sheet feeder or when loading cut sheet paper U Loading Cut Sheet 1 sheet on page 34 When loading roll paper open this cover and then open the roll pape...

Page 9: ...lot through which roll paper or cut sheets are fed during printing Insert cut sheets manually one by one C Ink tanks These supply ink to the print head D Ink tank cover Open this when refilling the ink tanks U Refilling ink on page 111 E Ink tank caps Open when refilling the ink tanks or changing the position of the transportation caps U Refilling ink on page 111 U Moving or Transporting the Print...

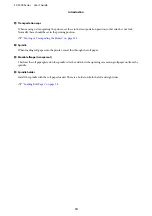
Page 10: ...e 134 G Spindle When loading roll paper into the printer insert this through the roll paper H Movable flange transparent This fixes the roll paper placed onthe spindle Attachor detachit when placingorremoving rollpaperon fromthe spindle I Spindle holder Install the spindle with the roll paper loaded There is a holder on both the left and right sides U Loading Roll Paper on page 26 SC F500 Series U...

Page 11: ...cting waste ink U Replacing Maintenance Box on page 113 C AC inlet Connect the supplied power cable here D LAN port Connects the LAN cable E Status light green orange The color indicates the network transmission speed Off 10BASE T Orange 100BASE TX Green 1000BASE T SC F500 Series User s Guide Introduction 11 ...

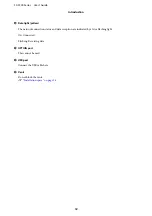
Page 12: ...eption are indicated by a lit or flashing light On Connected Flashing Receiving data G OPTION port This cannot be used H USB port Connect the USB cable here I Vents Do not block the vents U Installation space on page 16 SC F500 Series User s Guide Introduction 12 ...

Page 13: ... of Home screen operations U Operator s Guide PDF A Information display area Displays the printer s status error messages and so on B Roll paper information area When roll paper is loaded Displays information on the loaded roll paper When SetupissettoOn theapproximateremainingamount remaining length is displayed Touching this area displays a menu to perform operations such as setting and adjusting...

Page 14: ...ork icon The network connection status is indicated by an icon as shown below Touching the icon allows you to switch the network connection status U Changing the Network Connection Methods on page 74 Not connected to a wired LAN or the wired LAN or wireless LAN not set Connected to a wired LAN Wireless LAN Wi Fi is disabled Searching for SSID IP address not set or signal strength is 0 or poor Conn...

Page 15: ...r U Operator s Guide PDF Printer driver that is simple and easy to operate By simply changing the paper settings you can use the optimum settings for printing on rigid or fabric material This saves you the trouble of adjusting print settings individually When you select a Source setting printing failures due to paper loading mistakes are reduced because the size and type of paper loaded in the pri...

Page 16: ...areas air conditioned environment or under direct sunlight maintain the appropriate humidity Do not install the printer next to heat sources or directly in the path of air from a ventilator or air conditioner Failure to observe this precaution could result in the print head nozzles drying and clogging The print head may not be capped i e may not move to the right hand side if an error occurs and t...

Page 17: ...n refilling the ink tanks You may not be able to clean off ink that splashes onto clothes or belongings Do not shake or crush the ink bottles Use opened bottles as soon as possible Store ink bottles at room temperature and avoid direct sunlight We recommend using the ink bottle before the expiration date printed on the ink bottle To ensure print quality use all the ink in the tank before the earli...

Page 18: ...our hands can affect print quality Handle paper by the edges We recommend wearing cotton gloves Changes in temperature and humidity may cause paper to become wavy or curled Check the following points Load the paper just before printing Do not use wavy or curled paper For roll paper cut off the wavy or curled parts and then load it again For cut sheets use new paper Do not wet the paper Do not thro...

Page 19: ... time it takes for the printer to enter sleep mode At default settings the printer enters sleep mode if no operations are performed for 15 minutes The time it takes for the printer to enter sleep mode can be changed in the Basic Settings menu U General Settings Basic Settings on page 91 Note When the printer enters sleep mode the control panel s screen goes blank as if the power has been turned of...

Page 20: ...onal Software on page 23 LFP Print Plug In for Office Windows Only Plug insoftwareforMicrosoftOfficeapplications Word Excel andPowerPoint Installing thisplug indisplaysribbonitemsinOfficeapplicationsthatgivequickaccesstohorizontal and vertical banner printing and enlarged printing It can be installed by selecting it in the Additional Installation screen when installing the software You can also in...

Page 21: ...tworksecuritysettingscanbeconfiguredfromWebConfig Thissoftwarealsohasan email notification function for notifying of printer errors and other problems U How to Use Web Config on page 22 SC F500 Series User s Guide Introducing the Software 21 ...

Page 22: ... press the Enter or Return key Format IPv4 http IP address of printer IPv6 http IP address of printer Example IPv4 http 192 168 100 201 IPv6 http 2001 db8 1000 1 Closing Close the Web browser Function Summary Main Functions Check the printer s status such as the remaining amount of ink Check and update the printer s firmware version Configure the printer s network settings and advanced security se...

Page 23: ... the keyboard and then type the software name in the search box of the displayed window the software appears immediately The software can also be started by clicking the printer icon on the Taskbar of the desktop and then selecting Software Update Mac Select Go Applications Epson Software EPSON Software Updater C Select the software or manuals to be updated and then update them Follow the on scree...

Page 24: ...lecting EPSON SC XXXXX Printer Uninstall E Select the printer icon and then click OK F Follow the on screen instructions to continue When the delete confirmation message appears click Yes Restart the computer if you are reinstalling the printer driver Mac When reinstalling or upgrading the printer driver or other software follow the steps below to uninstall the target software first Printer Driver...

Page 25: ...l paper or use roll paper with no problem Do not load curled paper Loading curled paper may cause paper jams or soiled prints Flatten the paper before use by bending it in the opposite way or use paper with no problem Unsupported paper Do not use paper that is wavy torn cut folded too thick too thin has a sticker affixed etc Doing so may cause paper jams or soiled prints See the following for pape...

Page 26: ...remove the roll paper and then re load the paper in the auto sheet feeder Remove the paper stacker when printing on roll paper U Removing paper from the auto sheet feeder on page 33 U Installing and removing the paper stacker on page 31 Loading Roll Paper Caution Hold the flange while loading the roll paper If you load the paper while holding another part your hand or fingers may get trapped causi...

Page 27: ...skewed will cause a skew error or paper jam Note If the leading edgeof theroll paper is not horizontal or not cut cleanly it will be cut automatically after loading completes However it will not be cut if Auto Cut is set to Off J Close the roll paper cover and cut sheet cover K On the displayed screen set the paper type that matches the loaded paper and set remaining amount management if necessary...

Page 28: ... on the printer Touch the Roll paper information area Advanced Media Setting Auto Cut Off from the Home screen The change to the setting is saved as a setting of the currently selected paper type B Touch the Roll paper information area Feed Cut Paper from the Home screen of the printer after printing finishes Use the buttons displayed on the screen to cut and feed the paper When cutting at the pri...

Page 29: ...oving the paper touch Cut The cut or print cut lines selection screen appears D Touch Print Cutting Guideline Cut lines are printed and the paper is ejected automatically to a position where it can be easily cut with scissors E Cutthepaperalongthecutlineswithscissorsand then touch Done The paper rewinds to return the paper leading edge to the print wait position Removing Roll Paper This section de...

Page 30: ...r menu See the following for more details U Cutting the Roll Paper on page 28 E Hold the flanges on both ends of the spindle and remove the spindle from the spindle holder F Detach the transparent flange from the spindle G Remove the spindle from the roll paper cImportant Afterrewindingtherollpapercarefully storeit in the original package H Attach the transparent flange to the spindle and return t...

Page 31: ...e front of the printer Removing Pull the paper stacker straight out to remove it Loading paper into the auto sheet feeder Note You can load the paper while viewing the loading procedure on the screen To view the procedure on the screen touch PaperSetting Auto SheetFeeder from the Home screen cImportant When loading multiple sheets of printing paper carefullywipeawayanypaperdustandarrangethe edges ...

Page 32: ... Align the edgeguides with the edges of the paper Iftheedgeguidesaretoofarfromtheedgesofthe paper thepapermaybefedatananglewhichcan cause skew errors and paper jams E On the displayed screen set the paper type and size that match the loaded paper Not setting the appropriate paper type will cause print quality trouble See the following for more details on the paper types and sizes U For Auto Sheet ...

Page 33: ...t feeder A Move the edge guides away from the paper and remove the paper B Push the auto sheet feeder back into its slots and then fold it forward C Close the cut sheet cover SC F500 Series User s Guide Loading and Setting the Paper 33 ...

Page 34: ...sert all paper in portrait orientation Inserting paper in landscape orientation may cause a decline in print quality D Insert the leading edge of the paper straight into the paper slot until you hear a beep cImportant Hold the edges of the paper and insert it straight into the paper feed slot Inserting it skewed will cause a skew error or paper jam E On the displayed screen set the paper type and ...

Page 35: ...timate of the remaining amount of roll paper is displayed on the printer s Home screen and on the printer driver screen Furthermore a notification can also be displayed when the remaining amount has become low The remaining amount is saved along with the paper type selected above For example you can manage the amount remaining for plain paper and tracing paper separately Note When you want to mana...

Page 36: ...e in step 1 If you will not set the remaining amount management setting touch OK D Touch Paper Remaining E Touch Setup The setting changes to On and Remaining Amount and Remaining Alert are enabled Touch each one and enter a value as follows Remaining Amount Total length of roll paper see the manual supplied with the roll paper Remaining Alert Remaining amount value that will be the timing for dis...

Page 37: ...d to step 2 When changing Paper Size without changing Paper Type Proceed to step 3 When not changing either of them Touch OK You can start printing once Ready appears on the screen Note The settings are confirmed if no operations are performed for 90 seconds on the above screen To change the settings later touch the following in order from the Home screen and then configure the settings For Auto S...

Page 38: ... length On the keypad screen for entering a numeric value enter numbers that include a number of the first decimal place For example if you want to enter 5 m touch 5 and 0 D When the screen of step 1 is redisplayed touch OK YoucanstartprintingonceReadyappearsonthe screen SC F500 Series User s Guide Loading and Setting the Paper 38 ...

Page 39: ...ble curls wrinkles waves folds or bends is used correct adjustment may not be possible Remove curled wavy or folded sections by cutting them off Adjusting Adjustments are performed by using a wizard Follow the on screen instructions to print the adjustment pattern twice Adjustments are made by visually checking the pattern and specifying the optimal pattern from the first and second adjustment she...

Page 40: ...alueofthepatternwiththemoststraightlinesin 3 on the screen G Touch OK Printing of the second set of adjustment patterns starts For cut sheets smaller than A2 size load the second sheet of paper cImportant When using A2 size or larger cut sheets or roll paper with the auto cut turned off the part with the first set of patterns printed on it is pulled inside the printer to print the second set of pa...

Page 41: ...stment results are saved as settings of the currently selected paper type Next time simply select the paper type to realize the optimum print results SC F500 Series User s Guide Loading and Setting the Paper 41 ...

Page 42: ...sheet feeder on page 31 U Loading Cut Sheet 1 sheet on page 34 B When you have created the data in the application click Print in the File menu C Select the printer in Printer and then click Printer Properties The printer driver dialog will be displayed Note When printing a PDF file In the Print dialog box of Adobe Acrobat select the Actual size or Page Scaling None radial button and Choose paper ...

Page 43: ... menu below the Document Size See the following for more details on enlargement settings U Enlargements and Horizontal and Vertical Banners on page 53 F Select Source and check the roll paper width and media type Select from Roll Paper Auto Sheet Feeder or Sheet Ifyouselectapapersourceforwhichpaper is not loaded in the printer appears For Roll Paper Width and Media Type the settings configured in ...

Page 44: ...the printer driver help for more details on setting items Youcandisplaythehelpinthefollowingtwoways Click Help at the bottom right of the screen Right clicktheitemyouwanttocheckandthenclick Help This is not possible in the print preview screen Canceling Printing There are a few ways to stop printing operations depending on the situation When the computer has finished sending data to the printer yo...

Page 45: ...d printers or Devices and Printers Windows 10 8 1 8 7 Click in the following order Hardware and Sound or Hardware View devices and printers or Devices and Printers Windows Vista Click in the following order Hardware and Sound and then Printer Windows XP Click in the following order Printers and Other Hardware and then Printers and Faxes Note If your Windows XP Control Panel is in Classic View clic...

Page 46: ...ettings to a file Display the same screen of the printer driver on another computer click Import and then import the settings Rearranging display items The display items of Select Setting Media Type and PaperSizecanbearrangedasfollowstodisplaytheones you use normally right away Hide unnecessary items Rearrange in an order of most frequent use Arrange in groups folders A Click Utility tab Menu Arra...

Page 47: ...o delete a group folder click Delete Group Drag and drop unnecessary items to Not Display Note When Delete Group is performed the group folder is deleted but the settings in the deleted group folder remain Delete them individually from List in the save location D Click Save SC F500 Series User s Guide Printing with the Printer Driver from Your Computer 47 ...

Page 48: ...ge 26 U Loading paper into the auto sheet feeder on page 31 U Loading Cut Sheet 1 sheet on page 34 B When you have created the data in the application click Print in the File menu C Click Show Details or at the bottom of the screen Note Ifpagesettingsarenotdisplayed intheprintdialog click the page settings option e g Page Setup in the File menu SC F500 Series User s Guide Printing with the Printer...

Page 49: ...output size is Same as Paper Size This is done to secure the necessary margins 3 mm on each side for this printer Select this when you want to print at the full size without any reduction Roll Paper Banner Select to make long prints on roll paper using banner printing software F Select Printer Settings from the list and set Output Size If Printer Settings is not displayed in the list the dedicated...

Page 50: ...r Even if nothing is set in the printer driver the print data is reversed mirrored and printed Printing is not reversed if you select Mirror Image I Check the print settings in the print preview screen and if there is no problem click Print to start printing The icons and menus at the top of the preview screen allow you to change the image display settings You can change the print settings using t...

Page 51: ...eprinter printdatais not displayed on the above screen Canceling on the printer The Cancel button is displayed on the control panel screen during printing Touch the Cancel button The print job is canceled even in the middle of printing It may take a while before the printer returns to the ready status However print jobs in the print queue on a computer cannot be deleted in this way Use the procedu...

Page 52: ...our computer The settings are saved to Presets You can then select the settings you saved from Presets Deleting from presets A Click Show Presets from Presets in the Print dialog box B Select the setting you want to delete clickDelete and then click OK SC F500 Series User s Guide Printing with the Printer Driver from Your Computer 52 ...

Page 53: ... or reduces the image size to fit the roll paper width Fit to Output Size Automatically enlarges or reduces the image size to fit the paper size Specify Size You can specify the enlargement or reduction ratio Use this method for a non standard paper size Note Whenprintingfromapplicationsdesignedexpressly for horizontal or vertical banners adjust printer driver settings as described in the applicat...

Page 54: ...plication and check that this printer is selected in Printer and check the paper size Select a paper size that does not have Retain Scale or Roll Paper Banner If the size is different select the correct size from the pull down menu U Basic Operating Procedures Mac on page 48 Note In the case of an application without a page setup menu item you can set the paper size if you open the Print dialog bo...

Page 55: ... on the Printer Settings tab of the printer driver Windows Display the Printer Settings tab of the printer driver from the application and check that the document size is the same as the setting of the application If it differs click Settings and specify the correct size in the Change Paper Size dialog box U Basic Operating Procedures Windows on page 42 Mac Open the page setup screen of the applic...

Page 56: ...c on page 48 B Select Fit to Output Size on the Printer Settings tab of the printer driver Windows Mac C Select the desired size from the Output Size pull down menu Windows Mac D Check other settings and then start printing SC F500 Series User s Guide Printing with the Printer Driver from Your Computer 56 ...

Page 57: ... this printer is selected in Printer and check the paper size Select a paper size that does not have Retain Scale or Roll Paper Banner If the size is different select the correct size from the pull down menu U Basic Operating Procedures Mac on page 48 Note In the case of an application without a page setup menu item you can set the paper size if you open the Print dialog box from the Print menu it...

Page 58: ...and other print dialogs The following sizes can be used Paper Width 89 to 610 mm Paper Length 127 to 18000 mm The paper length can be longer when using an application that supports banner printing However the actual print size depends on the application the paper size loaded in the printer and the computer environment cImportant The smallest size supported by the printer is 89 mm wide 127 mm long ...

Page 59: ...o change the paper size you saved select the paper size name from the list on the left To delete a saved paper size select the paper size name from the list on the left of the screen and then click Delete You can save up to 100 paper sizes C Click OK to close the User Defined Paper Size dialog box Also close the printer driver s dialog box Registration of the user defined size is now complete D Se...

Page 60: ...Width and Height of the Paper Size enter the margins and then click OK Therangesofpagesizesandmarginsizesthatcan be specified differ depending on your printer model and the settings on the printer U Printable area on page 132 Note To edit a saved custom size choose its name from the list on the left To duplicate a saved paper size select its name from the list on the left of the screen and click D...

Page 61: ...egistered paper size is not displayed in the application check whether it exceeds the sizes supported by the application F When you have finished creating the data display the Printer Settings tab of the printer driver from the Print dialog box The registered paper size is displayed in Document Size on the Printer Settings tab U Basic Operating Procedures Mac on page 48 G Check other settings and ...

Page 62: ...lay the Layout tab of the printer driver and select the Page Layout check box Then select N up and click the Settings button U Basic Operating Procedures Windows on page 42 B Set Number of pages per sheet and Page Order in the Print Layout dialog box If the Print page frames check box is selected page frames are printed on each page C Check other settings and then start printing SC F500 Series Use...

Page 63: ...d 2 Sided Printing Windows only Two consecutive pages can be printed on a single sheet The second page is flipped 180 and printed adjacent to the first page allowing the paper to be folded to make a 2 sided document A Display the Layout tab of the printer driver and select the Page Layout check box Then select Folded Double Side and click the Settings button U Basic Operating Procedures Windows on...

Page 64: ...nted across multiple sheets The sheets can then be joined together to form large posters up to 16 times the original size A Display the Layout tab of the printer driver and select the Page Layout check box Then select Poster and click the Settings button U Basic Operating Procedures Windows on page 42 SC F500 Series User s Guide Printing with the Printer Driver from Your Computer 64 ...

Page 65: ...ge frames Prints frames for joining the paper without overlapping D Check other settings and then start printing Joining poster sheets in multi page printing If Overlapping Alignment Marks is selected join guides indicated by the lines drawn through and around the X marks in the illustration below will be printed on each sheet Note If the output is in color the join guides will be in blue and the ...

Page 66: ...y cutting along the line joining the two join guides the centers of the X marks B Lay the upper left sheet on top of upper right sheet Lineup the X marks as shown in the illustration below and temporarily fasten them using an adhesive tape on the back SC F500 Series User s Guide Printing with the Printer Driver from Your Computer 66 ...

Page 67: ...together E Repeat steps 1 to 4 for the lower two sheets F Trim the bottom from the upper sheets by cutting along the line joining the two guides the lines above the X marks G Lay the upper sheet on top of the lower sheet Lineup the X marks as shown in the illustration below and temporarily fasten them using an adhesive tape on the back SC F500 Series User s Guide Printing with the Printer Driver f...

Page 68: ...g along the line joining the two cut guides the lines above the X marks I Join the upper and lower sheets together Use an adhesive tape to stick the backs of the sheets together SC F500 Series User s Guide Printing with the Printer Driver from Your Computer 68 ...

Page 69: ...le Documents Layout Manager Windows Only Documents created in different applications can be printed together in your choice of layout This allows you to improve print work efficiency and conserve paper Sample Multi Document Layout SC F500 Series User s Guide Printing with the Printer Driver from Your Computer 69 ...

Page 70: ...er screen opens The print data is not printed but one page is placed on the paper of the Layout Manager screen as one object D Leaving the Layout Manager screen open repeat steps 1 to 3 until all the print data has been added to the layout The objects are added to the Layout Manager screen E Arrange the objects on the Layout Manager screen Objects can be moved or resized by dragging as well as rea...

Page 71: ...r screen and then click Save As B Enter the file name select the location and then click Save C Close the Layout Manager screen Opening saved files A Right click the printer icon on the Windows taskbar and then click Layout Manager in the displayed menu The Layout Manager screen appears Note When the printer icon is not displayed on the Windows taskbar Open the Utility tab of the printer driver an...

Page 72: ...2 specific settings such as palette settings HP GL 2 Unique Settings Basic Print Settings A Touch Settings General Settings Printer Settings Universal Print Settings from the Home screen B Check Paper Source and change the setting if necessary Thedefaultsetting is Roll Paper When HP GL 2 or HP RTL print data is sent an error occurs if paper is not loaded for the paper source set here C Check the o...

Page 73: ...anguage USB from the Home screen and then change the setting from Auto to HP GL 2 When the computer and printer are connected via a network Select Settings General Settings Printer Settings Printing Language Network from the Home screen and then change the setting from Auto to HP GL 2 To print from the printer driver as usual after HP GL 2 or HP RTL finishes return the setting to Auto CAD Applicat...

Page 74: ...ching to Wireless LAN The SSID network name and password of the access point to which the printer is to be connected are required Confirm them in advance The printer can be connected to a wireless LAN while the LAN cable is still connected Note If your access point supports WPS Wi Fi Protected Setup the printer can be connected using Push Button Setup WPS or PIN Code Setup WPS without using an SSI...

Page 75: ...n operations on page 13 B Touch Wi Fi Direct When Wi Fi Direct is already enabled the network SSID password numberofconnected devices and so on are displayed Proceed to step 5 Note If a part of the displayed network SSID or device name and so on cannot be seen because it is cut off at the right edge of the screen touch the corresponding item to display the entire setting value C Touch Start Setup ...

Page 76: ...escribed below See the reference pages for more details on each item Paper Setting The Paper Setting menu is displayed if paper is loaded Details of each item U Paper Setting menu on page 85 Settings item Settings value Roll Paper SC F500 Series User s Guide Using the Menu 76 ...

Page 77: ...h Drying Time Drying Time per Pass 0 to 10 0 sec Drying Time per Page 0 to 60 min Auto Cut On Off Manage Remaining Amount Setup On Off Remaining Amount 5 0 to 150 0 m Remaining Alert 1 0 to 15 0 m Change Paper Type Paper Type General Purpose Textile Display supported paper types General Purpose Rigid 01 Others Auto Sheet Feeder Media Adjust Start Change Paper Type Paper Size Paper Type General Pur...

Page 78: ... Others User Defined Display paper size input screen Printer Status Details of each item U Printer Status menu on page 90 Settings item Settings value Supply Status Display the approximate free space and product number for the Maintenance Box Message List Display list of messages communicating printer status Firmware Version Display firmware version Print Status Sheet Configuration Status Sheet Pr...

Page 79: ...age Display supported languages Operation Time Out On Off Keyboard QWERTY AZERTY QWERTZ Length Unit m ft in Printer Settings Details of each item U General Settings Printer Settings on page 93 Paper Source Settings Error Notice Paper Size Notice On Off Paper Type Notice On Off Roll Paper Setup Detect Paper Meandering On Off Print Cutting Guideline On Off After Print Options Hold Paper Eject Paper ...

Page 80: ...o HP GL 2 Universal Print Settings Paper Source Roll Paper Auto Sheet Feeder Cut Sheet 1 sheet Quality Standard Speed Fine Super Fine Color Mode Color Black White Page Margins option Clip By Margins Oversize Page Margin 3 mm 5 mm Smoothing On Off Base Output Size Auto A Series Display supported paper sizes US ANSI US ARCH B Series ISO B Series JIS Others User Defined Display paper size input scree...

Page 81: ...Settings item Settings value HP GL 2 Unique Settings SC F500 Series User s Guide Using the Menu 81 ...

Page 82: ... Timeout Setting 0 sec or 5 to 300 sec Network Settings Details of each item U General Settings Network Settings on page 103 Wi Fi Setup Router Connect via Wi Fi When wireless LAN connection disabled Display Connect via Wi Fi menu WhenwirelessLANconnectionconnected Displayconnectionstatus and settings information Wi Fi Setup Wizard Push Button Setup WPS Others PIN Code Setup WPS Wi Fi Auto Connect...

Page 83: ...l Duplex Redirect HTTP to HTTPS Enable Disable Disable IPsec IP Filtering Proceed Displayed when enabled Disable IEEE802 1X System Administration Details of each item U General Settings System Administration on page 106 Security Settings Admin Settings Admin Password Register Change Clear All Settings Lock Setting Off On Restore Default Settings all Wi Fi network settings Yes No Clear All Data and...

Page 84: ...tenance Box Display procedure Replace Cutter Start Powerful Cleaning Start Power Ink Flushing Start Total CR Displays the current number of carriage passes Language Display supported languages Printer Status Print Details of each item U Printer Status Print on page 108 Print Status Sheet Configuration Status Sheet Print Network Display General Settings Network Settings Network Status SC F500 Serie...

Page 85: ...d from inside the printer U Removing Roll Paper on page 29 Feed Cut Paper Backward UseBackwardandForwardtomovethepapertothedesiredposition Touch Cut to cut the paper using the built in cutter U Cutting the Roll Paper on page 28 Forward Cut Media Adjust Start Run this adjustment when there is a problem with print results or after registering custom paper settings Touch Start to print an adjustment ...

Page 86: ...a High Drying Time Drying Time per Pass 0 0 to 10 0 seconds 0 0 Select the time the print head pauses to allow drying after each pass Choosefromvaluesbetween0 0and10 0seconds Dependingonthe paper type the ink may take a while to dry If the ink blurs on the paper set a longer time for drying the ink Increasing the drying time increases the time needed to print Drying Time per Page 0 0 to 60 minutes...

Page 87: ...screen and on the printer driver screen In Remaining Alert set the limit at which to display a warning when the amount of remaining roll paper drops below that limit You can set in 0 1 m increments Remaining Alert 1 0 to 15 0 m 5 0 Change Paper Type Paper Type General Purpose Textile Select the type of loaded paper The three options other than Others display the most recently selected paper type W...

Page 88: ...e 39 Change Paper Type Paper Size Paper Type General Purpose Textile Select the type of loaded paper The three options other than Others display the most recently selected media type When the desired paper type is not displayed touch Others to display the other paper types and then select a paper type U For Auto Sheet Feeder Cut Sheet 1 sheet on page 37 General Purpose Rigid 01 Others Paper Size A...

Page 89: ...ings for the selected paper type U Optimizing Paper Settings Media Adjust on page 39 Change Paper Type Paper Size Paper Type General Purpose Textile Select the type of loaded paper The three options other than Others display the most recently selected paper type When the desired paper type is not displayed touch Others to display the other paper types and then select a paper type U For Auto Sheet ...

Page 90: ...nstillprintuntilyouareinstructedtoreplacethe box However make sure you prepare a new maintenance box in advance Message List Display a list of messages communicating printer status Select a message from the list to display detailed information Firmware Version Display the printer firmware version Print Status Sheet Configuration Status Sheet Printalistofcurrentprintersettings Usethistoviewallinfor...

Page 91: ...und when touching the menu or other items on the control panel screen and of the confirmation sound when inserting paper into the paper slot when loading paper Pattern2 Sleep Timer 1 to 60 minutes 15 Theprinterwillentersleepmodeifnoerrorshaveoccurred noprint jobs have been received and no actions are performed on the controlpanelforanextendedperiodoftime Thissettingselectsthe amount of time until ...

Page 92: ...n German Portuguese Spanish Dutch Polish Russian Korean Simplified Chinese Traditional Chinese Operation Time Out On Setting this to On will display a message and return to the Home screenifthereisnooperationwithinacertainamountoftimewhile a screen other than the Home screen is displayed Off Keyboard QWERTY Select the key arrangement for the text input screen displayed when entering the name of Cu...

Page 93: ...On or not print Off cut lines on roll paper Cut lines are not printed if Auto Cut is On or when cut sheets are used Note however that if the roll width selected with the computer is narrowerthanthepaperloadedintheprinter cutlineswillbeprinted regardless of the option selected for Auto Cut The setting selected with the printer driver takes priority when the printer driver is used Off After Print Op...

Page 94: ...select the media type that is the closest to the paper you are using Advanced Media Setting Platen Gap 1 6 ThisisthePlatenGap distancebetweenprintheadandpaper forthe paper selected in Change Reference Paper so it does not normally need to be changed Change this to a setting that will widen the gap a higher value if print results are smeared 2 1 2 6 Top Bottom Mar gins Standard Setting this to Stan...

Page 95: ...ingtheink The longer the drying time the more time required for printing Auto Cut On Select whether to automatically cut On or not cut Off using the built in cutter as each page is printed on roll paper Set On to automatically cut the edge if it is not a horizontal cut when paper is loaded The setting selected with the printer driver takes priority when the printer driver is used U Cutting the Rol...

Page 96: ...paperselectedinPaper Source Speed Fine Super Fine Color Mode Color Specifywhethertoprintincolororswitchtoblackandwhiteandthen print Black White Page Margins option Clip By Margins Depending on the base output size setting adds the value selected for the page margin area of in the following illustration inside the hard clip area of the PS command of the data or the size selected for base output siz...

Page 97: ...lip area of the PS command of the data area of in the following illustration When set to a standard size or user defined size Adds the value selected for page margin area of in the following illustration outside the size selected for base output size area of in the following illustration With the actual output size the margin section becomes larger than the selected size the area of in the followi...

Page 98: ...ds on the Page Margins option When the data does not contain a PS command the smallest rectangle area of in the following illustration including the print object becomes the base output size A Series The compatible standard sizes for the selected Paper Source are displayed therefore select the Base Output Size The actual output size depends on the Page Margins option For a cut sheet this setting i...

Page 99: ...e for CAD drawings and other line drawings Off No Color Management Do not perform color correction HP GL 2 Unique Settings Print settings unique to HP GL 2 or HP RTL modes Rotate 0 Youcanrotatethecoordinatesofthedrawndatacounterclockwisein units of 90 before printing Note that objects drawn by RTL are not rotated When both this setting and the RO command specify rotation rotation is performed usin...

Page 100: ...rding to the MC command of the data On or move lines to be printed later to the front at intersections Off Off Color Mode HP GL 2 EPSON Standard sRGB Optimize the sRGB space and correct the color Business Graphics Perform color correction to sharpen your images based on the sRGB space GIS Perform color correction suitable for when printing GIS Geographic Information System topographical maps or si...

Page 101: ...ine Palette Palette A Pen 0 to Pen 15 Pen Width 0 13 to 12 00 mm InSelectPalette selectingPaletteAwillprintinaccordancewiththe settings defined here You can define a unique built in palette by specifying the pen width and color for the 16 types of logical pen Select the pen number and then define the pen width and pen color for each pen You can use Print Color Palette to print and check the colors...

Page 102: ...llows access from a USB connected computer Setting this to Disable does not allow access Disable USB I F Timeout Setting 0 sec or 5 to 300 sec 60 If printing stops mid way when the printer and computer are connected by a USB cable set a longer time SC F500 Series User s Guide Using the Menu 102 ...

Page 103: ...this menu item can be used for connection Input of SSID and password is not required After selecting this menu item touch and hold the push button on the access point until it flashes then again touch Start Setup on the printer screen to connect Others PIN Code Setup WPS If the access point to use supports WPS Wi Fi Protected Setup then this menu item can be used for connection Touch this to displ...

Page 104: ...d smart devices Disable Wi Fi Direct Performing this operation will disconnect all connected computers and smart devices To disconnect only a specific device disconnect the connection from the device Restore Default Settings Restores all Wi Fi Direct settings to the manufacturer s settings This also removes connection information stored by the printer that was registered using the Wi Fi Direct fea...

Page 105: ...Internet for firmware updates or similar select Use and set the server name and port number Do Not Use IPv6 Address Enable Select whether to enable or disable the IPv6 function Disable Link Speed Duplex Auto Normally set this to Auto 10BASE T Half Duplex 10BASE T Full Duplex 100BASE TX Half Duplex 100BASE TX Full Duplex Redirect HTTP to HTTPS Enable Selectwhethertoenableordisablethefunctiontoauto ...

Page 106: ...r All Settings Lock Setting Off Setting On will result in the administrator password being requested when any of the following menu items are selected and unless the password is entered changing the setting or running the function willnotbepossible WhenselectingOn firstsettheAdminPassword Sleep Timer Power Off Timer Circuit Breaker Interlock Startup Date Time Settings Operation Time Out Printing L...

Page 107: ...ged nozzles by printing a check pattern U Checking the print head for clogging and then cleaning on page 109 Head Cleaning Start Perform if the printed check pattern has faint or missing areas U Checking the print head for clogging and then cleaning on page 109 Paper Guide Cleaning Start Run this when the printing side of the paper is soiled when printing from the auto sheet feeder U Smearing occu...

Page 108: ...nk is not visible through the ink tank window However thisconsumes moreink than Normal cleaning U Power Ink Flushing on page 110 Total CR XXXXXXXXXX Displays the current number of carriage passes Printer Status Print Settings item Settings value Explanation Print Status Sheet Configuration Status Sheet Printalistofcurrentprintersettings Usethistoviewallinformationat a glance Network Display curren...

Page 109: ...art printing a check pattern When changing the paper source displayed on the start screen touch Paper Source C Refer to the following and check the printed check pattern for clogging Example of clean nozzles If none of the pattern is missing the print head nozzles are not clogged Touch to end the nozzle clogging check Example of clogged nozzles If the pattern has missing areas touch to displaytheH...

Page 110: ...performthisoperationwithonly a smallamount of ink remaining the ink may containbubblesandyouwill notbe able toprint correctly Execute after refilling ink to the upper line on the ink tank Power Ink Flushing takes a maximum of 20 minutes You may need to replace the maintenance box Ink in the tubes is discharged into the maintenance box When the maintenance box is full you cannot print until it has ...

Page 111: ...Epson Web site Checking how much ink remains Checkallinktanksvisuallytoconfirmtheamountofink remaining cImportant If you continue to use the printer when the amount of ink remaining is below the bottom line a malfunction could occur Refilling ink cImportant To keep the printer in optimum condition do not repeatedly fill the tanks with small amounts of ink A Open the ink tank cover B Open the ink t...

Page 112: ...nserting the bottle If the colors of the ink do not match the ink does not pour Ink pouring stops automatically when it reaches the upper line Even if there is ink remaining in the bottle do not try to force it into the tank You can use the remaining ink later cImportant Do not hit the top of the bottle when the cap is removed Otherwise ink may leak Do not grip the bottle too tightly Otherwise ink...

Page 113: ...of its service life is displayed you need to replace the maintenance box When the message The Maintenance Box is nearing the end of its service life is displayed prepare a new maintenancebox Printingispossible untilreplacement is instructed Supported maintenance box U Options and Consumable Products on page 129 cImportant DonotreplacetheMaintenance Boxwhileprinting Waste ink may leak Note You can ...

Page 114: ...d Consumable Products on page 129 Useacross headscrewdrivertoreplacethecutter Make sure you have a cross head screwdriver with you before you start work Caution Store the cutter out of the reach of children The cutter s blade could cause an injury Pay careful attention when replacing the cutter cImportant Droppingthecutter orknockingitagainsthard objects may chip the blade The protective material ...

Page 115: ...nt D Install the new cutter Insert the cutter so that the pin on the printer matches up with the hole on the cutter Use a cross head screwdriver to tighten down the screw to hold the cutter in place cImportant Screw the cutter firmly otherwise the cut position may be slightly shifted or skewed E Remove the protective material shown in the figure cImportant Do not pull the protective sheet SC F500 ...

Page 116: ...F Touch OK The cutter moves and the protective sheet stuck to the blade comes off Remove the protective sheet G Close the cutter cover SC F500 Series User s Guide Maintenance 116 ...

Page 117: ...has started in recovery mode Use the procedure below to update the firmware again 1 Connect a computer and the printer using a USB cable Updates during recovery mode cannot use a network connection 2 Download the latest firmware from the Epson website and start the update Refer to the firmware download page for update methods When a Maintenance Call Printer Error Occurs Error messages Solutions Ma...

Page 118: ...rties dialog and check the option selected for Print to the following port s USB USBxxx x stands for the port number for the USB connection Network The correct IP address for the network connection If it is not indicated the printer driver is not installed correctly Delete and reinstall the printer driver U Uninstalling Software on page 24 The printer driver is not installed properly Mac o Is the ...

Page 119: ...e printer icon in the Devices and Printers Printers or Printers and Faxes folder if printing is paused open the Printer menu and clear the Pause check box o DoesthecurrentprinterstatusshowPaused Mac Open the status dialog for your printer and check whether printing is paused 1 SelectSystemPreferences Printers Scanners or Print Fax Open Print Queue from the Apple menu 2 Double click the icon for an...

Page 120: ... then cleaning on page 109 If you can print the nozzle check pattern the printer is not malfunctioning Check the following section o Is the message Motor self adjustment running displayed on the control panel s screen Theprinteradjuststheinternalmotor Waitforawhile without turning off the printer SC F500 Series User s Guide Problem Solver 120 ...

Page 121: ...not change it U Setting Loaded Paper on page 35 If print results do not improve Perform Media Adjust Paper settings are optimized for the paper loaded U Optimizing Paper Settings Media Adjust on page 39 If print results do not improve Check for clogging in the print head and perform cleaning Check for print head nozzle clogging and if they are clogged perform cleaning U Checking the print head for...

Page 122: ...andle these by following the process below U The prints are not what you expected on page 121 If these measures do not resolve the issue check the following items o Is the Color Density setting appropriate If you feel that lines in drawings are too light then on the printer driver Advanced screen click Paper Configuration and increase the ink density Conversely if the ink density is too high on tr...

Page 123: ...ns set in the roll paper Advanced Media Setting Top Bottom Margins menu are set in the application software then priority is given to the printer settings U Roll Paper menu on page 85 Vertical ruled lines are misaligned o Has Media Adjust been carried out Confirmthatthepapertypesettingsmatchthepaper and perform Media Adjust U Setting Loaded Paper on page 35 U Optimizing Paper Settings Media Adjust...

Page 124: ...per Setting Roll Paper Feed Cut Paper from the Home screen C Touch and hold the Forward button until the paper is no longer marked Paper is fed while the Forward button is touched If the paper is not soiled cleaning is complete D Touch the Cut button to cut the paper Smearing occurs when printing from the auto sheet feeder When feeding from the auto sheet feeder for printing the printed side may b...

Page 125: ...k to be fired is controlled according to the media type If the settings do not match the paper loaded too much ink may be fired U Setting Loaded Paper on page 35 o Is the Color Density setting appropriate On the printer driver Advanced screen click Paper Configuration and decrease the ink density The printer may be printing with too much ink for some paper We recommend that black and color densiti...

Page 126: ... the printer Open the front cover of the printer and check that there are no paper jams or foreign objects in the printer Ifpaperisjammed see Rollpaperjam or Cut sheets jam below and clear the jammed paper Paper does not collect in the paper basket or is creased or folded o Doestheprintjobrequirealotofink oristhe humidity of the work environment high Depending on the job and the work environment p...

Page 127: ...dge straight horizontally Cut any wavy or wrinkled sections If there are any wrinkles on the edge then paper may not be fed or it may jam Cut sheets jam To remove jammed paper follow the steps below A Open the front cover B When ejecting paper from the front grasp the paper with both hands and slowly pull it out towards you C Remove the jammed paper then close the front cover cImportant Do not tou...

Page 128: ...r Epson Support Print head is automatically cleaned o To ensure print quality the printer may automatically perform head cleaning when the printer is turned on or before starting printing The printer turned off due to a power cut o Turn off the printer and then turn it back on When the printer is not turned off normally the print head may not be capped correctly If the print head is left uncapped ...

Page 129: ... and under certain circumstances may cause erratic printer behavior Information about non genuine ink levels may not be displayed and use of non genuine ink is recorded for possible use in service support Printer model Ink color Product Number SC F500 SC F560 Black T49N1 Cyan T49N2 Magenta T49N3 Yellow T49N4 SC F530 SC F540 Black T49P1 Cyan T49P2 Magenta T49P3 Yellow T49P4 Others Product Part numb...

Page 130: ...art number Explanation Stand 24 C12C933151 The stand comes with a paper basket Roll Feed Spindle 24 C12C935701 Thisisthesameastherollpaperspindlesupplied with the printer SC F500 Series User s Guide Appendix 130 ...

Page 131: ...elow As of July 2019 Roll Paper Paper name Size DS Transfer General Purpose 17 inch Roll 432 mm 17 inch DS Transfer General Purpose 24 inch Roll 610 mm 24 inch DS Transfer General Purpose A3 Roll A3 DS Transfer General Purpose A4 Roll A4 Cut Sheet Paper name Size DS Transfer General Purpose A3 Sheet A3 DS Transfer General Purpose A4 Sheet A4 SC F500 Series User s Guide Appendix 131 ...

Page 132: ...m Margins in the menu as shown in the table below Settings for Top Bottom Margins U Roll Paper menu on page 85 The default setting is Standard Settings of Top Bottom Margins Margin Values Standard A C 30 mm B D 3 mm Settings of Top Bottom Margins Margin Values Top 3 mm Bottom 3 mm A C 3 mm B D 3 mm Top 15 mm Bottom 15 mm A C 15 mm B D 3 mm Top 45 mm Bottom 15 mm A 45 mm C 15 mm B D 3 mm 3 mm A B C...

Page 133: ...intablearea Thearrowintheillustrationindicatesthe direction that the paper is ejected Cut Sheet 1 sheet The gray area in the illustration below shows the printablearea Thearrowintheillustrationindicatesthe direction that the paper is ejected SC F500 Series User s Guide Appendix 133 ...

Page 134: ... secure the ink tank caps Otherwise ink could leak cImportant When moving or transporting the product be sure that it is level do not tilt it at an angle or place it upside down Otherwise ink could leak MovingtoaDifferentLocationin the Same Building Preparations for Moving This explains preparations for moving the printer a short distance for example within the same building Seethefollowingsection...

Page 135: ... D Remove the transportation caps E Turn over the transportation caps F Place the overturned transportation caps in the position shown in the illustration transportation position G Close the ink tank caps firmly SC F500 Series User s Guide Appendix 135 ...

Page 136: ... after Moving Thisexplainsoperationstopreparefor useaftermoving the printer cImportant After moving the printer return the transportation capstotheprintingposition Youcannotprintwhen the caps are in the transportation position because ink is not supplied A Connect the power cable and turn the printer on B Open the ink tank cover C Open all ink tank caps D Remove the transportation caps E Turn over...

Page 137: ... H Close the ink tank cover I Checkforprintheadnozzleclogging andifthese are clogged carry out print head cleaning U Checking the print head for clogging and then cleaning on page 109 When Transporting Before transporting the printer contact your dealer or Epson Support U Where To Get Help on page 142 SC F500 Series User s Guide Appendix 137 ...

Page 138: ... Server 2008 R2 Windows Server 2008 Windows Server 2003 R2 Windows Server 2003 SP2 or later CPU Intel Core2 Duo 3 05 GHz or more Available memory space 1 GB or more Hard disk Available volume to install 32 GB or more Display resolution WXGA 1280 800 or better Connection method with the printer USB Ethernet or Wi Fi For details on the connection methods interface specifications see the following U ...

Page 139: ...ee the following for details on the network interfaces U Specifications Table on page 140 Mac Browser Safari 1 Firefox 1 Chrome 1 Connection method with the printer 2 Ethernet or Wi Fi 1 Use the latest version 2 See the following for details on the network interfaces U Specifications Table on page 140 Smart device Operating system iOS 1 Connection method with the printer 2 Wi Fi 1 Use the latest v...

Page 140: ... Within a month at 40 C Humidity Printing 20 to 80 40 to 60 is recommended without condensation In storage 5 to 85 without condensation Printer Specifications Temperature and humidity range for operating the range shown by diagonal lines is recommended Dimensions Width x Depth x Height When printing 970 x 577 x 245 mm When the optional stand is installed 1 970 x 980 x 928 mm Storage 970 x 577 x 24...

Page 141: ...rferencetothelicensedservice this device is intended to be operated indoors and away from windows to provide maximum shielding Equipment oritstransmitantenna that is installed outdoors is subject to licensing Ink Specifications Type Dedicated ink bottles Ink Specifications Sublimation dye ink Black Cyan Magenta Yellow Print quality guar antee expiry 25 days from the day the ink tank was refilled w...

Page 142: ...ratingproperly andyou cannot solve the problem using the troubleshooting information in your product documentation contact Epson support services for assistance If Epson support foryourareaisnotlistedbelow contactthedealerwhere you purchased your product Epson support will be able to help you much more quickly if you give them the following information Product serial number Theserialnumberlabelisu...

Page 143: ...ler call 800 GO EPSON 800 463 7766 Or you can purchase online at https www epsonstore com U S sales or https www epson ca Canadian sales Help for Users in Europe Check your Pan European Warranty Document for information on how to contact Epson support Help for Users in Taiwan Contacts for information support and services are World Wide Web https www epson com tw Information on product specificatio...

Page 144: ...stralia https www epson com au New Zealand https www epson co nz Access the Epson Australia New Zealand World Wide Web pages The site provides a download area for drivers Epson contact points new product information and technical support e mail Epson Helpdesk Epson Helpdesk is provided as a final backup to make sure our clients have access to advice Operators on the Helpdesk can aid you in install...

Page 145: ...4 8 823 9239 Service Center 80 Truong Dinh Street District 1 Hochiminh City Vietnam Help for Users in Indonesia Contacts for information support and services are World Wide Web https www epson co id Information on product specifications drivers for download Frequently Asked Questions FAQ Sales Enquiries questions through e mail Epson Hotline Sales inquiries and product information Technical suppor...

Page 146: ...s are World Wide Web https www epson com my Information on product specifications drivers for download Frequently Asked Questions FAQ Sales Enquiries questions through e mail Epson Trading M Sdn Bhd Head Office Phone 603 56288288 Fax 603 56288388 399 Epson Helpdesk Sales enquiries and product information Infoline Phone 603 56288222 Enquiries on repair services warranty product usage and technical ...

Page 147: ...sers are welcome to contact the Epson Philippines Corporation at the telephone and fax numbers and e mail address below Trunk Line 63 2 706 2609 Fax 63 2 706 2665 Helpdesk Direct Line 63 2 706 2625 E mail epchelpdesk epc epson com ph World Wide Web https www epson com ph Information on product specifications drivers for download Frequently Asked Questions FAQ and E mail Inquiries are available Tol...

Reviews: