Where XXXX is the actual paper size, such as A4.
Note:
If page setting options are not available in the
application's print dialog, display the page
settings dialog.
B
When you select
Auto Expand
as the paper
size, select
Page Layout Settings
from the list,
and then click
Amount of Enlargement
.
The following shows the amount of enlargement.
Max
: 3 mm for left and 5 mm for right
(the image shifts 1 mm to the right)
Standard
: 3 mm left and right
Standard
: 1.5 mm left and right
Note:
Moving the slider towards
Standard
decreases
the image enlargement ratio. Therefore, some
margins may appear at the edges of the paper
depending on the paper and printing environment.
C
When printing on roll paper, select
Advanced
from the list, and then set
Auto Cut
.
U
“About Roll Paper Cutting” on page 93
D
Check other settings, and then start printing.
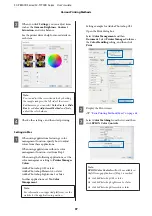
Correct color and print
The printer driver automatically and internally
corrects colors to match the color space. You can
select from the following color correction modes. On
the SC-T7700D Series, you can select the color
correction method by clearing the
Print Quality
-
Simple Settings
checkbox.
❏
EPSON Standard (sRGB)
Optimizes the sRGB space and corrects the color.
❏
Adobe RGB
Optimizes the Adobe RGB space and corrects the
color.
❏
Business Graphics (SC-T7700D Series)
Performs color correction to sharpen your images
based on the sRGB space.
❏
Line Drawing
Optimizes color correction for line drawing by
processing the border between lines and the
background as discontinuous.
❏
ICM
Performs color management to match the colors
in the image data to those in the printed output
(Windows only).
U
“Color Management Printing” on page 112
❏
Off (No Color Adjustment)
Color correction is not performed by the printer
driver. Choose if color management is performed
by the application.
U
“Color Management Printing” on page 112
SC-P8500D Series/SC-T7700D Series User's Guide
Various Printing Methods
95


