GX8 Manipulator 3. Environments and Installation
GX series Rev.2
127
CAUTION
■
The robot system must be installed to avoid interference with buildings, structures,
utilities, other machines and equipment that may create a trapping hazard or pinch
points.
■
Vibration (resonance) may occur during operation depending on rigidity of the
installation table.
If the vibration occurs, improve rigidity of the table or change the speed or
acceleration and deceleration settings.
The following sections describe the installation of the Standard and ESD model
Manipulator.
3.4.2 Table Top Mounting
3.4.3 Wall Mounting
3.4.4 Ceiling Mounting
When the Manipulator is a Cleanroom & ESD model or Protected-model, refer to each
section.
3.4.5 Cleanroom & ESD model
3.4.6 Protected-model
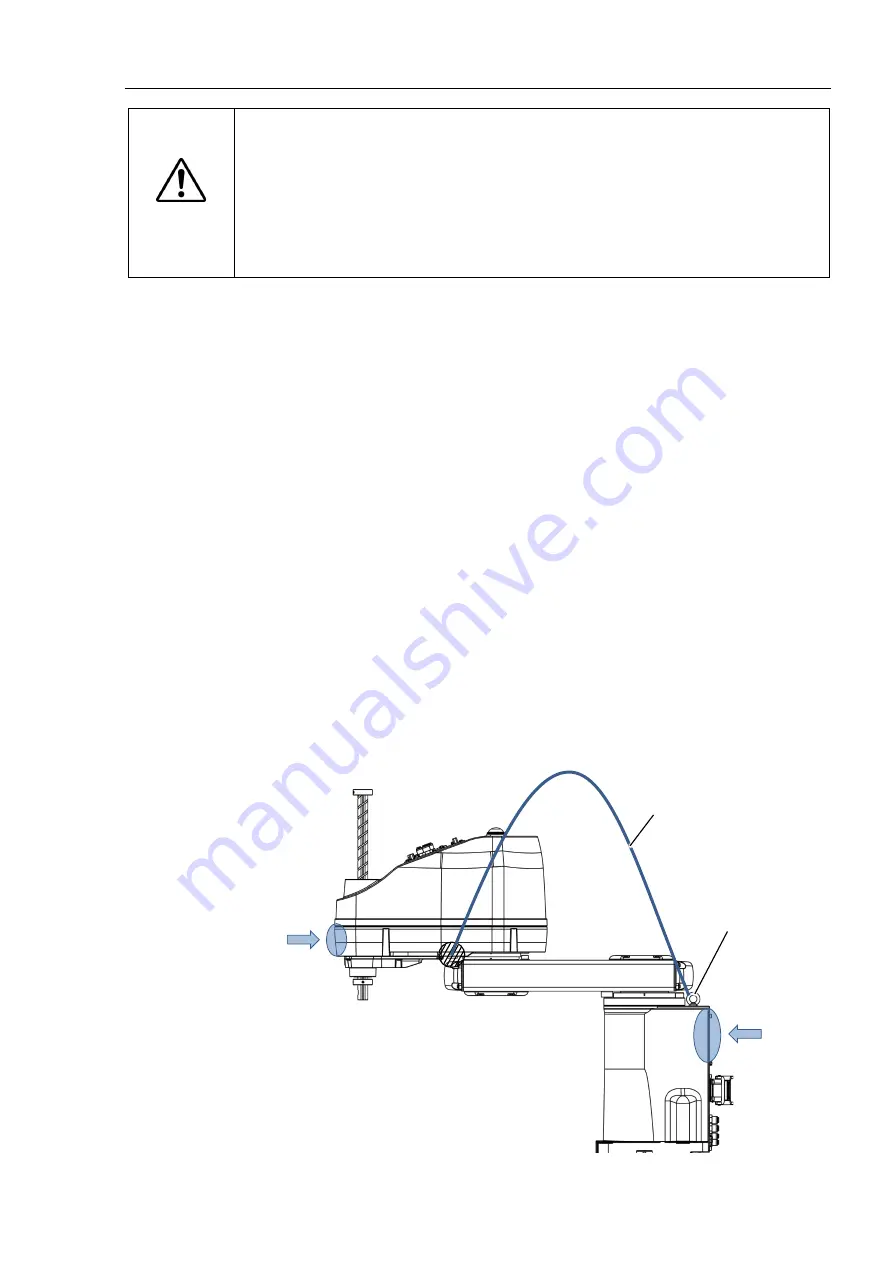
Follow the procedure below to transport the Manipulator by lifting.
(1) Attach the eyebolt to the upper part of the base of the Manipulator.
(2) Put the Manipulator arm in the extended position.
(3) Allow the lifting belt to be fixed to Arm #2. Use the metal part of the shaded area in
the figure below as a guide to prevent the band from shifting.
Note that the cover may be damaged if the belt gets caught in the resin cover.
(4) To prevent the Manipulator from falling over, lift it up slightly and remove the bolts
secured to the delivery equipment and table.
(5) To prevent the Manipulator from falling over, place your hand on the position
indicated by the arrow and lift the Manipulator and move the Manipulator to the table
where it will be installed.
M8 eyebolt
(supplied)
Lifting belt
NOTE
Summary of Contents for SCARA GX Series
Page 1: ...Original instructions Rev 2 EM221R5129F SCARA Robots GX series Manual ...
Page 2: ...GX series Manual Rev 2 ...
Page 12: ......
Page 86: ...GX4 Manipulator 5 Motion Range 76 GX series Rev 2 ...
Page 88: ......
Page 188: ......
Page 202: ......


