Function 7.3 Extension I/O Board (Extension I/O Board – Optional)
61
7.3 Extension I/O Board
(the standard for the regions outside Europe)
7.3.1 Extension I/O Board : Jumper Settings
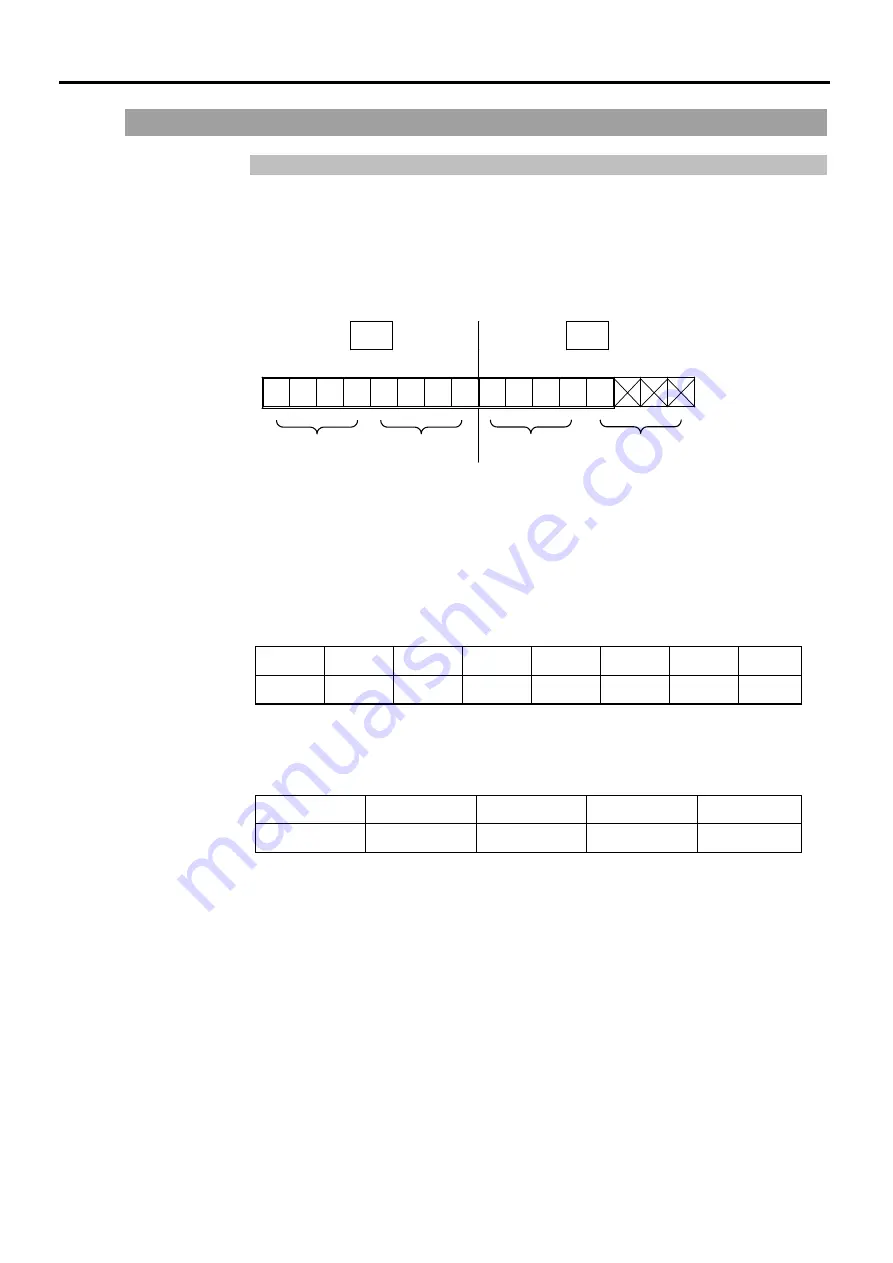
The I/O board address is defined by the jumpers JP1, 2, and 3.
When assigning the I/O boards to 0700H to 0707H, set them as follows:
JP1 : Short-circuit 16-15, 14-13, 12-11, 10-9 and 8-7.
JP2 : Short-circuit 10-9, 8-7, 6-5, 4-3 and 2-1.
JP1
JP2
A15 A8 A7 A3
0 0 0 0 0 1 1 1 0 0 0 0 0
0 7 0 0
When the Extension I/O Board is extended, an appropriate software settings must be done
in addition to the below jumper settings. For details about software settings, refer to the
SRC5**/SPEL 95 User’s Guide for the section, “11.2.2 Remote” in the “Function 11.
Setup”.
JP1
JP1 assigns I/O addresses A15 through A8.
16-15 14-13 12-11 10-9 8-7 6-5 4-3 2-1
A15 A14 A13 A12 A11 A10 A9 A8
Short : 0, Open : 1
JP2
JP2 assigns I/O addresses A7 to A3.
10-9 8-7 6-5 4-3 2-1
A7 A6 A5 A4 A3
Short : 0, Open : 1
JP3
Short-circuit between 1-2, 4-5, 7-8 and 10-11.
JP4, 5, 6
Normally open.
Summary of Contents for SRC520
Page 1: ...SRC520 Rev 4 EM015C868F ROBOT CONTROLLER ...
Page 2: ...ROBOT CONTROLLER SRC520 Rev 4 ...
Page 13: ...Function The manual herein explains in detail the functions of the robot controller SRC520 ...
Page 14: ...Function 2 ...
Page 29: ...Function 2 3 Control Unit Part Names and Functions 17 2 3 4 Dimensions mm ...
Page 35: ...Function 2 4 Drive Unit Part Names and Functions 23 2 4 5 Dimensions mm ...
Page 36: ...Function 2 4 Drive Unit Part Names and Functions 24 ...
Page 50: ...Function 3 5 Noise Countermeasures Installation 38 ...
Page 66: ...Function 6 3 Pin Assignments D I O Connector 54 ...
Page 96: ...Function 9 2 Preparation for Communication RS 232C Settings 84 ...
Page 106: ...Function 11 Stand alone Option for SRC520 94 ...
Page 108: ...Maintenance 96 ...
Page 139: ...Maintenance 4 3 Drive Unit Drive Unit 127 4 3 Drive Unit 4 3 1 System Configuration ...


