background image

The ejected paper is wrinkled.

The paper is too thin or is damp. Make sure the paper is within

the specifications. See “Technical Specifications” in the

Appendix. Do not store your paper in a damp or humid

environment.

Single-sheet paper does not fully eject.

Use the 

LOAD/EJECT 

button to eject the page.

The paper may be too long. Use paper that is within the

specified size. See “Technical Specifications” in the Appendix.

Paper from the paper feeder is crooked.

The paper may be old or creased. Use only new, clean sheets of

paper.

There may be too much paper on the paper support.

Make sure that your paper is the proper size and quality. See

the Appendix.

When installing the push tractor, it does not lock in place.

The release lever is in the continuous paper position. Move the

release lever to the single-sheet position.

3-30

Using the Printer

Summary of Contents for Stylus 1000

Page 1: ...User s Guide 1000 Stylus TM Esr z A E P S O N EPSON ...

Page 2: ...Printer Parts control panel paper feeder paper support manual feed slot parallel interface access panel J L AC inlet ...

Page 3: ...xpenses incurred by purchaser or third parties as a result of accident misuse or abuse of this product or unauthorized modifications repairs or alterations to this product or excluding the US failure to strictly comply with Seiko Epson Corporation s operating and maintenance instructions Seiko Epson Corporation shall not be liable against any damages or problems arising from the use of any options...

Page 4: ...tion and protection from overheating Placing the printer on a bed sofa rug or other similar surface may block the openings Also do not place the printer in a built in installation unless proper ventilation is provided Never place the printer near or over a radiator or heat register Use the type of power source indicated on the label If you are not sure of the type of power available consult your d...

Page 5: ...ints or other risks Refer all servicing in those compartments to service personnel 14 Unplug the printer from the wall outlet and have it repaired by a qualified service person under the following conditions A When the power cord or plug is damaged or frayed B If liquid has been spilled into it C If it has been exposed to rain or water D If it does not operate normally when the operating instructi...

Page 6: ...cuit different from that to which the receiver is connected Q Consult the dealer or an experienced radio TV technician for help WARNING The connection of a non shielded equipment interface cable to this equipment will invalidate the FCC Certification of this device and may cause interference levels which exceed the limits established by the FCC for this equipment It is the responsibility of the us...

Page 7: ...as a lines per page setting and you are using 8 5 x ll inch paper set the lines per page to 61 for A4 try 65 Note Tofind the right lines per page settingfor paper that is not 8 5 x 12 create a test document using your application program Set your top and bottom margins to 0 and then create a file of numbered lines from 1 to 66 When you print yourfile notice the last number printed on the first pag...

Page 8: ...ort and the paper separators l 6 Choosing a Place for the Printer l 7 Plugging in the Printer l 8 Installing the Ink Cartridge l 9 Loading Paper in the Paper Feeder l 13 Testing the Printer l 15 Connecting the Printer to Your Computer l 17 Setting Up Your Software Programs l 18 Chapter 2 Paper Handling Printing on Single Sheets 2 2 Tips on using the paper feeder 2 2 Adjusting the loading position ...

Page 9: ...ing the Printer Operating the Control Panel 3 2 Indicator lights 3 2 Buttons 3 3 Selecting Character Fonts 3 5 Scalable fonts 3 6 Condensed printing 3 7 Using the Default Settings Mode 3 7 Default settings descriptions 3 9 Character table Auto print direction Continuous paper page length Skip over perforation Network interface mode Mixed text graphics mode Auto line feed Auto interface selection A...

Page 10: ... Appendix Technical Specifications A 2 Printer specifications A 2 Printing Paper Mechanical Electrical Environmental Safety approvals Interface specifications A 7 Specifications and pin assignments Interface timing Initialization A 10 Default settings Command Summary A 11 Sending printer commands A 11 Using the command summary A 12 General operation Paper feeding Page format Print position motion ...

Page 11: ...e range of paper size with 136 printable columns You can print on paper up to A3 size 297 mm x 420 mm 11 7 inches x 16 5 inches using the paper feeder You can manually insert paper up to 420 mm x 420 mm 16 5 inches x 16 5 inches Quiet printing Ink jet technology helps maintain a quiet working environment Epson ESC P 2 This enhanced printer control language adds scalable fonts and improved graphics...

Page 12: ...npack and set up the printer It also describes printing a self test and configuring your software for the printer These instructions include basic directions regarding the ink paper and placement of the printer be sure to read and follow these instructions carefully Chapter 2 explains paper handling It contains instructions on using the optional push tractor and printing on special paper Chapter 3...

Page 13: ...wing support services through the Epson ConnectionSM at 800 922 8911 a a a a a a a a Assistance in locating your nearest Authorized Epson Reseller or Service Center Technical assistance with the installation configuration and operation of Epson products Information on ESC P 2 drivers for your software Sales of the ESC P reference manual which contains comprehensive information on ESC P 2 Epson tec...

Page 14: ...ter l 5 Attaching the paper support and the paper separators l 6 Choosing a Place for the Printer l 7 Plugging in the Printer l 8 Installing the Ink Cartridge Loading Paper in the Paper Feeder _ l 13 Testing the Printer l 15 Connecting the Printer to Your Computer l 17 Setting Up Your Software Programs l 18 Setting Up the Printer 1 1 ...

Page 15: ...t prints an ink jet printer is much quieter than an impact dot matrix printer A few precautions Even if you are familiar with other types of printers be sure to read through the following list of precautions to operate your ink jet printer safely and efficiently 0 The ink cartridge contains ethyl alcohol Under normal circumstances it will not come out of the cartridge If leakage occurs however mak...

Page 16: ...ng or swinging an ink cartridge may cause leakage of ink Do not put your hand inside the printer or touch the cartridge during printing Before transporting the printer make sure the print head is capped and do not remove the ink cartridge Before you turn off the printer make sure that the print head is capped It is capped when it is in the far right position as shown below The printer caps the pri...

Page 17: ...f test using a single sheet from the package and check the results Test both sides of the paper to determine which gives you the best quality printing If the ink does not bleed or smear the paper should be suitable for use with your printer Because the drying speed for the ink depends on the pattern being printed the type of paper used and the temperature and humidity some smudging or streaking ma...

Page 18: ...d is the right shape for your location q Caution It is not possible to change the printer s voltage Check the label on the back of the printer to make sure the printer s voltage matches your electrical outlet lf not con t your dealer You must remove all packing and protective materials packed with your printer before you can set it up and turn on the power Follow the directions on the Notice Sheet...

Page 19: ... below 1 Attach the paper support Grasp the paper support and place the right end notch over the mounting post of the printer Then push the left notch onto the left mounting post 2 Attach the paper separators Hold the first paper separator upright and push the tips into the notches Then lower the paper separator Repeat for the second paper separator 1 6 Setting Up the Printer ...

Page 20: ...ces Avoid places subject to shocks and vibrations Place the printer where you can easily unplug the power cord Avoid electrical outlets controlled by wall switches or automatic timers Also avoid outlets on the same circuit as large motors or other appliances that can cause fluctuations in line voltage Keep the entire computer system away from potential sources of electromagnetic interference such ...

Page 21: ...printer to make sure the voltage required by the printer matches that of your electrical outlet Also make sure that you have the correct power cable for your power source Caution It is not possible to change the printer s voltage If the rated voltage and your outlet voltage do not match contact your dealerfor assistance Do not plug in the power cord 3 If the power cord is not attached to the print...

Page 22: ...act a physician Wash all traces of inkfrom your skin with soap and water lf irritation occurs contact a physician The first time you use your new printer you need to charge the ink delivery system with ink You need to perform this operation only once Install the ink cartridge as follows Note Do not open the ink cartridge package until just before you install the cartridge OY the ink may dry up 1 M...

Page 23: ...3 Open the printer cover 4 Pull the top of the ink cartridge clamp towards you to open it 1 10 Setting Up the Printer ...

Page 24: ...ove it from the protective cardboard Make sure to remove the tape seal from the ink cartridge 6 Lower the cartridge into the holder with the label face up and the arrow mark on the cartridge towards the arrow mark on the printer case Setting Up the Printer 1 11 ...

Page 25: ... replace it with a new one The cartridge may bec e unusable otherwise 8 Press the ALT button again to charge the ink delivery system It takes about one minute The PAUSE light flashes throughout the cycle and turns off when the ink charging has finished R Caution Do not turn offor reset the printer until the ink charging cycle is complete 9 Close the printer cover 1 12 Setting Up the Printer ...

Page 26: ...while holding up the lever on 2 Slowly slide the right edge guide as far to the left as it will go and align it to the guide mark Then adjust the left edge guide to match the width of your paper You may also use the guide mark for A4 size paper or letter legal size paper for the U S version When you load paper 420 mm 16 5 inches wide move the right edge guide as far to the right as it will go 420 ...

Page 27: ...ter support 4 Fan a stack of paper then tap it on a flat surface to even the edges While aligning the paper s edges with the edge guides insert it with the printable surface face down all the way into the paper feeder until it meets resistance Note The paperfeeder holds up to 100 sheets the maximum for 64 g m or I6 lb paper Do not load paper higher than the mark on the edge guide 1 14 Setting Up t...

Page 28: ...ngth Then the printer prints character samples on page 2 Note Use paper at least 360 mm 14 inches wide otherwise the print head prints directly on the platen and shortens your printer life The paper feeder holds up to 200 sheets the maximum for 64 g m or 16 lb paper Follow these steps to run the self test 1 Make sure the printer is turned off 2 While holding down the FONT button LQ mode or the LOA...

Page 29: ...R 2 n O123456789 ABCDEFGHIJKLMNOPQRSTUVWX 0123456789 ABCDEFGHIJKLMNOPQRSTUVWXYZ _ abcdefghi 0123456789 ABCDEFGHIJKLMNOPQRSTUVWXYZ U _ abcdefghij 0123456789 ABCDEFGHIJKLMNO RSTUVWXYZN abcdefghij 3 The test continues until the paper in the paper feeder runs out or you press the PAUSE button To stop the test press the PAUSE button To resume the test press the PAUSE button again 4 To end the self test...

Page 30: ...and computer are turned off 2 Plug the cable connector securely into the printer s interface connector 3 Squeeze the wire clips together until they lock in place on both sides If your cable has a ground wire connect it to the ground connector above the interface connector 4 Plug the other end of the cable into the computer s parallel interface If there is a ground wire at the computer end of the c...

Page 31: ...e top of the list as possible Stylus 1000 SQ 850 2550 Stylus 800 ESC P 2 SQ 850 1050 ESC P SQ 870 1170 LQ 550 1010 LQ 870 1170 LQ 2550 LQ 570 1070 LQ 8OO lOOO LQ 1500 If none of these printers is listed among your software s options select the first one available from the following LQ EX FX LX RX MX Epson printer Standard printer and Draft printer After you select the most appropriate printer as d...

Page 32: ...r 2 7 Installing the push tractor 2 7 Loading continuous paper 2 8 Tips on using continuous paper 2 11 Using the tear off feature 2 12 Removing the push tractor 2 13 Switching Between Continuous Paper and Single Sheets 2 14 Switching to single sheets 2 14 Switching to continuous paper 2 15 Printing on Special Paper 2 16 Envelopes 2 16 Labels 2 18 Paper Handling 2 1 ...

Page 33: ... of paper during a print job reload the paper feeder and then press the LOAD EJECT button to continue printing tl Press the LOAD EJECT button if you need to eject a sheet of loaded paper Cl You can switch to either manual loading or to the optional push tractor without removing the paper supply from the paper feeder For details see Loading paper manually or Switching to continuous paper later in t...

Page 34: ...er feeder by pressing the LOAD EJECT button 3 Open the printer cover and the paper feeder cover 4 As soon as the paper is loaded hold down the ALT button and press the ECONOMY CONDENSED button to move the loading position up l 180 inch or the FONT button to move the loading position down l 180 inch Continue pressing the appropriate button until you reach the position you want 5 Close the printer c...

Page 35: ...urned on again Adjusting the print position The print position is the position on the page where the print head is currently printing If you want to change the current vertical print position you can use the micro feed feature as follows 1 Press the PAUSE button to stop printing the PAUSE light comes on 2 Hold down the ALT button and press the ECONOMY CONDENSED up or FONT down button to adjust the...

Page 36: ...er feeder You can use the manual feed slot to load single sheets of paper from 182 mm 7 2 inches to 420 mm 16 5 inches wide and long When you load paper manually you can use the printer s micro feed feature just as when you load paper from the paper feeder Follow these steps to load a single sheet in the manual feed slot 1 Turn on the printer Lower both sides of the page eject guide Note Ifa sheet...

Page 37: ...hen try loading if again 4 Send data from the computer to start printing When the printer finishes printing it ejects the sheet If the sheet does not come all the way out press the LOAD EJECT button Press the LOAD EJECT button or send data to the printer without inserting a sheet into the manual slot to switch back to the paper feeder The page eject guides raise automatically The printer then load...

Page 38: ...ning Be careful not to touch the part of the access panel or push tractor that fits inside the printer 1 Make sure the printer is turned off Then insert your fingers into the cutouts on both sides of the access panel pull straight back on the top of the cutouts to remove the access panel from the printer 2 Push the release lever of the tractor down to the single sheet position Paper Handling 2 7 ...

Page 39: ...ing continuous paper 1 Place the supply of continuous paper behind the printer so that the printer feeds the paper smoothly Make sure the paper path is not obstructed and allow the printed pages to be stacked in front of the printer See below for an illustration of proper paper placement 2 8 Paper Handling ...

Page 40: ...k levers Align one sprocket unit with the mark as shown below Slide the other sprocket unit to match the width of your paper but do not lock it 3 Position the center support midway between the two sprocket units 4 Open both sprocket covers Paper Handling 2 9 ...

Page 41: ...holes of the paper over the sprocket pins and then close the sprocket covers 6 Slide the left sprocket unit to remove any slack in the paper Then lower the sprocket lock levers until they lock into place 2 10 Paper Handling ...

Page 42: ...he printer When it receives data it advances the paper to the loading position and starts printing Tips on using continuous paper Follow the tips below for the best performance when printing on continuous paper If the printer runs out of paper during a print job attach additional paper to the push tractor and press the LOAD EJECT button to continue printing Paper Handling 2 11 ...

Page 43: ...nished printing you can use the tear off feature to advance paper to the tear off edge of the printer You can then easily tear off printed sheets When you resume printing the printer feeds paper back to the loading position This feature lets you save paper that would normally be lost between documents To use the tear off feature turn the tear off mode on using the default settings mode as describe...

Page 44: ...r reaches the factory set tear off position the printer beeps Use the factory setting as a reference point when adjusting the tear oflposition Removing the push tractor 1 Tear off any printed pages Press the LOAD EJECT button to feed the paper backward out of the printer and into the paper park position Remove the paper from the push tractor RCaution U Never feed labels backzuard To remove labels ...

Page 45: ... Replace the access panel Switching Between Continuous Paper and Single Sheets When using the push tractor you can easily switch to single sheet printing without removing the continuous paper Switching to single sheets To switch from continuous paper to single sheets follow the steps below 2 14 Paper Handling ...

Page 46: ...s the LOA D EJECT button to feed the paper backwnrds to the paper park position You can thcrz lower the lever again 4 Attach the paper separators as shown on page l 6 5 The printer is ready to print When it receives data it loads a single sheet from the paper feeder or manual feed slot Switching to continuous paper To switch from single sheets back to continuous paper follow the steps below 1 If a...

Page 47: ...wide variety of other paper types such as envelopes and labels Envelopes You can load the following envelope sizes from the manual feed slot No 6 envelope 166 mm 6 5 inches x 92 mm 3 6 inches No 10 envelope 240 mm 9 5 inches x 104 mm 4 1 inches Printing on envelopes You can use the manual feed slot to print on individual envelopes 1 Turn on the printer and open the printer cover 2 Turn the paper t...

Page 48: ...it finishes printing Note Make sure your software keeps the printing entirely within the printable area of the envelope See the Appendix for details Use envelopes only under normal operating conditions lf the ink is not dryingfast enough try removing envelopes one at a time as they finish printing To switch back to the paper feeder turn the paper thickness lever counterclockwise as far as it will ...

Page 49: ...easily peel off the backing and jam the printer I 1 Ll c l Make sure the tear off mode is set to offin the default settings mode when using labels Use labels under normal operating conditions only because they are sensitive to extreme temperature and humidity Do not leave labels loaded in the printer between jobs they nmy jam zclhen you resume printing To remove labels from the printer follow the ...

Page 50: ...nging the default settings 3 11 Optional Interface Cards 3 15 Installing an interface card 3 16 The C82305 C82306 serial interface card 3 17 Maintenance and Transportation 3 18 Replacing the ink cartridge 3 18 Cleaning the print head 3 20 Cleaning the printer 3 20 Transporting the printer 3 21 Troubleshooting 3 22 Error indicators 3 22 Power supply 3 24 Printing 3 25 Paper handling 3 29 Using the ...

Page 51: ... 0 DATA 0 PAPERour Indicator lights The indicator lights tell you the current status of the printer and give information about error conditions See Troubleshooting for details on errors PAUSE On when printing is paused FONT Indicates the current font setting These three lights go on and off when you press the FONT button The font menu on the control panel tells you which font is selected For instr...

Page 52: ...e ink cartridge see page 3 18 PAPER OUT On when the printer runs out of paper Rapid flashing indicates a paper jam DATA On when data remains in the printer s memory Note When the network interface mode is set to on in the default settings mode data may be present in the printer s buffer even though the printer is not continuously printing Always make sure the DATA light is off before turning ojf t...

Page 53: ...is button to select economy or condensed printing The indicator lights indicate which mode is on ALT Hold down this button for several seconds to move the print head to the ink cartridge replace position when the printer is paused The ALT button also alters the functions of the other buttons Hold down the ALT button and press another button to perform the following functions PRINT HEAD CLEANING AL...

Page 54: ...ppearance compared with draft fonts in other printers It uses fewer dots per character than the other fonts to increase printing speed This allows you to print good quality documents for rough drafts and editing work Press the FONT button to select from the eight fonts listed on the control panel The three FONT lights come on O or go off o or flash 5 to indicate the active font Note q Roman T and ...

Page 55: ...Prestige ABCDEFGhijklmOl23456789 0 0 Epson Script A8CDEFGhijklm0123456789 0 on 0 off 6 flashing Scalable fonts The size of the Roman Sans Serif Roman T and Sans Serif H fonts can be selected from 8 to 32 points in 2 point increments by using your software or by sending an ESC P 2 command See the documentation that came with your software for information on selecting the size of scalable fonts See ...

Page 56: ...lect the condensed mode you should select condensed mode through the software rather than with the control panel Software or command settings usually override panel settings Using the Default Settings Mode Your printer comes with a series of internal settings that control a variety of printer functions such as print direction and auto line feed Because these settings take effect each time you turn...

Page 57: ... 5 inches length 7016 inches Skip over perforation On Off Network interface mode On Off Mixed text graphics mode On Off Auto line feed On Off Auto interface selection On Off Auto interface wait time 10 seconds 30 seconds Tear off On Off l Available only in the European version Available only in the North South American version Note Most software controls the character table and auto line feed lf y...

Page 58: ...ta and unidirectional motion for graphics data When this feature is set to off the print head motion is controlled by your software Continuous paper page length When you are printing on continuous paper this feature lets you select from the four page lengths described in the table on page 3 15 Skip over perforation When this feature is on and you are using continuous paper the printer leaves a l i...

Page 59: ...ght is off before turning off the printer Mixed text graphics mode This feature is for software that has problems printing scalable font text combined with graphics Leave the mixed text graphics mode set to off if you don t notice any problems in your printout Auto line feed When the auto line feed feature is on each carriage return CR code is accompanied by a line feed LF code If your printed tex...

Page 60: ... specified period the printer re determines the source of any new data Otherwise the printer receives data only from the currently selected interface and ignores data from the other interface You can set the time to either 10 seconds or 30 seconds Tear of7 You can set this feature on to select tear off mode See Using the tear off feature in Chapter 2 for information on tear off mode Use the tear o...

Page 61: ...utton to make your selection Languages FONT English 0e0 French 000 German 0 0 Oon l off After you press the ALT button the printer prints the current default settings and the next instruction in the language you selected Wait until printing is finished then go to the next step 4 To move to the feature you want to change press the ALT button until the DATA PAPER OUT and INK OUT lights indicate the ...

Page 62: ...ps 4 and 5 to make all of your changes 7 To exit the default settings mode turn the printer off Note Cl You may exit default setting mode any time by turning off the printer Any changes you have made remain in effect until you change them again Cl lf you ulant to check the new default settings enter the default settings mode again and print the current settings Turn the printer qff to exit without...

Page 63: ...860 Portuguese PC863 Canadian French PC865 Norwegian PC853 Turkish BRASCII Brazilian Portuguese PC857 Turkish Abicomp Brazilian Portuguese PC437 Greek Greek PC851 Greek PC855 Cyrillic PC866 Russian PC852 East Europe on Off l Available only in the European version l Available only in the North South American version FONT m o o 0 0 1 0 0 000 000 I 000 060 I 000 I I 000 0 0 0 0 0 6 000 000 006 06 1 0...

Page 64: ... feed Off on Auto interface on selection Off Auto interface wait 30 seconds time 10 seconds Tear off Off on 000 orno 0 0 0 0 0 0 0 0 l O 0 0 0 0 0 0 0 0 l e orno 0 0 0 0 Optional Interface Cards You can use optional interface cards to supplement your printer s built in parallel interface The Epson interface cards below are compatible with your printer Not all interfaces are available in all countr...

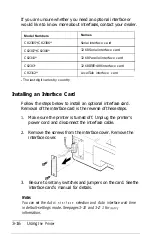
Page 65: ...terface Card Follow the steps below to install an optional interface card Removal of the interface card is the reverse of these steps 1 Make sure the printer is turned off Unplug the printer s power cord and disconnect the interface cable 2 Remove the screws from the interface cover Remove the interface cover 8 3 Be sure to set any switches and jumpers on the card See the interface card s manual f...

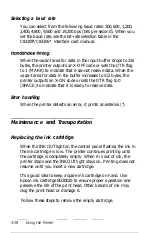
Page 66: ...the printer s internal socket 5 Re insert the screws and tighten to complete installation of the optional interface The C82305 C82306 serial interface card To use the C82305 C82306 interface card see the sections below on selecting a baud rate handshake timing and error handling For all other data transfer conventions see the C82305 C82306 interface card manual Using the Printer 3 17 ...

Page 67: ... indicate that it is ready to receive data Error handling When the printer detects an error it prints an asterisk Maintenance and Transportation Replacing the ink cartridge When the INK OUT light on the control panel flashes the ink in the ink cartridge is low The printer continues printing until the cartridge is completely empty When it is out of ink the printer stops and the INK OUT light stays ...

Page 68: ...e apart or try to refill it Warning The ink cartridge is self contained to prevent leaks However if ink gets on your hands wash them thoroughly with soapy water Avoid touching your eyes lf irritation occurs contact a physician 5 Turn to page l 11 and follow the instructions from step 5 on to install the new cartridge After installing make sure that you press the PAUSE button and that the PAUSE lig...

Page 69: ...40 seconds The PAUSE light flashes throughout the cycle and then stays on when the cleaning cycle is finished 3 Press the PAUSE button to resume printing Cleaning the printer To keep your printer operating at its best you should clean it thoroughly several times a year Before you clean the printer make sure the printer is turned off and remove any paper Use a soft brush to carefully brush away all...

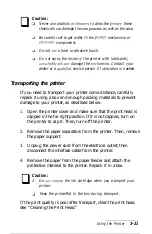
Page 70: ...to prevent damage to your printer as described below 1 Open the printer cover and make sure that the print head is capped in the far right position If it is not capped turn on the printer to cap it Then turn off the printer 2 Remove the paper separators from the printer Then remove the paper support 3 Unplug the power cord from the electrical outlet then disconnect the interface cable from the pri...

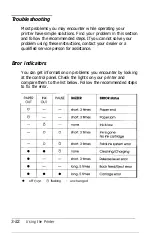
Page 71: ...ot solve your problem using these instructions contact your dealer or a qualified service person for assistance Error indicators You can get information on problems you encounter by looking at the control panel Check the lights on your printer and compare them to the list below Follow the recommended steps to fix the error l off Oon 6 flashing unchanged 3 22 Using the Printer ...
Page 72: ...rror Contact your dealer Cleaning Charging The printer is in the charging cycle or the cleaning cycle This is not an error Release lever error The release lever is in the wrong position Move the release lever to the correct position Back feed Eject error The paper is too long When using continuous paper tear off any printed page before ejecting Use paper that is within the specified size See Techn...

Page 73: ...ntrolled by an outside switch or automatic timer use a different outlet Plug another electrical device into the outlet to determine whether it is working The lights come on briefly but then go off and stay off Check that the printer s voltage rating matches the voltage of your electrical outlet If the voltages do not match unplug the printer and contact your dealer immediately Do not reconnect the...

Page 74: ...he computer Make sure the interface cable is plugged in securely Make sure your interface cable meets both the printer and computer specifications The printer sounds like it is printing but nothing prints _ _ _ _ The print head nozzles may be clogged Hold down the ALT button and press the PAUSE button for two seconds to clean the print head See Cleaning the Print Head earlier in this chapter Using...

Page 75: ...int The print head nozzles may be clogged Hold down the ALT button and press the PAUSE button for two seconds to clean the print head See Cleaning the Print Head earlier in this chapter The paper thickness lever may not be set correctly The raised position is for envelopes and may cause faint printouts if used for plain paper For details on the paper thickness lever see Printing on Special Paper i...

Page 76: ...tware is correctly configured for your printer The font selected on the control panel does not print Your software settings may be overriding the control panel setting Check the font settings in your software The wrong characters are printed The wrong character table is selected Change the character table as described in Using the Default Settings Mode earlier in this chapter Printing starts too h...

Page 77: ...gth setting may not match the length of the paper loaded in the printer Change the page length setting with your software to match the paper you are using When using continuous paper you can change the length in the default settings mode When using an optional interface card the printer does not print or the printout is not what you expected The other interface may be selected by the Auto interfac...

Page 78: ...r than the mark on the edge guide The paper is too thick or too thin to be fed Make sure the paper is within the specifications Some paper types require manual feeding See Technical Specifications in the Appendix Check that the release lever is in the single sheet position when using the push tractor The paper feeder cover may be opened Close the paper feeder cover Paper may be jammed near the pri...

Page 79: ...too long Use paper that is within the specified size See Technical Specifications in the Appendix Paper from the paper feeder is crooked The paper may be old or creased Use only new clean sheets of paper There may be too much paper on the paper support Make sure that your paper is the proper size and quality See the Appendix When installing the push tractor it does not lock in place The release le...

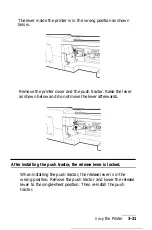
Page 80: ...er as shown below and do not move the lever afterwards After installing the push tractor the release lever is locked When installing the push tractor the release lever is in the wrong position Remove the push tractor and lower the release lever to the single sheet position Then re install the push tractor Using the Printer 3 31 ...
Page 81: ...paper jams Check that the release lever is in the correct position Make sure the paper supply is not obstructed by a cable or some other object Make sure that your paper supply is positioned within 1 meter 3 28 feet of the printer Check that the holes on the sides of the paper are aligned with each other Also make sure the sprocket units are locked and their covers are closed Check that the paper ...

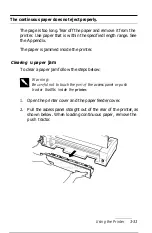
Page 82: ...med inside the printer Clearing u paper jam To clear a paper jam follow the steps below 0 Warning Be carefill not to touch the part of the access panel or push tractor thatfits inside the printer 1 Open the printer cover and the paper feeder cover 2 Pull the access panel straight out of the rear of the printer as shown below When loading continuous paper remove the push tractor Using the Printer 3...
Page 83: ...ve frequent paper feeding or paper jam problems refer to this checklist of corrective measures Cl Use a higher quality paper one that is not too thin or rough Some types of paper require manual feeding See Chapter 2 Ll Fan the stack of paper and then tap it on its edge to align it before you load it 0 Be sure that you do not load paper higher than the mark on the edge guide LI Try turning the stac...

Page 84: ...cal Specifications A 2 Printer specifications A 2 Interface specifications A 7 Initialization A 10 Command Summary A 11 Sending printer commands A l 1 Using the command summary A 12 Character Tables A 20 Appendix A l ...

Page 85: ...aphics Bidirectional with logic seeking for text and graphics The auto print direction can be set in the default setting mode Line spacing l 6 inch l 8 inch or programmable in l 360 inch increments Paper feed speed 82 milliseconds per l 6 inch line 2 2 inches set for continuous paper Input buffer 64 KB when Mixed text graphics option in default settings mode is set to ON 128 KB when Mixed text gra...

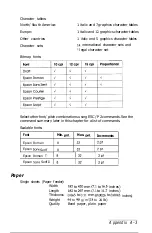
Page 86: ...binations using ESC P 2 commands See the command summary later in this chapter for a list of commands Scalable fonts Font Min pnt Max pnt Increments Epson Roman 8 32 2 Pf Epson Sans Serif 8 32 2 Pf Epson Roman T 18 132 12Pt 1 Epson Sans Serif Ii 18 132 bpt I Paper Single sheets Paper feeder Width 182 to 420 mm 7 1 to 16 5 inches Length 182 to 297 mm 7 1 to 11 7 inches Thickness 0 065 to 0 11 mm 0 ...

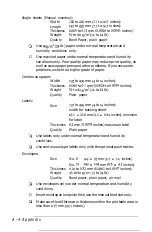
Page 87: ...nches Weight 52 to 82 g m2 14 to 22 lb Quality Plain paper Labels Size 102 to 406 mm 4 to 16 inches width for backing sheet 63 5 x 23 8 mm 2 5 x 0 94 inches minimum for label Thickness 0 2 mm 0 0078 inches maximum total Quality Plain paper D Use labels only under normal temperature and humidity conditions Cl Use continuous type labels only with the optional push tractor Envelopes Size No 6 166 x 9...

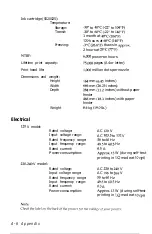
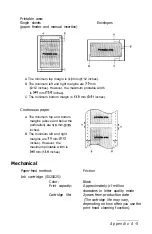
Page 88: ...A The minimum top and bottom margins above and below the perforation are 9 0 mm 0 35 inches B The minimum left and right margins are 3 0 mm 0 12 inches However the maximum printable width is 345 mm 13 6 inches Mechanical Paper feed method Ink cartridge S020025 Color Print capacity Cartridge life IA Friction Black Approximately 0 7 million characters in letter quality mode 2 years from production d...

Page 89: ...mm 26 25 inches 2 4 mm 11 2 inches without paper feeder 466 mm 18 3 inches with paper feeder Electrical 120 V model Rated voltage Input voltage range Rated frequency range Input frequency range Rated current Power consumption 220 240 V model Rated voltage Input voltage range Rated frequency range Input frequency range Rated current Power consumption AC 120 V AC 103 5 to 132 V 50 to 60 Hz 49 5 to 6...

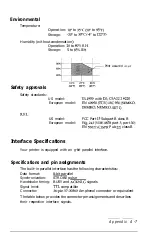
Page 90: ...lass B European model Vfg 243 VDE 0878 part 3 part 30 EN 55022 CISPR Pub 22 class B Interface Specifications Your printer is equipped with an g bit parallel interface Specifications and pin assignments The built in parallel interface has the following characteristics Data format bit parallel Synchronization STROBE pulse Handshake timing BUSY and ACKNLG signals Signal level TTL compatible Connector...

Page 91: ...ulse LOW indicates that data has been received and that the printer is ready to accept more data 11 29 BUSY OUT A HIGH signal indicates the printer cannot receive data The signal goes HIGH in the following cases 1 During data entry for each character 2 During printing 3 When the PAUSE button is pressed 4 During an error state 12 30 PE OUT A HIGH signal indicates the printer is out of paper 13 SLCT...

Page 92: ...NC Not used 35 Pulled up to 5 V through 1 O kR resistance 36 Note NC Not used The column heading Direction refers to the direction of signal flow as viewed from the printer Return denotes the twisted pair return connected at signal ground level For the interface wiring be sure to use a twisted pair cable for each signal and to complete the connection on the return side All interface conditions are...

Page 93: ... printer mechanism is initialized 2 The input data buffer is cleared 3 The download character set is cleared 4 The print buffer is cleared 5 The default values are set Panel settings are reset CI Software sends the ESC initialize the printer command The following condition then results 1 The print buffer is cleared 2 The default values are set Crhe last panel settings are kept D Hold down the RESE...

Page 94: ...t condensed printing Download character set Hardware initialization cleared Software control panel initialization deselected only Command Summary Sending printer commands Most actions your printer performs are handled by your software Software commands instruct the printer to print in a particular typeface feed the paper a certain amount after printing each line start printing a particular place o...

Page 95: ... it is merely listed If it has parameters they are explained The parameters are indicated by lowercase italicized letters usually n The examples below show how the parameters are indicated ESC 8 is a command with no parameters ESC U 1 O is a command that uses 1 to turn the feature on and 0 to turn it off ESC nl n2 is a command with two parameters ESC D nn is a command with a variable number of par...

Page 96: ...at ESC c4Omlm2nln2 m ml m2x256 m Top margin in defined units n nl n2 x 256 n Bottom margin in defined units Set Page Length in Defined Unit ESC C20nln2 n nl n2 x 256 n Number of defined units Set Page Length in Lines n Number of lines Set Page Length in Inches n Number of inches Set Bottom Margin for Continuous Paper n Number of lines Cancel Top Bottom Margin for Continuous Paper Set Left Margin n...

Page 97: ...ion n nl n2 x 256 n Moves current print position in defined units Before you define the unit the default unit is l 120 inch in draft and l 180 inch in LQ for this command Set Absolute Vertical Print Position ESC V20nln2 n nl n2 x 256 n Specifies print position from top margin in defined units Set Relative Vertical Print Position ESC v20nln2 n nl n2 x 256 n Moves current print position in defined u...

Page 98: ... in 0 5 points Total points nl n2 x 256 x 0 5 n 0 No change in point n 0 16 21 24 28 32 36 40 44 48 52 56 60 or 64 for Roman Sans Serif Roman T and Sans Serif H n 0 21 42 for other typefaces ESC P M g p or cancel ESC X Master Select To find the value of II add together the numbers of the font attributes and enhancements you want to combine from the list below n 0 1Ocpi 16 Double strike 1 12 cpi 32...

Page 99: ...ng Cancel Condensed Printing Select Double Width Printing one line Turn Double Width Printing On Off Cancel Double Width Printing one line Turn Double Height Printing On Off Select Superscript Printing Select Subscript Printing Cancel Superscript Subscript Printing Select Line Score ESC 301nln2 nl 1 Underline 2 Strikethrough 3 Overscore n2 0 Cancel score line selected by nl 1 Single continuous lin...

Page 100: ...0 inch n 10 20 30 40 50 or60 n 10 default Set Horizontal Motion Index HMI Select Pitch in n 360 inch units Total units nl n2 x 256 Character handling ASCII ESC 6 Dec Hex Description 54 36 Enable Printing of Upper Control Codes This command enables the printing of codes 128 to 159 if current table has characters in those locations ESC7 55 37 Enable Upper Control Codes Cancels ESC 6 ESCRn 82 52 Sele...

Page 101: ... PC 857 Turkish 13 0 PC 864 Arabic 14 0 PC 866 Russian 25 0 BRASCII Brazilian Portuguese 26 0 Abicomp Brazilian Portuguese available for European version only available for North South American version only ESCtn 116 74 ESC OnO Select Character Table Select character table n assigned by ESC t n 0 1 2 3 48 49 50 or 51 n 2 Remaps download characters from 0 127 to 128 255 unless a character table has...

Page 102: ...s ESC nl n2 data n nl n2 x 256 n Amount of data data The following n bytes of data printed as characters Graphics ASCll ESC Gnn Dec Hex Des p tion 40 71 28 47 Select Graphics Mode ESC GlOn n lor49 Cancel Graphics mode with ESC ESC nn 46 2E Print Raster Graphics ESC cvhmnln2data c 0 Full graphics mode 1 Compressed mode u 10 20 Dot density for vertical in 3600 u DPI h 10 20 Dot density for horizonta...

Page 103: ...Bit Image ESC m nl n2 data n nl n2 x 256 n Total columns Total data nl n2 x 256 x f t Number of data bytes per column Character Tables You can select these character tables by using the default setting mode or by using a command The characters for hex codes 00 through 7F are the same as the PC437 table so only the PC437 tables are shown completely The rest of the tables show only the characters fo...

Page 104: ... 6 R 6 g I 2 3 3CSCS 6ii 4 5 SEUeu bR 6 7 8 9 A LF B C CL 11 D E SO N _ n hi Pt c 4 1 F SI O 0 PC850 Multilingual CODE 89ABCDEF 0 c 6 g z L 3 6 1 ii9igpEq3f 2 CR6 86 3 4 5 6 bQaABfy 7 ciiC AAfp 8 2 ji i 0 b Y P o 9 A B C D E x x v 1 7 I F A f n n PC860 Portuguese ODE 0 1 2 3 4 5 6 7 8 9 A B C D E F Appendix A 21 ...

Page 105: ...ench PC865 Norwegian CODE 0 1 2 3 4 5 6 7 a 9 A B C D E F BBABCDEF PC853 Turkish CODE 0 1 2 3 4 5 6 7 a 9 A B C D E F CODE 0 1 2 3 4 5 6 7 a 9 A B C D E F PC857 Turkish CODE 0 1 2 3 4 5 6 7 a 9 A B C D E F A 22 Appendix ...

Page 106: ... L I I 11 o 51 PC855 C yrillic l CODE 0 1 2 3 4 5 6 7 a 9 A B C D E F 8 9 A B C D E F b Jb a 1 L n g BJbAsLJIpbl f R xtHTm e i XKOT CZ AIHKOYS syekibnY3 CODE 0 1 2 3 4 5 6 7 a 9 A B C D E F PC866 Russian CODE 0 1 2 3 4 5 6 7 a 9 A B C D E F 89ABCDEF A P a Q L JL p B Appendix A 2 3 ...

Page 107: ...i a c 0 c h E 0 b ii E 0 c Q HT EM E U b ii LF E Y y VT ESC f i B FF f L i P CR SO SI CODE 0 1 2 3 4 5 6 7 a 9 A B C D E F talk CODE 0 1 2 3 4 5 6 7 a 9 A B C D E F I i 89ABCDEF IUL SPO P cp lAQaq DC2 2 BRbr 3CScs DC4 4 D T d t XSEiJeu 6FVfv 7GWgw 8HXhx HT EM 9 2 Y i Y LF Jzjz VT ESC K I k C FF CR L L l M mj so N n SI O 0 No character is available for hex code 15 in the italic character table A 24...

Page 108: ... be selected in the default setting mode or with the ESC R command Country ASCII code hex 23 24 40 58 5C 5D 5E 60 78 7C 70 7E USA l Il France cl o c Q 1 4 ii Germany AOU BGiiI3 UK e lA ll Denmark lEOAAC OO Sweden aI2XoAuBiii8ii Italy 6Aii abi Spain Pt i m i _ c ii The following seven additional sets are available only with the ESC R command Country ASCII code hex 23 24 40 58 5C 5D SE 60 78 7C 7D 7...

Page 109: ...Characters available with the fSC A command To print the characters in the table below use the ESC command 1 CODE 0 1 7 t 0 1 2 3 4 5 6 7 a 9 A B C D E F 4 pT A 2 6 Appendix ...

Page 110: ... mode each carriage return code CR is automatically followed by a line feed LF code bidirectional printing Printing in which the print head prints in both directions This increases the speed of printing bif A binary digit 0 or 1 this is the basic unit of information used by a printer or computer buffer The portion of the printer s memory used to store data before printing it A unit of information ...

Page 111: ... in a folded stack Also called fanfold paper control code Special codes used to control printer functions such as a carriage return or line feed default A value or setting that takes effect when the equipment is turned on reset or initialized double height printing Printing in which each character is twice as tall as normal double width printing Printing in which each character is twice as wide as...

Page 112: ...and control panel button that advance the paper to the next top of form position hex dump A troubleshooting feature that helps advanced users find the cause of communication problems between the printer and the computer When the printer is in hex dump mode it prints each code it receives in hexadecimal notation and ASCII characters Also called data dump initialization Returns the printer to its de...

Page 113: ...on The position in which the paper is backed out of the paper path but is still attached to the optional push tractor printable area The area of a page in which print quality is assured It is smaller than the physical size of the page due to margins proportional printing Printing in which the width of the character varies from character to character For example a capital W receives much more space...

Page 114: ...n of the printer When you run the self test the printer prints the characters stored in its ROM software program A software program that helps you carry out a particular task such as word processing or financial planning subscript Printing in which each character is printed at about two thirds the normal height in the lower part of the character space superscript Printing in which each character i...

Page 115: ...the paper that the printer recognizes as the first printable line The printer feeds the paper to this position when it loads the paper unidirectional printing Printing in which the print head prints in one direction only Unidirectional printing is useful for printing graphics because it allows more precise vertical alignment than bidirectional printing user defined characters Characters that are d...

Page 116: ...23 Baud rate 3 18 Bidirectional printing see Auto print direction Bitmap fonts Draft A 3 Epson Courier A 3 Epson Prestige A 3 Epson Roman A 3 Epson Sans Serif A 3 Epson Script A 3 Buffer A 2 Buttons 3 1 ALT 3 4 ECONOMY CONDENSED 3 4 FONT 3 4 LOAD EJECT 3 4 PAUSE 3 3 RESET 3 3 Buzzer 3 22 C Cable parallel interface l 17 Carriage error 3 23 Cartridge ink l 9 12 3 18 19 installing l 9 12 life A 5 6 r...

Page 117: ...ings A 11 settings changing 3 11 15 settings mode 3 7 15 Draft font 3 5 6 A 3 E ECONOMY light 3 3 ECONOMY CONDENSED button 3 4 Economy mode 3 3 EJECT button 3 4 Electrical specifications A 6 Envelopes 2 17 A 4 5 Epson Courier 3 6 A 3 Epson Prestige 3 6 A 3 Epson Roman 3 6 A 3 Epson Roman T 3 5 A 3 Epson Sans Serif 3 6 A 3 Epson Sans Serif H 3 5 A 3 Epson Script 3 6 A 3 Error handling 3 18 Error in...

Page 118: ...de 3 25 Humidity printer environment A 7 I Image blurred 3 27 Indicator lights 3 2 3 CONDENSED 3 3 DATA 3 3 ECONOMY 3 3 FONT 3 2 INK OUT 3 3 PAPER OUT 3 3 PAUSE 3 2 Initialization A 10 Ink cartridge installing l 9 12 life A 5 replacing 3 18 specifications A 5 6 Ink charging l 12 Ink drying l 4 2 2 Ink is gone No ink cartridge 3 23 Ink is low 3 23 Ink jet l 2 3 Ink jet precautions l 2 3 INK OUT lig...

Page 119: ... 10 3 15 3 26 N Network interface mode 3 8 3 10 3 15 3 26 0 Optional interface cards 3 11 16 3 28 Optional push tractor 2 7 16 3 30 32 Options interface cards 3 15 3 28 push tractor 2 7 16 3 30 3 32 P Page length 3 8 9 3 15 3 28 continuous paper A 4 manual insertion A4 single sheets A 3 Paper choosing l 4 continuous paper 2 8 13 3 32 A 4 5 end 3 23 feeder l 13 15 2 2 feeding 3 32 handling 2 l 18 3...

Page 120: ...cial paper 2 16 Printing position adjusting 2 4 Print speed A 2 Problems paper feeding 3 34 paper jams 3 33 34 see also Troubleshooting Push tractor 2 7 16 3 30 32 installing 2 7 loading paper 2 8 removing 2 13 Q Quality print A 2 R Release lever 2 7 Release lever error 3 23 Removing the push tractor 2 13 Replacing ink cartridge 3 18 RESET button 3 3 Resetting printer defaults 3 11 A 10 11 Roman f...

Page 121: ...ing between continuous paper and single sheets 2 14 16 T Tear off 2 12 13 3 8 3 11 3 15 adjusting 2 13 position 2 12 Technical specifications A 2 Temperature printer environment A 7 Testing the printer l 15 16 Top margin 3 27 Tractor push 2 7 16 installing 2 7 loading paper 2 8 Transporting the printer 3 21 Troubleshooting 3 22 34 U Unidirectional printing 3 9 Unpacking the printer l 5 v Voltage l...

Page 122: ... No 1 Raffles Place 26 00 Frenchs Forest NSW 2086 Australia OUB Centre Singapore 0104 P h o n e 2 452 0666 P h o n e 5330477 F a x 2 975 l 409 F a x 53381 19 EPSON HONG KONG LTD 2 0 F Harbour Centre 25 Harbour Road Wanchat Hong Kong P h o n e 5854600 T e l e x 65542 EPSON ELECTRONICS TRADING LTD TAIWAN BRANCH 1OF No 287 Nanklng E Road Sec 3 Taipei Taiwan R O C Phone 02 7 17 7360 Fax 02 7 12 9 164 ...

Page 123: ...User s Guide Printed in Japan 94 02 ...

Reviews: