
R4C705P Plus_UK
Rev. C
SETUP.FM
A2 size
7/12/01
Proof Sign-off:
t.Ishiguri CRE Nakano
H.Kimura
K.Norum
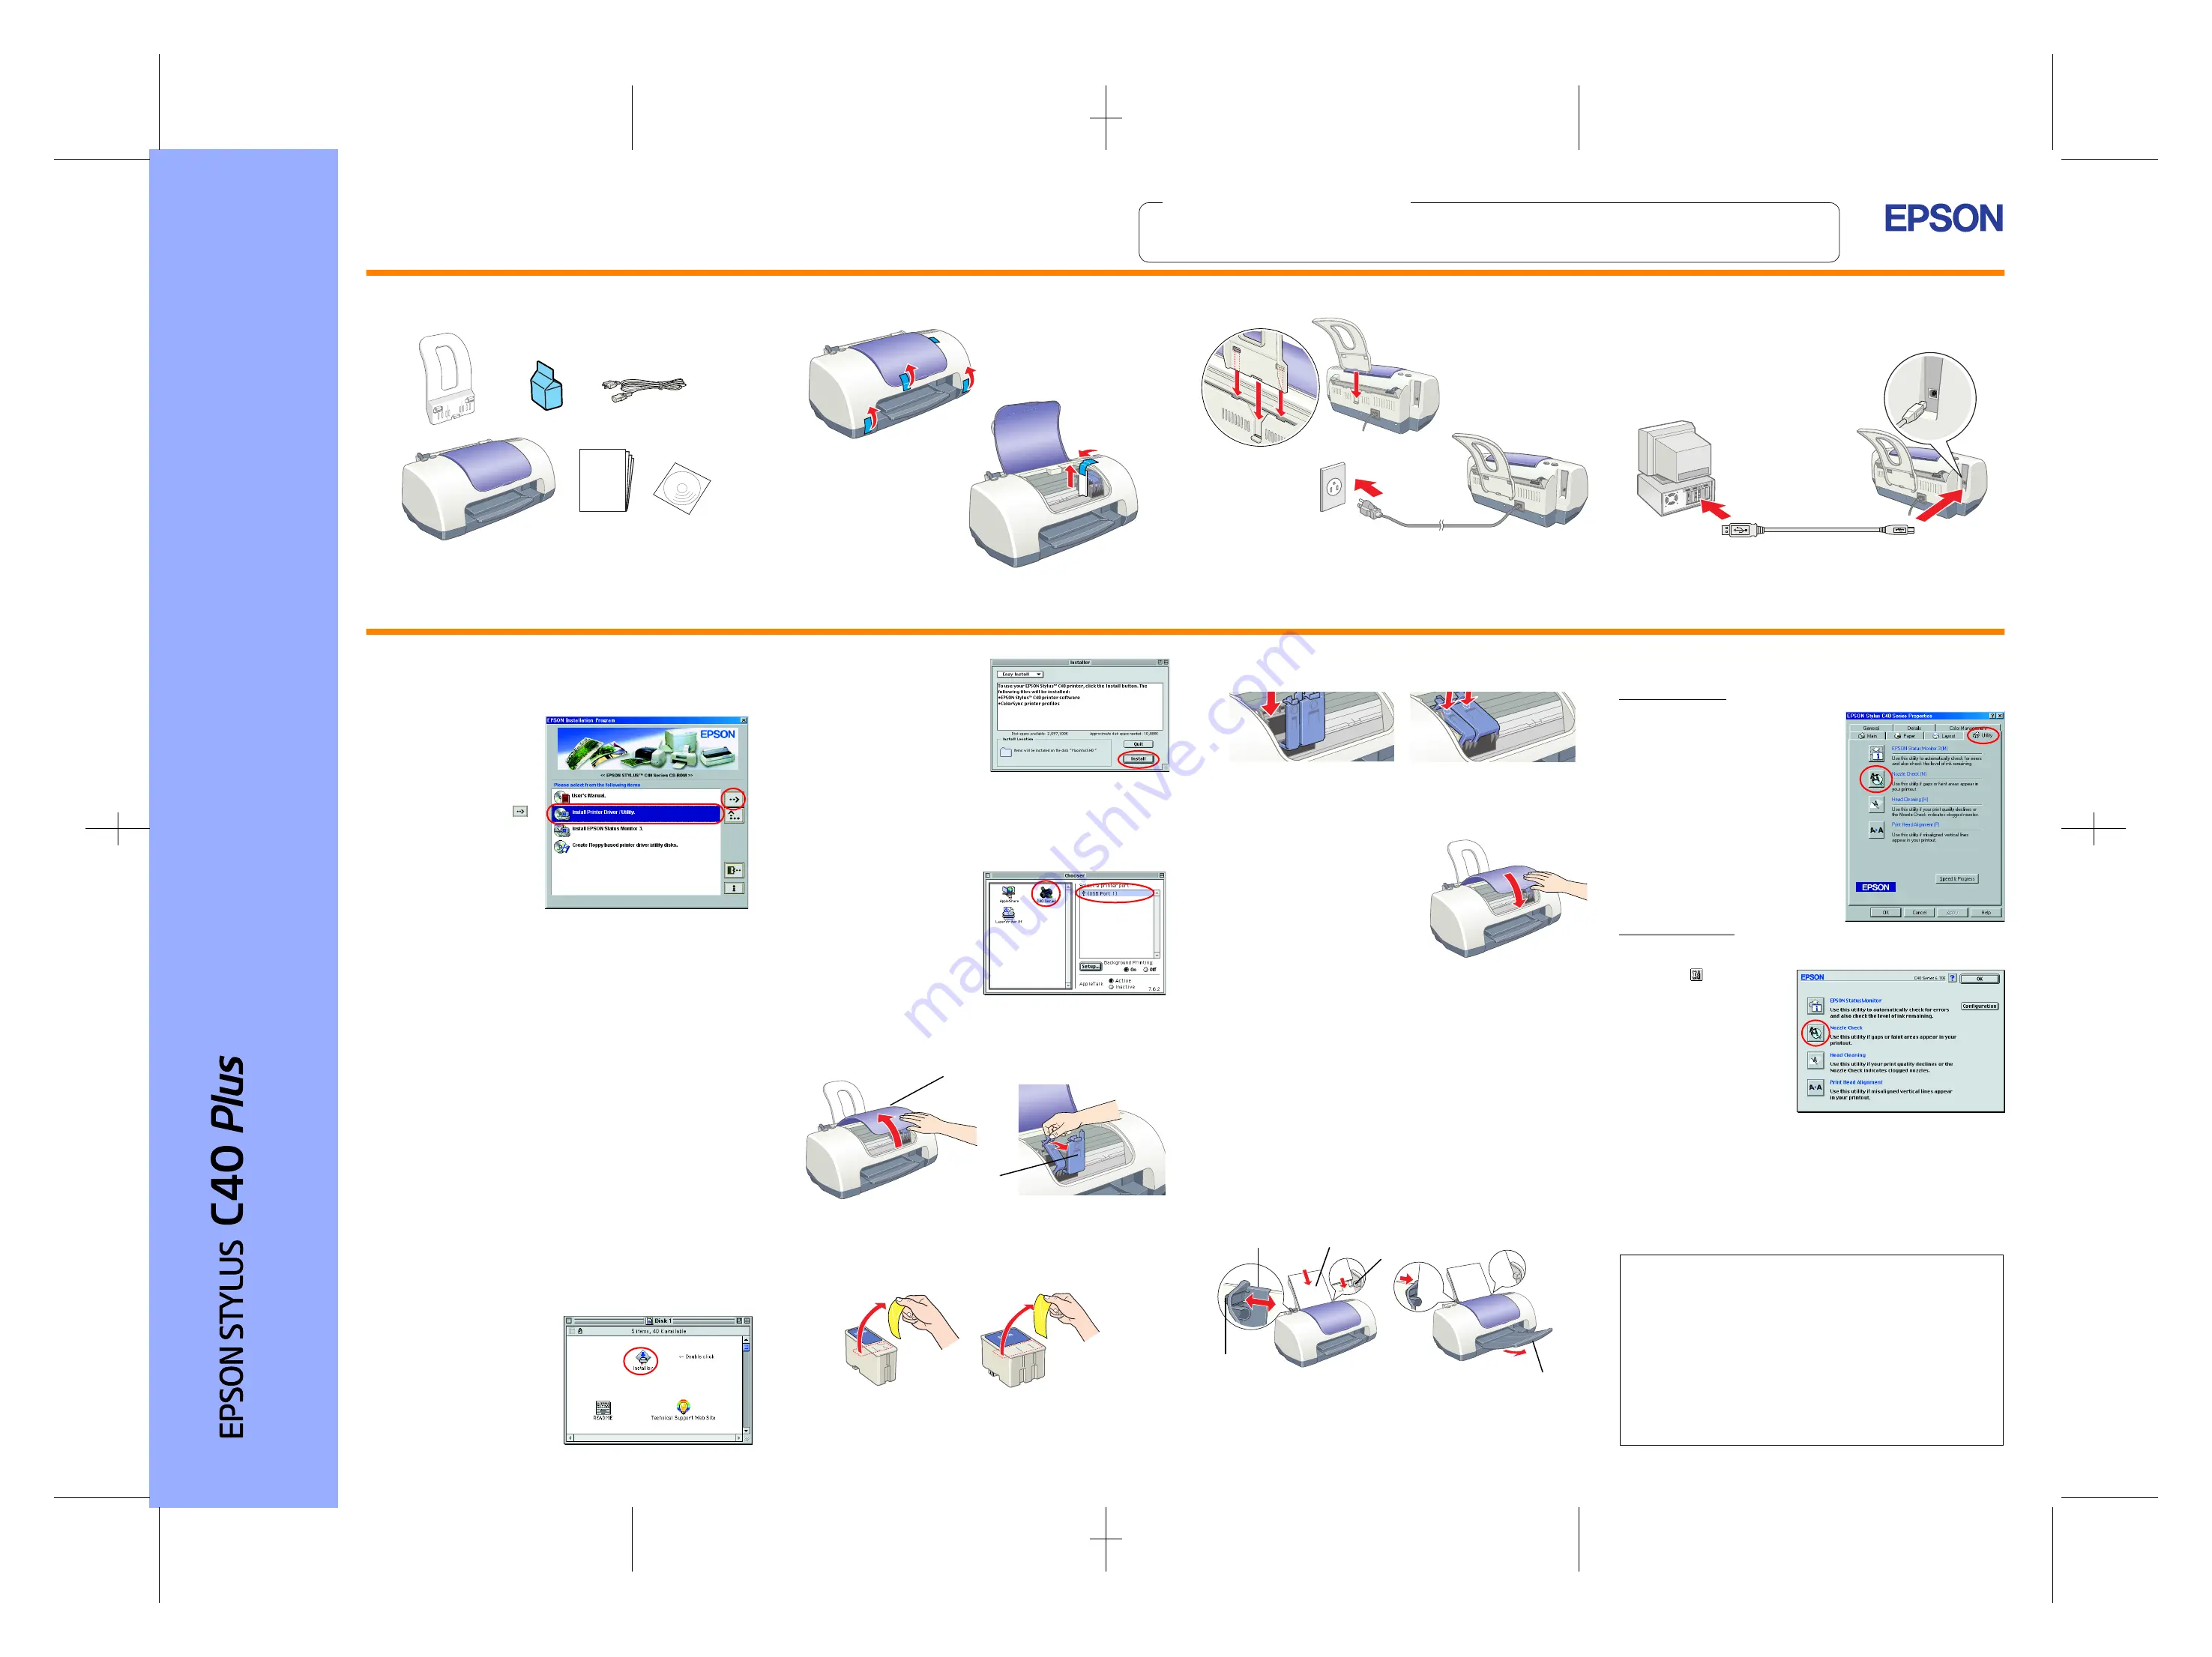
Setting Up the Printer Hardware
1. Unpack
2. Remove protective materials
3. Attach the printer parts
c
Caution:
If the printer comes on when you plug in the power cord, turn off the
printer by holding down the power button until light goes out.
4. Connect the printer
Connect the printer cable to the ports on the computer and the printer.
Installing the Printer Software and the Ink Cartridges
For Windows
1. Make sure that printer is off, then turn on your computer.
2. Insert the printer software CD
in the CD-ROM drive. If the
Installer dialog box does not
appear, double-click
EPsetup.exe
in the CD-ROM.
3. Select
Install Printer
Driver/Utility
, and click
.
4. Click
OK
in the dialog box that
appears.
5. When a message appears
prompting you to turn on the
printer, press the
P
power
button. The print head moves
to the ink cartridge installation position and the Setup utility starts
automatically.
c
Caution:
Do not move the print head by hand, as this may damage the
printer.
6. Follow the Setup utility’s on-screen instructions to install the ink
cartridges.
Note:
If the Setup utility does not start, follow the instructions in the Macintosh
section of this sheet, beginning from “3. Install the ink cartridges.”
When ink cartridge installation is complete, proceed to “Load paper and
check the print head nozzles” on this sheet.
For Macintosh
1. Install the printer software
c
Caution:
Turn off all virus protection programs before you install the printer
software.
1. Make sure that printer is off, then turn on your Macintosh and insert the
printer software CD in the CD-ROM drive.
2. Double-click the
Printer
software
folder, then
double-click the
Installer
icon
inside it.
3. Click
Continue
.
4. Make sure that the Install Location
box displays the correct drive, then
click
Install
.
5. Follow the on-screen instructions
to install the printer software.
2. Select the printer
After you have installed the printer software, you need to select your printer.
1. Press the
P
power button to turn on the printer. The print head moves
to the ink cartridge installation position.
2. Choose
Chooser
from the Apple
menu. Then, select the icon for
your printer and the port that your
printer is connected to.
3. Close the Chooser.
3. Install the ink cartridges
1. Open the printer cover, then open the ink cartridge clamps, as shown
in the illustrations.
c
Caution:
Do not move the print head by hand, as this may damage the
printer.
2. Remove only the yellow tape from the new ink cartridges.
3. Place the ink cartridges into the cartridge holders. Do not apply
excessive force to the cartridges.
Note:
Install both ink cartridges. The printer will not work with only one
cartridge.
4. Close the ink cartridge clamps until
they lock into place.
5. Close the printer cover.
6. Press the
b
maintenance button.
The printer moves the print head and
begins charging the ink delivery
system. This process takes about
one and half minutes. While charging,
the
P
power light flashes and the
printer produces a variety of mechanical sounds. This is normal.
c
Caution:
❏
Do not turn the power off during the ink charging process.
❏
Do not load paper until ink charging is complete.
When the ink charging process is finished, the
P
power light stops flashing
and remains on.
Load Paper and check the print head nozzles
Before checking the print head nozzles, you need to load paper as shown
below. When loading the paper, make sure that the paper stack fits under
the tabs inside the edge guides and does not exceed the loading limit
indicated by the arrow mark on the left edpge guide.
To adjust the left edge guide, hold down the locking tab and slide the guide
against the paper stack. Make sure that the position of the edge guide allows
the paper to move up and down freely.
Once paper is loaded, follow these steps to check the print head nozzles.
For Windows users
1. Click the
Start
button, point to
Settings,
and click
Printers
.
2. Select the icon for your printer, then
click
Properties
on the File menu.
Then click the
Utility
tab.
3. Click the
Nozzle Check
button, and
follow the on-screen instructions.
4. When you are finished, click
OK
to
close the Properties dialog box.
Your printer is now set up and ready to
use.
For Macintosh users
1. Select
Page Setup
in the Finder’s
File
menu.
2.
Click the
utility icon.
3. Click the
Nozzle Check
button, and follow the
on-screen instructions.
4. When you are finished, click
OK
to close the utility dialog
box. Then click
OK
to close
the Page Setup dialog box.
Your printer is now set up and ready to use.
Turning off the printer
To turn off the printer, hold down the
P
power button until the light goes out.
Power cord may come
attached in some countries.
Setup
Quick Guide
printer cover
Ink cartridge
clamps
printable side up
left edge guide
output tray
extension
tab
locking tab
All rights reserved. No part of this publication may be reproduced, stored in a retrieval system, or transmitted
in any form or by any means, electronic, mechanical, photocopying, recording, or otherwise, without the prior
written permission of SEIKO EPSON CORPORATION. The information contained herein is designed only for
use with this EPSON printer. EPSON is not responsible for any use of this information as applied to other
printers. Neither SEIKO EPSON CORPORATION nor its affiliates shall be liable to the purchaser of this
product or third parties for damages, losses, costs, or expenses incurred by the purchaser or third parties as
a result of: accident, misuse, or abuse of this product or unauthorized modifications, repairs, or alterations to
this product, or (excluding the U.S.) failure to strictly comply with SEIKO EPSON CORPORATION's operating
and maintenance instructions.
SEIKO EPSON CORPORATION shall not be liable for any damages or problems arising from the use of any
options or any consumable products other than those designated as Original EPSON Products or EPSON
Approved Products by SEIKO EPSON CORPORATION. SEIKO EPSON CORPORATION shall not be held
liable for any damage resulting from electromagnetic interference that occurs from the use of any interface
cables other than those designated as EPSON Approved Products by SEIKO EPSON CORPORATION.
EPSON is a registered trademark and EPSON Stylus is a trademark of SEIKO EPSON CORPORATION.
Microsoft and Windows are registered trademarks of Microsoft Corporation.
General Notice:
Other product names used herein are for identification purposes only and may be trademarks
of their respective owners. EPSON disclaims any and all rights in those marks.
Print quality is determined by the driver settings and the paper. See the online
Reference Guide
for details on driver settings and available media. Also visit the EPSON Web Site for the latest information.
Read this side first!
Setup
Re
ad
t
h
e S
a
fet
y
I
n
st
ruc
tio
ns on t
h
e
b
a
c
k
of
th
is she
e
t
whe
n
set
ting
up
a
n
d using t
h
is
p
rint
e
r.
English
C
o
lo
r Ink Jet Pr
inter
w
Warnings
must be followed
carefully to avoid bodily injury.
c
Cautions
must be observed to
avoid damage to your
equipment.
Notes
contain important information
and useful tips on the operation of your
printer.
Warnings, Cautions, and Notes
4014637-00
xxx
4014637
Rev.0
1-F
BK
4014637
Rev.0
1-F
Y
4014637
Rev.0
1-F
M
4014637
Rev.0
1-F
BK2
4014637
Rev.0
1-F
C


