

Unpacking
Unpacking
Unpacking
Unpacking
1. Unpack the printer.
Note:
Store the protective materials in case you want to ship the printer in the future.
2. Attach the printer parts.
c
Caution:
If the printer comes on when you plug in the power cord,
turn off
the printer by
pressing down the
P
power button until the printer lights go out.
3. Connect the printer.
Setting Up
Setting Up
Setting Up
Setting Up
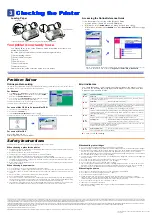
Installing the Printer Software
Note:
❏
When the country selection window appears, select your country of residence.
❏
If the language selection window appears, select your preferred language.
❏
For installing the Photo Print Software, refer to the Photo Print Software Setup in the
online Reference Guide.
For Windows
1.
Make sure that the printer is off.
2. Insert the printer software CD in the CD-ROM drive.
If the Installer dialog box does not appear, double-click
SETUP.EXE
on the CD-ROM.
3. Select
Install Software
, and then click
.
4. Follow the on-screen instructions. After the printer
software has been installed, the on-screen instructions
continue with the installation of the ink cartridges.
For Macintosh (EPSON Stylus C43UX only)
c
Caution:
Turn off all virus protection programs before you install the printer software.
For users of Mac OS 8.6 to 9.x (except Mac OS X)
1.
Make sure that the printer is off.
2. Insert the printer software CD in the CD-ROM drive.
3. Double-click the
EPSON
icon, select
Install Software
, and then click
.
4. Follow the on-screen instructions to install the printer software.
5. Press the
P
power button to turn on the printer. The print head moves to the ink
cartridge installation position.
6. After installing the software, click
Chooser
in the Apple
menu, and then select the icon for your printer and the
port that your printer is connected to.
For users of Mac OS X
1.
Make sure that the printer is off.
2. Insert the printer software CD in the CD-ROM drive.
3. Open the
Mac OS X Driver
folder, then double-click the
C43Series_xxxx.pkg
icon. If the Authorization dialog box appears, click the
icon, enter the
Password
or phrase
, then click
OK
.
4. Follow the on-screen instructions to install the printer software.
5. Press the
P
power button to turn on the printer. The print head moves to the ink
cartridge installation position.
6. Open the
Applications
folder on your hard drive, then open the
Utilities
folder
and double-click the
Print Center
icon. Click
Add Printer
in the Printer List dialog box.
7. Select
EPSON USB
from the pop-up menu. Select
Stylus C43
in the Product list,
then select
All
from the Page Setup pop-up menu. Click
Add
.
8. Make sure the Printer List contains the printer(margin-type) options, then close Print
Center. See the Reference Guide on the printer software CD-ROM for more details.
Note:
When you print, be sure to match the
Format for
setting in the Page Setup dialog
box and the
Printer
setting in the Print dialog box. Otherwise, the data may not be
printed correctly. See the Reference Guide for more details.
Installing the Ink Cartridges
1. Turn on the printer.
2. Remove the new ink cartridges from their protective bag.
3. Insert the ink cartridges as shown in the illustration below.
Note:
Install all ink cartridges. The printer will not work unless all cartridges are installed
properly.
4. Press the
b
ink button.
The printer begins the ink charging process. It
takes about
one and a half minutes
. While
charging ink, the printer produces a variety of
mechanical sounds. This is normal. When the
green lamp stops flashing, ink charging is
complete.
c
Caution:
❏
Do not turn the power off during the ink charging process.
❏
Do not load paper until ink charging is complete.
Note:
In order to produce high quality printouts, the print head in your printer must be
fully charged with ink during the initial setup. This process consumes ink from the ink
cartridges packaged with your printer. Replacement cartridges will last for their full
rated life.
The contents may vary depending on the place of purchase.
Setup
The power cord may come attached in some countries.
Do not touch this part.
Do not remove or tear the label on the
cartridge.
Setup
c
Cautions
must be observed to
avoid damage to your
equipment.
Notes
contain important information
and useful tips on the operation of your
printer.
English
xxxxxxx-00
xxx
Cautions and Notes


