background image

EPSON Stylus C66

3/04

EPSON Stylus C66

 - 5

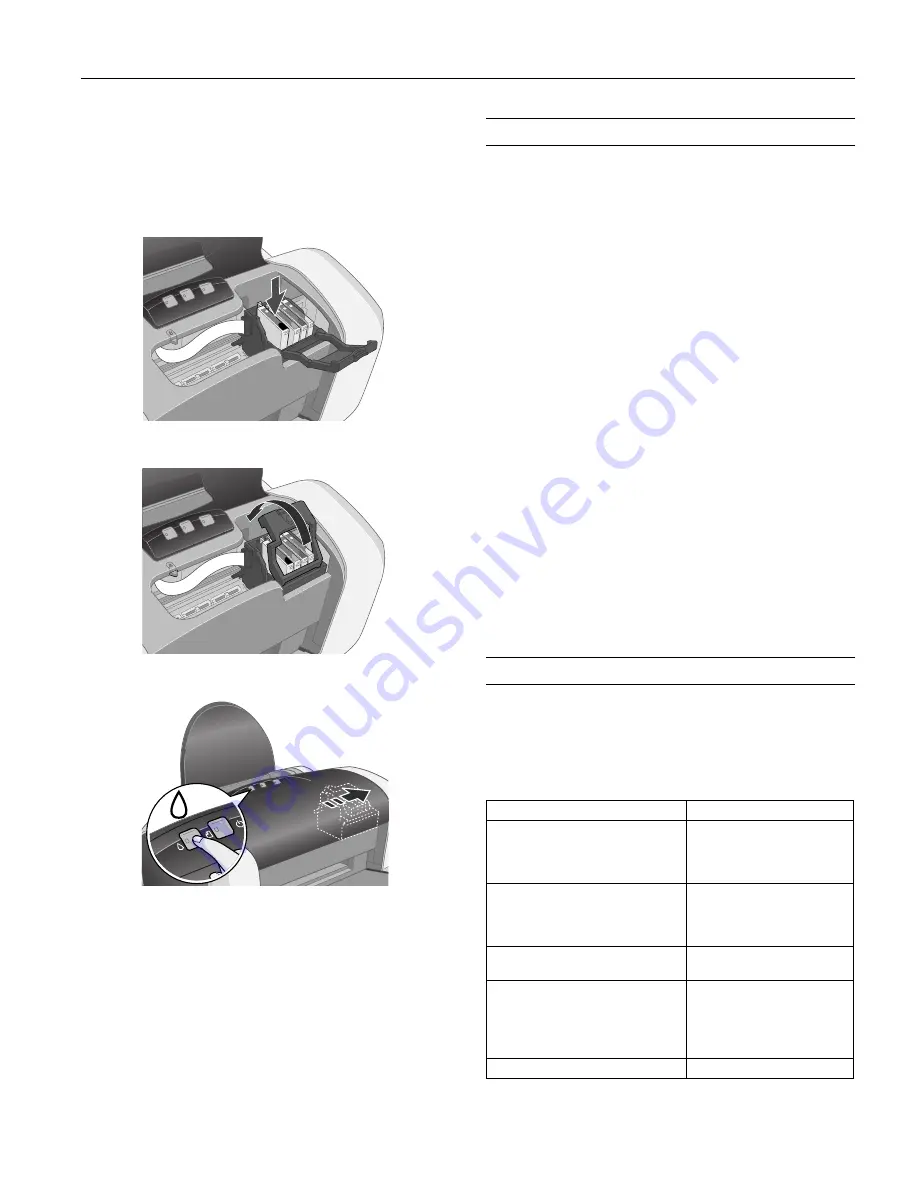
5. Lower each ink cartridge down into its holder with the 

green circuit board facing the front. Then gently push each 
ink cartridge down until it is firmly seated.

The color of the cartridge label should match the marker on 
the holder.

6. Close the cartridge cover.

7. Press the 

H

 ink button and close the printer cover.

The green

 P 

power light flashes as your printer charges ink 

for several seconds.

Caution:

Don’t turn off the printer while the green 

P

 power light is 

flashing, unless the printer hasn’t moved or made noise for 
more than 5 minutes.

Running a Printer Check

You can run a printer check to determine whether a problem 
comes from the printer itself or some other source.

1. Make sure both the printer and computer are turned off. 

Then disconnect the USB cable from the printer.

2. Make sure letter-size plain paper is loaded in the printer.

3. Hold down the 

)

paper button, then press and release the 

P

power button. Continue holding down the 

)

paper 

button until the green

 P

power light starts to flash, then 

release it.

The printer prints a nozzle check pattern. (If the pattern has 
gaps, you need to clean the print head; see page 7.)

4. Turn off the printer after it prints the check page. Then 

reconnect the cable and turn on your printer and computer.

If the check page prints, the problem probably lies in 
your software settings, the USB cable, or your 
computer. It’s also possible that your software may not 
be installed correctly. See your 

Start Here

 sheet for 

instructions on reinstalling the printer software.

If the check page doesn’t print, you may have a
problem with your printer. Try the suggestions in
your 

Quick Guide

 or on-screen 

User’s Guide

. If nothing 

works, contact your dealer or Epson as described on 
your 

Start Here

 sheet.

Selecting the Correct Paper Type

Your printer automatically adjusts itself for the type of paper 
you select in your print settings. That’s why the paper Type 
setting is so important. It tells your printer what kind of paper 
you’re using and adjusts the ink coverage accordingly. The 
table below lists the settings you should choose for your paper:

For this paper

Select this Type setting

Plain paper sheets or envelopes
Epson Premium Bright White Paper
Epson Photo Quality Ink Jet Paper
Epson Photo Quality Ink Jet Cards

Plain Paper / Bright White Paper

Epson Matte Paper Heavyweight
Epson Double-Sided Matte Paper
PremierArt Matte Scrapbook Photo 
Paper for Epson

Matte Paper - Heavyweight

Epson DURABrite Ink Glossy Photo 
Paper

DURABrite Ink Glossy Photo 
Paper

Epson Glossy Photo Paper
Epson All Purpose Glossy Photo Paper
Epson Photo Paper
Epson Premium Semigloss Photo 
Paper

Glossy Photo Paper

Epson Ink Jet Transparencies

Ink Jet Transparencies 

Summary of Contents for Stylus C66

Page 1: ...Epson paper name Size Part number Premium Bright White Paper Letter S041586 Photo Quality Ink Jet Paper Letter A4 Legal S041062 S041061 S041067 Photo Quality Ink Jet Cards A6 S041054 DURABrite Ink Glossy Photo Paper Letter 4 6 S041731 S041734 All Purpose Glossy Photo Paper Letter S041654 Glossy Photo Paper Photo Paper 4 6 20 sheets 4 6 50 sheets 4 6 20 sheets 4 6 50 sheets Letter 20 sheets Letter ...

Page 2: ...m D 0 78 inch 20 0 mm When printing with the 4 6 Borderless feature print quality may decline in the expanded area Before printing large jobs using the borderless setting print a single sheet to confirm printout quality Specification Value Input voltage range 90 to 264 V Rated frequency range 50 to 60 Hz Input frequency range 49 5 to 60 5 Hz Rated current 0 2 to 0 4 A Power consumption Approx 12 W...

Page 3: ...elopes No 10 4 1 9 5 inches 104 241 mm DL 4 3 8 7 inches 110 220 mm C6 4 4 6 4 inches 114 162 mm 132 220 5 2 8 7 inches Plain bond paper or air mail paper 0 006 to 0 02 inch 0 16 to 0 52 mm 12 to 20 lb 45 to 75 g m2 Premium Bright White Paper Letter 8 5 11 inches Premium Bright White Paper distributed by Epson Ink Jet Paper Letter 8 5 11 inches Legal 8 5 14 inches A4 210 297 mm Ink Jet Paper distr...

Page 4: ...nter reload paper and press the paper button Red H ink light flashes One of the cartridges is low on ink Check the message that appears on your screen to determine which cartridge is low Make sure you have a replacement cartridge Red H ink light is on One of the cartridges is out of ink or not installed Make sure you have a replacement cartridge then follow the steps on page 6 to install it If you...

Page 5: ... on your printer and computer If the check page prints the problem probably lies in your software settings the USB cable or your computer It s also possible that your software may not be installed correctly See your Start Here sheet for instructions on reinstalling the printer software If the check page doesn t print you may have a problem with your printer Try the suggestions in your Quick Guide ...

Page 6: ...en the red H ink light stays on you need to replace the cartridge s When you print you ll also see a message on the screen telling you which cartridge is empty 1 Turn on the printer 2 Lower the printer s output tray pull out the extension and open the cover 3 Press and release the H ink button If your ink light is off go to step 5 If your ink light is on or flashing the print head moves to the lef...

Page 7: ...akes noise Charging takes about half a minute When it s finished the green P power light stops flashing and stays on and the red H ink light goes out Caution Never turn off the printer while the P power light is flashing unless the printer hasn t moved or made noise for more than 5 minutes Cleaning the Print Head If your printouts are unexpectedly light or dots or lines are missing you may need to...

Page 8: ...be solid with no gaps as shown If your printout looks okay you re done If you see any gaps as shown below clean the print head again see the previous section for instructions Aligning the Print Head If your printouts contain misaligned vertical lines or you see light or dark horizontal banding you may need to align the print head 1 Turn on the printer 2 Load several sheets of paper 3 Right click t...

Page 9: ...Warning Don t touch the gears inside the printer Caution Never use a hard or abrasive brush alcohol or paint thinner for cleaning they can damage the printer components and case Don t get water on the printer components and don t spray lubricants or oils inside the printer Transporting the Printer If you need to ship your printer you must prepare it for transportation in its original box or one of...

Page 10: ...emove the tape securing the print head Plug in and power on your printer install your ink cartridges and test your printer If you notice a decline in print quality clean the print head see page 7 if output is misaligned align the print head see page 8 Related Documentation CPD 16770 EPSON Stylus C66 Start Here CPD 16771 EPSON Stylus C66 Printer Basics CPD 16772 EPSON Stylus C66 CD ROM with Print S...

Reviews: