background image

Problems and Solutions

13

Your printout is blurry or smeared.

Make sure the printable side of the paper is face-up. It’s usually shinier or 
whiter than the other side.

If you’re using double-sided paper and printing heavily saturated or dark 
images, you may notice that smudges or marks appear on the front of the 
paper when you print the second side. If one side of the paper will contain
a lighter image or text, print that side first to prevent marks or smudging.

If ink smears on the back of a printout, clean the inside of the printer as 
described in your on-screen 

User’s Guide

.

Make sure your paper isn’t damp or curled. If it’s damp or curled, reload a new 
stack of paper.

When printing on special paper, check the instructions in the paper package. 
You may need to use an included support sheet or load your paper one sheet at 
a time.

Use Epson papers to ensure proper saturation and absorption of genuine 
Epson inks.

Make sure your paper meets the specifications listed in your on-screen

User’s Guide

.

Run the Print Head Alignment utility; see your on-screen 

User’s Guide

 for 

instructions.

Remove each sheet from the output tray after printing, especially when you’re 
printing on transparencies.

Your printout is faint or has gaps.

The print head nozzles may need cleaning; see page 16 for instructions.

The ink cartridges may need replacing; see your on-screen 

User’s Guide

 for 

instructions on replacing ink cartridges.

Make sure the paper Type setting matches the paper you loaded; see page 10 
for guidelines.

Make sure the printable side of the paper is face-up. It’s usually shinier or 
whiter than the other side.

Summary of Contents for Stylus C66

Page 1: ...Quick Guide Printing Solving Problems Notices CPD 17763 4049260 00 XXX ...

Page 2: ...r problems arising from the use of any options or any consumable products other than those designated as Original Epson Products or Epson Approved Products by Seiko Epson Corporation Responsible Use of Copyrighted Materials Digital cameras scanners and ink jet printers like conventional photocopiers and cameras can be misused by improper copying or printing of copyrighted material While some count...

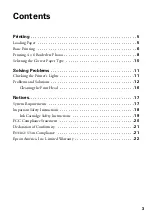
Page 3: ...lving Problems 11 Checking the Printer s Lights 11 Problems and Solutions 12 Cleaning the Print Head 16 Notices 17 System Requirements 17 Important Safety Instructions 18 Ink Cartridge Safety Instructions 19 FCC Compliance Statement 20 Declaration of Conformity 21 ENERGY STAR Compliance 21 Epson America Inc Limited Warranty 22 ...

Page 4: ...4 Contents ...

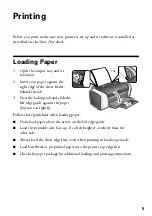
Page 5: ...locking tab and slide the left edge guide against the paper but not too tightly Follow these guidelines when loading paper Don t load paper above the arrow on the left edge guide Load the printable side face up It s often brighter or whiter than the other side Always load the short edge first even when printing in landscape mode Load letterhead or preprinted paper into the printer top edge first C...

Page 6: ...your printer what kind of paper you re using and what type of print you want Make sure you check your printer settings every time you print 1 Start your program and open the file you want to print 2 From the File menu click Print You see a Print window like this one 3 Make sure EPSON Stylus C66 Series is selected 4 Click the Properties or Preferences button If you see a Setup Printer or Options bu...

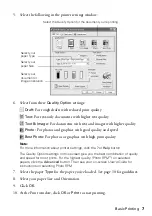
Page 7: ...er settings click the or Help button The Quality Option settings on this screen give you the best combination of quality and speed for most prints For the highest quality Photo RPM on selected papers click the Advanced button Then see your on screen User s Guide for instructions on selecting Photo RPM 7 Select the paper Type for the paper you ve loaded See page 10 for guidelines 8 Select your pape...

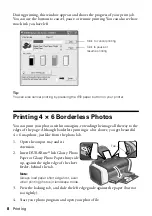
Page 8: ...s of the page Although borderless printing is a bit slower you get beautiful 4 6 snapshots just like from the photo lab 1 Open the output tray and its extension 2 Insert DURABrite Ink Glossy Photo Paper or Glossy Photo Paper shiny side up against the right edge of the sheet feeder behind the tab Note Always load paper short edge first even when printing photos in landscape mode 3 Press the locking...

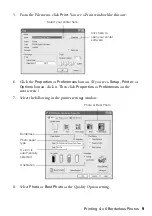
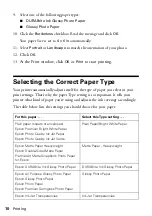
Page 9: ...p Printer or Options button click it Then click Properties or Preferences on the next screen 7 Select the following in the printer settings window 8 Select Photo or Best Photo as the Quality Option setting Click here to open your printer software Select your printer here Photo or Best Photo Orientation 4 x 6 in is automatically selected Photo paper type Borderless ...

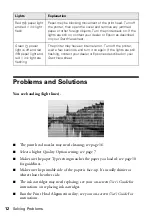
Page 10: ...your printer what kind of paper you re using and adjusts the ink coverage accordingly The table below lists the settings you should choose for your paper For this paper Select this Type setting Plain paper sheets or envelopes Epson Premium Bright White Paper Epson Photo Quality Ink Jet Paper Epson Photo Quality Ink Jet Cards Plain Paper Bright White Paper Epson Matte Paper Heavyweight Epson Double...

Page 11: ...work turn off the printer open the cover and pull the paper out from the front including any torn pieces Then turn on the printer reload paper and press the paper button Red ink light flashes One of the cartridges is low on ink Check the message that appears on your screen to determine which cartridge is low Make sure you have a replacement cartridge Red ink light is on One of the cartridges is ou...

Page 12: ... Run the Print Head Alignment utility see your on screen User s Guide for instructions Red paper light and red ink light flash Paper may be blocking movement of the print head Turn off the printer then open the cover and remove any jammed paper or other foreign objects Turn the printer back on If the lights are still on contact your dealer or Epson as described on your Start Here sheet Green power...

Page 13: ...r check the instructions in the paper package You may need to use an included support sheet or load your paper one sheet at a time Use Epson papers to ensure proper saturation and absorption of genuine Epson inks Make sure your paper meets the specifications listed in your on screen User s Guide Run the Print Head Alignment utility see your on screen User s Guide for instructions Remove each sheet...

Page 14: ...the cover and pull the paper out from the front including small pieces that may have torn off Reload the paper and press the paper button Heavily saturated prints may curl causing a paper jam when printing on both sides of the paper If your paper loads incorrectly or jams frequently Use new smooth high quality paper loaded printable side up Fan the edges of the stack of paper to separate the sheet...

Page 15: ...rrect characters Make sure the USB cable is securely connected and meets the requirements on page 17 Then try printing again Make sure your printer is selected in your software If you re using a switch box or USB hub with your printer connect the printer directly to your computer Then try printing again You don t see the printer icon in the lower right corner of your screen taskbar in Windows Try ...

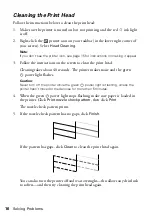
Page 16: ...ing takes about 40 seconds The printer makes noise and the green power light flashes Caution Never turn off the printer while the green power light is flashing unless the printer hasn t moved or made noise for more than 5 minutes 4 When the green power light stops flashing make sure paper is loaded in the printer Click Print nozzle check pattern then click Print The nozzle check pattern prints 5 I...

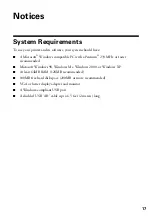
Page 17: ...le PC with a Pentium 233 MHz or faster recommended Microsoft Windows 98 Windows Me Windows 2000 or Windows XP At least 64MB RAM 128MB recommended 100MB free hard disk space 200MB or more recommended VGA or better display adapter and monitor A Windows compliant USB port A shielded USB AB cable up to 6 5 feet 2 meters long ...

Page 18: ...stem away from potential sources of electromagnetic interference such as loudspeakers or cordless telephone base units Avoid locations that are subject to rapid changes in heat or humidity shocks or vibrations or dust Leave enough room around the printer for sufficient ventilation leaving at least 3 9 inches between the back of the printer and the wall Do not place the printer near a radiator or h...

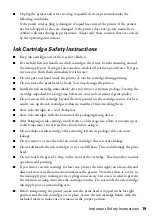
Page 19: ...st results use up the ink cartridges within six months of first installing them Store ink cartridges in a cool dark place Store ink cartridges with the bottom of the packaging facing down After bringing an ink cartridge inside from a cold storage site allow it to warm up at room temperature for at least three hours before using it Do not shake an ink cartridge after removing it from its package th...

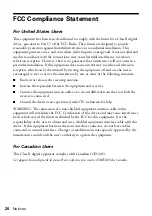
Page 20: ...ing measures Reorient or relocate the receiving antenna Increase the separation between the equipment and receiver Connect the equipment into an outlet on a circuit different from that to which the receiver is connected Consult the dealer or an experienced radio TV technician for help WARNING The connection of a non shielded equipment interface cable to this equipment will invalidate the FCC Certi...

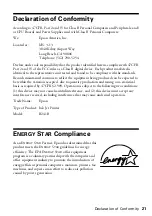
Page 21: ... be expected to be within the variation accepted due to quantity production and testing on a statistical basis as required by 47CFR 2 909 Operation is subject to the following two conditions 1 this device may not cause harmful interference and 2 this device must accept any interference received including interference that may cause undesired operation Trade Name Epson Type of Product Ink Jet Print...

Page 22: ...em to Epson within five 5 working days of receipt of the replacement Epson requires a debit or a credit card number to secure the cost of the replacement printer in the event that you fail to return the defective one If your printer is being repaired Epson will direct you to send your printer to Epson or its authorized service center where the printer will be fixed and sent back to you You are res...

Page 23: ... IF THESE LAWS APPLY THEN ALL EXPRESS AND IMPLIED WARRANTIES ARE LIMITED TO THE WARRANTY PERIOD IDENTIFIED ABOVE UNLESS STATED HEREIN ANY STATEMENT OR REPRESENTATIONS MADE BY ANY OTHER PERSON OR FIRM ARE VOID EXCEPT AS PROVIDED IN THIS WRITTEN WARRANTY NEITHER EPSON AMERICA INC NOR ITS AFFILIATES SHALL BE LIABLE FOR ANY LOSS INCONVENIENCE OR DAMAGE INCLUDING DIRECT SPECIAL INCIDENTAL OR CONSEQUENT...

Page 24: ...Printed in XXXXXX XX XX XX ...

Reviews: