background image

Using Software Programs

To take full advantage of your printer’s features, find the

instructions for your software program or programs below.

After the instructions for specific programs is a section of

general information for other programs.

Microsoft

®

 Windows 3.1

 and all Windows Programs

If Windows is already installed on your system, follow the

steps below to choose the printer. Then your printer will work

correctly for all your Windows programs, such as Word for

Windows, Lotus” 

 for Windows, and 

If Windows is not already installed on your system, run the

setup program as instructed by the Windows documentation,

and follow steps 4 through 10 below when you reach the

section for choosing a printer.

1. In the window labeled 

Main, 

double click the

Control Panel 

icon.

2. Double 

click the Printers 

icon.

3. Choose the Add> button on the right side of the screen.

4. In the list of printers box, select EPSON Stylus 400.

If Stylus 400 is not available, select EPSON Stylus 300,

EPSON Stylus 800, or EPSON AP-3250  ESC/P 2.

If these are also not available, select EPSON LQ-870.

5. Choose the 

Install  

button. A dialog box may instruct you to

insert a diskette.

6. If necessary, insert the diskette required.

Setting Up Your Printer 

1-17 

Summary of Contents for Stylus Color 400

Page 1: ...U S E R S GUIDE aa ...

Page 2: ...ng the US failure to strictly comply with Seiko Epson Corporation s operating and maintenance instructions Seiko Epson Corporation shall not be liable against any damages or problems arising from the use of any options or any consumable products other than those designated as Original EPSON products or EPSON Approved Products by Seiko Epson Corporation EPSON and EPSON ESC P are registered trademar...

Page 3: ...cuit different from that to which the receiver is connected 0 Consult the dealer or an experienced radio TV technician for help WARNING The connection of a non shielded equipment interface cable to this equipment will invalidate the FCC Certification of this device and may cause interference levels which exceed the limits established by the FCC for thii equipment It is the responsibility of the us...

Page 4: ... l 6 Choosing a Place for the Printer l 6 Plugging in the Printer l 7 Installing the Ink Cartridge l 8 Testing the Printer 1 13 Loading paper in the paper feeder 1 13 Running the self test 1 15 Connecting the Printer to Your Computer 1 16 Using Software Programs 1 17 Microsoft Windows 3 1 and all Windows Program s 1 17 What is a Printer Driver 1 18 Fonts with Windows 1 19 WordPerfect 6 0 or 5 1 fo...

Page 5: ...t Setting Mode 2 11 Default setting descriptions 2 12 Changing the default settings 2 13 Changing the character table setting 2 16 Chapter 3 Maintenance and Troubleshooting Replacing the Ink Cartridge Cleaning the Print Head Cleaning the Printer 3 4 Transporting the Printer 3 5 Troubleshooting 3 5 Error indicators 3 6 Power supply 3 7 Printing 3 7 Paper handling 3 12 Appendix Technical Specificati...

Page 6: ...control panel paper supper Paper feeder cover paper separator manual feed slot access panel AC inlet 0 0 Courier 0 0 Roman T PS 00 Sans Serii H PS 08 Roman 80 Sans Serif 8 8 Prestige ...

Page 7: ...ontains information that you will need to use special printer functions It explains how to load paper manually and change printer settings from the control panel Chapter 3 contains maintenance and troubleshooting information If the printer does not operate properly or you have difficulties see this chapter The Appendix includes the printer specifications commands and character tables A glossary of...

Page 8: ...ages manually without removing the paper supply Fast printing speed You can print up to 144 characters per second in 12 c letter quality LQ mode Quiet printing Ink jet technology helps maintain a quiet working environment Small footprint conserves your work space EPSON ESC P 21 This enhanoqd printer control language provides scalable fonts and improved graphics capability Compatibility Supports th...

Page 9: ...sement of any product or service Where United States Users Can Get Help Epson America provides local customer support and service through a nationwide network of authorized EPSON dealers and Service Centers EPSON also provides the following support services through the EPSON Connection at 800 922 8911 cl cl ci 0 D Assistance in locating your nearest Authorized EPSON Reseller or Service Center Tech...

Page 10: ... CompuServe you are eligible for a free introductory membership as an owner of an EPSON product This membership entitles you to IJ An introductory 15 credit on CompuServe 0 Your own user lD and password 0 A complimentary subscription to CompuServe Magazine CompuServe s monthly publication To take advantage of this offer call 800 848 8199 in the United States and Canada and ask for representative 5...

Page 11: ...s under this guarantee MUST be supported by evidence of purchase normally the bill of sale invoice and it is the responsibility of the claimant to furnish such proof Epson UK Limited does not issue or operate any form of guarantee registration card Claims are made by the user returning the product to the supplier from whom it was purchased or if this is impractical to any EPSON supplier who also h...

Page 12: ...when the product is used in any combination with other equipment or program software Product guarantee may be invalidated as a result of excessive or inappropriate use use in adverse environment or in conditions outside the specifications or if the product has been subjected to unapproved modifications The guarantee does not cover visits to the user s premises or the repair or commissioning of the...

Page 13: ...e coloured markings identifying the terminals in your plug proceed as follows 0 The green and yellow wire must be connected to the terminal in the plug which is marked with the letter E or the earth symbol or coloured green or green and yellow 0 The blue wire must be connected to the terminal in the plug marked with the letter N or coloured black Q The brown wire must be connected to the terminal ...

Page 14: ...tection from overheating Placing the printer on a bed sofa rug or other similar surface may block the openings Also do not place the printer in a built in installation unless proper ventilation is provided Never place the printer near or over a radiator or heat register Use the type of power source indicated on the label If you are not sure of the type of power available consult your dealer or loc...

Page 15: ...ints or other risks Refer ail servicing in those compartments to service personnel 0 Unplug the printer from the wall outlet and have it repaired by a qualified service person under the following conditions When the power cord or plug is damaged or frayed If liquid has been spilled into it If it has been exposed to rain or water If it does not operate normally when the operating instructions are f...

Page 16: ...es m Warnings must befoIIozoed carefully to avoid bodily injury g Cautions must be observed to avoid damage to your equipment Notes contain important information and useful tips on the operation of your printer 10 Introduction ...

Page 17: ...nter 1 13 Loading paper in the paper feeder 1 13 Running the self test 1 15 Connecting the Printer to Your Computer 1 16 Using Software Programs 1 17 Microsoft Windows 3 1 and aII Windows Programs 1 17 What is a Printer Driver 1 18 Fonts with Windows 1 19 WordPerfect 6 0 or 5 1 for MS DOS 1 19 Microsoft Word for MS DOS l 20 Lotus l 2 3 Version 3 X for MS DOS l 20 Using Fonts l 21 Setting Up Other ...

Page 18: ...ge and then propel ink dots onto the page in the form of characters or graphics Because the print head does not strike the page as it prints it is much quieter than an impact printer such as a dot matrix A few precautions Even if you are familiar with other types of printers be sure to read through the following list of precautions to operate your ink jet printer safely and efficiently cl cl 0 0 U...

Page 19: ... a cold place to a warm one let it sit for about one hour until the ink warms to the new temperature 0 Do not turn off the printer while printing or before the print head is capped The print head is capped when it is in the far right position The print head caps automatically if the printer receives no data for several seconds You can also cap the print head by pressing the Pause button 0 Do not p...

Page 20: ...n your printer before buying large quantities To test a supply of paper take a single sheet from the package and load it in the printer Perform the self test and check the results You should test both sides of the paper to determine which gives you the best quality printing When you load paper remember that the printer prints on the bottom side of the paper If the ink does not bleed or smear the p...

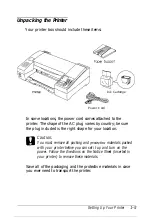
Page 21: ... plug included is the right shape for your location Q Caution You must remove all packing and protective materials packed with your printer before you can set it up and turn on the power Follow the directions on the Notice Sheet inserted in your printer to remove these materials Save all of the packaging and the protective materials in case you ever need to transport the printer Setting Up Your Pr...

Page 22: ...inter on a flat horizontal stable surface If the printer is tilted or at an angle it cannot operate properly Place the printer close enough to the computer for the interface cable to reach it easily Leave adequate room for easy operation and maintenance Avoid using or storing the printer in places subject to rapid changes in temperature and humidity Also keep it away from direct sunlight strong li...

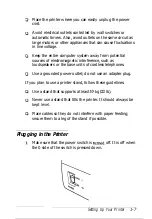
Page 23: ...ch as loudspeakers or the base units of cordless telephones Use a grounded power outlet do not use an adapter plug If you plan to use a printer stand follow these guidelines 0 Use a stand that supports at least 10 kg 22 lb 0 Never use a stand that tilts the printer It should always be kept level 0 Place cables so they do not interfere with paper feeding secure them to a leg of the stand if possibl...

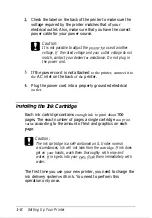
Page 24: ...the printer 4 Plug the power cord into a properly grounded electrical outlet Installing the Ink Cartridge Each ink cartridge contains enough ink to print about 700 pages The exact number of pages a single cartridge can print varies according to the amount of text and graphics on each page eCaution The ink cartridge is a self contained unit Under normal circumstances ink will not leak from the cart...

Page 25: ...ly if print quality has declined a cl Ll Don t move the print head by hand Leave the cartridge sealed until just before you install it Select Economy mode to print quickly using less ink Follow these steps to install the ink cartridge 1 2 Make sure the printer is turned off Hold down both the AH and Pause buttons while you turn on the printer Release the buttons after the printer starts initializi...

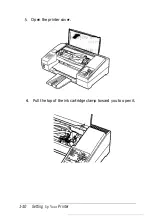
Page 26: ...3 Open the printer cover 4 Pull the top of the ink cartridge clamp toward you to open it 1 10 Setting Up Your Printer ...

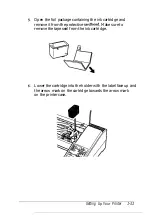
Page 27: ...ove it from the protective cardboad Make sure to remove the tape seal from the ink cartridge 6 Lower the cartridge into the holder with the label face up and the arrow mark on the cartridge towards the arrow mark on the printer case Setting Up Your Printer 1 11 ...

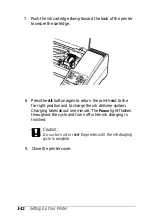
Page 28: ...nt head to the far right position and to charge the ink delivery system Charging takes about one minute The Pause light flashes throughout the cycle and turns off when ink charging is finished eCaution Do not turn off or reset the printer until the ink charging cycle is complete 9 Close the printer cover 1 12 Setting Up Your Printer ...

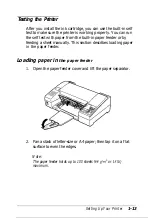
Page 29: ...lt in paper feeder or by feeding a sheet manually This section describes loading paper in the paper feeder Loading paper in the paper feeder 1 Open the paper feeder cover and lift the paper separator 2 Fan a stack of letter size or A4 paper then tap it on a flat surface to even the edges Note The paper feeder holds up to 100 sheets 64 g m2 or 18 lb maximum Setting Up Your Printer 1 13 ...

Page 30: ...r feeder Then move the left edge guide to match the width of your paper as shown below 4 Close the paper feeder cover and lower the paper separator to secure the paper stack Now you are ready to run the self test For more about printing with the paper feeder be sure to read Tips for Using the Paper Feeder at the end of this chapter 1 14 Setting Up Your Printer ...

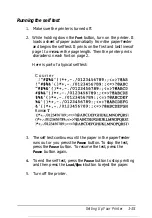
Page 31: ...56789 AB 0123456789 ABC I 0123456789 ABCD a 0123456789 ABCDE I 0123456789 ABCDEF a 0123456789 ABCDEFG 0123456789 ABCDEFGH Roman T I 0123456789 ABCDEFGHIJKLMNOF QRS O 0123456789 ABCDEFGHIJKLMNOF QRS I I 0123456789 ABCDEFGHIJKLMNOPQRSTl 3 The self test continues until the paper in the paper feeder runs out or you press the Pause button To stop the test press the Pause button To resume the test press...

Page 32: ...and computer are turned off 2 Plug the cable connector securely into the printer s interface connector 3 Squeeze the wire clips together until they lock in place on both sides If your cable has a ground wire connect it to the ground connector above the interface connector 4 Plug the other end of the cable into the computer s parallel interface If there is a ground wire at the computer end of the c...

Page 33: ...If Windows is not already installed on your system run the setup program as instructed by the Windows documentation and follow steps 4 through 10 below when you reach the section for choosing a printer 1 In the window labeled Main double click the Control Panel icon 2 Double click the Printers icon 3 Choose the Add button on the right side of the screen 4 In the list of printers box select EPSON S...

Page 34: ...the Close button You have now chosen the printer driver for Windows What is a Printer Driver The software you use to enter and format your documents sends codes that run or drive your printer These software codes select the font margins page size line spacing and other features of the document you are printing Therefore it is important that you choose the right printer driver and install it correc...

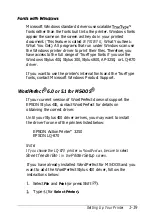
Page 35: ...the TrueType fonts contact Microsoft Windows Product Support WordPerfect 6 0 or 5 1 for MS DOS If your current version of WordPerfect does not support the EPSON Stylus 400 contact WordPerfect for details on obtaining the correct driver Until your Stylus 400 driver arrives you may want to install the driver for one of the printers listed below EPSON ActionPrinter 3250 EPSON LQ 870 Note lf you choos...

Page 36: ... the bottom of the screen Press Enter The program copies the file into the WordPerfect directory You can access the printer s internal scalable fonts by selecting Font and Base Font or pressieg CTRL F8 and then pressing 4 WordPerfect displays a list of all the Stylus 400 fonts including the scalable fonts Microsoft Word for MS DOS Contact Microsoft s Word for MS DOS Product Support to get the late...

Page 37: ...t likely need to select your fonts through your software Seifing Up Other Software Programs To take full advantage of your printer s features including ESC P 2 choose one of the ESC P 2 printers on the list below If none of these is listed contact your software manufacturer for an update that includes one of these Until you receive an update choose another printer as close to the top of the list a...

Page 38: ...ware manual Tips for Using the Paper Feeder Following the tips below will give you the best performance when printing with the paper feeder 0 0 0 0 Load paper into the paper feeder before you turn on the printer and send data When the printer receives data from the computer it loads a single sheet automatically and begins to print If the printer runs out of paper during a print job reload the pape...

Page 39: ...position See Using the Default Setting Mode in Chapter 2 0 The default page length for paper loaded from the paper feeder is 61 lines letter size paper and 65 lines A44ze paper You can change it using your application program or printer commands if necessary See the Appendix for more about printer commands 0 If the ink does not dry fast enough try removing sheets one at a time as they finish print...

Page 40: ...ing the Correct Printing Position 2 6 Operating the Control Panel 2 6 Indicator lights 2 7 Buttons 2 8 Selecting Character Fonts 2 9 Scalable fonts 2 10 Condensed printing 2 10 Using the Default Setting Mode 2 11 Default setting descriptions 2 12 Changing the default settings 2 13 Changing the character table setting 2 16 Using Other Printer Functions 2 1 ...

Page 41: ...slot to load single sheets of paper from 210 mm 8 3 inches to 216 mm 8 5 inches wide and from 257 mm 10 1 inches to 297 mm 11 7 inches long You can also load the following envelope sizes fromthe manual feed slot 0 Envelope No 6 166 mm 6 5 inches wide x 92 mm 3 6 inches I J Envelope No 10 240 mm 9 5 inches wide x 104 mm 4 1 inches Printing on single sheets Follow these steps to load a single sheet ...

Page 42: ...ow give your print command When the printer receives the data it begins printing When the printer finishes printing it ejects the sheet automatically If the sheet does not come all the way out press the Load Eject button 4 You can print as many sheets as you like from the manual slot When you want to switch to the paper feeder press the Load Eject button without inserting a sheet into the manual s...

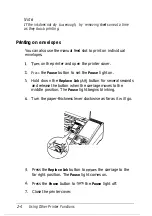
Page 43: ...to set the Pause light on 3 Hold down the Replace Ink AN button for several seconds and release the button when the carriage moves to the middle position The Pause light begins blinking 4 Turn the paper thickness lever clockwise as far as it will go 5 Press the Replace Ink button to return the carriage to the far right position The Pause light comes on 6 Press the Pause button to turn the Pause li...

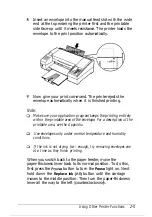
Page 44: ...ble area of the envelope For a description of the printable urea see the Appendix Q Use envelopes only under normal temperature and humidity conditions 0 If the ink is not drying fas t enough try removing envelopes one at a time as they finish printing When you switch back to the paper feeder move the paper thickness lever back to its normal position To do this first press the Pause button to turn...

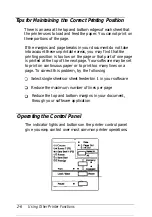
Page 45: ...that part of one page is printed at the top of the next page Your software may be set to print on continuous paper or to print too many lines on a page To correct this problem try the following IJ Select single sheets or sheet feeder bin 1 in your software 0 Reduce the maximum number of lines per page 0 Reduce the top and bottom margins in your document through your software application Operating ...

Page 46: ...ge 210 for more information Economy On when the economy printing mode is selected In economy mode the printer uses fewer dots per character The print speed is the same in both economy and LQ mode but the economy mode uses less ink This mode is ideal for rough drafts Paper Out Ink Out On when the printer runs out of paper Flashing indicates that the ink in the ink cartridge is low or the cartridge ...

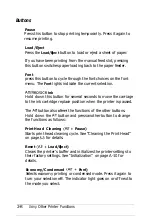
Page 47: ...o the ink cartridge replace position when the printer is paused The Alt button also alters the functions of the other buttons Hold down the Alt button and press another button to change the functions as follows Print Head Cleaning Alt Pause Starts print head cleaning cycle See Cleaning the Print Head on page 3 3 for details Reset Alt Load Eject Clears the printer s buffer and initializes the print...

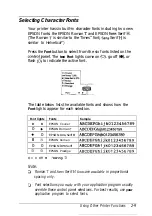
Page 48: ... how the Font lights appear for each selection Font lights Fonts Sample 0 0 EPSON Courier ABCDEFGhijk0123456789 0 0 EPSON Roman T ABCDEFGhijk0123456789 0 0 EPSON Sons Serif H ABCDEFGhijkOl23456789 0 6 EPSON Roman ABCDEFGhijk0123456789 I 0 0 EPSON Sons Serif ABCDEFGhi j k0123456789 6 6 EPSON Prestige ABCDEFGhijkOl23456789 On 0 Off l Flashing b Note o Roman T and Sans Serif H fonts are available in ...

Page 49: ...size of characters to approximately 60 percent of their normal width allowing more characters to fit on a line This is useful for spreadsheets and other applications where you need to print the maximum amount of information on a page You can condense the current font by pressing the Economy Condensed AR Font button EPSON Roman T and EPSON Sans Serif H cannot be condensed You can condense printing ...

Page 50: ...ions below To change a setting see Changing the default settings on page 2 13 Sefflng Character table Auto print dlrection Network Interface mode Options Italic U S A Italic France Italic Germany italic U K ltallc Denmark I Italic Sweden Italic Italy Italic Spain I PC437 PC850 PC860 PC861 PC863 PC865 BRASCII Ablcomp On Off On Off Mlxed text graphics mode On Off Auto line feed On Off Loading positi...

Page 51: ...cise vertical alignment When auto print direction is set to on the printer switches automatically between bidirectional for text data and unidirectional motion for graphics data When this feature is set to off the print head motion is controlled by your software Network interface mode If your printer is connected to a single computer leave this feature off If you want to use the printer in a netwo...

Page 52: ... lines on a page set this feature to 3 mm For example with ACsize paper and the loading position set to 8 5 mm you can print 65 lines per page with l 6 inch line spacing but with the 3 mm setting you can print 66 lines If you set the top margin in your software that setting is added to the default setting value Changing the default settings To change the printer s default settings you use the cont...

Page 53: ...h 0 0 On 0 Off 0 Flashing d After you press the Ait button the printer prints the current default settings and the next instruction in the language you selected Wait until printing is finished then go to the next step 4 To move to the feature you want to change press the AH button until the Data and Paper Out lights indicate the appropriate selection Default setting menu Data light Paper Out light...

Page 54: ...ging the character table setting skip to Changing the character table setting below 5 Press the Font button until the Font lights match your desired setting as shown in the table below Network Interface mode On 0 Off 0 6 Repeat steps 4 and 5 to make all your changes 7 Exit the default setting mode by turning the printer off Using Other Printer Functions 2 15 ...

Page 55: ...U S A ltallc France ltallc Germany Italic U K Italic Denmark I Italic Sweden Italic Italy Italic Spain I PC437 PC850 PC860 PC863 PC865 PC861 BRASCII Abicomp Note lf the table you printed in Step 3 on page 2 14 includes Submenu 3 I use that table to select the character table setting instead of the one above 2 Press the Font button to change the setting As you move from setting to setting the Font ...

Page 56: ...mode any time by turning ofi You may exit the default setting mode any time by turning off the printer Any changes you have made remain in effect until the printer Any changes you have made remain in effect until you change them again you change them again Q lf you want to check fhe new default settings enter the default setting mode again and print the current settings After you check them turn t...

Page 57: ...g Replacing the Ink Cartridge 3 2 Cleaning the Print Head 3 3 Cleaning the Printer 3 4 Transporting the Printer 3 5 Troubleshooting 3 5 Error indicators 3 6 Power supply 3 7 Printing 3 7 Paper handling 3 12 Maintenance and Troubleshooting 3 1 ...

Page 58: ...k cartridge on hand Use EPSON ink cartridge SO20025 to ensure proper operation and preserve the life of the print head Other brands of ink may clog the print head or damage it Follow these steps to remove the empty cartridge 1 Make sure both the Ink Out and Data lights flash and the Pause light stays on 2 Hold down the Replace ink AH button for several seconds and release the button when the print...

Page 59: ...edures This can take up to 40 seconds to complete Cleaning the Print Head If print quality diminishes use the printer s built in print head cleaning cycle to ensure that the nozzles are delivering ink properly To avoid wasting ink clean the print head only if print quality declines Follow these steps 1 Make sure the printer is turned on and the Pause light is on If the Pause light is not on press ...

Page 60: ... cover closed to prevent water from getting inside 5 If the inside of the printer accidentally gets soiled with ink wipe it off with a damp cloth eCaution 0 Never use alcohols or thinners to clean the printer these chemicals can damage the components as well as the case 0 Be careful not to get water on the printer mechanism or electronic components 0 Do not use a hard or abrasive brush Q Do not sp...

Page 61: ... from the electrical outlet then disconnect the interface cable from the printer 3 4 5 Remove the paper from the paper feeder Attach the protective material to the printer Repack the printer and power cord and place them in the original box 6 Keep the printer flat in the box during transport 7 If the print quality is poor after transport clean the print head See Cleaning the Print Head Troubleshoo...

Page 62: ...y be on or off Paper out No paper is loaded in the printer Load paper again and press the Pause button to turn the Pause light off Paper jam or carriage error The paper is jammed inside the printer Follow the steps on page 3 13 A carriage error occurred Turn off the printer After a few seconds turn it back on again No ink or no ink cartridge The ink cartridge may be empty or not installed Install ...

Page 63: ...ther it is working The lights come on briefly but then go off and stay off Check that the printer s voltage rating matches the voltage of your electrical outlet If the voltages do not match unplug the printer and contact your dealer immediately Do not reconnect the power cord to an electrical outlet Prinfing All lights flash but nothing prints Contact your dealer Printing stops and the Data and Pa...

Page 64: ...Printing stops and the Pause light is on Printing has been temporarily suspended Press the Pause button to continue The Pause light is off but nothing prints The interface cable may not be plugged in securely Check both ends of the cable between the printer and the computer Make sure your interface cable meets both the printer and computer specifications Make sure your software is properly set up ...

Page 65: ... receives from the computer in hexadecimal format You can analyze this information to isolate problems The printer sounds like it is printing but nothing prints The print head nozzles may be clogged Turn the Pause light on Next hold down the AH button and press the Pause button for two seconds to clean the print head See Cleaning the Print Head earlier in this chapter Dots are missing in printed c...

Page 66: ...may have selected the economy printing mode To exit this mode press the Economy Condensed AH Font button until the Economy light goes off The printed image is blurred You may not be using the correct type of paper Although most types of businesscorrespondencequality paper work well with your printer you should always test the paper you want to use before buying it in large quantities See Chapter 1...

Page 67: ... default setting mode so that the printer automatically adds a line feed code to each carriage return See Using the Default Setting Mode in Chapter 2 The text prints an extra blank line between each text line Set auto line feed to off in the default setting mode so that two line feed signals are not sent See Using the Default Setting Mode in Chapter 2 Line spacing is incorrect Adjust the line spac...

Page 68: ... be fed Make sure that the paper you are using meets the specifications Some paper types require manual feeding See Technical Specifications in the Appendix The printer loads more than one sheet at a time The paper is too thin Make sure that the paper you are using meets the specifications Some paper types require manual feeding See Technical Specifications in the Appendix The ejected paper is wri...

Page 69: ...in the Appendix Paper is loaded crookedly from the manual feed slot Use the Load Eject button to eject the page Then insert a new sheet straight into the manual feed slot The paper is jammed inside the printer To clear a paper jam follow the steps below 1 Open the printer cover and the paper feeder cover 2 Pull the access panel away from the rear of the printer as shown below Maintenance and Troub...

Page 70: ...ed or paper jam problems try these corrective measures cl 0 Ll cl Use a higher quality paper one that is not too thin or rough Some types of paper require manual feeding See Chapter 2 Fan the stack of paper and straighten it before loading Be sure that you do not load too much paper in the paper feeder You can load up to 100 pages Try turning the stack of paper over in the paper feeder Most packag...

Page 71: ...Appendix Technical Specifications A 2 Printer specifications A 2 Command Summary A 12 Sending printer commands A 12 Using the command summary A 12 Character Tables A 23 Appendix A 1 ...

Page 72: ...densed 160 240 Maximum resolution Printing direction Line spacing 360 x 360 dpi text graphics Bidirectional with logic seeking for text and graphics The auto print direction can be set in the default setting mode l 6 inch 1 8 inch or programmable in l 360 inch increments Paper feed speed Input buffer 110 milliseconds per l 6 inch line SKIS when mixed text graphics option in default setting mode is...

Page 73: ...Font Min pt Max pt Incw3ments EPSON Roman 8 32 2 EPSON Sans Serif 8 32 2 Pt EPSON Roman 8 32 2 Pt EPSON Sans Serif H 8 2 Pt Character tables Character sets Paper Single sheets paper feeder Size Thickness Quality 8 graphic character tables 14 graphic character tables are available in certain areas 14 character sets and 1 legal Letter 8 5 x 11 210 x 297 mm 0 065 to mm 0 0026 to 0 0055 inches 64 to 9...

Page 74: ...blems lf you encounter problems switch to a higher grade of paper Envelopes Manual insertion Size Thickness Weight Quality No 6 166 x 92 mm 6 5 x 3 6 inches No 10 240 x 104 mm 9 5 x 4 1 inches 0 16 to 0 52 mm 0 0063 to 0 0197 inches 45 to 90 g m2 12 to 24 lb 0 Use envelopes only under normal temperature and humidity conditions Q Insert envelopes long side first use the manual feed slot only Bond p...

Page 75: ...nical Paper feed method Ink cartridge S020025 Friction Color Print capacity Black Approximately 0 7 million characters in letter quality mode Cartridge life 2 years from production date The cartridge life may vary depending on how often you use the print head cleaning function Temperature Storage 30 to WC 22 to 104 F Transit 30 to 60 C 22 to 140 F 1 month at 40 C 104 F 120 hours at 60 C 140 F lJ T...

Page 76: ...consumption 4 000 power on hours 25 000 pages 1000 characters A4 or letter 159 mm 6 3 inches 435 mm 17 1 inches 264 mm 10 4 inches without paper support 400 mm 15 7 inches with paper support 4 8 kg 10 6 lb AC12OV AC 103 5 to 132 V 5oto6OHz 49 5 to 60 5 Hz 0 4 A Approx 13 W during self test printing in LQ mode at 10 cpi AC22Oto240V AC 198 to 264 V 5oto6OHz 49 5 to 60 5 Hz 02A Approx 13 W during sel...

Page 77: ...0 RI I 5to 35qP o RH 80 55 20 Print aaeured 10 C 27 C 35 C 50 F 8OT 95T Safety approvals Safety standards US model European model R F I UL1950 with D3 CSA22 2 950 with D3 EN 60950 TijV IEC 950 SEMKO DEMKO NEMKO SETI US model European model FCC Part 15 Subpart B class B Vfg 243 VDE 0878 part 3 part 30 EN 55022 CISPR Pub 22 class B Appendix A 7 ...

Page 78: ...d describes their respective interface signals Signal Pln 1 2 20 DATA 1 3 21 DATA 2 4 22 DATA 3 5 23 DATA 4 6 24 DATA 5 7 25 DATA 6 8 26 DATA 7 9 27 DATA 8 10 28 ACKNLG Return Pin 19 Signal STROBE Direction IN IN IN IN IN IN IN IN IN OUT Descrbtton STROBE pulse to read data Pulse width must be more than 0 5 us at the receiving terminal These signals represent information in bits 1 to 8 of parallel...

Page 79: ...up to 5 V through 1 O kQ resistance 14 AUTO IN When this signal is LOW the FEED paper b automatically fed E one line after printing 15 NC Not used 16 GND Logic ground level 17 CHASSIS Printer s chassis ground GND which is isolated from the logic ground 18 NC 19 30 GND Not used Twisted pair return signal ground level 31 16 KiT IN When this level becomes LOW the printer controller is reset to its st...

Page 80: ...tion on the return side A interface conditions are based on the TJL level Both the r se and full times of each signal must be less than 0 2 microseconds Data transfer must be carried out by observing the ACKNl G or BUSY signal Data transfer to this printer can be carried out only after receipt of the ACKNl G signal or when the BUSY signal is LOW Initialization The printer can be initialized return...

Page 81: ...table below shows the default settings that take effect when the printer is initialized Item Default sefflng Top of form posltion Page length Current paper positlon Single sheets 65 lines for A6slze paper 61 lines for letter size paper 22 inches for manual insertion Left and right margins Line spacing Canceiled l 6 Inch line spaclna Character size I 10 5 point Vertical tab positlon Cleared Horizon...

Page 82: ...sert printer commands at all In addition your software probably specifies certain punctuation you must use to enter the command If your software allows you to send commands to the printer the software manual should explain exactly what format and punctuation are required Using the command summary The following section lists and describes all the commands by topic If a command has no parameters it ...

Page 83: ... oc Form Feed 10 OA Line Feed 48 30 Select l inch Line Spacing 50 32 Select l 6 inch Line Spacing 51 33 Set n 180 inch Line Spacing 43 2B Set n 360 inch Line Spacing Page format ASCII Dec Hex Description ESC cnn 40 99 28 63 ESC Cnn 40 67 28 43 ESCCn 67 43 Set Page Length in Lines n Number of lines Set Page Format ESC c4Omlm2nln2 m ml m2x256 m Top margin in defined units n nl n2x256 n Bottom margin...

Page 84: ...2 36 24 ESC nl n2 92 5c ESC Vnn 40 86 2856 Set Absolute Horizontal Print Position n nl t n2 x 256 n Specifies print position from left margin in defined units Before you define the unit the default is l 60 inch for this command Set Relative Horizontal Print Position n nl t n2 x 256 n Moves current print position in defined units Before you define the unit the default is l 120 inch in draft and l 1...

Page 85: ...l n2x256 n Moves current print position in defined units Set Horizontal Tabs Up to 32 tabs entered in ascending order Terminated by 0 Tab Horizontally Set Vertical Tabs Up to 16 tabs last n should be 0 Tab Vertically Advance paper n 180 inch ASCII ESCkn DeC Hex Description 107 6B Select Typeface n Roman 3 Prestige 1 Sans Serif 10 Roman T 2 Courier 11 Sans Serif H Appendix A 15 ...

Page 86: ... nZx256 n Set point size in 0 5 points Total points nl t n2 x 256 x 0 5 n 0 No change in point n 0 16 21 24 28 32 36 40 44 48 52 56 60 or 64 for Roman Sans Serif Roman T and Sans Serif H n 0 21 42 for other typefaces Cancel ESC X with ESC P Mg p or Select 10 5 point 10 cpi Select 10 5 point 12 cpi Select 10 5 point 15 cpi Turn Proportional Mode On Off Select LQ or Draft n 0 Draft l LQ Draft speed ...

Page 87: ... Dec Hex Description SI 15 OF DC2 18 12 s o 14 OE ESCWl O DC4 87 20 ESC w l O 119 ESC G 71 ESC H 72 ESCSO 83 ESCSl 83 ESC T 84 57 14 77 47 48 53 53 54 Select Condensed Printing Cancel Condensed Printing Select Double Width Printing one line Turn Double Width Printing On Off Cancel Double Width Printing one line Turn Double Height Printing On Off Select Double Strike Printing Cancel Double Strike P...

Page 88: ...aracter Style n 0 Normalstyle 1 Outline 2 Shadow 3 Outline with shadow Spacing ASCII Dec Hex Description ESC SP n 32 20 ESC Unn 40 85 28 55 ESCcnln2 99 63 Set Intercharacter Space n Number of units of space added to the space between characters Units are l 120 inch draft and l 180 inch LQ and proportional Define Unit ESC UlOn Define positioning unit as n 3600 inch n 10 20 30 40 50 or 60 n 10 defau...

Page 89: ...rench 9 0 PC 865 Nordic 10 0 PC 852 East Europe 11 0 PC 857 Turkish 14 0 PC866 Russia 15 0 P C 869 Greek 24 0 PC 861 Icelandic 25 0 BRASCII BrazPort 26 0 Abicomp Braz Port 27 0 MAZOWIA Poland 28 0 C o d e MJK CSFR 29 7 ISO 8859 7 Latin Greek 31 0 IS0 Latin 1T Turkish 32 0 Bulgaria Bulgaria Available only in certain areas ESCtn 116 74 Select Character Table Select character table n assigned by ESC ...

Page 90: ...f character dl Body width of character d2 Right space of character data 3 bytes required for each character super subscript requires only 2 bytes per character Copy ROM to RAM n 0 1 2 3 10 or 11 n Typeface see list in ESC k command description Select User Defined Set n 0 Normal set 1 User defined set Enable Printing of Upper Control Codes This command enables the printing of codes 128 159 if curre...

Page 91: ...pl density dpi Pins dots print t 0 60 60 8 Yes 1 1 120 60 8 Yes 1 2 120 60 8 No 1 3 240 60 8 No 1 4 80 60 8 Ye5 1 6 90 60 24 Yes 1 32 60 180 24 Ye5 3 33 120 180 24 Yes 3 38 90 180 24 Yes 3 39 180 180 24 Yes 3 40 360 180 24 No 3 71 180 360 48 Yes 6 72 360 360 48 No 6 73 360 360 48 Yes 6 ASCII ESC Gnn Dec Hex Description 40 71 28 47 Select Graphics Mode ESC GlOn n lor49 Cancel Graphics mode with ESC...

Page 92: ... Fullg aphicsmode 1 Compressed mode v 10 20 Dot density for vertical in 3600 v DPI h 10 20 Dot density for horizontal in 3600 h DPI m Number of vertical dots lSIllS24 n Number of horizontal dots Total dots nl n2 x 256 The following combination is not allowed v lOandh 20 A 22 Appendix ...

Page 93: ... the PC437 table for hex codes 00 through 7F so only the PC437 table is shown completely The rest of the tables show only the characters for hex codes 80 through FF The tables with an asterisk after the table name are available in certain areas only PC437 USA standard Europe CCDE10123456789ABCDEF 0 Ita O P p c E 6 L 1 0 5 1 2 3 4 5 6 7 8 9 A B C D E F Appendix A 23 ...

Page 94: ...7 a 9 A B C D E F 89ABCDEF c E a L B 6 PC863 Canadian French CODE 0 1 2 3 4 5 6 7 8 9 A B C D E F 89ABCDEF CaE 0 1 2 3 4 5 6 7 8 9 A B C D E F 89ABCDEF C 6 L 11 a a PC865 Norwegiun CODE 0 1 2 3 4 5 6 7 8 9 A B C D E F 89ABCDEF c fi a 1 L 11 a E A 24 Appendix ...

Page 95: ... 0 1 2 3 4 5 6 7 a Q A 0 C D E F 8QABCDEF Abicomp 8 12 Potfugese 0 1 2 3 4 5 6 7 8 9 A B C D E F I 8RASCll Bra Portuguese 0 1 2 3 4 5 6 7 8 9 A B C D E F PC437 Greek Greek ccr 0 1 2 3 4 5 6 7 a 9 A B C D E F Appendix A 25 ...

Page 96: ... Greek IS0 8859 7 Win Greek CODE 0 1 2 3 4 5 6 7 8 9 A B C D E F 89ABCDEF PC853 Turkish CODE 0 1 2 3 4 5 6 7 8 9 A B C D E F 89ABCDEF PC857 Turkish CCDE 0 1 2 3 4 5 0 7 8 9 A B C D E F 89ABCDEF A 26 Appendix ...

Page 97: ... PC552 East Europe 0 1 2 3 4 5 6 7 8 9 A B C D E F 89ABCDEF APazLlpe PC555 CyriMc 0 1 2 3 4 5 6 7 6 9 A B C D E F 89ABCDEF tj a LaR B A AJlpnr fi e 6 tj n PP r lb s M c 3 8hu Hc3 P I X HT eitaXKoTlli CItA1fK0ys sPeH nY3 FCXYE 0 1 2 3 4 5 6 7 8 9 A B C D E Appendix A 27 ...

Page 98: ...4 5 6 7 8 9 A B C D E F Bulguria Bulgaria CODEl89ABCDEF 0 IA P a p L 4 a f 1 EC6ilgpr 2 BTBT Z 3 I YrytIlI 4 Ll n j z f 5 EXextLaJ 6 7 8 9 A B C D E F Code MJK CSFR x E 0 1 2 3 4 5 6 7 8 9 A B C D E F BBABCDEF A 28 A p p e n d i x ...

Page 99: ...u O P R lAQa DC2 2 B R b r 3CScs DC4 4DTdt SECleu 6FVfv 7GWgw 8HXhx HrEMeC9IYiy LF VT ESC JZjz K ki FF CL 1 CR MIm so N n SI j O 0 No characters are available for hex code 15 in the italic character table Appendix A 29 ...

Page 100: ...an be selected with the default setting mode or with the ESC R command Country ASCII cod box 23244050X5D5E607B7C7D7E USA 1 13 France g o c Q 6 ti Germany gxsu asiia UK e l ll Denmark KBA 90b Sweden tiBAoAucaGBii Italy e aab i spain pt i R i L A The following seven additional sets can be selected only with the ESC R command Couniry ASCII ccdo hex 23a405BX5D5E607B7C7D7E Japan ul Norway UEKBAUC 0bti ...

Page 101: ...racters available with the ESC command To print the characters in the table below first send the ESC command CCCE 0 1 7 0 b 1 0 4 2 e t 3 v 4 q 5 6 l 7 6 T 9 0 1 A I B CT c OL D b E R A F 010 Appendix A 31 ...

Page 102: ...ata before printing it bVte A unit of information consisting of eight bits characters per inch cpi A measure of the size of text characters sometimes referred to as pitch character table A collection of letters numbers and symbols that provides you with the characters used in a particular language condensed printing Printing in which the width of each character is approximately 60 of the width of ...

Page 103: ...shooting feature that helps advanced users find the cause of communication problems between the printer and the computer When the printer is in hex dump mode it prints each code it receives in hexadecimal notation and ASCII characters Also called data dump initiaiization Returns the printer to its defaults fbced set of conditions ink jet A method of printing in which each letter or symbol is forme...

Page 104: ...l or by turning the printer off and then back on ROM Read Only Memory A portion of memory that can only be read and cannot be used for data storage ROM retains its contents when you turn off the printer self test A method for checking the operation of the printer When you run the self test the printer prints the characters stored in its ROM so ware pfografn A software program that helps you carry ...

Page 105: ... 20 A 23 Cleaning the printer 3 4 Cleaning the print head 3 3 Computer connecting to 1 16 Condensed mode 2 1 0 Configuration See Software Connecting the printer 1 16 Control codes A 13 22 Control panel 2 6 Courier font 2 9 Cover paper feeder 1 1 3 printer 1 10 D Data dump See Hex dump Data light 2 7 2 15 Default setting mode 2 1 1 settings A l 1 Driver printer l 18 E Economy light 2 7 Economy prin...

Page 106: ...cing 3 2 specifications A 5 Ink Out light 2 7 Input buffer A 2 Interface connecting 1 16 specifications A 8 l 0 International character sets samples A 30 selecting A 20 A 30 Italic fonts A 29 J Jam clearing 3 1 3 paper 3 13 preventing 3 14 L Lever paper thickness 2 4 Lights status 2 7 Load Eject button 2 8 Loading paper envelopes 2 4 manually 2 2 paper feeder 1 1 3 Loading position adjusting 2 1 3...

Page 107: ...2 Resetting printer defaults 2 8 A 11 Roman font 2 9 A 3 Roman T font 2 9 A 3 S Safety approvals A 7 Safety information Intro 7 1 2 Sans Serif font 2 9 A 3 Sans Serif H font 2 9 A 3 Scalable fonts 2 10 Self test 1 15 Service where to get Intro 3 Settings changing 2 1 3 description 2 1 2 printer defaults 2 11 Single sheets See Loading paper Sizes paper 2 2 A 3 A 4 Software 1 1 7 Specifications A 2 ...

Page 108: ...c o n t r o l p a n e l ink jet printing command summary l o a d i n g P a P e r Printed in Japan 94 4 10 ...

Reviews: