


EPSON Stylus Color 900
Revision C
Adjustment
Adjustments
159
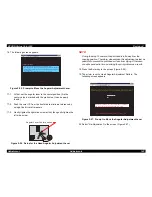
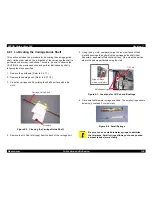
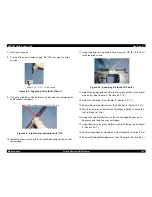
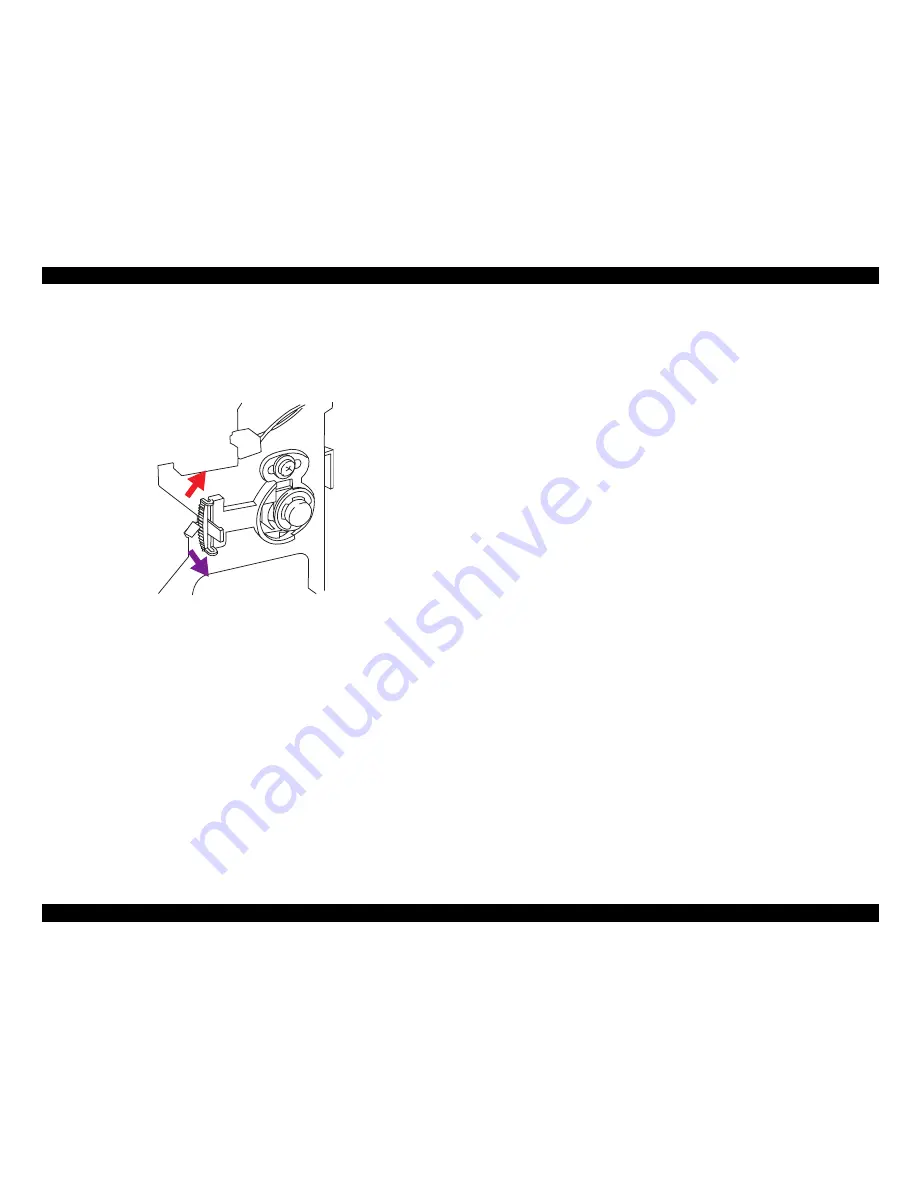
9. If the thickness gauge does not move, move the right parallelism
adjustment bushing upward by one notch. The direction for moving
the bushing and corresponding change in PG amount is as shown in
the following figure.
Figure 5-54.
Bushing’s Movement and Corresponding Change in PG Amount
NOTE:
Be sure to release the parallelism adjustment bushing (right/left)
from the frame before turning it. Otherwise, the teeth may crush and
the adjustment can not be done.
10. Repeat the steps from 3 to 9 until the thickness gauge moves being
pushed by the printhead.
11. When the thickness gauge starts moving, move the carriage away
from the thickness gauge set by pulling the timing belt. (The
carriage moves back to the left.)
12. Push the right parallelism adjustment bushing down from the current
position by one notch.
13. By pulling the timing belt, move the carriage again to the position
where the thickness gauge is set and make sure the thickness
gauge does not move.
14. Place the thickness gauge on the 80th column position and adjust
the with the left parallelism adjustment bushing in the same manner
as for the right parallelism adjustment bushing.
NOTE:
Make sure the PG lever (blue) is set properly depending on the
operation as shown below:
During the adjustment:
Set to the front (PG = narrower)
When moving the carriage away from the thickness gauge:
Set to the rear (PG = wider)
15. Set the PG lever (blue) to the rear (PG = wider).
16. Place the thickness gauge on the right side of the rib in the Front
Paper Guide again.
17. Set the PG lever (blue) to the front (PG = narrower).
18. By pulling the timing belt manually, move the carriage to the position
where the thickness gauge is set and make sure the thickness
gauge does not move.
19. Turn the right parallelism adjustment bushing upward by one notch
and ensure the thickness gauge moves.
20. Return the right parallelism adjustment bushing to the previous
position by turning it downward by one notch.
21. If the results of the steps 18 and 19 are incorrect, make the PG
adjustment using the left bushing again.
P G : N a r r o w e d
P G : W i d e n
Summary of Contents for Stylus Color 900
Page 1: ...EPSONStylusColor900 RevisionC Color ink jet printer SEIJ98006 ...
Page 8: ...Component Layout 180 Parts List 184 Exploded Diagrams 187 Circuit Diagrams 195 ...
Page 9: ... PRODUCTDESCRIPTION ...
Page 43: ... OPERATINGPRINCIPLES ...
Page 78: ... TROUBLESHOOTING ...
Page 101: ... DISASSEMBLYANDASSEMBLY ...
Page 130: ... ADJUSTMENT ...
Page 161: ... MAINTENANCE ...
Page 171: ... APPENDIX ...
Page 183: ...EPSON Stylus Color 900 Revision c Appendix Component Layout 183 Figure 7 6 C265 PNL Board ...
Page 194: ...06 03 01 02 for S E ASIA 03 03 05 03 04 EPSON STYLUS COLOR 900 No 7 10056 Rev 01 ...
Page 196: ......
Page 197: ......
Page 198: ......
Page 199: ......
Page 200: ......


