EPSON Stylus Pro 4400/4450/4800/4880/4880C
Revision C
Disassembly & Assembly
Disassembly Procedures
293
3.
Remove the "Head Unit" from the "Carriage Unit".
(Refer to "4.2.7.1 Carriage Unit" (p266).)
4.
Separate the "Carriage, C" from the "Carriage, B".
(Refer to "4.2.8.1 Printhead" (p285).)
5.
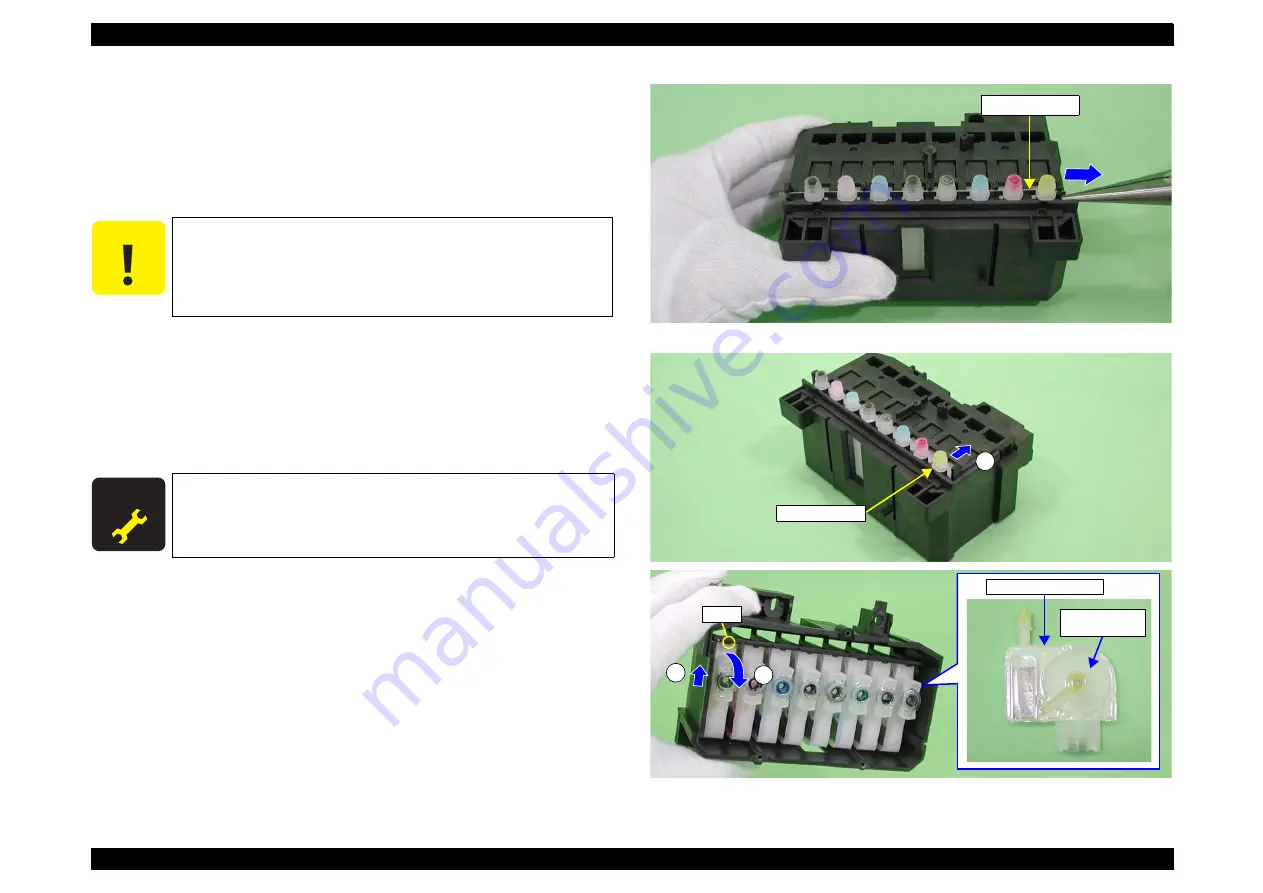
Draw out the "Plate, Damper" with a plier or a similar tool.
6.
Remove the "Valve Assy., Head" by following the steps below.
6-1.
Slide the joint section on the "Valve Assy., Head", which connects
"Tube, Supply, Ink", to remove the joint section.
6-2.
Release the tab and remove the "Valve Assy., Head" in the
direction of an allow.
Figure 4-116. "Plate, Damper" Drawing
Figure 4-117. "Valve Assy., Head" Removal
C A U T I O N
When performing the following work, pay attention to the
followings:
Do not hold the film area of the "Valve Assy., Head".
Do not damage or deform the joint section on the "Valve
Assy., Head" which connects the "Tube, Supply, Ink".
A D J U S T M E N T
R E Q U I R E D
Be sure to refer to Chapter 5
and
perform specified adjustments after replacing or removing
the "Valve Assy., Head".
Plate, Damper
1
Joint Section
1
2
Tab
Valve Assy., Head
Film Area
(both sides)
Summary of Contents for Stylus Pro 4800 Portrait Edition
Page 9: ...C H A P T E R 1 PRODUCTDESCRIPTION ...
Page 113: ...C H A P T E R 2 OPERATINGPRINCIPLES ...
Page 156: ...C H A P T E R 3 TROUBLESHOOTING ...
Page 200: ...C H A P T E R 4 DISASSEMBLY ASSEMBLY ...
Page 366: ...C H A P T E R 5 ADJUSTMENT ...
Page 448: ...C H A P T E R 6 MAINTENANCE ...
Page 457: ...C H A P T E R 7 APPENDIX ...


