EPSON Stylus Pro 4400/4450/4800/4880/4880C
Revision C
Disassembly & Assembly
Disassembly Procedures
346
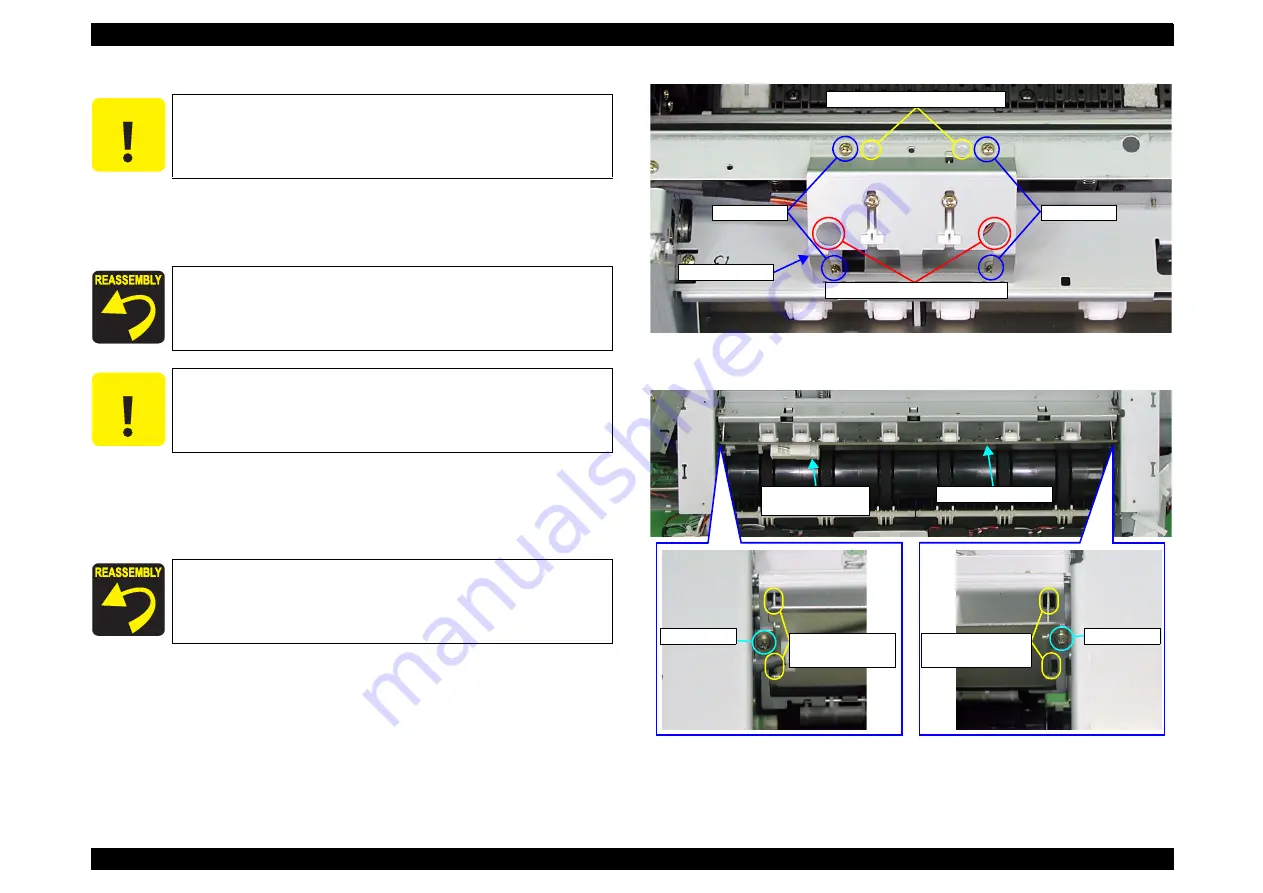
10. Remove the four screws securing the "PT Sensor Unit" and remove the
C.B.S. 3x6:
4 pcs.
11. Remove the two screws securing the "Guide, Roll Paper" and remove the
"Guide, Roll Paper" along with "Installation Plate, Detector, Rear".
C.B.S. 3x6:
4 pcs.
Figure 4-202. PT Sensor Unit Removal
Figure 4-203. Guide, Roll Paper and Installation Plate, Detector, Rear
Removal
C A U T I O N
When performing the following step, be careful not to pull
the "PT Sensor Unit" too much because a harness is
connected.
Align the two dowels of the "PT Sensor Unit" and the two
main frame positioning holes.
C A U T I O N
When performing the following step, be careful not to pull
the "Guide, Roll Paper" too much because a harness is
connected.
Align the four ribs of the "Guide, Roll Paper" and the four
main frame positioning holes.
PT Sensor Unit
Dowels and Positioning Holes
Screwdriver Insertion Holes
C.B.S. 3x6
C.B.S. 3x6
Rib and
Positioning Hole
Installation Plate,
Detector, Rear
Rib and
Positioning Hole
C.B.S. 3x6
C.B.S. 3x6
Guide, Roll Paper
Summary of Contents for Stylus Pro 4800 Portrait Edition
Page 9: ...C H A P T E R 1 PRODUCTDESCRIPTION ...
Page 113: ...C H A P T E R 2 OPERATINGPRINCIPLES ...
Page 156: ...C H A P T E R 3 TROUBLESHOOTING ...
Page 200: ...C H A P T E R 4 DISASSEMBLY ASSEMBLY ...
Page 366: ...C H A P T E R 5 ADJUSTMENT ...
Page 448: ...C H A P T E R 6 MAINTENANCE ...
Page 457: ...C H A P T E R 7 APPENDIX ...


