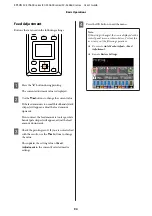
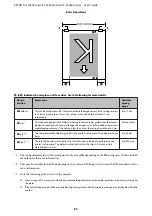
background image

Precautions regarding settings

Correctly load the media to be adjusted in the same
state as for the actual printing. For example, if you
are using the auto take-up reel unit for printing, the
auto take-up reel unit should also be used for
adjustment.

U


“Loading and Exchanging Media” on page 33

U


“Using the Auto Take-up Reel Unit” on

page 67

Using curled, creased, waved, folded, or curved
media may cause an adjustment failure. Cut off the
curled, creased, waved, folded, or curved part, and
load the media just before printing.

Cutting Media 

U


“Cutting Media” on page 64

If the media has different widths even when the
media type is the same, the media settings have to be
reconfigured. Save media settings for each media
width.

When using the same type of media with different
lots, you should reconfigure media settings.

When using the SC-S70600 series or SC-S50600
series, do not use the media part that has been fed
and rewound for adjustment. Media that has been
fed and then rewound may have traces or other
issues from rollers and it may not be possible to
adjust correctly.

Setting (normal)

The printer offers a total of 30 media setting banks.
Follow the steps below to save media settings.

Note:

The media settings saved in the printer can be changed
using EPSON LFP Remote Panel 2.

For details, see the EPSON LFP Remote Panel 2 help.

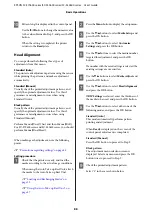
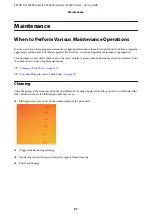
Buttons that are used in the following settings

Choosing a Media Setting Bank

A

After confirming that the printer is ready, press
the 

Menu

 button.

The settings menu will be displayed.

B

Select 

Media Setup

 and press the 

Z

 button.

C

Use the 

d

/

u

 buttons to select 

Customize

Settings

 and press the 

Z

 button.

D

Use the 

d

/

u

 buttons to select the desired media

number, and press the 

Z

 button.

If a number with the saved settings is selected, the
existing settings are overwritten.

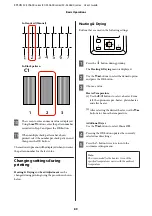
Setting Name

Name the media setting bank. Using distinctive names
makes it easier to select banks for use.

A

Select 

Setting Name

 and press the 

Z

 button.

B

Use the 

d

/

u

 buttons to display letters and

symbols. When the desired character is
displayed, press the 

r

 button to select the next

entry position.

Mistakes can be erased by pressing the 

l

 button

to delete the previous character and move the
cursor back one spot.

C

After entering the name, press the 

Z

 button.

EPSON SC-S70600 series/SC-S50600 series/SC-S30600 series     User's Guide

Basic Operations

84

Summary of Contents for SureColor SC-S70600

Page 1: ...User s Guide NPD4674 07 EN ...

Page 2: ...r than those designated as Original Epson Products or Epson Approved Products by Seiko Epson Corporation SeikoEpsonCorporationshallnotbeheldliableforanydamageresultingfromelectromagneticinterferencethatoccursfromtheuseofanyinterfacecables other than those designated as Epson Approved Products by Seiko Epson Corporation EPSON and EPSON EXCEED YOUR VISION or EXCEED YOUR VISION and their logos are re...

Page 3: ...e rollers and media For SC S70600 series and SC S50600 series 35 Loading Media SC S70600 series SC S50600 series 37 Loading Media SC S30600 series 51 Viewing and Changing Media Settings 63 Replacing and removing media 64 Using the Auto Take up Reel Unit 67 Notes when using the auto take up reel unit 67 Attaching the Roll Core 67 Take up with the Printed Side Facing Out 70 Take up with the Printed ...

Page 4: ...nce Call Service Call Occurs 159 Troubleshooting 160 You cannot print because the printer does not work 160 The printer sounds like it is printing but nothing prints 160 The prints are not what you expected 161 Media 167 Others 169 Appendix Options and Consumable Products 171 Supported Media 176 Moving and Transporting the Printer 176 Moving the Printer 176 Transport 177 Recommended Media Settings...

Page 5: ...If you use an extension cord with this product make sure the total ampere rating of the devices plugged into theextension cord doesnot exceed the cord s ampere rating Also make sure the total ampere rating of all devices plugged into the wall outlet does not exceed the wall outlet s ampere rating If you plan to use the printer in Germany observe the following To provide adequate short circuit prot...

Page 6: ...ese on your Web browser Setup Guide Provides information on how to setup the printer after unpacking it from the box Make sure you read this manual to perform operations safely User s Guide this guide Provides information on basic printer operations maintenance operations troubleshootingandso on Network Guide PDF Provides information on using the printer over a network Epson Video Manuals Provides...

Page 7: ... If the subtitles are not displayed when you play the video click the subtitles icon shown in the image below Illustrations Unless otherwise noted the illustrations in this manual show the SC S30600 series EPSON SC S70600 series SC S50600 series SC S30600 series User s Guide Introduction 7 ...

Page 8: ...tem The heater can be used to rapidly dry ink after printing Available separately for the SC S70600 series U Additional Print Drying System Setup Guide C After heater The heater can be used to rapidly dry ink after printing U Heating Drying on page 85 D Roll core holder Place the roll core for media take up on these holders There are same parts on both the left and the right U Using the Auto Take ...

Page 9: ...n the Auto switch is in the Off position K Casters There are two casters on each leg Once installation is complete the front casters should be kept locked while the printer is in use L Airflow vents Allows air to flow into the printer Do not obstruct these vents M Waste ink bottle holder Place the waste ink bottle in this holder N Adjuster The adjusters keep the printer in place After installing t...

Page 10: ... 103 X Media loading lever After loading media lower the media loading lever to keep the media in place Raise the lever to release the media prior to removal Y Alert lamp This lamp lights or flashes when an error occurs Light Flash An error occurred The type of error is indicated by how the lamp lights or flashes Check the contents of the error on the control panel s screen Off No error Z Control ...

Page 11: ...up on these holders There are same parts on both the left and the right U Using the Auto Take up Reel Unit on page 67 D Tensioner media guide Thetensionermediaguidepreventsthetake uprollfromskewingwhenusingtheautotake upreelunit Whennot using the auto take up reel unit move the guide out of the way toward both edges of the tensioner U Using the Auto Take up Reel Unit on page 67 E Tensioner The ten...

Page 12: ...aste ink bottle holder Place the waste ink bottle in this holder M Adjuster The adjusters keep the printer in place After installing the printer keep it securely in place during use N Waste ink bottle Waste ink collects in this bottle Replace with a new waste ink bottle when the level approaches the line O Waste ink tube Waste ink is discharged from this tube Be sure the end of this tube is in the...

Page 13: ...ease the media prior to removal X Alert lamp This lamp lights or flashes when an error occurs Light Flash An error occurred The type of error is indicated by how the lamp lights or flashes Check the contents of the error on the control panel s screen Off No error Y Control panel U Control panel on page 20 Z Front cover Open when loading media cleaning the inside of the printer or removing jammed m...

Page 14: ... page 37 C Cutter groove Pass the blade of a cutter available in the market down this groove to cut media D Pressure rollers high There are ten rollers in total the high pressure rollers are the two on the outside edges They press down on the edges of the media when transparent or milky white film is used and during ink layering U Positioning of the pressure rollers and media For SC S70600 series ...

Page 15: ...We recommend that this unit be cleaned at the end of each workday U Cleaning Around the Caps Daily on page 106 I Wiper The wiper removes ink from the print head nozzles We recommend that this unit be cleaned at the end of each workday This is a consumable replace about once every three months U Cleaning Around the Caps Daily on page 106 U Replacing the Wiper and Wiper Cleaner on page 120 J Flushin...

Page 16: ... of the media from touching the print head Position the plates at either side of the media before printing There are two types sliding plate and removable plate U Loading Media SC S30600 series on page 51 C Cutter groove Pass the blade of a cutter available in the market down this groove to cut media D Pressure rollers These rollers press down on the media during printing U Cleaning Inside the Pri...

Page 17: ... unit be cleaned at the end of each workday This is a consumable replace about once every three months U Cleaning Around the Caps Daily on page 106 U Replacing the Wiper and Wiper Cleaner on page 120 I Flushing pad Ink is discharged onto this pad during flushing This is a consumable replace about once every three months U Replacing the Flushing Pad on page 122 Back A Drive switch The drive switch ...

Page 18: ...in temperature F Roll support Rest media on these supports before placing it on the roll holders There are same parts on both the left and the right G Handle After placing media on the right roll holder rotate the handle to press the holder and apply pressure to the roll core LAN port A RJ 45 connector Connects the LAN cable Use a shielded twisted pair cable category 5 or higher B Data lamp The da...

Page 19: ...connection Flashing The printer is receiving data over a 1000base T connection On On red The printer is connected using a 100base TX connection Flashing The printer is receiving data over a 100base TX connection EPSON SC S70600 series SC S50600 series SC S30600 series User s Guide Introduction 19 ...

Page 20: ... as entering a Setting Name or IP Address in the setup menu H u d buttons up and down buttons When the media loading lever is in a lowered position and the d button is pressed media is fed If the u button is pressed media is rewound This occurs regardless of the way the loaded media is rolled If the d button is pushed and held in a printable state at screensafteradjustmentsorcheckpatternprinting o...

Page 21: ...sbuttonwhen menusaredisplayedcloses the menus and returns the printer to ready status M button media feed button Whentheprinterisinthereadystate youcanfeedthe media to the cut position by pressing this button and then Z U Cutting Media on page 64 When printing is in progress you can use this button to perform feed adjustment U Feed Adjustment on page 90 Understanding the Display The illustration s...

Page 22: ...ridgewithanew one promptly when using spot color inks If the old cartridge is not replaced the print head or other parts may be damaged The ink cartridge is not latched Lower the lock lever to engage the latch No ink cartridge is inserted Insert the inkcartridgeandlowerthelockleverto engage the latch An error occurred Check the message on the screen and clear the error A Cleaning cartridge is inst...

Page 23: ...a new waste ink bottle G Media rise detection status This is displayed by the SC S50600 series only The printer checks whether the media rises during printing The printer does not check whether the media rises during printing U The Maintenance Menu on page 151 H Additional print drying system status This display shows settings for the additional print drying system supplied with the SC S50600 seri...

Page 24: ...an be used for increased drying performance and improved productivity It is recommended when using the SC S70600 series in 10 Color mode as the white and metallic silver inks are slow to dry High Print Quality Smooth Tone Gradations High Fidelity Color Reproduction The SC S70600 series is equipped for light colored inks Light Black Light Cyan and Light Magenta reducing graininess for continuous to...

Page 25: ... a buzzer will sound and the alert lamp will light The large alert lamp is highly visible even at a distance A buzzer sounds simultaneously to prevent time wasted while stoppages due to errors go unnoticed High Speed USB Gigabit Ethernet The printer comes equipped with high speed USB and 100 Base TX 1000 Base T network interfaces Notes on Usage and Storage In this document White ink and Metallic S...

Page 26: ... the printer is on As well as being expended during printing ink is used during head cleaning and other maintenance required to keep the print head in working order Noteswhennotusingtheprinter If you are not using it note the following points when storing the printer If it is not stored correctly you may not be able to print properly the next time it is used When using spot color ink observe the f...

Page 27: ...eave it at room temperature for more than four hours before using the ink cartridge DonottouchtheinkcartridgeICchip Youmaynot be able to print properly In 8 Color Fixed mode or 4C Mode use replacement cartridges as well to fill all slots with cartridges In 8 Color Unfixed mode or 9 Color mode use Cleaning cartridge to fill all slots with cartridges You cannot print if any of the slots are empty Do...

Page 28: ...note the following points Donotruborscratchtheprintedsurface Iftheyare rubbed or scratched the ink may peel off Do not touch the printed surface as this may remove the ink Make sure printouts are completely dry before folding or stacking otherwise discoloration or other marks may appear where the prints touch These marks will disappear if the prints are immediately separated and dried but will bec...

Page 29: ...8 Spot color ink cartridges must be stored flat i e laid on their sides If the cartridges are stored vertically even shaking the cartridges before use may fail to dissolve the materials that have sedimented in the ink during storage When tint unevenness is detected in printing results perform Ink Refresh from the menu on the control panel U Ink Refresh on page 132 Note the following when using ink...

Page 30: ...a settings using EPSON LFP Remote Panel 2 It is not a printer driver In addition the software RIP may not display printer status if the Epson communications driver is not installed when the printer is connected to a computer via USB See the software RIP documentation for more information on the status display Epson Network Utilities Install and launch a wizard that will help you enter IP addresses...

Page 31: ...t an account with Administrators group privileges Enter the administrator password when prompted and then proceed with the remainder of the operation Exit any other applications that may be running Windows This section describes how to uninstall EPSON LFP Remote Panel 2 and the Epson communications driver using them as an example A Turn off the printer and unplug the interface cable B Go to the Co...

Page 32: ...plications Epson Software and drag anddroptheentire EPSONLFPRemotePanel2 folder into Trash to delete Use the Uninstaller to uninstall other software Uninstall the affected applications before performing a reinstall or update Download The Uninstaller can be downloaded from the Epson website URL http www epson com Uninstall When obtaining the Uninstaller check the procedure and follow it to perform ...

Page 33: ...nds or fingers when opening or closing the front cover Failure to observe this precaution could result in injury Do not rub your hands along the edges of the media The edges of the media are sharp and can cause injury Because the media is heavy it should not be carried by one person Load the media just before printing Thepressure rollers maycreasemedialeftintheprinter The media may also become wav...

Page 34: ...EPSON SC S70600 series SC S50600 series SC S30600 series User s Guide Basic Operations 34 ...

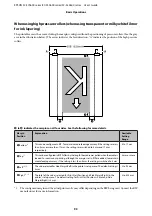
Page 35: ...e following cautions when positioning media to ensure that the positioning of pressure rollers is appropriate for the media width Ensure that the left edge of the media always passes within the range of A The right edge of the media must pass within the squares of B through H according to the media width Only when media except for transparent or milky white film is loaded or when not performing in...

Page 36: ...ds on the media width When transparent or milky white film is loaded or during ink layering Use high pressure rollers Note Iflowpressurerollersareusedwhenloadingtransparentormilkywhitefilm thepressurerollersmayleavethetracesin the print area If low pressure holders are used during ink layering ink layering is not performed correctly EPSON SC S70600 series SC S50600 series SC S30600 series User s G...

Page 37: ...tton and wait until Load media appears on the screen cImportant Whenspotcolorinksareinstalled circulation will be performed automatically to prevent ink accumulating in the printer and causing clogs when the printer is not in use Because turning the printer off prevents automatic circulation from being performed leading to printer malfunction we recommend that the printer not be turned off B Open ...

Page 38: ...e roll supports Note The method of placing the roll media varies as follows depending on how media is rolled Printable Side Out Printable Side In E Align the left and right edges of the media with the set positions according to the media width Recommended positioning by media width U Positioning of the pressure rollers and media For SC S70600 series and SC S50600 series on page 35 Note If the labe...

Page 39: ...ntil the screw no longer turns to fix the roll holder in place H Raise the lift lever on the right side of the printer to lift the media into position then firmly insert the roll holder Note If the media roll has an outer diameter that is less than 140mm liftitmanually andloaditto theroll holder I To ensure the roll holder is inserted into the roll core sufficiently push the center section on the ...

Page 40: ...r may move during printing This could cause stripes and unevenness in the print results K Rotate the handle until part A in the illustration below is fully inserted cImportant Once part A is hidden do not turn the handle anyfurther Failuretoobservethisprecaution could damage the roll holder If part A is still visible even after the handle has been turned fully rewind the handle Loosen the roll hol...

Page 41: ...are not within the square holes Do not attempt to reposition the roll holders while they are inserted in the media O Hold the center of the media and raise the media loading lever P Pull the media straight to the center of the after heater Do not pull the media with both hands This could cause the media to skew or move around The labels on the after heater are not used when media is loaded If it i...

Page 42: ...ing low pressure rollers within the black square labels There may be extraneous lowpressurerollersdependingonthemediawidth Position the extraneous low pressure rollers away from the black square labels Whentransparentormilkywhitefilmisloaded or during ink layering Use high pressure rollers only We recommend positioning the rollers within 10 mm from the left and right edges of the media Position th...

Page 43: ...ing plates with the white lines of the platen 2 To keep the plates from lifting push them down until you hear a clicking sound cImportant Do not use the media holding plates with media that is 0 4 mm or thicker The media holding plates could touch and damage the print head Always position the plates so that the edgesofthemediaareatthecentersofthe round holes Incorrect positioning causes banding ho...

Page 44: ...e following U Notes on loading media on page 33 A Press the P button and wait until Load media appears on the screen cImportant Whenspotcolorinksareinstalled circulation will be performed automatically to prevent ink accumulating in the printer and causing clogs when the printer is not in use Because turning the printer off prevents automatic circulation from being performed leading to printer mal...

Page 45: ...ee below Printable Side Out Printable Side In E Align the left and right edges of the media with the set positions according to the media width Recommended positioning by media width U Positioning of the pressure rollers and media For SC S70600 series and SC S50600 series on page 35 Note If the label with black squares is not in place affix the label as described in the Setup Guide U Setup Guide F...

Page 46: ...the roll core sufficiently push the center section on the side of the roll holder towards the roll end twice cImportant If the roll holder is inserted into the roll core insufficiently media is not fed correctly during printing because of slippage between the roll holder and roll core This may cause banding in the print results EPSON SC S70600 series SC S50600 series SC S30600 series User s Guide ...

Page 47: ...handle until part A in the illustration below is fully inserted cImportant Once part A is hidden do not turn the handle anyfurther Failuretoobservethisprecaution could damage the roll holder If part A is still visible even after the handle has been turned fully rewind the handle Loosen the roll holder screw on the right side and then restart from Step 8 M Raise the media loading lever EPSON SC S70...

Page 48: ...are not within the square holes Do not attempt to reposition the roll holders while they are inserted in the media P Hold the center of the media and raise the media loading lever Q Pull the media straight to the center of the after heater Do not pull the media with both hands This could cause the media to skew or move around The labels on the after heater are not used when media is loaded If it i...

Page 49: ...ing low pressure rollers within the black square labels There may be extraneous lowpressurerollersdependingonthemediawidth Position the extraneous low pressure rollers away from the black square labels Whentransparentormilkywhitefilmisloaded or during ink layering Use high pressure rollers only We recommend positioning the rollers within 10 mm from the left and right edges of the media Position th...

Page 50: ...ing plates with the white lines of the platen 2 To keep the plates from lifting push them down until you hear a clicking sound cImportant Do not use the media holding plates with media that is 0 4 mm or thicker The media holding plates could touch and damage the print head Always position the plates so that the edgesofthemediaareatthecentersofthe round holes Incorrect positioning causes banding ho...

Page 51: ...AFEGr Before loading media be sure to read the following U Notes on loading media on page 33 A Press the P button and wait until Load media appears on the screen B Open the front cover and move the media holding plates out of the way cImportant If the media holding plates are not moved out of the way media insertion may fail or damage may occur to the edge of the media Sliding media holding plates...

Page 52: ...llows depending on how media is rolled Printable Side Out Printable Side In E Align the left edge of the media with the position on the label Note Ifthelabeldoesnothavetheloadingposition mark it on the label as instructed in the Setup Guide U Setup Guide F Raise the lift lever on the left side of the printer to lift the media into position then firmly insert the roll holder EPSON SC S70600 series ...

Page 53: ...he roll holder Note If the media roll has an outer diameter that is less than 140mm liftitmanually andloaditto theroll holder I To ensure the roll holder is inserted into the roll core sufficiently push the center section on the side of the roll holder towards the roll end twice cImportant If the roll holder is inserted into the roll core insufficiently media is not fed correctly during printing b...

Page 54: ...inserted cImportant Once part A is hidden do not turn the handle anyfurther Failuretoobservethisprecaution could damage the roll holder If part A is still visible even after the handle has been turned fully rewind the handle Loosen the roll holder screw on the right side and then restart from Step 8 L Raise the media loading lever M Insert the media approximately 30 cm into the opening then lower ...

Page 55: ...ted in the media O Hold the center of the media and raise the media loading lever P Pull the media straight to the center of the after heater Do not pull the media with both hands This could cause the media to skew or move around The labels on the after heater are not used when media is loaded If it is adjusted to forcefully the media way move around or become loose Q Lower the media loading lever...

Page 56: ...ing plates with the white lines of the platen 2 To keep the plates from lifting push them down until you hear a clicking sound cImportant Do not use the media holding plates with media that is 0 4 mm or thicker The media holding plates could touch and damage the print head Always position the plates so that the edgesofthemediaareatthecentersofthe round holes Incorrect positioning causes banding ho...

Page 57: ...elowered toapprox 190mm from the floor Before loading media be sure to read the following U Notes on loading media on page 33 A Press the P button and wait until Load media appears on the screen B Open the front cover and move the media holding plates out of the way cImportant If the media holding plates are not moved out of the way media insertion may fail or damage may occur to the edge of the m...

Page 58: ... the left edge of the media matches the set position on the label Note Ifthelabeldoesnothavetheloadingposition mark it on the label as instructed in the Setup Guide U Setup Guide E Align the media and the roll holders Raiseorlowerthelifteruntilthemediarollcoreis level with the roll holders F Fully insert the left roll holder Next tighten the roll holder screw until the screw no longer turns to fix...

Page 59: ...ed correctly during printing because of slippage between the roll holder and roll core This may cause banding in the print results I Tighten the roll holder screw until the screw no longer turns to fix the roll holder in place cImportant If the roll holder screw is loose the roll holder may move during printing This could cause stripes and unevenness in the print results J Remove the lifter EPSON ...

Page 60: ... from Step 7 L Raise the media loading lever M Insert the media approximately 30 cm into the opening then lower the media loading lever N Confirm that the left edge of the media passes within the square of the label on the pre heater cImportant Perform Steps 13 to 4 in reverse order and repeat theloadingprocess if the leftedge of the media is not within the black square of the label Do not attempt...

Page 61: ...orcefully the media way move around or become loose Q Lower the media loading lever to hold the media in place R Set the media holding plates at both sides of the media Sliding media holding plates While holding the tabs of the media holding plates on both sides move the plate to the edge of the media Adjust so that the edge of the media is aligned to the center of the round holes in the media hol...

Page 62: ...nt head Always position the plates so that the edgesofthemediaareatthecentersofthe round holes Incorrect positioning causes banding horizontal banding tint unevenness or stripes during printing Move the media holding plates to the left and right edges of the platen when they are not in use Donotusethe mediaholdingplates if the sidesoftheprintedmediaaresmudgedor torn S Close the front cover When us...

Page 63: ...hown below RIP Settings Media settings are based on those in the RIP XXXXXXXXXXXXXXXXXX Media settings are based on those stored in the printer in media settings bank No 1 Media settings banks can store a variety of settings for different media based on the options selected in the Heater Temperature Media Suction Head Alignment and other menus Up to 30 combinations of settings can be stored by ass...

Page 64: ...n the media is loaded You can print the amount of media remaining on the leading edge of the roll before it is removed from the printer and then enter this number the next time the mediaisloadedforaccurateinformationontheamount remaining Note The printer does not calculate or display the amount of media remaining when Off is selected for Remaining Setup in the setup menu U Viewing and Changing Med...

Page 65: ...iasothat thisinformation will remainon the roll after the media is cut When the auto take up reel unit is used raise the tensioner C Open the front cover and move the media holding plates out of the way Sliding media holding plates Move the media holding plates to the right and left sides of the platen Hold both tabs on the media holding plates to move them Insertable media holding plates Remove t...

Page 66: ... is rolled F Remove the take up roll U Removing the Take up Roll on page 81 G To remove the media reverse the steps you followed to load it U Loading Media SC S70600 series SC S50600 series on page 37 U Loading Media SC S30600 series on page 51 cImportant To finish the procedure in the SC S70600 series or SC S50600 series raise the media loading lever Otherwise the pressure rollers will be deforme...

Page 67: ...g media roll cores or take up rolls could result in injury Be sure that your hands or hair do not get caught in the media feeding unit or auto take up reel unit while it is operating Failure to observe this precaution could result in injury Use a roll core that is longer than the width of the media Thisallowsthemediatobetakenupwithoutprotruding from the core Attach media to the roll core using the...

Page 68: ...the media is loaded correctly keep the d button pressed until the leading edge of the media reaches the roll core holder cImportant Alwayspressthedbuttontofeedthemediaas far as the roll core holder If the media is pulled by hand the media may twist during take up B Loosen the roll core holder fixing screws at both sides and adjust the left roll core holder Center the roll supports between the roll...

Page 69: ...tem optional Proceed to step 7 F Push the holder until part A shown in the illustration below is fully inserted and tighten the screw cImportant Stop when part A is no longer visible The take up reel unit may not function as expected if the holder is inserted too far For the subsequent steps depending on how media is rolled see For information on taking up with printed side out see U Take up with ...

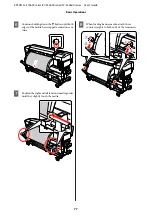
Page 70: ...depending on how media is rolled see For information on taking up with printed side out see U Take up with the Printed Side Facing Out on page 70 For information on taking up with printed side in see U Take up with the Printed Side Facing In on page 76 Take up with the Printed Side Facing Out A Cut the paper tape approximately 60 cm in length andpasteitapproximatelyinthecenterof the media using co...

Page 71: ...the Auto switch to E Lower the tensioner until it slightly touches the paper tape F Continue holding down the d button until both edges of the media reach the paper core and wrap around once or twice G Positiontherightandlefttensionermediaguides until they slightly touch the media EPSON SC S70600 series SC S50600 series SC S30600 series User s Guide Basic Operations 71 ...

Page 72: ...are added to one side only or the quantities are different on the left and right For media other than banner media always remove the counterweights before printing Failure to do so may cause the print head to strike the media during printing To remove counterweights open them in the same way as when attaching them EPSON SC S70600 series SC S50600 series SC S30600 series User s Guide Basic Operatio...

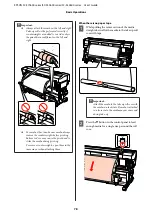
Page 73: ...taut state If media is attached in a loose state the media may move around during take up B Press the d button in the control panel to feed enough media for a single wrap around the roll core C Flip the Auto switch to Off and hold down the Manual switch to to wrap the media once around the roll core D Flip the Auto switch to EPSON SC S70600 series SC S50600 series SC S30600 series User s Guide Bas...

Page 74: ... correctly When one side is loose restart the procedure from Step 1 Note You can confirm differences in tension by lightly tapping both edges of the media as shown in the illustration below G Continue holding down the d button until the media has wrapped around once or twice H Positiontherightandlefttensionermediaguides until they slightly touch the media EPSON SC S70600 series SC S50600 series SC...

Page 75: ...are added to one side only or the quantities are different on the left and right For media other than banner media always remove the counterweights before printing Failure to do so may cause the print head to strike the media during printing To remove counterweights open them in the same way as when attaching them EPSON SC S70600 series SC S50600 series SC S30600 series User s Guide Basic Operatio...

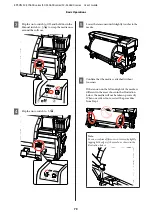
Page 76: ...f the pipe C Turnthepapertapeoverfromthefrontoftheroll core and stick using commercially available adhesive tape cImportant Attach the media to the take up roll core with the media in a taut state If media is attached in a loose state the media may move around during take up D Flip the Auto switch to E Lower the tensioner until it slightly touches the paper tape EPSON SC S70600 series SC S50600 se...

Page 77: ...around once or twice G Positiontherightandlefttensionermediaguides until they slightly touch the media H When loading banner media attach three counter weights to both ends of the tensioners EPSON SC S70600 series SC S50600 series SC S30600 series User s Guide Basic Operations 77 ...

Page 78: ...move counterweights open them in the same way as when attaching them When there is no paper tape A While pulling the center section of the media straight down affix the media to the take up roll core with tape cImportant Attach the media to the take up roll core with the media in a taut state If media is attached in a loose state the media may move around during take up B Press the d button in the...

Page 79: ...out looseness If the tension on the left and right of the media is different in the areas shown in the illustration below the media will not be taken up correctly When one side is loose restart the procedure from Step 1 Note You can confirm differences in tension by lightly tapping both edges of the media as shown in the illustration below EPSON SC S70600 series SC S50600 series SC S30600 series U...

Page 80: ...p around once or twice H Positiontherightandlefttensionermediaguides until they slightly touch the media I When loading banner media attach three counter weights to both ends of the tensioners EPSON SC S70600 series SC S50600 series SC S30600 series User s Guide Basic Operations 80 ...

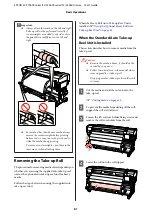
Page 81: ...ied auto take up reel unit When the Heavy Roll Auto Take up Reel Unit is installed U Using the Optional Heavy Roll Auto Take up Reel Unit on page 82 When the Standard Auto Take up Reel Unit Is Installed This section describes how to remove media from the take up reel Caution Because the media is heavy it should not be carried by one person Follow the instructions in the manual when removing media ...

Page 82: ...ifter is recommended when handling media that weigh 40 kg or more Follow the instructions in the manual when removing media or take up roll Dropping media or take up rolls could result in injury A Cut the media and roll the cut end onto the take up reel U Cutting Media on page 64 B Insert the lifter between the media and the auto take up reel unit and adjust the height to support the take up roll ...

Page 83: ...zle check patterns on page 128 Head Cleaning U Head Cleaning on page 129 Saving media settings Basic setting flow To use new media configure its settings in advance according to the media characteristics Media setting banks store the following Setting Name Platen Gap Auto Media Adjust Media Adjust Heating Drying AdvancedSettings MediaSuction MediaTension etc During general use follow the flow belo...

Page 84: ...ing normal The printer offers a total of 30 media setting banks Follow the steps below to save media settings Note The media settings saved in the printer can be changed using EPSON LFP Remote Panel 2 For details see the EPSON LFP Remote Panel 2 help Buttons that are used in the following settings Choosing a Media Setting Bank A After confirming that the printer is ready press the Menu button The ...

Page 85: ...ystem Approx 1116 mm SC S30600 series Standard roll media system Approx 1061 mm Heavy Roll Media System Approx 1190 mm Setting procedure A Load the media according to the actual usage conditions When usage conditions change the adjustment results will also change When using the auto take up reel unit Loadthemediaontheprinter andattachittothe auto take up reel unit U Loading and Exchanging Media on...

Page 86: ...reconfiguring media settings is required due to a change made in printing conditions after saving the media settings In this menu perform Feed Adjustment and Head Alignment individually Media adjustment when Auto Media Adjust cannot be used When you cannot adjust media using Auto Media Adjust or when banding or graininess is detected in printing results even after Auto Media Adjust has been perfor...

Page 87: ...o the Auto Take up Reel Unit U Loading and Exchanging Media on page 33 U Using the Auto Take up Reel Unit on page 67 B PresstheMenubuttontodisplaythesetupmenu C Use the d u buttons to select Media Setup and press the Z button D Use the d u buttons to select Customize Settings and press the Z button E Use the d u buttons to select the media number targeted for adjustment and press the Z button Ifan...

Page 88: ...uto Take up Reel Unit attach the media to the Auto Take up Reel Unit U Loading and Exchanging Media on page 33 U Using the Auto Take up Reel Unit on page 67 B PresstheMenubuttontodisplaythesetupmenu C Use the d u buttons to select Media Setup and press the Z button D Use the d u buttons to select Customize Settings and press the Z button E Use the d u buttons to select the media number targeted fo...

Page 89: ...ngs A Press the button during printing The Heating Drying menu is displayed B Use the d u buttons to select the desired option and press the Z button C Choose a value Heater Temperature 1 Use the r l buttons to select a heater From left the options are pre heater platen heater and after heater 2 After selecting the desired heater use the d u buttons to choose the temperature Additional Dryer Use t...

Page 90: ...the feed amount downwards C Check the printing result If you are not satisfied with the results use the d u buttons to change the value This updates the setting value of Feed Adjustment in the currently selected media settings D Press the Z button to exit the menu Note If the setting is changed the icon is displayed on the control panel screen as shown below To clear this icon carry out the follow...

Page 91: ...media When media holding plates are attached within 5 mm of the left and right edges of the media is recognized as the media edge The edges of the media are not detected correctly if the media holding plates are not attached correctly U When the Standard Media Feeding Unit Is Installed on page 37 U Using the Optional Heavy Roll Media Feeding Unit on page 44 Off 5 mm at the exterior from A is recog...

Page 92: ... default setting is 5 mm 3 to 25 mm D Right 2 3 The total of the values selected for Print Start Position and Side Margin Right in the printer s setup menu The default setting for Print Start Position is 0 mm and Side Margin Right is 5 mm 3 to 825 mm 1 The configured margin and the actual print results may differ depending on the RIP being used Contact the RIP manufacturer for more information 2 T...

Page 93: ... 5 to 17 mm B Top 1 ThiscanbeconfiguredinRIP Differsbythelengththemediawaspulledwhenthemediais loaded For continuous printing although the margins set in RIP are added to maintain media feeding accuracy if the setting is less than 5 mm the setting is switched to 5 mm 5 mm or more C Left 2 3 The value selected for Side Margin Left in the printer s setup menu The default setting is 5 mm 3 to 25 mm D...

Page 94: ...ze Check settings On The printer automatically detects the left and right edges of the loaded media When media holding plates are attached within 5 mm of the left and right edges of the media is recognized as the media edge The edges of the media are not detected correctly if the media holding plates are not attached correctly U When the Standard Media Feeding Unit Is Installed on page 51 U Using ...

Page 95: ...intain media feeding accuracy if the setting is less than 5 mm the setting is switched to 5 mm 5 mm or more C Left 2 3 The value selected for Side Margin Left in the printer s setup menu The default setting is 5 mm 3 to 25 mm D Right 2 3 The total of the values selected for Print Start Position and Side Margin Right in the printer s setup menu The default setting for Print Start Position is 0 mm a...

Page 96: ...ed when Media Size Check is Off printing may occur outside the left and right edges of the media Ink used outside the edges of the media will stain the inside of the printer Ensure that the print data width does not exceed the loaded media width When media is loaded to the left of the right side reference position align the Print Start Position setting with the position where the media set U The P...

Page 97: ...performed Print the check sheet to help schedule maintenance U Cleaning Check Sheet on page 117 U Consumable Replacement Check Sheet on page 127 Cleaning Cleantheprinteratthefrequencylistedthechartbelow Ifcleaningisneglected andtheprinterisusedwithinkstains lint and dust attached the following trouble may occur Ink drops from lint or dust on the nozzle surface of the print head Clogged nozzles dur...

Page 98: ...dure SC S70600 seriesU https www youtube com playlist list PLD67cTLxxk9M3XJ7ytYW5QkJDXITlbJOj SC S50600 seriesU https www youtube com playlist list PLD67cTLxxk9OWBIEifb1tAruevhTX _f9 SC S30600 seriesU https www youtube com playlist list PLD67cTLxxk9P6FW3ylGgUd98QUDyAFEGr From once a week to once a month depending on the condition Inside Platen heater pressure rollers media holding plates and left ...

Page 99: ...es except for spot color U Shaking on page 118 When checkingifnozzlesareclogged When checking which colors are clogged Horizontal stripes or tint unevenness banding are appeared Print a check pattern and check which color nozzles are missing U Checking for clogged nozzles on page 128 If no nozzles are clogged see Horizontal stripes or tint unevenness banding in Problem Solver for other solutions U...

Page 100: ...ified period guideline varies with the selected ColorMode U Change Color Mode SC S70600 series only on page 134 When the following message is displayed on the control panel screen Apply secondary carriage rod grease See manual Applying Secondary Carriage Rod Grease U Applying Secondary Carriage Rod Grease on page 135 EPSON SC S70600 series SC S50600 series SC S30600 series User s Guide Maintenance...

Page 101: ...hodU Using Ink Cleaner on page 103 A metal tray supplied with the printer Use when putting cleaning utensils removed consumables or ink cleaner moved in the container supplied with the printer cImportant If the used cleaning stick etc are directly put on the printer it may cause a deformation from the characteristics of the ink cleaner Soft cloth brush available in the market Use when cleaning ins...

Page 102: ...can be dangerous Afterreplacingthewasteinkbottleorusingthe ink cleaner wash your hands and gargle thoroughly Remove the media from the printer before proceeding Never touch the belts circuit boards or any parts that do not require cleaning Failure to observe this precaution could result in malfunction or reduced print quality Use only the supplied cleaning sticks or sticks contained in a maintenan...

Page 103: ...dampening a clean room wiper with ink cleaner use ink cleaner poured into a cup cImportant Do not reuse ink cleaner Using dirty ink cleaner will make staining worse Used ink cleaner cleaning stick and clean room wipers are industrial waste Dispose of them in the same way as for waste inks U Disposal of used consumables on page 126 Store ink cleaner at room temperature out of direct sunlight Afteru...

Page 104: ...ng Ink Cleaner on page 103 cImportant Rinse a cleaning stick using ink cleaner for each step After removing a clot of ink with a cleaning stick wipe off using a clean room wiper D Wipe off any adhered ink lint and dust from the parts that are indicated by below cImportant Do not touch the parts framed below Failure to observe this precaution could affect print quality Right print head only in SC S...

Page 105: ...hard on the nozzles parts indicated by shown below Also make sure you move the cleaning stick in one direction do not move it back and forth F Dampen a new clean room wiper with the ink cleaner then wipe away any dust and dirt on the front back and sides of the wiper blade G Wipe away ink stains and so on from the print head surface by moving the cleaning wiper from the inside toward you once cImp...

Page 106: ...ure you clean the wipers rubber part first The following chart shows the number of cleaning areas by printer model SC S70600 series SC S50600 series SC S30600 series Wiper 2 1 Caps 10 4 Wiper cleaner 2 1 Before starting this procedure be sure to read the following U Precautions regarding maintenance on page 102 Cleaning a wiper rubber part daily Instead of following this procedure clean the entire...

Page 107: ...s and SC S50600 series clean both of the caps cImportant Do not push strongly against the edges or the surrounding area of the cap or touch the inner side of thecapwith acleaningstickortweezers Thepart maybe deformed and it may no longer be possible to perform capping correctly A Dampen the cleaning stick with ink cleaner U Using Ink Cleaner on page 103 EPSON SC S70600 series SC S50600 series SC S...

Page 108: ...wing section U Cleaning the wiper cleaner daily on page 109 Cleaning Around the Caps When Dirty Perform the following procedures depending on the condition of the printer When you have finished proceed to the cleaning process of the wiper cleaner U Cleaning the wiper cleaner daily on page 109 When ink adheres to the guide section A Dampen the cleaning stick with ink cleaner U Using Ink Cleaner on ...

Page 109: ...n the control panel and confirm that the wiper has moved to the back B Grasp the wiper cleaner as shown and lift it from the printer C Placethewipercleanerfacedown andcheckthat no lint or dust has attached to the rear side Otherwise proceed to Step 5 Attached ink does not present any problems however if a film of ink has adhered around the part circled in the photo below you should replace the wip...

Page 110: ...e attachment point and press down until you hear a click For the SC S70600 series and SC S50600 series clean the other wiper cleaner in the same way G Aftercleaning closetheright maintenancecover and press the Z button The menus will close when the print head returns to its normal position To continuously make prints perform Nozzle Check U Printing nozzle check patterns on page 128 Disposing of us...

Page 111: ...aning A Open the right maintenance cover B Holding the wiper by the attachment point tilt it left and lift it out C Dampen the clean room wiper with ink cleaner U Using Ink Cleaner on page 103 D Press the front and rear side of the rubber part of the wiper against the clean room wiper then wipe off any adhered ink clots lint and dust If the wiper part has split off or is broken we recommend replac...

Page 112: ...il Once Every Two Weeks Perform this after cleaning the wiper cleaner in step 4 U Cleaning the wiper cleaner daily on page 109 If ink adheres to the wiper rail it may stop the wipers from moving which prevents ink from being wiped from the print head nozzles As a result nozzle clogs cannot be cleared even after repeated head cleaning cImportant If this is cleaned more than once every two weeks it ...

Page 113: ...n injury cImportant When cleaning inside the printer do not use ink cleaner Failure to observe this precaution could result in damaged parts A Make surethe printer is turnedoff andthescreen has turned off and then unplug the power cable from the outlet B Leave the printer for a minute C Open the front cover D Raise the media loading lever E Removestainsonthepressurerollersusingadry soft cloth SC S...

Page 114: ...ay result in the print head striking during printing Sliding media holding plates Normally wipe off any lint and dust that has attached to the surface without removing the media holding plates When self adhesive media is used or ink has adhered to the surface of the media holding plates removetheplates andwipestainsoffboth the front and rear surfaces When stains are removed be sure to attach the p...

Page 115: ... I After cleaning close the front cover and left maintenance cover CleaningtheFlushingPad When It Is Dirty If lint or dust adhere to the surface of the flushing pad it may contact the the print head and clog nozzles Use the following procedure for cleaning Before starting this procedure be sure to read the following U Precautions regarding maintenance on page 102 EPSON SC S70600 series SC S50600 s...

Page 116: ...h a new one U Replacing the Flushing Pad on page 122 E Close the maintenance cover and press the Z button twice Themenuswillclosewhentheprintheadreturns to its normal position Disposing of used ink cleaner and cleaning stick U Disposal of used consumables on page 126 Cleaning the Sides of the Auto Take up Reel Unit When It Is Dirty White powdered stains may have been created due to rubbing between...

Page 117: ...und caps U Cleaning Around the Caps Daily on page 106 Once every two weeks HWiper rail U Cleaning theWiperRail Once Every Two Weeks on page 112 I Entire Wiper U CleaningtheEntireWiperand Attachment Point Once Every Two Weeks on page 111 Once a week to once a month B C Inside U Cleaning Inside the Printer Onceaweektoonceamonth on page 113 When dirty D Flushing pad U Cleaning the Flushing Pad When I...

Page 118: ...y If the ink expended warning is left displayed the print head or other parts may be damaged If an ink cartridge is expended while printing you can continue printing after replacing the ink cartridge However when replacing ink during a print job you may see a difference in color depending on the drying conditions The following procedure explains how to replace an ink cartridge and a cleaning cartr...

Page 119: ...sal do not transfer it to another container cImportant During printing or while the printer is running the operations shown below do not remove the waste inkbottleunlessinstructedtodosobytheon screen instructions Failure to observe this precaution could cause ink to leak Head Cleaning Head Washing Ink Refresh Pre Storage Maint Change Color Mode Waste Ink Counter Theprinterusesthe wasteinkcounterto...

Page 120: ...he waste ink counter cImportant Be sure to confirm that the waste ink tube is inserted in the mouth of the waste ink bottle Ink will spill onto the surrounding area if the tube is not inserted in the bottle Disposalof used wasteinkbottlesU Disposal on page 126 Replacing the Wiper and Wiper Cleaner Follow the procedure below to replace the parts Before starting this procedure be sure to read the fo...

Page 121: ...ntenance cover C Remove the wiper cleaner Grasp the cleaner as shown and lift it from the printer D Insert a new wiper cleaner Place on the attachment point and press down until you hear a click EPSON SC S70600 series SC S50600 series SC S30600 series User s Guide Maintenance 121 ...

Page 122: ... its normal position and the menu closes Disposal of used wipers and wiper cleanersU Disposal on page 126 Replacing the Flushing Pad Follow the procedure below to replace the parts Before starting this procedure be sure to read the following U Precautions regarding maintenance on page 102 A Position the print head for maintenance purposes U Moving the Print Head on page 102 B After the print head ...

Page 123: ...tonispressedonce thewipermoves to the inner side If the Z button is pressed again the print head returns to its normal position and the menu closes Disposal of used flushing padsU Disposal on page 126 Replacing the media holding plates When the media holding plates supplied with the printer are deformed or damaged be sure to replace them with new ones Media holding plates available on the printer ...

Page 124: ...he media holding plate from the left edge of the platen If the plate is removed from the right edge it will drop into the printer and cause malfunction 2 Remove the left media holding plate and then remove the right one D Insertanewmediaholdingplateintotheleftedge of the platen cImportant If the media holding plate is inserted into the right edge it will drop into the printer and cause malfunction...

Page 125: ...ed as shown below and that they are attached with no gap between the plate and platen 1 Latchattherearofsquarehole Groovein front of white line 2 Latch at the rear of tab Front corner of the platen cImportant If both hooked sections are not positioned correctly return to Step 3 to attach them again Otherwise the head may be damaged EPSON SC S70600 series SC S50600 series SC S30600 series User s Gu...

Page 126: ...sal Usedcleaningsticks dirtyink cleaner wasteinkbottles wipers wiper cleaners flushing pads and post printing media are industrial waste Disposeofitemsaccordingtolocallawsandregulations For example contract a industrial waste disposal company for disposal In such cases submit the Safety data sheet to the industrial waste disposal company You can download it at your local Epson Web site EPSON SC S7...

Page 127: ...cartridge U Replacement procedure on page 118 Once every three months Be sure to replace the wiper and the wiper cleaner at the same time D Wiper E Wiper cleaner U Replacing the Wiper and Wiper Cleaner on page 120 F Flushing pad U Replacing the Flushing Pad on page 122 When the plates are deformed or damaged A Media holding plates U Replacing the media holding plates on page 123 EPSON SC S70600 se...

Page 128: ...ified intervals the printer prints a test pattern at the start of normal printing When printing is complete you can visually inspect the pattern to determine whether there may be faint or missing colors in the preceding or following printout Use Print Nozzle Pattern with media not suited to Auto Nozzle Check or if you feel that Auto Nozzle Check would take too long U The Printer Setup Menu on page...

Page 129: ...nt or missing segments you may be able to unclog the nozzles by cleaning the print head There is noneed to clean the head if the print result does not contain faint areas or other color problems You can also clean the head while printing is paused Note however that hues in the printout may change when printing is resumed Head Cleaning Level Choose from three levels of head cleaning Select Execute ...

Page 130: ...If nozzle clogs cannot be cleared even after repeated head cleaning the area around the print head maybe stained See the following sections and clean each part U Cleaning Around the Print Head Daily on page 103 U Cleaning Around the Caps Daily on page 106 U Cleaning the Flushing Pad When It Is Dirty on page 115 If nozzle clogs cannot be cleared by cleaning perform Head Washing in the Maintenance m...

Page 131: ...ction may not run When there is an insufficient amount remaining have new cartridges on hand as a precaution Buttons that are used in the following settings A After confirming that the printer is ready press the button The Maintenance menu will be displayed B Use the d u buttons to select Head Washing and press the Z button C Use the d u buttons to select any mode and press the Z button Then follo...

Page 132: ...e storage Maintenance If the printer will not be used for an extended period and switched off perform Pre Storage Maint in the Maintenance menu before storage Failure to perform pre storage maintenance causes permanent clogs Use Cleaning cartridge available separately for Pre Storage Maint The following chart shows the storage interval guidelines for Pre Storage Maint and the necessary number of C...

Page 133: ...u buttons to select Pre Storage Maint and press the Z button C Select the target menu and press the Z button When not using spot color inks Select All Nozzles When using spot color inks You can select MS WH SC S70600 series 10 Color mode WH SC S70600 series 9 Color mode SC S50600 series 5C Mode or All Nozzles depending on the storage period Follow the on screen instructions to replace the cartridg...

Page 134: ...equired When not using both spot color inks for three months or more Select 8 Color Unfixed Two Cleaning cartridge is required Changing from 9 Color mode When restarting the use of Metallic Silver Select 10 Color One Metallic Silver ink cartridge is required When White is not used in addition to Metallic Silver for one month or more Select 8 Color Unfixed One Cleaning cartridge is required Changin...

Page 135: ...from rod B The secondary carriage rod grease is only for rod A This cannot be used for rod B The photo shows SC S70600 series Greasing procedure Before starting this procedure be sure to read the following U Precautions regarding maintenance on page 102 A Attach a fresh pad to the grease tool Insert the tab of the pad firmly into the rectangular slot on the grease tool and fit the pad to the tool ...

Page 136: ...t in a location that is not exposed to direct sunlight PartsThatArePeriodically Replaced The following parts require periodic replacement Carriage encoder The time until replacement varies according to the conditions of use When replacing the carriage encoder you also need to replace the carriage scale When it is almost time to replace parts a maintenance request is displayed on the control panel ...

Page 137: ...Using the Control Panel Menu Menu Operations The menus are used as shown below EPSON SC S70600 series SC S50600 series SC S30600 series User s Guide Using the Control Panel Menu 137 ...

Page 138: ...nter models 1 SC S70600 series and SC S50600 series only supported 2 SC S50600 series only supported 3 SC S30600 series only supported 4 SC S70600 series only supported Item Parameter Media Remaining Remaining Setup On Off Length 1 0 to 999 5 m 3 to 3000 ft Remaining Alert 1 to 15 m 4 to 50 ft Print Remaining Length Print Select Media RIP Settings 1 to 30 media setting bank number Customize Settin...

Page 139: ...Side Out Printable Side In Tension Measurement Periodically Every Page Off Media Tension 0 to 40 Restore Settings Yes No 1 to 30 media setting bank number Setting Name Up to 22 half size characters Platen Gap 1 5 2 0 2 5 Auto Media Adjust Print Media Adjust Feed Adjustment Auto Manual Head Alignment Standard Auto Standard Manual Block pattern EPSON SC S70600 series SC S50600 series SC S30600 serie...

Page 140: ...ter Setup For more information on these items see U The Printer Setup Menu on page 149 Setting items and setting values marked with asterisks indicate the following printer models 1 SC S70600 series and SC S50600 series only supported 2 SC S50600 series only supported 3 SC S30600 series only supported 4 SC S70600 series only supported Item Parameter Side Margin Right 3 to 25 mm 0 12 to 1 00 inch S...

Page 141: ...s indicate the following printer models 1 SC S70600 series and SC S50600 series only supported 2 SC S50600 series only supported 3 SC S30600 series only supported 4 SC S70600 series only supported Item Parameter Nozzle Check Print TheoptionsavailablevarywiththeoptionselectedforMediaSizeCheckand the width of the media used Print At Right Print At Center Print At Left Cleaning All Nozzles Execute Li...

Page 142: ...olor Mode 4 8 Color Unfixed 9 Color 10 Color The menu displayed in the setting item varies depending on the currently specified mode Change Orange Ink 4 Ink Level The ink level is displayed depending on your model or the specified color mode There are not required setting items for this option Details on menu U The Ink Level Menu on page 153 Parameter Print Logs Details on menu U The Print Logs Me...

Page 143: ...5 255 BONJOUR On Off Print Status Sheet Print Restore Settings Yes No Preference Details on menu U The Preference Menu on page 154 Item Parameter Date And Time MM DD YY HH MM Language Japanese English French Italian German Portuguese Spanish Dutch Russian Korean Chinese Unit Length m ft in Unit Temperature C F Alert Sound Setting On Off Alert Lamp Setting On Off Reset All Settings Details on menu ...

Page 144: ... the amount of media remaining reaches this length Choosefromvaluesbetween1and15m 4and50ft Youcansetin 0 5 m 1 ft increments Print Remaining Length Print Use Print RemainingLength to print the amount of media remaining on the current roll before replacing it with another type of media You can then enter this number as the media the length the next time the roll is used Select Media Parameter Expla...

Page 145: ... is changed the setting value registered on the printer has priority over the setting value specified in the software RIP Thedefaultsettingof1 5isrecommendedinmostsituations Choose2 0if printout is scratched or smudged Select 2 5 only if print results are still smudged when 2 0 is selected Choosing a larger gap than required may result in ink stains inside the printer reduced print quality or shor...

Page 146: ...tension Restore Settings Yes IfYesisselected thecontentofconfiguredRIPSettingsarereturnedtothe default settings No 1 to 30 media setting bank number Setting items and setting values marked with asterisks indicate the following printer models 1 SC S70600 series and SC S50600 series only supported 2 SC S50600 series only supported 3 SC S30600 series only supported 4 SC S70600 series only supported I...

Page 147: ...totheafterheaterafterprinting chooseMode1orMode2 otherwise choose Off IfMode1isselected theportionfedfordryingwillnotberewoundbefore thenextjobstarts Selectthisoptionifthemediawillbecutbeforethenext job starts IfMode2isselected theportionfedfordryingwillberewoundbeforethe next job starts eliminating unnecessary margin Select this option if multiple jobs will be printed consecutively Mode 2 Off Add...

Page 148: ...riodically is selected The printer may however be unable to adjust tension appropriately for some media resulting in excessive slack or other maladjustments that cause printing problems in which case you should select Off Note however that Off may resultin unusually large margin between pages In addition after media has been ended printing may not stop and the inside of the printer may become stai...

Page 149: ...rint Start Position is left blank If a value is selected for Side Margin Right an additional area corresponding to the width selected for Side Margin Right will be left blank Margin widths vary with the model of printer used See the following for more information U Printable area on page 91 Media Size Check On Choose whether the printer automatically detects On or does not automatically detect Off...

Page 150: ...elected If1to10isselected theprinterwill automatically checks for clogs at the specified intervals by scanning a test pattern with a sensor as it is being printed Note that Auto Nozzle Check is not capable of detected all types of clog In addition Auto Nozzle Check is not available depending on media types or conditions U Checking for clogged nozzles on page 128 1 to 10 pages Options When Clogged ...

Page 151: ...ed with the SC S50600 series optional with other models is installed it will turn off automatically To reactivate the control panel display press any button in the control panelexceptP Thecontrolpanel displaywillhoweverturnoffagainifno operations areperformedforanother 30secondsunderthese conditions The printer and heaters are only fully reactivated when a print job is received the media loading l...

Page 152: ... maintenance Perform such maintenance as cleaning the wiper caps and the area around print head only after using this option to position the head for cleaning Moving the print head manually could cause malfunction U Cleaning on page 103 Waste Ink Counter If you replace the waste ink bottle before being prompted by a message indicating the replacement interval of the waste ink bottle in the control...

Page 153: ...ge Ink PDF The Ink Level Menu Item Explanation View the approximate level of ink in each cartridge When you replace an ink cartridge the remaining ink level is automatically reset The Print Logs Menu These items are used to track consumables Item Parameter Explanation Print Job Log Sheet Print Press the OK button to print the print job log Notes on ink consumption This is a simple tool for estimat...

Page 154: ... HH MM GMT Firmware Version XXXXXXX X_XX XXXX View the printer Firmware Version The Network Setup Menu indicates default settings Item Parameter Explanation IP Address Setting Auto Choose whether IP addresses are obtained automatically Auto using DHCP or manually Panel If Panel is selected enter an IP address subnet mask and default gateway address Contact your system administrator for detailed in...

Page 155: ...y and when printing test patterns ft in Unit Temperature C Choose the temperature units used in the control panel display F Alert Sound Setting On Enable On or disable Off the buzzer that sounds when an error occurs Off Alert Lamp Setting On Enable On ordisable Off thealertlampthatlightswhenanerror occurs Off The Reset All Settings Menu Parameter Explanation Yes Select Yes to reset all settings in...

Page 156: ...ersists insert a new Cleaning cartridge do not reinsert the Cleaning cartridge that caused the error U Replacement procedure on page 118 Condensation may have formed inside the cartridge Leave it at room temperature for at least four hours before installing the cleaning cartridge Ink Low The ink is low Ready a new ink cartridge U Options and Consumable Products on page 171 Warming Up Z Force to st...

Page 157: ...el again contact your dealer or Epson Support Print head is nearing end of service life The current print head is nearing the end of its service life Contact your dealer or Epson Support Auto Take up Reel Unit stopped Media is not correctly attached to the auto take up reel unit Press the W button and select Job Cancel to cancel printing Flip the Auto switch on the auto take up reel unit to the Of...

Page 158: ... under conditions other than those listed above confirm that the currently loaded media match usage conditions of the printer U Supported Media on page 176 Pressure Roller Error Pressure rollers are positioned incorrectly Release media loading lever and reposition rollers Oneofthefollowinghasoccurred Repositiontherollersasdescribedin Printable Area None of the rollers is positioned inside the boun...

Page 159: ...clear the maintenance request until the part is replaced A service call occurs if you continue to use the printer Call For Service XXXX Error XXXX Power off and then on If this doesn t work note the code and call for service A call for service occurs when The power cable is not connected securely An error that cannot be cleared occurs Whenacallforservicehasoccurred theprinterautomaticallystopsprin...

Page 160: ...B hub is recognized correctly on the computer If it has disconnect the USB hub from the computer and connect the computer directly to the printer AsktheUSBhubmanufactureraboutUSBhub operation You cannot print under the network environment o Are the network settings correct Ask your network administrator for the network settings o Connect the printer directly to the computer using a USB cable and t...

Page 161: ...bvious graininess or out of focus characteristics Select Media Adjust Head Alignment in the media settings to adjust a print head misalignment that occurs during printing U Head Alignment on page 88 o Perform Feed Adjustment Large discrepancies in the feed amount cause banding horizontal banding tint unevenness or stripes Select Media Adjust Feed Adjustment in the media settings to make adjustment...

Page 162: ... on the media o Is the media loaded correctly and are the margins correct Ifthemedia is notloadedcorrectly theresultsmaybe off center or part of the data may not be printed You should also check whether the correct options are selected for Side Margin and Print Start Position in the setup menu U Loading Media SC S70600 series SC S50600 series on page 37 U Loading Media SC S30600 series on page 51 ...

Page 163: ...hen Platen Gap or Media Tension has been changed perform Media Adjust again U Media Adjust on page 86 Areas secured by pressure rollers are stained o Are the pressure rollers stained Clean the pressure rollers U Cleaning Inside the Printer Once a week to once a month on page 113 Nozzle clogs cannot be cleared o Is cleaning being performed regularly If lint or dust adheres to the area around the pr...

Page 164: ...e the following reference and reattach the media holding plates U Loading and Exchanging Media on page 33 Ifinstallingthemediaholdingplatecorrectlystill does not resolve the problem perform the following measure B Resolving ink sedimentation Ink sedimentation components settling to the bottom of the liquid may occur inside the printer Perform Ink Refresh U Ink Refresh on page 132 If this error rec...

Page 165: ...g association table researched by EpsonU Microweave M W Setting and Banding Association Table on page 180 Stains Due to Head Striking The media and print head are contacting during printing Perform the following sequence until the print results have improved A Cut sections of media with wrinkles or waviness If media is stored inappropriately or left loaded in the printer wrinkles and waviness may ...

Page 166: ...ne level Repeat steps 2 and 3 until print results are im proved in the range up to a setting value of 5 If you are using SC S70600 series or SC S50600 seriesandadjustingtheMediaTensiondoesnot resolve the problem perform the following measure 1 Set Feed Speed to Lv1 U Customize Settings on page 145 2 Set the Media Tension setting value to 2 temporarily 3 Print and check if the print results have im...

Page 167: ...s weak Adjust Media Suction in the following manner 1 Set the setting value to 10 temporarily U Customize Settings on page 145 2 Print and check if creasing is improved If the creasing of media has improved media suction was too low 3 While gradually lowering the Media Suction setting repeat test printing until the optimal state is reached Media Media Is Creased o AretheMediaTensionorFeedSpeedopti...

Page 168: ...llow the steps below to remove jammed media Caution Be careful not to trap your hands or fingers when opening or closing the front cover Failure to observe this precaution could result in injury A Open the front cover B Turn off the printer If a message is displayed and the printer will not turn off unplug both power cables C Move the media holding plates out of the way cImportant Cease use of the...

Page 169: ...t to Off auto maintenance is necessarily performed when the specified time lapsed after printing Heaters Turn off or the Optional Additional Print Drying System Stops o The pre platen and after heaters will turn off if no printjobisreceivedforsometimeandnoerroroccurs Thetimebeforetheheatersturnoffautomaticallycan be selected using the Heat Off Timer option in the setup menu U The Printer Setup Men...

Page 170: ...he printer White powdered stains are detected on the sides of the auto take up reel unit o Seethefollowingsectionsandcleanthepart U Cleaning the Sides of the Auto Take up Reel Unit When It Is Dirty on page 116 EPSON SC S70600 series SC S50600 series SC S30600 series User s Guide Problem Solver 170 ...

Page 171: ...artridges Black T7131 Cyan T7132 Magenta T7133 Yellow T7134 Light Cyan T7135 Light Magenta T7136 Light Black T7137 Orange 2 T7138 Orange Plus 2 T7139 White T713A Metallic Silver T713B SC S70610 Ink cartridges Black T7141 Cyan T7142 Magenta T7143 Yellow T7144 Light Cyan T7145 Light Magenta T7146 Light Black T7147 Orange 2 T7148 Orange Plus 2 T7149 White T714A Metallic Silver T714B EPSON SC S70600 s...

Page 172: ...hite T715A Metallic Silver T715B SC S70680 Ink cartridges Black T7161 Cyan T7162 Magenta T7163 Yellow T7164 Light Cyan T7165 Light Magenta T7166 Light Black T7167 Orange 2 T7168 Orange Plus 2 T7169 White T716A Metallic Silver T716B SC S50600 Ink cartridges Black T6871 Cyan T6872 Magenta T6873 Yellow T6874 White T713A EPSON SC S70600 series SC S50600 series SC S30600 series User s Guide Appendix 17...

Page 173: ... T6901 Cyan T6902 Magenta T6903 Yellow T6904 White T716A SC S30600 Ink cartridges Black T6871 Cyan T6872 Magenta T6873 Yellow T6874 SC S30610 Ink cartridges Black T6881 Cyan T6882 Magenta T6883 Yellow T6884 SC S30670 Ink cartridges Black T6891 Cyan T6892 Magenta T6893 Yellow T6894 SC S30680 Ink cartridges Black T6901 Cyan T6902 Magenta T6903 Yellow T6904 EPSON SC S70600 series SC S50600 series SC ...

Page 174: ...age 103 Secondary Carriage Rod Grease Kit S210036 Identical to the grease kit supplied with the printer U Applying Secondary Carriage Rod Grease on page 135 Ink Cleaner T6993 Identical to the ink cleaner supplied with the printer U Cleaning on page 103 Waste Ink Bottle T7240 Identical to the waste ink bottle supplied with the printer Cleaning Wiper S090012 Identical to the maintenance kit items su...

Page 175: ...ies and regions We recommend BEMCOT M 3II by Asahi Kasei Corporation when purchasing commercial products 2 Not available for purchase in some countries and regions EPSON SC S70600 series SC S50600 series SC S30600 series User s Guide Appendix 175 ...

Page 176: ...80 kg 508 mm for ink layering Moving and Transporting the Printer This section describes how to move and transport the product Moving the Printer This section assumes that the product is being moved to another location on the same floor without traversing stairs ramps or lifts See below for information on moving the printer between floors or to another building U Transport on page 177 Caution Do n...

Page 177: ...er setup be sure to perform parallel adjustment again U Setup Guide If you do not have the Setup Guide contact your dealer or Epson Support U Where To Get Help on page 186 B Plug in the power cables and turn the printer on U Setup Guide C Perform a nozzle check to check for clogged nozzles U Printing nozzle check patterns on page 128 D Perform Auto Media Adjust in the media settings and check the ...

Page 178: ...a Suction 4 4 4 4 Media Tension 15 15 15 15 Pressure roller 1 Low High Low Low Counterweight 2 Attach 1 U Positioning of the pressure rollers and media For SC S70600 series and SC S50600 series on page 35 2 How to attach counterweights U Using the Auto Take up Reel Unit on page 67 SC S30600 series Adhesive vinyl Transparent film Milky white film Banner Canvas Platen Gap 1 5 1 5 1 5 1 5 Heater Temp...

Page 179: ...1 How to attach counterweights U Using the Auto Take up Reel Unit on page 67 2 Change the factory default setting value EPSON SC S70600 series SC S50600 series SC S30600 series User s Guide Appendix 179 ...

Page 180: ...20 720 6 1 Stripe banding less likely 2 Tint uneveness less likely Vinyl 720 720 8 3 Stripe banding less likely 4 Tint uneveness less likely but stripe banding more likely 5 Stripe banding less likely 6 Tint uneveness less likely but stripe banding more likely All media Including Banner Vinyl 720 1440 12 3 Stripe banding less likely 4 Tint uneveness less likely SC S50600 series Resolution dpi Numb...

Page 181: ... less likely to occur If the banding cannot be cleared completely with HQ1 mode then select HQ2 mode in RIP print settings However graininess might be obvious than printing with HQ1 mode The print speed of HQ1 HQ2 mode becomes lower than when other print modes that use the same number of passes are selected Followings are the example of the RIP print setting mode Display of setting mode will be di...

Page 182: ... likely 3 Stripe banding less likely Vinyl 720 1440 6 0 Tint uneveness less likely 1 Stripe banding less likely All media Including Banner Vinyl 720 1440 8 3 Tint uneveness less likely 4 Stripe banding less likely EPSON SC S70600 series SC S50600 series SC S30600 series User s Guide Appendix 182 ...

Page 183: ...100 to 120V AC 200 to 240V Rated frequency 1 2 3 2 50 to 60Hz Rated current 1 2 10A 100 to 120V AC 5A 200 to 240V AC Rated current 3 2 1A 100 to 120V AC 0 5A 200 to 240V AC Printer Specifications Power consumption SC S70600 series total for numbers 1 and 2 Printing Approx 800 W Ready mode Approx 580 W Sleep mode Approx 12 W Power off 0 6 W or less SC S50600 series total for numbers 1 2 and 3 2 Pri...

Page 184: ...Light Cyan Light Magenta White SC S50600 series White Black Cyan Magenta Yellow SC S30600 series Black Cyan Magenta Yellow Use by date See the date printed on the package at normal temperature Print quality guarantee expiry Six months from date package containing ink cartridge is opened Storage temperature Uninstalled 20 to 40 C within a month at 40 C Installed 10 to 40 C maximum four days at 40 C...

Page 185: ...4 108 EC EN 55022 Class A EN 55024 EN 61000 3 2 EN 61000 3 3 Warning This is a class A product In a domestic environment this product may cause radio interference in which case the user may be required to take adequate measures EPSON SC S70600 series SC S50600 series SC S30600 series User s Guide Appendix 185 ...

Page 186: ...cannot solve the problem using the troubleshooting information in your product documentation contact Epson support services for assistance If Epson support foryourareaisnotlistedbelow contactthedealerwhere you purchased your product Epson support will be able to help you much more quickly if you give them the following information Product serial number Theserialnumberlabelisusuallyonthebackofthe p...

Page 187: ...N 800 463 7766 Or you can purchase online at http www epsonstore com U S sales or http www epson ca Canadian sales Help for Users in Europe Check your Pan European Warranty Document for information on how to contact Epson support Help for Users in Taiwan Contacts for information support and services are World Wide Web http www epson com tw Information on product specifications drivers for download...

Page 188: ...eb pages Worth taking your modem here for the occasional surf The site provides a download area for drivers Epson contact points new product information and technical support e mail Epson Helpdesk Epson Helpdesk is provided as a final backup to make sure our clients have access to advice Operators on the Helpdesk can aid you in installing configuring and operating your Epson product Our Pre sales ...

Page 189: ...s for information support and services are World Wide Web http www epson co id Information on product specifications drivers for download Frequently Asked Questions FAQ Sales Enquiries questions through e mail Epson Hotline Sales enquiries and product information Technical support Phone 62 21 572 4350 Fax 62 21 572 4357 Epson Service Center Jakarta Mangga Dua Mall 3rd floor No 3A B Jl Arteri Mangg...

Page 190: ...d Frequently Asked Questions FAQ Sales Enquiries questions through e mail Epson Trading M Sdn Bhd Head Office Phone 603 56288288 Fax 603 56288388 399 Epson Helpdesk Sales enquiries and product information Infoline Phone 603 56288222 Enquiries on repair services warranty product usage and technical support Techline Phone 603 56288333 Help for Users in India Contacts for information support and serv...

Page 191: ...orporation at the telephone and fax numbers and e mail address below Trunk Line 63 2 706 2609 Fax 63 2 706 2665 Helpdesk Direct Line 63 2 706 2625 E mail epchelpdesk epc epson com ph World Wide Web http www epson com ph Information on product specifications drivers for download Frequently Asked Questions FAQ and E mail Enquiries are available Toll Free No 1800 1069 EPSON 37766 Our Hotline team can...

Page 192: ... that it is subject to the terms of this Apple Public Source License version 2 0 License As used in this License 1 1 Applicable Patent Rights mean a in the case where Apple is the grantor of rights i claims of patents that are now or hereafter acquired owned by or assigned to Apple and ii that cover subject matter contained in the Original Code but only to the extent necessary to use reproduce and...

Page 193: ...odified Code You may use reproduce display perform internally distribute within Your organization and Externally Deploy verbatim unmodified copies of the Original Code for commercial or non commercial purposes provided that in each instance a You must retain and reproduce in all copies of Original Code the copyright and other proprietary notices and disclaimers of Apple as they appear in the Origi...

Page 194: ...ame scope and extent as Apple s licenses under Sections 2 1 and 2 2 above 4 Larger Works You may create a Larger Work by combining Covered Code with other code not governed by the termsofthisLicenseanddistributetheLargerWorkasasingleproduct Ineachsuchinstance Youmustmakesurethe requirements of this License are fulfilled for the Covered Code or any portion thereof 5 Limitations on Patent License Ex...

Page 195: ...WISE EVENIFAPPLE OR SUCH CONTRIBUTOR HAS BEEN ADVISED OF THE POSSIBILITY OF SUCH DAMAGES AND NOTWITHSTANDING THE FAILURE OF ESSENTIAL PURPOSE OF ANY REMEDY SOME JURISDICTIONS DO NOT ALLOW THE LIMITATION OF LIABILITY OF INCIDENTAL OR CONSEQUENTIAL DAMAGES SO THISLIMITATIONMAYNOTAPPLYTOYOU InnoeventshallApple stotalliabilitytoYouforalldamages other than as may be required by applicable law under thi...

Page 196: ...rformthesameorsimilarfunctionsas or otherwise compete with Modifications Larger Works technology or products that You may develop produce market or distribute 13 4 Waiver Construction Failure by Apple or any Contributor to enforce any provision of this License will not be deemed a waiver of future enforcement of that or any other provision Any law or regulation which provides that the language of ...

Page 197: ...ed as the following set of individuals Mark Adler John Bush Karl Davis Harald Denker Jean Michel Dubois Jean loup Gailly Hunter Goatley Ed Gordon Ian Gorman Chris Herborth Dirk Haase Greg Hartwig Robert Heath Jonathan Hudson Paul Kienitz David Kirschbaum Johnny Lee Onno van der Linden Igor Mandrichenko Steve P Miller Sergio Monesi Keith Owens George Petrov Greg Roelofs Kai Uwe Rommel Steve Salisbu...

Page 198: ...mited to labeling of the altered versions with the names Info ZIP or any variation thereof including but not limited to different capitalizations Pocket UnZip WiZ or MacZip without the explicit permission of Info ZIP Such altered versions are further prohibited from misrepresentative use of the Zip Bugs or Info ZIP e mail addresses or the Info ZIP URL s such as to imply Info ZIP will provide suppo...

Reviews: