background image

6-16

   Installation

Rev.B

Confidential

Customized Values

Table 6-9 Customized values

Serial Communication Conditions

Table 6-10 Serial communication conditions

Function

Selection

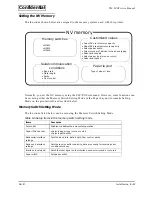
Select NV user memory 
capacity

1KB 64KB 128KB 192KB

Select NV bit image 
memory capacity

None 64KB 128KB 192KB 256KB 320KB 384KB

Select paper width

38 mm
39 mm

   •
   •

   •

80 mm (43 steps in increment of 1 mm, except for the size 
from 71 mm to 79 mm)

Select number of division 
for head energizing

Undivided energizing
Two-part energizing
Three-part energizing
Four-part energizing

Select print density

×

 0.7, 

×

 0.75, 

×

 0.8, 

×

 0.85, 

×

 0.9, 

×

 0.95, 

×

 1.0,

×

 1.05, 

×

 1.1, 

×

 1.15, 

×

 1.2, 

×

 1.25, 

×

 1.3, 

×

 1.35, 

×

 1.4

Select paper type (mono 
or color)

Single color
Two colors

Select print speed

Print speed level 1

   •
   •

   •

Print speed level 9

Function

Selection

Baud rate

2400 bps, 4800 bps, 9600 bps, 19200 bps,
38400 bps, 57600 bps, 115200 bps

Parity

None
Odd
Even

Flow control

DTR/DSR control
XON/XOFF control

Data length

7 bits, 8 bits

Summary of Contents for TM-L90 series

Page 1: ...Confidential Service manual TM L90 series English 401392002 Rev C Issued date Issued by EPSON ...

Page 2: ...lures Reason for change To make the explanation easier to understand 2 3 Change the Troubleshoting Fliowcharts to the simptoms and solutions Reason for change To make the explanation easier to understand 2 5 Add the explanation to the paper layout error that is the automatically recoverable errors of the Troubleshooting using the ERROR LED Reason for change Missing information 2 6 Add the below ex...

Page 3: ...elow explanation for select paper withs 43 steps in increment of 1 mm except for the size from 71 mm to 79 mm Reason for change To make the explanation easier to understand 7 3 Add the explanation for Precautions on paper handling When the printer is not used for one week or more it is recomended not to leave the thermal paper between the platen and the print head Reason for change Missing informa...

Page 4: ...acer Thermal Head is added on Thermal Print Head So the following illustration is changed 3 25 52 Added the explanation about the method of installing the head new type as Important Note About Installing Thermal Print Head Appendix D 10 The part Spacer Thermal Head on ParsList and Exploded Diagram is deleted Rev Page Description Spacer Thermal Head Before change After change ...

Page 5: ...nformation in the document You may not reproduce store or transmit the confidential information in any form or by any means electronic mechanical photocopying recording or otherwise without the prior written permission of Seiko Epson Your obligations under this Agreement are in addition to any other legal obligations Seiko Epson does not waive any right under this Agreement by failing to exercise ...

Page 6: ...nd Assembly Notes for Assembly and Disassembly 3 1 How to Read this Chapter 3 2 Structure of this Chapter 3 2 Shortest Route for Disassembly of Major Parts 3 3 Representation of Small Parts 3 3 Replacing the Thermal Print Head Assembly 3 4 Disassembly and Assembly of the TM L90 3 9 First Level 3 9 Disassembly and Assembly of the Printer Mechanism 3 15 First Level 3 15 Second Level 3 35 Third Level...

Page 7: ...16 Chapter 7 Handling Safety Precautions 7 1 Precautions on Handling the Printer 7 2 Precautions on Paper Handling 7 3 Part Names 7 3 LEDs and Button 7 4 Handling 7 4 Powering the unit ON or OFF 7 4 Loading the paper roll 7 6 Removing the roll paper 7 7 Appendix A General Specifications Printing Specifications A 1 Paper Specifications A 1 Paper Specifications A 2 Autocutter A 4 Paper Roll Supply D...

Page 8: ...ts General Description F 2 Main Circuit Board Unit F 3 Switch Circuit Board Assembly F 6 Sub Circuit Board Assembly F 6 Interface Circuit Board Unit F 6 Test Points F 7 Test points on the main circuit board F 7 Test Point Locations F 8 Parts Layout F 9 Main Circuit Board Unit F 9 Switch Circuit Board Assembly F 11 Sub Circuit Board Assembly F 11 Circuit Board Diagrams F 1 Main Circuit Board 1 of 3...

Page 9: ...oard Use of a different type may result in fire Remove the power cord and all other cables from this product before disassembly or reassembly to prevent electrical shock To prevent the possibility of electrical shock do not perform maintenance repair or inspection during a thunderstorm Shut down your equipment immediately if it produces smoke a strange odor or unusual noise Continued use may lead ...

Page 10: ... during operation Therefore wait approximately 10 minutes after turning the power off before touching them Note that the thermal print head and paper feed motor become very hot during normal operation creating the danger of burn injury Be sure to wait for about 10 minutes after turning printer power off before beginning the maintenance repair or inspection Modular Connector Use the modular connect...

Page 11: ...justment Chapter 5 Maintenance Inspection Cleaning and Lubrication Offers information about periodic maintenance and inspection cleaning and lubrication of the unit Chapter 6 Installation Provides information about installation Chapter 7 Handling Gives information about handling Appendix A Features and General Specifications Describes major specifications of the unit Appendix B Overview of the Mec...

Page 12: ... real time status Sequence peculiar to a printer such as a paper layout setting can be performed The newest firmware released can be written in memeory that a printer has It is released and multilingual fonts can be written in the memory that a printer has corresponding to multilingual If a repair wizard is used it can be made to complete by operating a series of work which is needed for part exch...

Page 13: ...nterface type UB S01 RS 232 UB P02II IEEE1284 bidirectional parallel etc Use an EPSON approved interface board Font type Alphanumeric Japanese Simplified Chinese Traditional Chinese Thai Korean Use the EPSON approved main circuit board Autocutter setting Partial cut Full cut For details about how to set partial or full cut see Chapter 6 Installation Paper width selection 38 60 80 mm etc For detail...

Page 14: ...ection of an arrow 2 Return the cutter blade to the normal position by rotating the autocutter knob in the direction of the arrow When it is returned to the normal position a triangle mark becomes visible through the hole in the autocutter frame 3 Lift up the roll paper cover Note Besides a paper jam a foreign object such as a push pin can cause the autocutter to lock up If this is the case follow...

Page 15: ...the above steps Refer to Appendix D 12 Before Servicing Pages vi to viii at the beginning of this manual provide precautions you should observe to perform work safely and the necessary information to service this product safely Always read that information before starting your work Diagnosing Failures Use one of the following methods to identify the area where a failure occurred See Table 2 1 for ...

Page 16: ... See page 3 13 4 Replace the Head FFC See page 3 13 The print is thin Receipt Printing Label printing 1 Clean the thermal print head assembly See page 5 2 2 Setting the memory switch See page 6 12 3 Replace the thermal print head assembly See page 3 4 4 Replace the main circuit board unit See page 3 13 Unevenness occurs in the concentration of the print Receipt Printing Label printing 1 Clean the ...

Page 17: ...the thermal printer print test Step Operation Printer Operation 1 Turn the power supply ON while pressing the FEED button and continue to push the FEED button untill ERROR LED is li The printer will print the status of the printer settings Afterward the autocutter will cut the roll paper and the PAPER OUT LED will flash 2 Press the FEED button after the PAPER OUT LED flashes The print test will be...

Page 18: ... error can be specified either as an automatically recoverable error or as a recoverable error Table 2 3 Automatically recoverable errors Error ERROR LED Blinking Pattern Description Recovery Print head temperature error Approx 320 msec The temperature of the print head is extremely high Recovers automatically when the print head cools Roll paper cover open error Printing is not performed correctl...

Page 19: ...t Paper layout error Label paper or the black mark is not detected or the paper layout of the paper installed in the printer and the setting of the paper layout defined by the GS E command do not match Confirm if the error happened by the jammed paper while printing If so that remove the jammed paper After then close the roll paper cover turn it off and then turn it on again Perform the threshold ...

Page 20: ...e page 3 13 Low voltage error The power supply voltage is extremely low Replace the power supply unit Replace the main circuit board unit See page 3 13 CPU execution error The CPU executes an incorrect address Replace the main circuit board unit See page 3 13 Interface circuit board error Interface circuit board does not work correctly Check installation status of the interface circuit board Repla...

Page 21: ...Test points on the printer mechanism Name of Mechanism Part Name Internal Element Function Where to Check Normal Status Thermal mechanism assembly Cutter motor sub assembly DC brush motor Autocutter drive Remove the cable connector connected to CN8 on the main circuit board Test between and There is continuity Aproxinately 38 3 8Ω Paper feed motor 4 phase stepping motor Receipt paper feed Remove t...

Page 22: ...he circuit boards to shock or vibration because this may damage them Do not touch the circuit board or cable terminals with your hands to prevent contamination that may result in a malfunction Always remove the power supply unit from the printer before working Power is flowing to the internal circuit boards even if you turn the printer off at the power supply switch You may damage the printer if y...

Page 23: ...onnector cover I F circuit board unit Main assembly case Main circuit board unit Disassembly and assembly of the printer mechanism Cable wiring Roll paper cover unit Roll paper cover unit Platen holder Switch circuit board assembly Sub circuit board assembly Autocutter unit Autocutter unit Thermal print head assembly Hinge cover Label paper guide Reduction gears Label paper holder assembly LED hol...

Page 24: ...of the thermal print head see page 3 4 Representation of Small Parts The standard small parts used in this chapter such as screws washers and nuts are all indicated with abbreviations For details see Appendix D Parts List Cutter cover Connector cover Thermal print head assembly I F circuit board unit Main assembly case Main circuit board unit Switch circuit board assembly Auto cutter unit N E dete...

Page 25: ...rist band Failure to do so may result in thermal print head failure Do not touch the print head portion that appears like a black line and the adjacent areas in the thermal print head assembly Touching this area may result in thermal print head failure When the thermal print head assembly is contaminated or has a deposit of foreign particles wipe it off with a cotton swab moistened with alcohol 1 ...

Page 26: ... set to full cut or partial cut When you install the autocutter unit return the unit to the user s position 4 Remove the autocutter unit by removing the two S4 screws securing it Stand the removed autocutter unit against the front of the printer The dowel positions are marked F and P To select partial cut adjust the dowel to the position marked P To select full cut adjust the dowel to the position...

Page 27: ... Otherwise head holder springs may suddenly fly out creating the danger of eye injury 6 Lift up the thermal print head assembly and remove the head FFC from the thermal print head assembly CAUTION To prevent static generated failures keep the removed thermal print head assembly in an anti static bag or other suitable container Spring holder plate Head holder springs Thermal print head assembly Spr...

Page 28: ...r plate by rotating them 5 Insert the two head holder springs into the groove in the thermal print head assembly 6 While holding the two head holder springs so they do not fly out install the spring holder plate CAUTION Be sure to hold the two head holder springs while installing the spring holder plate Otherwise the head holder springs may suddenly fly out creating the danger of eye injury 7 Adju...

Page 29: ... cut adjust the dowel to the position marked F 10 Secure the autocutter unit with the two S4 screws Note When tightening the screws do not deform the frame assembly This can decrease the sharpness of the cutter Do not tighten the autocutter unit when the dowels are not properly engaged This can also decrease the sharpness of the cutter 11 Install the cutter cover 12 Close the roll paper cover Dowe...

Page 30: ...l Disassembly and Assembly of the TM L90 First Level Cutter Cover 1 Open the roll paper cover 2 Remove the cutter cover by spreading area of the main case assembly as shown below Install in the reverse sequence of removal Main case assembly Cutter cover Roll paper cover ...

Page 31: ...sembly Rev C Confidential Connector Cover 1 With the main assembly upside down remove the connector cover by pressing its rear section and unhooking the two claws Install in the reverse sequence of removal Claw onnector cover ...

Page 32: ...bly 3 11 TM L90 Service Manual Confidential I F Circuit Board Unit 1 With the main assembly upside down remove two S6 screws 2 Remove the I F circuit board unit Install in the reverse sequence of removal S6 I F circuit board unit ...

Page 33: ...bly 1 With the main assembly upside down remove two S5 screws and one S3 screw 2 Remove the main case assembly CAUTION When installing the case do not pinch the lead wire Doing so may cause failures Install in the reverse sequence of removal Main case assembly S3 S5 ...

Page 34: ...crews tighten in the order and The other two places can be tightened in any order but should be tightened diagonally 5 Remove the head FFC from connector on the main circuit board unit 6 Remove the three lead wires from the main circuit board unit connector in the order of and 7 Remove the switch circuit board FFC from connector on the main circuit board unit Note When replacing the switch circuit...

Page 35: ...3 14 Disassembly and Assembly Rev C Confidential Install in the reverse sequence of removal Main circuit board unit S6 S6 S6 Bottom plate ...

Page 36: ...older assembly from one hook 2 Remove the lead wire of the paper feed motor from two hooks 3 Remove the NE detector lead wire from the hook on the frame L assembly When installing see the figure below and hook the NE detector lead wire onto the frame L assembly by wrapping around it twice CAUTION When removing the lead wire take precautions against damaging the cable Install in the reverse sequenc...

Page 37: ...r Cover Unit 1 Release the two tabs on the label paper guide from the roll paper cover unit 2 Remove the insulating tape that is securing the lead wire of the BM black mark paper detector circuit board assembly Tabs Label paper guide Insulating tape Lead wire ...

Page 38: ...circuit board assembly 4 Disconnect the lead wire of the BM paper detector circuit board assembly from the switch circuit board assembly and remove the ferrite core When assembling pass the lead wire into the ferrite core twice so that you make one loop as shown below Ground wire S1 Ferrite core Lead wire make one loop Connector Insulating tape ...

Page 39: ...embly out through the clearance in the hinge cover To remove the roll paper cover unit position the cover unit as shown below and pull out the unit in the direction shown with the arrow in the illustration Note When you need to disassemble or assemble the roll paper cover unit further see page 3 35 for instructions Install in the reverse sequence of removal Roll paper cover unit E2 Cover rotation ...

Page 40: ...e and the switch circuit board FFC from the switch circuit board assembly 2 Remove two S2 screws 3 Remove the switch circuit board assembly by spreading the two hooks of the switch panel holder Install in the reverse sequence of removal Switch circuit board assembly Switch panel holder Cover detector lead wire Switch circuit board FFC S2 ...

Page 41: ...sembly Rev C Confidential Sub Circuit Board Assembly 1 Remove two S6 screws 2 Remove the sub circuit board assembly by pulling it up diagonally and out Install in the reverse sequence of removal S6 Sub circuit board assembly ...

Page 42: ...ll cut or partial cut When you install the autocutter unit return the unit to the user s position 2 Remove the two S4 screws 3 Remove the autocutter unit Note When you need to disassemble or assemble the autocutter unit further see page 3 39 for instructions The dowel positions are marked F and P To select partial cut adjust the dowel to the position marked P To select full cut adjust the dowel to...

Page 43: ...e user s position partial cut or full cut To select partial cut adjust the dowel to the position marked P To select full cut adjust the dowel to the position marked F 3 Secure the autocutter unit with the two S4 screws Note When tightening the screws do not deform the frame assembly This can decrease the sharpness of the cutter Do not tighten the autocutter unit when the dowels are not properly en...

Page 44: ...touch the print head portion that appears like a black line and the adjacent areas in the thermal print head assembly Touching this area may result in thermal print head failure When the thermal print head assembly is contaminated or has a deposit of foreign particles wipe it off with a cotton swab moistened with alcohol 1 While holding the two head holder springs so they do not fly out pull out t...

Page 45: ...g them 3 Lift up the thermal print head assembly and remove the head FFC from the thermal print head assembly CAUTION To prevent static generated failures keep the removed thermal print head assembly in an anti static bag or other suitable container Thermal print head assembly Head holder springs Spring holder plate Head FFC ...

Page 46: ...nsert the two head holder springs into the groove in the thermal print head assembly 6 While holding the two head holder springs so they do not fly out install the spring holder plate CAUTION Be sure to hold the two head holder springs while installing the spring holder plate Otherwise the head holder springs may suddenly fly out creating the danger of eye injury 7 Adjust the two head holder sprin...

Page 47: ... two S1 screws and one S2 screw 2 Remove the hinge cover by spreading the two hooks 3 Remove the feed sheet from the hinge cover 4 Remove the DIP switch cover from the hinge cover Install in the reverse sequence of removal Hinge cover S1 DIP switch cover Feed S1 S2 sheet ...

Page 48: ... 27 TM L90 Service Manual Confidential Label Paper Guide Remove the label paper guide by raising it and pulling it out from the label paper holder groove Install in the reverse sequence of removal Label paper holder Label paper guide ...

Page 49: ...n gear D Install using the following steps 1 Lubricate the two reduction gear shafts with G 45 in a line shape 2 Install reduction gear D Note When installing reduction gears C and D see the drawing and install them in the correct directions 3 Install reduction gear C 4 Secure with one E ring E2 Reduction gear C E2 Reduction gear D ...

Page 50: ...ront frame with G 36 7 Lubricate the contact area of the frame L assembly and the front frame with G 36 8 Lubricate the contact area of the right side of the center frame and the circuit board frame with G 36 9 Lubricate the right side of the center frame and the groove in frame R with G 36 frame Frame R Circuit Frame L assembly frame Frame R Center board Front frame ...

Page 51: ...L assembly and frame R Install using the following steps 1 Pass the lead wire of the LED holder assembly through to the front between the center frame and the front frame 2 Press in and slide the label paper holder straight along the grooves in the frame L assembly and frame R until it hits the stop CAUTION When installing the label paper holder do not pinch the cables 3 Tighten the S1 screw Frame...

Page 52: ...steps 1 Affix insulating tape on the right side of the circuit board frame as shown in the photo above 2 Install the circuit board frame Then align the dowels on the circuit board frame with the holes in the frame L assembly and frame R 3 Tighten the four S4 screws See the drawing to locate the screw holes Circuit board frame S4 S4 S4 Frame L assembly Frame R Insulating tape ...

Page 53: ...inal cover detector assembly has the insulation tape affixed 2 Install the cover detector assembly onto frame R and secure with one switch screw Then align the front and back so that the protrusion on the switch faces the position marked on frame R 3 Install the center frame Then route the lead wire of the paper feed motor forward Align two dowels on the center frame with two holes in the frame L ...

Page 54: ...embly 3 33 TM L90 Service Manual Confidential Front Frame 1 Remove one S4 screw 2 Remove frame strengthening plate L 3 Remove the front frame Install in the reverse sequence of removal Frame strengthening plate L S4 Front frame ...

Page 55: ... insert the three screws on the motor into the holes in the three paper feed motor dampers 4 Install two W1 washers and one motor ground plate Then make sure the ground plate touches the frame L assembly If you insert the ground plate in an incorrect way it does not touch the frame 5 Tighten the three N1 nuts with the specified torque of 34 3 to 39 2 Ncm 3 5 to 4 0 kgcm in the order shown in the i...

Page 56: ...ne E2 type E retaining ring and slide the lever shaft to remove the lever button 2 Remove the lead wires of the BM black mark paper detector circuit board assembly from the roll paper cover unit When assembling thread the wires as shown below Lever shaft Lever button E2 Bend Pass through Hook with the clamp the hole ...

Page 57: ...er Do not use a screwdriver with a short handle and or thick shaft as it can easily touch the gear Touching the gear may damage it Note When you need to disassemble or assemble the platen holder further see page 3 47 for instructions 4 Remove one E2 type E retaining ring and remove the FEED button 5 Remove the feed spacer from the FEED button E2 S1 Feed spacer FEED button Roll paper cover Double s...

Page 58: ...ssembly 3 37 TM L90 Service Manual Confidential 6 Peel off spacer B When assembling affix the spacer as shown below 7 Peel off the mini clamp When assembling affix it in the direction shown below Spacer B Spacer B Mini clamp ...

Page 59: ...l 8 Remove the two hinge spacers from the roll paper unit When assembling make sure you insert the spacers in the direction shown below Install in the reverse sequence of removal Hinge spacer Glossy surface Glossy surface Glossy surface Hinge spacer ...

Page 60: ...hooks 8 Remove the two S9 screws Note When removing the screws near the paper cutter cover insert a screwdriver into the gap between the paper cutter cover and the cutter driving gear Do not damage the gear 9 Remove the cutter motor sub assembly Note When removing the cutter motor sub assembly pull it out straight so not to catch the cutter motor gear in the hole in the paper cutter assembly cover...

Page 61: ... position of the movable blade so that the round hole in the cutter frame assembly is visible through the long hole in the movable blade 8 Lubricate halfway around the center of the contact area with G 36 between the cutter worm gear located in the paper cutter cover assembly and the paper cutter cover assembly 9 Lubricate once around the cutter driving gear which is located on the paper cutter co...

Page 62: ...ver assembly 12 Install the paper cutter cover assembly onto the cutter frame assembly CAUTION Do not pinch the lead wire between the paper cutter cover assembly and the cutter frame assembly 13 Tighten one manual cutter screw at on the previous page 14 Install the manual cutter by aligning the two holes in it with the two dowels on the paper cutter cover assembly 15 Tighten the two manual cutter ...

Page 63: ...ssing both claws inside 2 Remove the cover leaf spring Install using the following steps 1 Press in the cover leaf spring into the label paper holder 2 Install the LED holder assembly Then pass the lead wire through first and then insert the LED holder assembly into the label paper holder Label paper holder Cover leaf spring LED holder assembly Lead wire ...

Page 64: ...by rotating it with a coin 4 Remove the N1 hex nut and the NE detector assembly 5 Remove the NE detector lead wire from the hook of the NE detector holder and remove it from the micro switch connector 6 Remove the NE detector lever by lightly pressing the two keys inside 7 Remove one S7 screw 8 Remove the micro switch NE detector adjustment screw NE detector Label paper holder N1 S7 E1 Micro switc...

Page 65: ...E detector lead wire to the micro switch connector and hook it to the NE detector holder 5 Install the NE detector assembly by placing it temporarily facing the left slanting diagonally 6 Fit the N1 hex nut and install the NE detector adjustment screw Rotate the NE detector adjustment screw with a coin until the groove in it comes out of the N1 hex nut 7 Install one E1 type E retaining ring into o...

Page 66: ... pull out the auxiliary holder plate downward at an angle 3 Remove the eight paper holding rollers 4 Remove the two E1 type E retaining rings and pull out the side plate guide shaft 5 Remove the spacer guide plate while pushing up one front claw of the label paper holder S10 Auxiliary holder plate Paper holding Paper holding rollers Paper holding rollers Paper holding rollers E1 Side plate E1 Labe...

Page 67: ...embly Rev C Confidential Install in the reverse sequence of removal After you have installed the paper holding rollers lubricate with G 45 at the 16 points shown below G 45 G 45 G 45 G 45 G 45 G 45 G 45 G 45 G 45 G 45 Zoom up ...

Page 68: ...emove the fixed blade from the platen holder by raising the blade When installing the fixed blade see the drawing below to check the installation direction CAUTION The fixed blade is sharp Handle it with care 2 Remove the two tension plate springs Fixed blade Tension plate spring Tension plate spring ...

Page 69: ...dential 3 Pull out the lever shaft and remove one E2 type E retaining ring 4 Remove the cover open lever 5 Remove the lead wire of the BM black mark detection set board from the hooks of the platen holder Lever shaft E2 Cover open lever Hooks ...

Page 70: ... BM detector holder When you assemble the BM detector holder make sure the shield plate fits into place as shown below 7 Pull the lead wire of the BM paper detector circuit board assembly out of the hole in the platen holder BM detector holder S1 S1 OK NG This portion of the shield plate goes up slightly Hole ...

Page 71: ...nd Assembly Rev C Confidential 8 Remove one S1 screw then remove the shield plate 9 Remove one S1 screw and remove the BM paper detector circuit board assembly Shield plate S1 S1 BM paper detector circuit board assembly ...

Page 72: ...ay result in deformation When installing it make sure the claw has been hooked 11 Remove the two E2 type E retaining rings and one paper feed roller shaft holder then remove the platen assembly Note When installing the paper feed roller shaft holder see the drawing and engage it to the platen holder in the correct direction Install in the reverse sequence of removal Fixed blade holder spring E2 Pa...

Page 73: ...lease follow these instructions to install the new thermal print head correctly Note that the new head has a spacer on it 1 Cut the plastic sheet with a cutting tool such as a cutter knife Be sure not to cut the surrounding parts 2 Install the new thermal print head in the correct position sheet spacer ...

Page 74: ...te setting if you do not use the specified paper shown above 2 With the roll paper cover opened turn the power on while pressing the FEED button 3 Press the FEED button again eight times 4 Close the roll paper cover 5 The printer performs the setting Once the setting value is printed on the roll paper the setting is finished The printer power may be turned off automatically depending on the DIP sw...

Page 75: ...al Note For details about the settings listed below see Chapter 6 Installation Setting for the position of the roll paper near end detector Setting for the roll paper cutting method Roll paper width setting DIP switch settings NV memory settings ...

Page 76: ...nts Type Name Grease G 15 G 36 G 45 Table 5 2 Recommended cleaning Checkpoints Cleaning method Whether any dust or foreign material adheres to thermal print head See Cleaning the thermal head section in this chapter Whether any paper dust or foreign material adheres to LED holder assembly Remove the dust or foreign material with a cotton swab lightly dampened with water Whether any paper dust or f...

Page 77: ...ing Note that the thermal head thermal element and radiation plate becomes very hot during normal operation creating the danger of burn injury Be sure to wait for about 10 minutes after turning printer power off before beginning the cleaning 1 Open the paper roll cover 2 Clean the thermal element the area that looks like it is marked with a thin black line of the thermal head with a cotton swab mo...

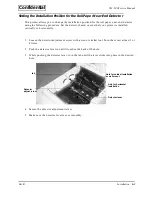
Page 78: ...st It may malfunction or cause fire Do not wire cables other than as instructed in this document Improper wiring may cause malfunction or fire Installation Position This printer can be installed vertically horizontally or mounted on the wall If you change the installation position you also need to set the installation position of the roll paper near end detector Refer to the section Setting the In...

Page 79: ...r horizontally and choose full cut without attaching the paper outlet guide the cut paper falls inside the paper path which can result in double cuts a paper jam or cutter error However if the printer is installed vertically or partial cut is chosen the paper outlet guide is not necessary Wall Mounting The printer can be attached to the wall by using the wall hanging bracket WH 10 When you are goi...

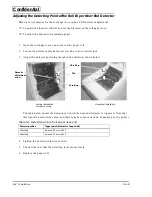
Page 80: ...talled vertically or horizontally 1 Loosen the detector adjustment screw with a coin or similar tool Turn the screw at least 3 or 4 times 2 Push the detector lever in until it touches the back of the hole 3 While pushing the detector lever turn the tab until the lever clicks into place in the desired hole 4 Secure the detector adjustment screw 5 Make sure the detector lever moves smoothly Hole for...

Page 81: ...detector by sliding the tab in the direction shown below The table below shows the diameter at which the near end detector is triggered Note that this figure is a calculated value and there may be some variations depending on the printer 4 Tighten the detector adjustment screw 5 Check to be sure that the detecting lever moves freely 6 Replace the paper roll Table 6 1 Detection point of roll paper ...

Page 82: ... where the paper passes and the paper does not pass which can result in a paper cutting problem However if the printer is new you can change the cutting method from partial cut to full cut If the printer is installed horizontally and full cut is chosen attach the paper outlet guide See page 6 2 If it is not attached the cut paper falls inside the paper path which can result in double cuts a paper ...

Page 83: ...autocutter unit with the two S4 screws Make sure the two dowels on the frame assembly engage the two slits in the autocutter unit Note When tightening the screws do not deform the frame assembly This can decrease the sharpness of the cutter Do not tighten the autocutter unit when the dowels are not properly engaged This can also decrease the sharpness of the cutter 6 Install the cutter cover 7 Clo...

Page 84: ...e paper does not pass can be worn out since the platen directly contacts the head The wear rate of the cutter blades is different between the areas where paper passes and does not pass which can result in a paper cutting problem However if the printer is new you can change the paper width from narrow to wide 1 When you want to set the roll paper width from 61 mm to 70 mm 2 4 to 2 76 break off the ...

Page 85: ...asurement 6 Tighten the spacer with the screw included with the spacer See figure above 7 Set the NV memory for the desired paper width Attaching the Power Switch Cover WARNING If an accident occurs when the power switch cover is attached unplug the power supply cord from the outlet immediately Continued usage may lead to fire or shock You can use the power switch cover to make sure the power swit...

Page 86: ...above illustration Setting the DIP Switches Location of the DIP switches A single set of DIP switches is located in the area shown below To access the DIP switches remove the DIP switch cover Note About the DIP switch on the main circuit board When disassembling and assembling the printer you may notice a DIP switch on the main circuit board This switch is used only at the factory Always set this ...

Page 87: ...dels Table 6 2 DIP switch settings for serial interface models Switch number Function ON OFF 1 Power switch function Disabled Enabled 2 Setting for serial communication conditions To be specified with DIP switches To be specified with NV memory 3 Handshake XON XOFF DTR DSR 4 Bit length 7 bits 8 bits 5 Parity check Yes No 6 Parity selection Even Odd 7 Baud rate selection See the next table 8 Table ...

Page 88: ...Rev B Installation 6 11 TM L90 Service Manual Confidential 6 Reserved Fixed to off 7 Reserved Fixed to off 8 Reserved Fixed to off Switch number Function ON OFF ...

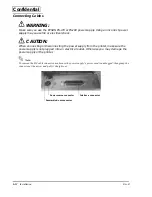
Page 89: ...necting or disconnecting the power supply from the printer make sure the power supply is not plugged into an electrical outlet Otherwise you may damage the power supply or the printer Note To remove the DC cable connector make sure the power supply s power cord is unplugged then grasp the connector at the arrow and pull it straight out Drawer kick out connector Power source connector Interface con...

Page 90: ...the autocutter operation Paper Print density Selects paper type mono or color Selects print density Basic serial interface settings Sets the baud rate data length flow control parity Advanced interface settings Sets the receive buffer capacity data processing for receiving error conditions for busy Interface reset signal Sets if the reset signal on the interface connector is used or not used Paper...

Page 91: ...tic Setting Mode Follow the steps below to run the Paper Layout Automatic Setting Mode 1 Install the paper roll you want to use 2 With the roll paper cover opened turn the power on while pressing the FEED button 3 Press the FEED button again six times 4 Close the roll paper cover The printer runs the Paper Layout Automatic Setting Mode During the mode the printer checks the necessary information f...

Page 92: ...ed 3 Undefined 4 Undefined 5 Undefined 6 Undefined 7 Undefined 8 Undefined Bit Function 0 off 1 on 1 Undefined 2 Undefined 3 Undefined 4 Undefined 5 Undefined 6 Feeding paper to the start position during power on Enabled Disabled 7 Undefined 8 Select the type of error when the roll paper cover is opened while printing Generate an automatically recoverable error Generate an error recoverable by ESC...

Page 93: ... 1 mm except for the size from 71 mm to 79 mm Select number of division for head energizing Undivided energizing Two part energizing Three part energizing Four part energizing Select print density 0 7 0 75 0 8 0 85 0 9 0 95 1 0 1 05 1 1 1 15 1 2 1 25 1 3 1 35 1 4 Select paper type mono or color Single color Two colors Select print speed Print speed level 1 Print speed level 9 Function Selection Ba...

Page 94: ...t hands Doing so may result in severe shock Do not allow foreign objects to fall into the equipment Penetration by foreign objects may lead to fire or shock If water or another liquid spills into this equipment unplug the power cord immediately Continued usage may lead to fire or shock Do not place multiple loads on the power outlet wall outlet Overloading the outlet may lead to fire Always supply...

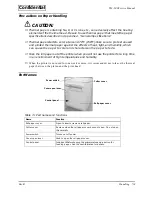
Page 95: ...uching them may cause burns Precautions on Handling the Printer Observing the following operational precautions protects the unit against damage CAUTION Do not turn off the printer while the autocutter is working Doing so leaves the cutter blade exposed which prevents the roll paper cover from opening Do not pull out paper when the roll paper cover is closed Except for a paper jam do not turn the ...

Page 96: ...paper out of the printer when you will not use the printer for a long time in an environment of high temperatures and humidity When the printer is not used for one week or more it is recomended not to leave the thermal paper between the platen and the print head Part Names Table 7 1 Part names and functions Name Function Roll paper cover Open to insert or remove roll paper Cutter cover Remove when...

Page 97: ...ffline and flashes when an error occurs PAPER OUT LED Lights when roll paper is nearly out FEED Button Feeds the roll paper Table 7 3 Purpose of each method of power ON OFF Method Description Power ON OFF using the power switch To power the printer ON or OFF using the power switch Power ON OFF with the power switch disabled To power the printer ON or OFF using the power breaker where the printer i...

Page 98: ...r ON OFF using the power switch OFF Power ON OFF with the power switch disabled ON Power ON Press the power switch Power OFF Hold down the power switch for more than 3 seconds Power ON Turn ON the power breaker at the store where the printer is installed or turn ON the switch on the power box or wall outlet where the printer is connected Power OFF 1 Execute the power off process using the DLE DC4 ...

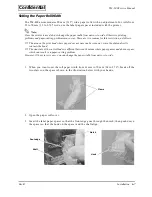
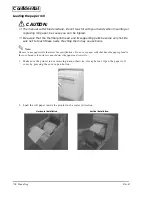
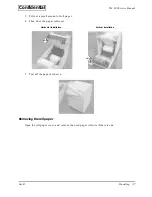
Page 99: ...e not to touch these parts Touching them may cause burns Note Be sure to use paper rolls that meet the specifications Do not use paper rolls that have the paper glued to the core because the printer cannot detect the paper end correctly 1 Make sure the printer is not receiving data otherwise it may be lost Open the paper roll cover by pressing the cover open button 2 Load the roll paper inside the...

Page 100: ...l 3 Pull out a small amount of roll paper 4 Then close the paper roll cover 5 Tear off the paper as shown Removing the roll paper Open the roll paper cover and remove the used paper roll core if there is one Horizontal installation Vertical installation ...

Page 101: ... mm dots per inch Paper type Specified thermal roll paper The following paper can be used Receipt paper without black mark Receipt paper with black mark Label paper without black mark Label paper with black mark Refer to page 6 13 Paper Layout Automatic setting mode Form Paper roll Paper width 79 5 0 5 mm 3 13 0 02 for 80 mm 3 15 paper width 59 5 0 5 mm 2 34 0 02 for 60 mm 2 36 paper width 37 5 0 ...

Page 102: ...KS ET Two color thermal roll paper ENTPC080090 PD750R Label stock Length of label Label Width 80 mm 3 15 60 mm 2 36 38mm 1 5 Monocrome label paper stock 25 mm 1 ENTLA080090 025 ENTLA060090 025 ENTLA038090 025 51 mm 2 ENTLA080090 051 ENTLA0600900 51 76 mm 3 ENTLA080090 076 ENTLA060090 076 102 mm 4 ENTLA080090 102 ENTLA060090 102 Two color label paper stock 25 mm 1 ENTLA080090 025 ENTLA060090 025 EN...

Page 103: ... Nippon Paper Industries Co Ltd PD160R Paper thickness 75 µm Oji paper Mfg Co Ltd P350 Paper thickness 62 µm Kanzaki Specialty Paper USA KF50 Paper thickness 62 µm KANZAN Spezialpapiere GmbH Germany Two color thermal paper PD750R Paper thickness 75 µm Oji paper Mfg Co Ltd Paper roll size Roll diameter Maximum 90 mm 3 54 Take up paper roll width 80 60 38 mm 3 15 2 36 1 5 with 0 5 1 0 mm 0 02 0 04 o...

Page 104: ... a paper cutting problem However if the printer is new you can change the cutting method from partial cut to full cut If the printer is installed horizontally and the full cut is chosen attach the paper outlet guide Refer to Chapter 6 If it is not attached the cut paper falls inside the paper path which can result in double cutting a paper jam or cutter error Table A 1 Autocutter settings Setting ...

Page 105: ...oblems However if the printer is new you can change the paper width from narrow to wide Supply method Drop in paper roll Near end detector Detection method Micro switch Paper roll core diameter Inside 25 4 mm 1 Outside 31 4 mm 1 24 Near end adjustment Adjusting screw Fixed position 1 diameter approximately 36 mm 1 42 2 diameter approximately 41 mm 1 61 Paper width selection 80 mm 3 15 default sett...

Page 106: ...ge 24 VDC 7 optional power supply EPSON PS 170 or PS 180 Pin assignments for the power connector Height Approx 203 mm 7 99 Width Approx 140 mm 5 51 Depth Approx 148 mm 5 83 Weight Approx 1 9 kg 4 19 lb not including paper Table A 2 Pin assignment for the power connector Pin Function 1 24V 2 GND 3 N C SHELL F G 1 2 3 ...

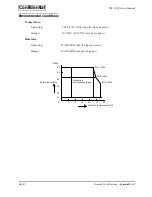
Page 107: ...ature Operating 5 45 C 23 113 F See the figure below Storage 10 50 C 14 122 F except for paper Humidity Operating 10 90 RH See the figure below Storage 10 90 RH except for paper RH 90 80 60 40 20 10 0 0 10 20 30 40 50 Relative humidity Ambient temperature C Operating 34 C 90 40 C 65 45 C 50 environment range ...

Page 108: ... or off You can use the DIP switches to enable or disable the power switch Panel Button Feed FEED button Note The ESC c 5 command enables or disables the panel button When disabled the button will not function Table A 3 Drawer kick out connector pin assignments Pin Number Signal Name Direction 1 Frame GND 2 Drawer kick out drive signal 1 Output 3 Drawer open close signal Input 4 24 V 5 Drawer kick...

Page 109: ...oaded normal condition Blinking Waiting for the self test print to continue Or it is waiting for the macro execution command Table A 4 PAPER OUT LED blinking pattern State PAPER OUT LED Blinking Pattern Recovery Conditions Waiting for self test printing to continue or macro execution ready state PAPER OUT Pressing the PAPER FEED button continues self test printing or executes a macro On Offline ex...

Page 110: ...Appendix A 10 General Specifications Rev B Confidential ...

Page 111: ...pendix B Overview of the Mechanisms This printer consists of the next four units Cover unit Print paper feed unit Paper supply unit Autocutter unit The illustration below shows an external view of the printer mechanism Cover unit aper supply unit Print paper feed unit Autocutter unit ...

Page 112: ...d the left frames of the print paper feed unit and the platen is secured into place The platen gear attached to the lever shaft is engaged with the reduction gear on the print paper feed unit and can rotate the platen A proper load is applied to the cover unit by the leaf spring on the paper supply unit When an operator manipulates the lever button while the cover unit is closed the lock between t...

Page 113: ...ircuit board frame holds the main circuit board that controls the printer mechanism The cover open detector detects if the cover unit is closed or open Rotating the paper feed motor when the cover unit is closed drives the reduction gear to rotate the platen Thermal paper is fed if it is rolled up on the platen With the thermal paper pinched between the platen and the thermal print head the printi...

Page 114: ...olor forming layer but the popular thermal paper is the one that forms the color black Depending on the paper type environment and printing conditions part of the dissolved color forming layer may be deposited on the thermal printer head side In this case you need to clean the heat generating element of the thermal print head Data Input and Printing Serial print data input from DATA IN synchronize...

Page 115: ...s with the reflective photo detector on the platen holder and detects the several types of paper The paper detection LED is covered by a transparent resin to prevent the detector from being destroyed by static The NE detector detects the remaining amount of roll paper It can be set to perform detection at two points depending on the setting This detector can be rotated by loosening it with a coin ...

Page 116: ...d unit and consists of a movable blade cutter sub assembly motor movable blade position detector power transmission mechanism and frame The autocutter unit s movable blade and the fixed blade attached to the cover unit cross each other and cut paper with the principle of scissors Appearance of paper spacer Paper spacer is attached to the label holder example Cutter sub assembly motor Movable blade...

Page 117: ...by various gears If paper is present it is cut between the movable and the fixed blades Then the movable blade returns to the standby position The movable blade position detector detects if the movable blade is in the standby position or not The power transmission mechanism is equipped with a one way clutch that cuts power transmission when the movable blade catches on foreign material or somethin...

Page 118: ...the paper feed motor Use commercially available product Crosshead screwdriver No 0 1 2 Disassembly and assembly Use commercially available product Flathead screwdriver Disassembly and assembly Use commercially available product Tweezers Disassembly and assembly Use commercially available product Wrist strap static electricity countermeasure Disassembly and assembly Use commercially available produ...

Page 119: ...CTOR AA 1 141 Cover detector assembly COVER DETECTOR ASSEMBLY 1 166 Cover leaf spring PLATE SPRING COVER 1 124 Cover open lever LEVER COVER OPEN 1 128 Cover rotation shaft SHAFT COVER TURNING 2 133 Cover tape TAPE COVER 1 160 Accessory Cutter cover COVER CUTTER AA 1 139 Cutter frame assembly FRAME CUTTER ASSEMBLY 1 149 Cutter motor sub assembly MOTOR CUTTER SUB ASSEMBLY 1 151 NE detector adjustmen...

Page 120: ... 1 130 Lever shaft SHAFT LEVER 1 129 Logo plate LOGO PLATE AB 1 102 Main case assembly CASE MAIN ASSEMBLY AA 1 136 Main circuit board unit MAIN CIRCUIT BOARD UNIT 1 201 Manual cutter MANUAL CUTTER 1 167 Manual cutter screw SCREW MANUAL CUTTER 3 148 Micro switch MICRO SWITCH 1 146 Mini clamp MINI CLAMP 1 179 Motor ground plate GROUND PLATE MOTOR 1 118 NE detector holder HOLDER N E DETECTOR 1 145 NE...

Page 121: ...ew S6 C P S O SCREW S06 Screw S7 C B B TITE SCREW S07 Screw S9 C B SCREW S09 Shield plate PLATE SHIELD 1 180 Spacer SPACER 3x4x4 3 153 Spacer B SPACER B 2 178 Spacer guide plate PLATE SPACER GUIDE 1 171 Spacer guide shaft SHAFT SPACER GUIDE 1 170 Spacer 3X4X4 SPACER 3X4X4 F ZN 3 153 Spring holder plate PLATE SPRING HOLDER 1 113 Sub circuit board assembly SUB CIRCUIT BOARD ASSEMBLY AA 1 209 Switch ...

Page 122: ... 113 Spring holder plate PLATE SPRING HOLDER 1 114 Fixed blade FIXED BLADE 1 115 Reduction gear C GEAR REDUCTION C 1 116 Reduction gear D GEAR REDUCTION D 1 117 Paper feed motor damper DAMPER PAPER FEED MOTOR 3 118 Motor ground plate GROUND PLATE MOTOR 1 119 Center frame FRAME CENTER 1 120 Label paper holder HOLDER LABEL 1 121 LED holder assembly HOLDER LED ASSEMBLY 1 122 Paper holding roller ROLL...

Page 123: ...4 DIP switch cover COVER DIP SWITCH 1 155 Handling label LABEL OPERATION BA 1 156 Label paper platen holder HOLDER LABEL PLATEN 1 157 Power switch cover COVER POWER SWITCH AA 1 Accessory 158 Switch panel label LABEL SWITCH PANEL BA 1 Accessory 159 Rubber foot C RUBBER FOOT C 4 160 Cover tape TAPE COVER 1 Accessory 162 Autocutter unit AUTO CUTTER UNIT 1 163 Platen assembly PLATEN ASSEMBLY 1 164 Pap...

Page 124: ...Y 1 210 Switch circuit board assembly SWITCH CIRCUIT BOARD ASSEMBLY 1 211 Ferrite core FERRITE CORE 1 213 BM paper detector circuit board assembly CIRCUIT BOARD BM PAPER DETECTOR ASSEMBLY 1 E1 E ring E1 RETAINING RING E2 E ring E2 RETAINING RING N1 Nut N1 HEXAGON NUT S01 Screw S1 C B P TITE 3X10 F ZN S02 Screw S2 C C P TITE SCREW 3X8 F ZN S03 Screw S3 C B B SCREW 4X12 F ZN S04 Screw S4 C B S SCREW...

Page 125: ...andard screw types Head top Head side Body Washer assembled C Cross P Pan B Bind C Cup S tite B tite P tite T B S Spring lock washer S P1 S P2 S P3 S P4 Spring lock washer plain washer O Outside toothed lock washer P1 P2 P3 P4 Plain washer O P1 Outside toothed washer plain washer Head top Head side Washer assembled Body ...

Page 126: ...Appendix D 10 Parts List Rev C Confidential Special Screws Table D 4 Special screws Overview Ref 101 105 148 ...

Page 127: ... 130 133 171 152 155 158 123 129 179 123 128 104 114 156 163 112 164 180 213 102 157 160 139 201 136 173 141 202 140 106 140 159 132 E2 E2 S6 E2 E2 E2 S1 S5 S3 S6 S6 S5 S7 S1 E2 211 E2 S1 140 140 S6 172 172 175 174 S6 S6 S7 S7 S7 159 159 159 S10 133 178 E H G A C B L N C K A B J H I G K F F N E D D I J L ...

Page 128: ...205 119 117 117 107 109 166 165 101 150 167 148 148 148 151 105 149 207 147 113 125 166 135 154 S2 S2 S1 S1 162 206 121 120 122 122 122 122 122 122 213 122 122 125 209 111 124 108 S6 S6 S4 S9 S9 S4 E1 N1 S7 S4 W1 N1 N1 W1 N1 S1 S4 S1 S4 S4 S6 S6 S6 S6 105 S4 S4 S4 S2 169 103 L M O C T S T A A B G G H H I I F F Q B D D E E J J N U S C O P U N M L K R R Q V V W W P X X ...

Page 129: ...iagram Appendix E 1 TM L90 Service Manual Confidential Appendix E Lubrication Points Diagram G 36 G 36 G 36 G 36 G 36 G 15 G 36 G 45 G 36 G 36 G 45 G 45 G 36 G 45 G 45 G 45 G 45 G 45 G 45 G 45 G 45 G 45 G 45 G 45 G 45 G 45 G 45 ...

Page 130: ...ntrol circuit Volatile RAM U8 DRAM Font ROM U9 Flash EEPROM Program ROM U7 Flash EEPROM CPU U4 BUS VI0 VBUS Paper feed motor drive circuit Auto cutter motor drive circuit Sensor circuits Thermal head drive circuit Thermal head Printer mechanism VI0 5V power system 3 3V power system 24V power system DKD driver I F circuit board interface Switch board interface Host interface Drawer Power supply CN7...

Page 131: ...fidential Main Circuit Board Unit The main circuit board unit is comprised of circuits used to control the CPU memory mechanism drive unit detectors and power supply It forms the nucleus of the control system for the TM L90 Program ROM Font ROM DRAM CPU ...

Page 132: ...r supply for thermal head UZ1 VIO 5 VDC 1 5A Power supply to I O logic circuits UZ2 VBUS 3 3 VDC 0 15A Power supply to bus logic circuits Connectors CN6 I F BOARD Universal interface board UIB connector CN10 HEAD Connector for thermal head unit connection front of the printer CN11 NE Connector for paper near end connection CN12 RE for TM T90 only CN13 Label photo Connector for transmission sensor ...

Page 133: ...ecifications listed in the table below Table F 2 Output voltages and their applications Voltage Level Application 5 V Logic circuit used mainly for circuits around CPU 24 V Print mechanism power supply Drawer kick power supply Interface circuit board unit power supply 3 3V Logic circuit used mainly for circuits around memory Table F 3 Logic circuit functions DC IN Dip switch 1 1 Power Switch DC Ou...

Page 134: ...cuit board and their major functions Interface Circuit Board Unit The interface circuit board unit serves as the core of the system that controls data send and receive operations between the TM L90 and host computer Various interface circuit boards can be used including the EPSON UB series except for the UB P02 and UB S03 Table F 4 Major components of the sub circuit board unit and their major fun...

Page 135: ...ot the problem Table F 5 Checking the power supply line Power source Terminal name Test terminal Parts terminal Normal value Power source for logic circuit DC Semiconductor switch ON DS1 C 15V Semiconductor switch OFF 24V Power source for logic circuit VIO VIO UZ2 4 5V Power source for logic circuit VBUS VBUS UZ2 5 3 3V Power source for logic circuit GND GND 0V Power source for mechanisms 24V oper...

Page 136: ...ev B Overview of Electric Circuits Appendix F 7 TM L90 Service Manual Confidential Test Point Locations Test Point Locations Side A Test Point Locations Side B REF_RF Q1 CN6 GND UK1 VBUS VIO R38 UZ2 DS1 ...

Page 137: ...Appendix F 8 Overview of Electric Circuits Rev B Confidential Parts Layout Main Circuit Board Unit Parts Layout for the Main Circuit Board Unit Side A ...

Page 138: ...Rev B Overview of Electric Circuits Appendix F 9 TM L90 Service Manual Confidential Parts Layout for the Main Circuit Board Unit Side B ...

Page 139: ... F 10 Overview of Electric Circuits Rev B Confidential Switch Circuit Board Assembly Parts Layout for the Switch Circuit Board Side A Parts Layout for the Switch Circuit Board Side B Sub Circuit Board Assembly ...

Page 140: ...3 22 PTLED1 23 PTLED2 23 SWV24 20 OFF_CTRL 8 nTIMO1 20 nTIMO2 20 AC_1 6 AC_2 6 DKD1 5 DKD2 5 SILAT 20 SICLK 20 UIBSEL 4 nRESET 3 20 nNMI 20 SV24 20 STH 22 ALRE 23 DSWMEM 2 nOFF_TRG 8 20 A1 2 A2 2 A3 2 A4 2 A5 2 A6 2 A7 2 A8 2 A9 2 A10 2 A11 2 A12 2 A13 2 A14 2 A15 2 A16 2 A17 2 A18 2 A19 2 A20 2 A21 2 AT99 AT99 PSW 8 nWDTOUT 20 RERR_LED 20 PWR_LED 20 ROUT_LED 20 VBUS VBUS VBUS VBUS VIO C30 1 2 R33...

Page 141: ...1 1 D12 1 A13 1 D10 1 DSWMEM 1 nFNTCE 1 D2 1 nRAS2 1 D7 1 VIO VBUS VBUS VBUS VBUS VBUS VBUS C48 1 2 C46 1 2 R94 1 2 C502 P N DSW2 1 2 U7 1 2 3 4 5 6 7 8 9 10 11 12 13 14 15 16 17 18 19 20 21 22 23 24 25 26 27 28 29 30 31 32 33 34 35 36 37 38 39 40 41 42 43 44 45 46 47 48 A15 A14 A13 A12 A11 A10 A9 A8 A19 NC A20 WE RESET NC WP ACC RY BY A18 A17 A7 A6 A5 A4 A3 A2 A1 A0 CE VSS1 OE D0 D8 D1 D9 D2 D10 ...

Page 142: ... 3 nERRDIS 5 OFF_CTRL 1 8 nTIMO1 1 SWV24 1 nTIMO2 1 nIFRST 3 UIBSEL 1 4 nWDTOUT 1 IF_PWRON 4 8 EXT_RES 1 nOFF_TRG 1 8 nACOVC 6 nSPDV24 1 DADAT 1 DACLK 1 ROUT_LED 1 AC_1 1 6 MFS 1 PWR_LED 1 SICLK 1 RERR_LED 1 AC_2 1 6 SILAT 1 HRA1 1 22 HRA3 1 22 HRLD 1 22 HRA0 1 22 HRA2 1 22 HRCLK 1 22 HRDATA 1 22 PTLED1 1 23 PTLED2 1 23 RXD 1 4 CTS 1 4 DET 1 4 DKDS1 1 5 SV24 1 N25_RES 1 4 DSR_RES 1 4 nSPDV24 1 HCT...

Page 143: ...2 RZ5 1 2 V24S 5 8 20 nIFRST 20 nRESET 1 20 VBUS 1 2 20 22 23 VIO 1 2 4 5 6 8 20 23 24 BLOCK 13 RTS TXD RXD N25_RES CLKIN DTR CTS DET CLK_REQ UIBSEL DSR_RES VIO VIO VIO CY1 1 2 DY2 A C RY15 1 2 RY10 1 2 RY20 1 2 RY22 1 2 RY5 1 2 RY6 1 2 RY7 1 2 RY2 1 2 RY8 1 2 CY500 1 2 RY3 1 2 DMY1 4 2 3 1 CY501 1 2 RY9 1 2 RY12 1 2 UY2B 5 3 7 8 4 UY2A 2 6 1 8 4 RY11 1 2 RY23 1 2 QMY1 4 3 5 1 6 2 CY502 1 2 RY4 1 ...

Page 144: ...1 2 RK1 1 2 DK5 A C RK2 1 2 RK13 1 2 RK14 1 2 RK16 1 2 DMK1 1 2 3 4 5 6 RK15 1 2 RK6 1 2 QMK1 3 5 2 1 4 QK1 2 3 1 UK1 2 1 3 G I O CK1 1 2 DKD_EN 20 DKD1 1 DKD2 1 DK_P 20 DKDS1 1 DK_2 20 DK_1 20 DK_S1 20 GPS24 1 2 3 4 6 20 22 23 24 V24 VIO RA3 1 2 CA3 1 2 RA4 1 2 QMA3 3 5 2 1 4 QA1 2 3 1 QMA2 4 3 5 2 1 DMA1 4 2 3 1 CA2 1 2 CA4 1 2 CA1 1 2 RA5 1 2 RMA1 1 2 3 4 5 6 7 8 QMA1 6 8 2 4 5 3 10 1 7 9 ACM 2...

Page 145: ... 3 4 5 6 DMS6 4 2 3 1 RS2 1 2 DMS4 1 2 3 4 5 6 DS1 1 2 RS1 1 2 RS7 1 2 QS3 2 3 1 US2A 3 2 1 8 4 RS21 1 2 CS2 1 2 US2B 5 6 7 RS18 1 2 RS28 1 2 US1B 12 9 11 8 10 13 14 7 D Q CLK Q PR CL VCC GND RS4 1 2 QS2 1 2 3 RS31 1 2 CS12 P N RS30 1 2 QS14 2 3 1 RS29 1 2 RS14 1 2 CS6 1 2 RS5 1 2 CS7 1 2 DMS5 1 2 3 4 5 6 RS26 1 2 RS23 1 2 RS8 1 2 U2B 5 6 7 RS25 1 2 CS101 2 RS17 1 2 CS8 P N CS4 1 2 CS5 1 2 QS1 1 2...

Page 146: ...2 VH2 1 RH9 1 2 CH11 1 2 CH3 1 2 RH17 1 2 RH7 1 2 CH10 P N RH3 1 2 DMH1 4 2 3 1 LH1 1 2 RH11 1 2 LH3 1 2 CH5 1 2 LH8 1 2 RH13 1 2 RH12 1 2 LH4 1 2 RH5 1 2 LH9 1 2 RH14 1 2 RH16 1 2 CH1 1 2 CH2 1 2 RH2 1 2 RH6 1 2 LH5 1 2 RH4 1 2 CH4 1 2 TH_THERM 1 TH_VH1 20 TH_DI2 20 TH_DI1 20 TH_CLK 20 TH_LATCH 20 TH_STB 20 TH_DI3 20 TH_DI4 20 TH_D1 1 TH_D2 1 TH_SCLK 1 TH_STB_A 1 TH_LAT 1 TH_D3 1 TH_D4 1 TH_TM1 2...

Page 147: ...S 20 RRE_S 20 RNE_S 20 AC_RST_S 20 PTLED_COM1 1 CVS_S 20 PTLED_COM2 1 PF_PH2 PF_VR PF_I20 PF_I20 PF_PH2 PF_A PF_B PF_B PF_A PF_I10 PF_PH1 PF_I10 PF_PH1 V24 VIO VIO DP6 A C DP7 A C REF_PF 1 DP8 A C CP3 1 2 CP4 1 2 RP1 1 2 RP6 1 2 RP4 1 2 UP2 9 8 12 13 14 15 1 2 4 3 5 6 7 11 10 16 D1 D2 G3 G4 D0 OUTB PFD REF G1 RC G2 VCC PHASE SENSE OUTA VBB CP5 P N UP1 9 8 12 13 14 15 1 2 4 3 5 6 7 11 10 16 D1 D2 G...

Page 148: ...SEIKO EPSON CORPORATION Printed in Japan EPSON ...

Reviews: