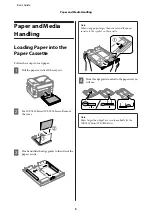
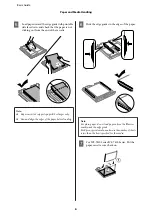
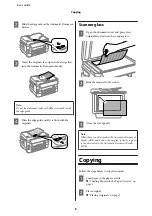
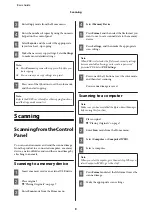
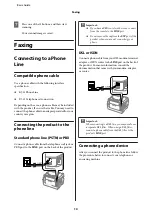
background image

Basic Guide

Summary of Contents for WF-3620 series

Page 1: ...Basic Guide ...

Page 2: ...nk Cartridge Codes Product Black Cyan Magenta Yellow WF 7610 WF 7620 252 252XL 254XL 252 252XL 252 252XL 252 252XL WF 3620 WF 3640 252 252XL 252 252XL 252 252XL 252 252XL WF 7621 WF 3621 188 188 188 188 ...

Page 3: ...ting the line type 12 Setting the number of rings to answer 13 Sending Faxes 13 Receiving Faxes 14 Setting up the receive mode 14 Outputting received faxes 14 Viewing received faxes on the LCD screen 15 Replacing Ink Cartridges 16 Safety Instructions and Precautions 16 Safety instructions 16 Precautions 16 Replacing an ink cartridge 16 Basic Troubleshooting 19 Error Code on the Status Menu 19 Pape...

Page 4: ...atures such as 2 sided copying Network Guide PDF Provides instructions on network settings for your computer smartphone or product and solving problems Administrator s Guide PDF Provides the system administrator with information on security management and product settings Caution Important and Note Caution Important and Note in this manual are indicated as below and have the following meaning Caut...

Page 5: ...he power light turns on when the product is on Flashes when the product is printing copying scanning faxing replacing an ink cartridge charging ink or cleaning the print head b Returns to the top menu When on the top menu switches between the modes c 1 Interruptsthecurrentprintorcopyjobandallowsyoutoperformadifferentprintorcopyjob Press this button again to restart the job that has been paused d R...

Page 6: ...e number of copies and fax number k Starts printing copying scanning faxing in black and white l Starts printing copying scanning faxing in color m u d 2 Scrolls the screen n 2 Shows a list of the preset settings you registered 1This button is only available for the WF 7610 Series WF 7620 Series 2These buttons are only available for the WF 3620 Series Status Menu The Status Menu displays the curre...

Page 7: ...Series Remove the cover C Pinch and slide the edge guides to the sides of the paper cassette Note When using paper larger than A4 extend the paper cassette to the symbol on the cassette D Slidetheedgeguidetoadjusttothepapersizeyou will use Note Paper larger than Legal size is only available for the WF 7610 Series WF 7620 Series Basic Guide Paper and Media Handling 5 ...

Page 8: ...n and align the edges of the paper before loading F Slide the edge guides to the edges of the paper Note For plain paper do not load paper above the H arrow mark inside the edge guide For Epson special media make sure the number of sheets is less than the limit specified for the media G For WF 7610 Series WF 7620 Series Put the paper cassette cover back on Basic Guide Paper and Media Handling 6 ...

Page 9: ...eeder ADF to copy scan or fax multiple pages quickly The ADF can scan both sides of your documents You can use the following originals in the ADF Size B5 A5 1 A4 Letter Legal 1 B4 2 A3 2 Type Plain paper Weight 64 g m2 to 95 g m2 Capacity 35 sheets or 3 5 mm or less 3 1For the WF 3620 Series WF 3640 Series you cannot automatically scan both sides of A5 and Legal size paper 2B4 and A3 documents are...

Page 10: ...e document cover and place your original face down on the scanner glass B Slide the original to the corner C Close the cover gently Note When there is a document in the Automatic Document Feeder ADF and on the scanner glass priority is given to the document in the Automatic Document Feeder ADF Copying Follow the steps below to copy documents A Load paper in the paper cassette Loading Paper into th...

Page 11: ...y card or an external USB device B Place original Placing Originals on page 7 C Enter Scan mode from the Home menu D Select Memory Device E Press Format and then select the file format you want to use to save scanned data to the memory device F Press Settings and then make the appropriate scan settings Note When PDF is selected as the file format security settings become available allowing you to ...

Page 12: ... LINE port on the back of the product cImportant If you have a PBX console in the room connect from the console to the LINE port DonotremovethecapfromtheEXTportofthe product when you are not connecting your phone DSL or ISDN ConnectaphonecablefromyourDSLmodem terminal adapter or ISDN router to the LINE port on the back of the product For more information consult the documentation that came with yo...

Page 13: ...on the terminal adapter or ISDN router Setting Up for Faxing Using the Fax Setting Wizard The product s Fax Setting Wizard menu guides you through setting up the basic fax features The wizard is automatically displayed when the product is turned on for the first time If you have already configured the settings skip this section unless you need to change the settings cImportant Before starting the ...

Page 14: ...duct and then go to the next step If you select No Receive Mode is automatically set to Auto Go to Step 10 cImportant When no external telephone is connected to the product Receive Mode must be set to Auto otherwise you cannot receive faxes I On the next Receive Mode Setting screen select Yes to receive faxes automatically Select No to receive faxes manually Note When you have connected an externa...

Page 15: ...ake sure the Rings to Answer setting is correct cImportant TheRingstoAnswersettingindicatesthenumberof rings that must occur before the product automatically receives a fax If the connected answering machine is set to pick up on the fourth ring you should set the product to pick up on the fifthringorlater Otherwisetheansweringmachine cannot receive voice calls Depending on the region this setting ...

Page 16: ...nselectFaxSendSettingsto change the fax transmission settings such as the resolution if necessary E Go to Step 6 if you do not want to preview before sending To preview the fax monochrome fax only press Preview on the fax top screen The product starts scanning the documents and displays the scanned image on the LCD screen To start sending the fax go to Step 6 F Press x Color or x B W to start send...

Page 17: ...ve to Memory Device Enable this to save received faxes in a memory card or external USB storage device connected to the product SelectYesandPrinttoprintreceivedfaxes automatically while saving them to the external storage device Before you use this function you need to create a folder to save in the device Select Create Folder to Save in the Other Settings menu and then follow the on screen instru...

Page 18: ...red by Epson s warranties and under certain circumstances may causeerratic productbehavior Information about non genuine ink levels may not be displayed Do not shake ink cartridges too vigorously otherwise ink may leak from the cartridge To maintain optimum print head performance some ink is consumed from some cartridges not only during printing but also during maintenance operations such as ink c...

Page 19: ...and remove the ink cartridge Note The illustration shows replacement of the black ink cartridge Replace the cartridge appropriate to your situation Removed ink cartridges may have ink around the inksupplyport sobecarefulnottogetanyinkonthe surrounding area when removing the cartridges D Gently shake new replacement cartridges four or five times and remove the replacement ink cartridge from its pac...

Page 20: ...therwise the cartridge may become unusable Do not remove or tear the label on the cartridge otherwise ink will leak F Insert the cartridge and press it until it clicks G Close the ink cartridge cover Press Check on the control panel of the product to check if the cartridges are installed correctly H Close the scanner unit slowly Ink charging starts Note The power light continues to flash while the...

Page 21: ...age 10 Find more solutions in the following section No dial tone detected error occurs on page 27 204 The recipient machine is busy Wait for a moment and then try again 205 The recipient machine does not answer 206 The phone cable is incorrectly connected to the LINE and EXT port of the product Connect the product to the phone line correctly Connecting to a Phone Line on page 10 207 The product is...

Page 22: ...Network Guide 314 The data size exceeds the maximum size for attached files When scanning increase the Attached File Max Size setting or change the following settings to reduce the size of the scanned data Select a lower resolution Select a higher Compression Ratio 306 315 The memory is full Wait until other ongoing jobs are finished 322 422 An authentication error has occurred Check that the ente...

Page 23: ... An error occurred while sending the scanned data 341 A communication error has occurred Make sure the product is connected to the computer or network correctly For details see the Network Guide When you are using Scan to Computer make sure you have installed Epson Event Manager Paper Jams Caution Never touch the buttons on the control panel while your hand is inside the product Note Cancel the pr...

Page 24: ...en the rear cover 1 C Remove the jammed paper D Pull out the rear cover 2 E Carefully remove the jammed paper F Carefully remove the jammed paper G Open the rear cover 2 Basic Guide Basic Troubleshooting 22 ...

Page 25: ... Reattach the rear cover 2 J Close the rear cover 1 WF 3620 Series WF 3640 Series A Pull out the rear cover B Carefully remove the jammed paper C Carefully remove the jammed paper D Open the rear cover Basic Guide Basic Troubleshooting 23 ...

Page 26: ...ument cover is open C Remove all of the paper inside including any torn pieces cImportant Do not touch the flat white cable connected to the cartridge holder D Close the scanner unit slowly Note for WF 7610 Series WF 7620 Series If there are still some torn pieces of paper inside the productevenafterclearingthepaperjam followthesteps below to remove them Setup Maintenance Remove Paper Basic Guide ...

Page 27: ...e cover C Remove the jammed paper from the cassette D Carefully remove any paper jammed inside the product E Align the edges of the paper F For WF 7610 Series 7620 Series Put the paper cassette cover back on G Keep the cassette flat and slowly and carefully reinsert it all the way into the product Basic Guide Basic Troubleshooting 25 ...

Page 28: ...cover For WF 3620 Series WF 3640 Series Open the ADF cover cImportant Makesure youopentheADF coverbeforeremoving jammed paper If you do not open the cover the product may be damaged C Carefully remove the jammed paper D Open the document cover E Carefully remove the jammed paper F Close the document cover and ADF cover G Raise the ADF input tray Basic Guide Basic Troubleshooting 26 ...

Page 29: ...stem Administration Fax Settings Check Fax Connection Checktheerrorcodedisplayedforthefailedfaxjob and then see the following section for the solution Error Code on the Status Menu on page 19 If the product is not connected to a phone and you want to receive faxes automatically make sure you set Receive Mode to Auto If you connected the product to a DSL phone line you must install a DSL filter on ...

Page 30: ...need further help visit the Epson support website shown below Select your country or region and go to the support section of your local Epson website The latest drivers FAQs manuals or other downloadables are also available from the site http support epson net http www epson eu Support Europe IfyourEpsonproductisnotoperatingproperly andyou cannot solve the problem contact Epson support services fo...

Page 31: ...on Corporation shall not be liable for any damages or problems arising from the use of any options or any consumable products other than those designated as Original Epson Products or Epson Approved Products by Seiko Epson Corporation Seiko Epson Corporation shall not be held liable for any damage resulting from electromagnetic interference that occurs from the use of any interface cables other th...

Page 32: ... 2013 Seiko Epson Corporation All rights reserved Printed in XXXXXX ...

Reviews: