background image

WF-B4023 User's Guide

Summary of Contents for WF-B4023

Page 1: ...WF B4023 User s Guide ...

Page 2: ......

Page 3: ...Multipurpose Tray 20 Loading Envelopes 23 Paper Loading Capacity 26 Available Epson Papers 27 Paper or Media Type Settings 29 Setting the Paper Size for Each Source 29 Setting the Paper Size for Each Source Windows 30 Printing From a Computer 33 Printing with Windows 33 Selecting Basic Print Settings Windows 33 Paper Source Options Windows 35 Print Quality Options Windows 36 Multi Page Printing Op...

Page 4: ...Print Head Maintenance 53 Print Head Nozzle Check 53 Checking the Nozzles Using the Printer Buttons 53 Checking the Nozzles Using the Product Software 55 Print Head Cleaning 56 Cleaning the Print Head Using the Printer Buttons 56 Cleaning the Print Head Using the Product Software 57 Ink Tube Flushing 59 Flushing the Ink Tubes Using the Product Software 59 Print Head Alignment 59 Aligning the Print...

Page 5: ...se When Product Sits for a While 79 Product Icon Does Not Appear in Windows Taskbar 79 Printing is Slow 80 Solving Page Layout and Content Problems 81 Inverted Image 81 Too Many Copies Print 81 Blank Pages Print 82 Incorrect Margins on Printout 82 Incorrect Characters Print 83 Incorrect Image Size or Position 83 Solving Print Quality Problems 84 White or Dark Lines in Printout 84 Blurry or Smeared...

Page 6: ...cations 94 Network Interface Specifications 95 Safety and Approvals Specifications 95 Notices 97 General Printer Safety Instructions 97 Ink Pack Safety Instructions 98 Wireless Connection Safety Instructions 99 FCC Compliance Statement 99 Software Notices 100 Trademarks 104 Copyright Notice 105 A Note Concerning Responsible Use of Copyrighted Materials 105 Default Delay Times for Power Management ...

Page 7: ...WF B4023 User s Guide Welcome to the WF B4023 User s Guide 7 ...

Page 8: ...e the same Note The illustrations do not show the ink tanks Printer Parts Locations The Power Off Timer Using the Epson iPrint Mobile App Cleaning the Product Printer Parts Locations See these sections to identify the parts on your printer Printer Parts Top Printer Parts Back Printer Parts Inside Printer Parts Control Panel Buttons and Lights Parent topic Product Basics 8 ...

Page 9: ... Parts Top 1 Edge guides on paper cassette 2 Paper stopper 3 Output tray extension 4 Output tray 5 Edge guides on rear MP tray 6 Rear MP multipurpose tray 7 Feeder guard Parent topic Printer Parts Locations 9 ...

Page 10: ...Printer Parts Back 1 USB port 2 Ethernet LAN port 3 Maintenance box 4 Duplexer rear unit 5 AC inlet Parent topic Printer Parts Locations 10 ...

Page 11: ...Printer Parts Inside 1 Ink system 2 Front cover 3 Print head Parent topic Printer Parts Locations Printer Parts Control Panel Buttons and Lights 11 ...

Page 12: ...f time after it enters sleep mode You can adjust the time period before power off but increasing the time reduces the product s energy efficiency Changing the Power Off Timer Setting Windows Parent topic Product Basics Changing the Power Off Timer Setting Windows You can use the printer software to change the time period before the printer turns off automatically 1 Do one of the following Windows ...

Page 13: ...ngs You see the Printer Settings window 3 Select the time period you want as the Power Off Timer setting 4 Click Apply 5 When you see the confirmation message click Yes then close the Printer Settings window Parent topic The Power Off Timer Using the Epson iPrint Mobile App Use this free Apple and Android app to print to nearby Epson networked products The Epson iPrint Mobile App lets you print PD...

Page 14: ...asics Cleaning the Product To keep your product working at its best you should clean it several times a year Caution Do not use a hard brush benzene alcohol or paint thinner to clean the product or you may damage it Do not place anything on top of the cover or use the cover as a writing surface or it could get permanently scratched Do not use oil or other lubricants inside the product or let water...

Page 15: ... Tray Loading Envelopes Paper Loading Capacity Available Epson Papers Paper or Media Type Settings Setting the Paper Size for Each Source Loading Paper in the Cassette You can load Letter 8 5 11 inches 216 279 mm A4 8 3 11 7 inches 210 297 mm and Legal 8 5 14 inches 216 357 mm plain paper in the paper cassette 1 Close the output tray if necessary 15 ...

Page 16: ...2 Pull out the paper cassette 3 Slide the edge guides outward Note If you are using legal size paper squeeze the tab to extend the paper cassette 16 ...

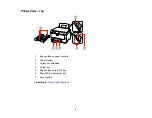
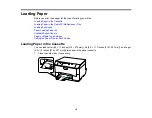
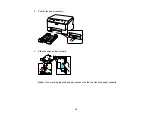
Page 17: ...4 Load a stack of paper printable side down in the cassette as shown 17 ...

Page 18: ...5 Slide the edge guides against the paper but not too tightly Note Make sure the paper fits beneath the top edges of the guide and is not sticking out from the end of the cassette 18 ...

Page 19: ...load too much paper in the cassette 6 Gently replace the paper cassette 7 Extend the output tray and open the paper stopper Note If you are using legal size or longer paper do not open the paper stopper Do not remove or insert the paper cassette during printing 19 ...

Page 20: ...er in the Rear MP Multipurpose Tray Loading Envelopes Loading Paper in the Rear MP Multipurpose Tray You can print documents on a variety of paper types and sizes 1 Extend the output tray and open the paper stopper Note If you are using legal size or longer paper do not open the paper stopper 20 ...

Page 21: ...2 Pull up the rear MP tray 3 Flip the feeder guard forward then slide the edge guides outward 21 ...

Page 22: ...ke sure you do not load too much paper in the tray 5 Slide the edge guides against the paper but not too tightly Always follow these paper loading guidelines Load only the recommended number of sheets Load paper short edge first no matter which way your document faces Load letterhead or pre printed paper top edge first Do not load paper above the arrow mark inside the edge guides Check the paper p...

Page 23: ... 5 14 inches 216 357 mm The holes must be within 0 74 inch 19 mm of the left edge of the page Parent topic Loading Paper Related references Paper Loading Capacity Related tasks Loading Paper in the Cassette Loading Envelopes Loading Envelopes You can print on plain paper envelopes in this size No 10 4 1 9 5 inches 105 241 mm 1 Extend the output tray and open the paper stopper 23 ...

Page 24: ...2 Pull up the rear MP tray 3 Flip the feeder guard forward then slide the edge guides outward 24 ...

Page 25: ...ouble loading a stack of envelopes press each envelope flat before loading it or load one envelope at a time If print quality declines when printing multiple envelopes try loading one envelope at a time Do not load envelopes that are curled folded or too thin Parent topic Loading Paper Related references Paper Loading Capacity Related tasks Loading Paper in the Cassette Loading Paper in the Rear M...

Page 26: ...nches 216 279 mm 250 sheets 1 sheet Legal 8 5 14 inches 216 357 mm Epson Bright White Paper 200 sheets 50 sheets 20 sheets for manual two sided printing Epson Presentation Paper Matte 80 sheets Thick paper cardstock up to 68 lb 10 sheets Letter 8 5 11 inches 216 279 mm and A4 8 3 11 7 inches 210 297 mm 5 sheets for manual two sided printing 26 ...

Page 27: ...pson Premium Photo Paper Semi gloss Envelopes 10 envelopes Parent topic Loading Paper Available Epson Papers You can purchase genuine Epson ink and paper at Epson Supplies Central at www epson com ink3 U S sales or www epson ca Canadian sales You can also purchase supplies from an Epson authorized reseller To find the nearest one call 800 GO EPSON 800 463 7766 Paper Type Size Part number Sheet cou...

Page 28: ...entation Letter 8 5 11 inches S041341 50 Paper Matte 216 279 mm Epson Photo Paper Glossy 4 6 inches 102 152 mm S041809 50 S042038 100 Letter 8 5 11 inches S041141 20 216 279 mm S041649 50 S041271 100 Epson Premium Photo Paper 4 6 inches 102 152 mm S041808 40 Glossy S041727 100 5 7 inches 127 178 mm S041464 20 8 10 inches 203 254 mm S041465 20 Letter 8 5 11 inches S042183 25 216 279 mm S041667 50 E...

Page 29: ...on Paper Matte Double sided Epson Ultra Premium Presentation Paper Matte Epson Brochure Flyer Paper Matte Double sided Epson Ultra Premium Photo Paper Glossy Ultra Premium Photo Paper Glossy Epson Premium Photo Paper Glossy Premium Photo Paper Glossy Epson Photo Paper Glossy Photo Paper Glossy Epson Premium Photo Paper Semi gloss Premium Photo Paper Semi Gloss Envelopes Envelope Cardstock up to 68...

Page 30: ...lect Printer properties Windows Vista Click and select Control Panel Click Printer under Hardware and Sound right click your product name and select Properties Windows XP Click Start and select Printers and Faxes Or open the Control Panel select Printers and Other Hardware if necessary and select Printers and Faxes Right click your product name and select Properties 2 Click the Optional Settings t...

Page 31: ... Cassette 2 5 If you want the printer software to warn you if you try to print with the wrong paper size select the Paper Size Notice checkbox Note If you turn on Paper Size Notice the printer will prevent you from printing with the wrong paper size settings If you turn this option off and you try to print with the wrong settings the printer will print even if the image size exceeds the printable ...

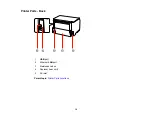
Page 32: ...8 Close the Printer Settings window Parent topic Setting the Paper Size for Each Source 32 ...

Page 33: ... Printing Your Document or Photo Windows Selecting Default Print Settings Windows Parent topic Printing From a Computer Selecting Basic Print Settings Windows Select the basic settings for the document or photo you want to print 1 Open a photo or document for printing 2 Select the print command in your application Note You may need to select a print icon on your screen the Print option in the File...

Page 34: ...tting Note You can also select the User Defined setting to create a custom paper size 6 Select the orientation of your document Note If you are printing an envelope select Landscape 7 Select the type of paper you loaded as the Paper Type setting Note Check the paper type settings list for details 8 Select the Quality setting that matches the print quality you want to use 34 ...

Page 35: ...at can be modified and combined with other print jobs select Job Arranger Lite 15 To reduce noise during printing when you select Plain Paper Bright White PaperPlain Paper Bright White Paper select Quiet Mode Paper Source Options Windows Print Quality Options Windows Multi Page Printing Options Windows Parent topic Printing with Windows Related references Paper or Media Type Settings Related tasks...

Page 36: ...st print speed Parent topic Selecting Basic Print Settings Windows Multi Page Printing Options Windows You can select any of the available options in the Multi Page menu to set up your multi page print job 2 Up and 4 Up Prints 2 or 4 pages on one sheet of paper Click the Page Order button to select page layout and border options 2 1 Poster 2 2 Poster 3 3 Poster 4 4 Poster Prints one image on multi...

Page 37: ...checkbox is not automatically selected do one of the following Select the Auto checkbox to automatically print your double sided print job Deselect the Auto checkbox to print your double sided print job manually by printing one side and flipping the paper over to print the other side recommended for paper types that do not support automatic duplexing 3 Click the Settings button You see this window...

Page 38: ...4 Select the double sided printing options you want to use 5 Click OK to return to the Main tab 6 Click the Print Density button You see this window 38 ...

Page 39: ...ouble sided Printing Options Windows Print Density Adjustments Windows Parent topic Printing with Windows Double sided Printing Options Windows You can select any of the available options on the 2 Sided Printing Settings window to set up your double sided print job Binding Edge Options Select a setting that orients double sided print binding in the desired direction Binding Margin Options Select o...

Page 40: ...age for double sided printing Increased Ink Drying Time Sets the amount of time required for drying ink after printing on one side of the paper before printing the other side in double sided printing to prevent ink smearing Parent topic Selecting Double sided Printing Settings Windows Selecting Additional Layout and Print Options Windows You can select a variety of additional layout and printing o...

Page 41: ... options Select Automatic to automatically adjust the sharpness brightness contrast and color saturation for your image Select Custom and click the Advanced button to manually adjust the color correction settings or turn off color management in your printer software 3 To add a watermark to your printout select Watermark settings 4 Select any of the Additional Settings options to customize your pri...

Page 42: ...Fix Photo uses a sophisticated face recognition technology to optimize photos that include faces For this to work both eyes and the nose must be visible in the subject s face If your photo includes a face with an intentional color cast such as a statue you may want to turn off Fix Photo to retain the special color effects ICM Lets you manage color using installed color printing profiles No Color A...

Page 43: ...ror Image Flips the printed image left to right Edge Smoothing Smooths jagged edges in low resolution images such as screen captures or images from the Web Fix Red Eye Reduces or removes red eye in photos Parent topic Selecting Additional Layout and Print Options Windows Selecting a Printing Preset Windows For quick access to common groups of print settings you can select a printing preset on the ...

Page 44: ...n to control your printing presets 4 To choose an option for printing select it 5 Click OK Parent topic Printing with Windows Printing Your Document or Photo Windows Once you have selected your print settings you are ready to save your settings and print 1 Click OK to save your settings You see your application s Print window such as this one 44 ...

Page 45: ...print settings in a program the changes apply only while you are printing in that program session If you want to change the print settings you use in all your Windows programs you can select new default print settings 1 Right click the product icon in the Windows taskbar 2 Select Printer Settings You see the printer settings window 45 ...

Page 46: ...or printing You can still change them as needed for printing in any program session Parent topic Printing with Windows Cancelling Printing Using a Product Button If you need to cancel a print job you can press the cancel button on your product Then cancel the print job in your print queue if necessary Parent topic Printing From a Computer 46 ...

Page 47: ... when ink is low or expended or when the maintenance box needs to be replaced Checking Ink and Maintenance Box Status Lights Checking Ink and Maintenance Box Status With Windows Parent topic Replacing Ink and Maintenance Boxes Checking Ink and Maintenance Box Status Lights You can check the status of your ink and maintenance box by checking the lights on your product 1 The maintenance box light 2 ...

Page 48: ... Maintenance Box Status With Windows A low ink reminder appears if you try to print when ink is low and you can check your ink or maintenance box status at any time using a utility on your Windows computer 1 To check your status double click the product icon in the Windows taskbar then click Details You see this window 2 Replace or reinstall the maintenance box as indicated on the screen Contact E...

Page 49: ...e product icon in the Windows taskbar and select Monitoring Preferences You see this window 4 Deselect the See Low Ink Reminder alerts checkbox at the bottom of the screen 5 To disable promotional offers deselect the Display Epson Offers checkbox 49 ...

Page 50: ...aintenance box before you begin Caution Do not reuse a maintenance box that has been removed and left uninstalled for more than a week Keep the maintenance box away from direct sunlight 1 Make sure the product is not printing 2 Remove the new maintenance box from its package Caution Do not touch the green chip on the maintenance box 3 Press the buttons on the sides of the duplexer rear unit and re...

Page 51: ...oroughly with soap and water If ink gets into your eyes flush them immediately with water If ink gets into your mouth spit it out and see a doctor right away Keep the maintenance box out of the reach of children and do not drink the ink 5 Place the used maintenance box in the plastic bag that came with the new maintenance box Seal the bag and dispose of it carefully 51 ...

Page 52: ...6 Insert the new maintenance box into the holder and push it all the way in 7 Press the buttons on the sides of the duplexer rear unit and reattach it Parent topic Replacing Ink and Maintenance Boxes 52 ...

Page 53: ...you clean them so you don t clean them unnecessarily Note You cannot clean the print head if ink is expended and may not be able to clean it when ink is low You must have the ink refilled first Print Head Nozzle Check Print Head Cleaning Ink Tube Flushing Parent topic Adjusting Print Quality Related topics Replacing Ink and Maintenance Boxes Print Head Nozzle Check You can print a nozzle check pat...

Page 54: ... flash then release the buttons 4 Check the printed pattern to see if there are gaps in the lines Print head is clean Print head needs cleaning 5 If there are no gaps the print head is clean and you can continue printing If there are gaps or the pattern is faint clean the print head Parent topic Print Head Nozzle Check Related topics Replacing Ink and Maintenance Boxes 54 ...

Page 55: ... computer 1 Make sure no product lights are indicating errors 2 Load a few sheets of plain paper in the product 3 Right click the product icon in the Windows taskbar 4 Select Nozzle Check You see a window like this 5 Click Print 6 Check the printed pattern to see if there are gaps in the lines Print head is clean 55 ...

Page 56: ...clogged nozzles you can clean the print head Note You cannot clean the print head if ink is expended and may not be able to clean it when ink is low You must have the ink refilled first Cleaning the Print Head Using the Printer Buttons Cleaning the Print Head Using the Product Software Parent topic Print Head Maintenance Related topics Replacing Ink and Maintenance Boxes Cleaning the Print Head Us...

Page 57: ...cycle or you may damage it 4 Run a nozzle check to confirm that the print head is clean If you don t see any improvement after cleaning the print head up to 4 times turn off the product and wait at least 6 hours Then try cleaning the print head again If the quality still does not improve flush the ink tubes Parent topic Print Head Cleaning Related concepts Ink Tube Flushing Related topics Replacin...

Page 58: ... stops flashing and remains on you can check to see if the nozzles are clean click Print Nozzle Check Pattern and click Print 7 Check the printed pattern to see if there are gaps in the lines Print head is clean Print head needs cleaning If there are no gaps click Finish If there are gaps or the pattern is faint click Clean to clean the print head again If you don t see any improvement after clean...

Page 59: ...nk tubes Before you begin make sure there are no warnings or errors indicated by the product control panel 1 Right click the product icon in the Windows taskbar and select Ink Change Then select Power Ink Flushing 2 Follow the on screen instructions to flush the ink tubes 3 When you finish flushing the ink tubes run a nozzle check to check the print quality If necessary also clean the print head I...

Page 60: ...duct Software You can align the print head using a utility on your Windows computer 1 Make sure no product lights are indicating errors 2 Load a few sheets of plain paper in the product 3 Right click the product icon in the Windows taskbar 4 Select Print Head Alignment 5 Click Next then click Print to print an alignment sheet Note Do not cancel printing while you are printing a head alignment patt...

Page 61: ...e sets choose the closest one in each set and click Realignment Then print another alignment sheet and check it Note Click Skip where available if you want to skip a particular alignment sheet 7 When you are done click Finish Parent topic Print Head Alignment Cleaning the Paper Path If you see ink on the back of a printout you can clean the paper path to remove any excess ink 1 Load a few sheets o...

Page 62: ...2 Press the paper feed button to load and eject paper 3 Repeat as necessary until the paper comes out clean Parent topic Adjusting Print Quality 62 ...

Page 63: ...ving Network Problems Solving Paper Problems Solving Problems Printing from a Computer Solving Page Layout and Content Problems Solving Print Quality Problems When to Uninstall Your Product Software Where to Get Help Printer Light Status You can often diagnose problems with your printer by checking the printer lights Lights 1 power 2 WiFi 3 maintenance box 4 paper 63 ...

Page 64: ...me to clear the error then install or replace the maintenance box The maintenance box light is flashing The maintenance box is near the end of its service life Make sure you have a replacement maintenance box Paper may be out Load more paper in The paper light is on the cassette or rear MP tray and press the paper feed button to continue If multiple sheets have fed press the paper feed button to e...

Page 65: ... the cassette inside the printer and in the duplexer to remove the jammed paper Turn the printer off and then back on again If the error does not clear contact Epson The firmware update has failed and the The yellow ink out light is flashing printer is in recovery mode Contact Epson for instructions on repeating the firmware update Parent topic Solving Problems Related references Paper Jam Problem...

Page 66: ... printer is operating properly Any printing problem you may have could be caused by your computer cable software or selected print settings Check the other solutions in this section or try uninstalling and reinstalling your printer software If the page prints but the nozzle check pattern has gaps clean or align the print head If the page does not print the printer may have a problem Check the othe...

Page 67: ...rocess has not finished after 15 minutes turn off your product Turn it back on and check to see if charging is still in progress If it is still in progress contact Epson for help Make sure the ink tube locks are open and the cap is properly installed Parent topic Solving Setup Problems Software Installation Problems If you have problems while installing the product software try these solutions Mak...

Page 68: ... or access point Check to see if access restrictions such as MAC address filtering are set on the router or access point If access restrictions are set add your product s MAC address to your router s address list To obtain your product s MAC address print a network status sheet Then follow the instructions in your router or access point documentation to add the address to the list If your router o...

Page 69: ...D that came with your product If you have replaced your router reinstall your product software to connect to the new router Parent topic Solving Network Problems Related concepts When to Uninstall Your Product Software Cannot Print Over a Network If you cannot print over a network try these solutions Make sure that your product is turned on Make sure you install your product s network software as ...

Page 70: ...can print a network status sheet to help you determine the causes of any problems you may have using your product on a network To print the status sheet press the network status button on the product Examine the settings shown on the network status sheet to diagnose any problems you have Parent topic Solving Network Problems Solving Paper Problems Check these sections if you have problems using pa...

Page 71: ...ased old too thin or too thick Load paper in the cassette printable side down Follow any special loading instructions that came with the paper Parent topic Solving Paper Problems Related references Paper Jam Problems Inside the Product Paper Jam Problems in the Cassette Paper Jam Problems in the Duplexer Paper Loading Capacity Related topics Loading Paper Paper Jam Problems Inside the Product If p...

Page 72: ... front cover 5 If any jammed paper remains near the output tray carefully remove it 6 Press the paper feed button to resume printing Parent topic Solving Paper Problems Related references Paper Jam Problems in the Cassette Paper Jam Problems in the Duplexer 72 ...

Page 73: ...he Cassette If paper has jammed in the cassette try this solution 1 Close the output tray 2 Pull out the paper cassette 3 Remove any jammed paper inside the cassette 4 Remove any paper jammed inside the paper cassette slot 73 ...

Page 74: ...5 Carefully follow all paper loading instructions when you load new paper 6 Replace the paper cassette 74 ...

Page 75: ...oblems Inside the Product Paper Jam Problems in the Duplexer Paper Jam Problems in the Duplexer If paper has jammed in the duplexer rear unit try these solutions 1 Cancel the print job from your computer if necessary 2 Press the buttons on the sides of the duplexer and remove it 3 Carefully remove the jammed paper 75 ...

Page 76: ...4 If paper is jammed in the duplexer remove the paper as shown 5 Press the buttons on the duplexer as you press it into place on your product 76 ...

Page 77: ... Cancel printing using the product control panel then press the button to eject the paper Remove any paper remaining in the product Select the correct size when you reprint If paper is wrinkled when it ejects it may be damp or too thin Load new paper and be sure to select the correct paper type setting in your printer software when you reprint Parent topic Solving Paper Problems Related references...

Page 78: ...page prints If the test page prints check to see if your product software is installed correctly In Windows make sure your product is selected as the default printer In Windows clear any stalled print jobs from the Windows Spooler Windows 8 Navigate to the Start screen right click the screen and select All apps Select Control Panel Hardware and Sound Devices and Printers Right click your product n...

Page 79: ... the product in all directions Parent topic Solving Problems Printing from a Computer Noise When Product Sits for a While Your product is performing routine maintenance This is normal Parent topic Solving Problems Printing from a Computer Product Icon Does Not Appear in Windows Taskbar If you do not see your product icon in the Windows taskbar first try restarting your computer If that does not wo...

Page 80: ... print If your product is connected to a USB hub connect it directly to your computer instead If printing becomes slower after printing continuously for a long time the product may have automatically slowed down to protect the print mechanism from overheating or becoming damaged Let the product rest with the power on for 30 minutes then try printing again For the fastest printing select the follow...

Page 81: ...y these solutions Turn off any mirror or inversion settings in your printing application Turn off the Mirror Image Flip horizontally or Reverse page orientation settings in your printer software This option has different names depending on your operating system version Note Leave these options turned on when you print on Epson Iron on Cool Peel Transfer paper if available for your product Parent t...

Page 82: ... program Parent topic Solving Page Layout and Content Problems Related concepts Print Head Nozzle Check Print Head Cleaning Related tasks Selecting Basic Print Settings Windows Incorrect Margins on Printout If your printed page has incorrect margins try these solutions Make sure you selected the correct paper size settings in your printing program and printer software Make sure you selected the co...

Page 83: ...ck the stalled print job click Cancel and click Yes Windows XP Click Start and select Printers and Faxes Or open the Control Panel select Printers and Other Hardware if necessary and select Printers and Faxes Right click your product name select Open right click the stalled print job click Cancel and click Yes Make sure your product is selected as the printer in your printing program If your produ...

Page 84: ...eck to see if any of the print head nozzles are clogged Then clean the print head if necessary Make sure the paper type setting matches the type of paper you loaded Make sure you loaded the printable side of the paper correctly for your product Turn off any high speed settings in your product software Use the Maintenance option in your product software to align the print head You may need to have ...

Page 85: ...n your product software If you print on both sides of a sheet of paper smudges may appear on the reverse side of heavily saturated or dark images If one side of a sheet will contain a lighter image or text print that side first Run a nozzle check to see if any of the print head nozzles are clogged Then clean the print head if necessary Align the print head Clean the paper path Note Your product wi...

Page 86: ...ty Problems Related concepts Print Head Cleaning Related tasks Selecting Basic Print Settings Windows Cleaning the Paper Path Grainy Printout If your printouts are grainy try these solutions Make sure you loaded the printable side of the paper correctly for your product Select a higher print quality setting and turn off any high speed settings in your product software Run a nozzle check to see if ...

Page 87: ... you can use a color management system to get as close as possible Try using the color management options in your printer software For best results use genuine Epson ink and paper Parent topic Solving Print Quality Problems Related concepts Print Head Cleaning Related references Available Epson Papers Related tasks Selecting Additional Layout and Print Options Windows Related topics Replacing Ink ...

Page 88: ...e following Windows 8 Navigate to the Start screen right click the screen and select All apps Select Control Panel Programs Programs and Features Select the uninstall option for your Epson product then select Uninstall Change Note If you see a User Account Control window click Yes or Continue Select your product again if necessary then select OK and click Yes to confirm the uninstallation Windows ...

Page 89: ...ou need to contact Epson for technical support services call 888 201 4696 Before you call Epson for support please have the following information ready Product name Product serial number located on a label on the product Computer configuration Description of the problem Then call 888 201 4696 7 AM to 5 PM Pacific Time Monday through Friday Parent topic Solving Problems 89 ...

Page 90: ...ifications Electrical Specifications Environmental Specifications Interface Specifications Network Interface Specifications Safety and Approvals Specifications Windows System Requirements To use your product and its software your computer should use one of these Microsoft operating systems Windows 8 Windows 7 Windows Vista Windows XP Professional x64 Edition Windows XP SP3 Windows Server 2008R2 Wi...

Page 91: ...lar brand or type of paper may be changed by the manufacturer at any time Epson cannot guarantee the quality of any non Epson brand or type of paper Always test a sample of paper stock before purchasing large quantities or printing large jobs Single sheets Size A4 8 3 11 7 inches 210 297 mm A6 4 1 5 8 inches 105 148 mm Letter 8 5 11 inches 216 279 mm Legal 8 5 14 inches 216 357 mm 4 6 inches 102 1...

Page 92: ...nch 19 mm of the left edge of the page Envelopes Size No 10 4 1 9 5 inches 105 241 mm Paper types Plain paper Weight 20 lb 75 g m2 to 24 lb 90 g m2 Parent topic Technical Specifications Printable Area Specifications Note When printing borderless quality may decline in the expanded printable area Single sheets 1 Top 0 12 inch 3 mm minimum 2 Left 0 12 inch 3 mm minimum 3 Right 0 12 inch 3 mm minimum...

Page 93: ...79 inch 20 mm minimum Parent topic Technical Specifications Dimension Specifications Note Dimensions do not include the ink tank Height Stored 11 2 inches 284 mm Printing 15 1 inches 383 mm Width Stored 18 1 inches 460 mm Printing 18 1 inches 460 mm Depth Stored 16 5 inches 420 mm Printing 25 7 inches 654 mm 93 ...

Page 94: ... consumption Printing 23 W ISO IEC24712 Approximate Ready mode 6 0 W Sleep mode 3 0 W Power off mode 0 3 W Parent topic Technical Specifications Environmental Specifications Temperature Operating 50 to 95 ºF 10 to 35 ºC Storage 4 to 104 ºF 20 to 40 ºC 1 month at 104 ºF 40 ºC Humidity Operating 20 to 80 RH non condensing Storage 5 to 85 RH Parent topic Technical Specifications Interface Specificati...

Page 95: ...ty UL60950 1 EMC FCC part 15 Subpart B Class B Canada Safety CAN CSA C22 2 No 60950 1 EMC CAN CSA CEI IEC CISPR 22 Class B This equipment contains the following wireless module Manufacturer Marvell Semiconductor Inc Type SP88W8786 MD0 2C2T00 This product conforms to Part 15 of FCC Rules and RSS 210 of the IC Rules Epson cannot accept responsibility for any failure to satisfy the protection require...

Page 96: ...icensed service this device is intended to be operated indoors and away from windows to provide maximum shielding Equipment or its transmit antenna that is installed outdoors is subject to licensing Parent topic Technical Specifications 96 ...

Page 97: ... system that regularly switches on and off or on an outlet controlled by a wall switch or timer Do not let the power cord become damaged or frayed If you use an extension cord with the printer make sure the total ampere rating of the devices plugged into the extension cord does not exceed the cord s ampere rating Also make sure the total ampere rating of all devices plugged into the wall outlet do...

Page 98: ...vice the printer yourself Unplug the printer and refer servicing to qualified service personnel under the following conditions if the power cord or plug is damaged if liquid has entered the product if the product has been dropped or the case damaged if the product does not operate normally or exhibits a distinct change in performance Adjust only those controls that are covered by the operating ins...

Page 99: ...al facility Within 8 7 inches 22 cm of a cardiac pacemaker Near automatically controlled devices such as automatic doors or fire alarms Parent topic General Printer Safety Instructions FCC Compliance Statement For United States Users This equipment has been tested and found to comply with the limits for a Class B digital device pursuant to Part 15 of the FCC Rules These limits are designed to prov...

Page 100: ...xigences du Règlement sur le materiel brouilleur du Canada Parent topic Notices Software Notices 1 This printer product includes open source software programs listed in Section 6 according to the license terms of each open source software program 2 We provide the source code of the GPL Programs LGPL Programs and Apple Public Source License Programs each is defined in Section 6 until five 5 years a...

Page 101: ... 2 or later version GPL Programs The list of GPL Programs busybox_1 7 2 coreutils_5 2 1 debianutils_2 6 2 dpkg_1 10 18 hostname_2 10 ifupdown_0 6 4 inetutils ftpd_1 4 2 initscripts_2 85 libc6_2 3 6 libgcc1_4 1 1 login_4 0 3 module init tools 1 60 9 net tools_1 60 netbase_4 14 procps_3 1 14 sysvinit 2 85 telnetd_0 17 21 udhcp 0 9 8cvs20050124 5 util linux 2 12 GNU LGPL This printer product includes...

Page 102: ...ware program Net SNMP which applies the terms and conditions provided by owner of the copyright to the Net SNMP OpenSSL License Original SSLeay License This printer product includes t he open source software program OpenSSL toolkit which applies the license terms of OpenSSL License and Original SSLeay License BSD License Berkeley Software Distribution License This printer product includes the open...

Page 103: ... list of glibc Programs libc6_2 3 6 TCP Wrappers license This printer product includes the open source software program TCP Wrappers which applies the terms and conditions provided by owner of the copyright to the TCP Wrappers TCP Wrappers Program libwrap0_7 6 libncurses license This printer product includes the open source software program libncurses which applies the terms and conditions provide...

Page 104: ... Program login_4 0 3 telnetd license This printer product includes the open source software program telnetd which applies the terms and conditions provided by owner of the copyright to the telnetd telnetd Program telnetd_0 17 21 Parent topic Notices Trademarks EPSON is a registered trademark and EPSON Exceed Your Vision is a registered logomark of Seiko Epson Corporation Epson iPrintTM is a tradem...

Page 105: ...ginal Epson Products or Epson Approved Products by Seiko Epson Corporation Seiko Epson Corporation shall not be held liable for any damage resulting from electromagnetic interference that occurs from the use of any interface cables other than those designated as Epson approved Products by Seiko Epson Corporation This information is subject to change without notice A Note Concerning Responsible Use...

Page 106: ...Parent topic Copyright Notice Copyright Attribution 2013 Epson America Inc 5 13 CPD 39444 Parent topic Copyright Notice 106 ...

Reviews: