background image

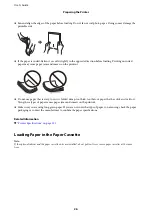
Fan and align the edges of the paper before loading. Do not fan or curl photo paper. Doing so may damage the
printable side.

If the paper is curled, flatten it or curl it slightly in the opposite direction before loading. Printing on curled
paper may cause paper jams and smears on the printout.

Do not use paper that is wavy, torn, cut, folded, damp, too thick, too thin, or paper that has stickers stuck to it.
Using these types of paper causes paper jams and smears on the printout.

Make sure you are using long-grain paper. If you are not sure what type of paper you are using, check the paper
packaging or contact the manufacturer to confirm the paper specifications.

Related Information

&

“Printer Specifications” on page 131

Loading Paper in the Paper Cassette

Note:

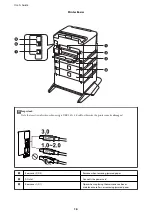
If the optional cabinet and the paper cassette units are installed, do not pull out two or more paper cassettes at the same
time.

User's Guide

Preparing the Printer

26

Summary of Contents for WorkForce Pro WF-C8190DTWC

Page 1: ...User s Guide NPD5899 02 EN ...

Page 2: ...uage 41 Menu Options for Printer Status Print 41 Saving Power 41 Saving Power Control Panel 41 Printing Printing from the Printer Driver on Windows 43 Accessing the Printer Driver 43 Printing Basics 43 Printing on 2 Sides 45 Printing Several Pages on One Sheet 46 Printing and Stacking in Page Order Reverse Order Printing 47 Printing a Reduced or Enlarged Document 47 Printing One Image on Multiple ...

Page 3: ...blems Paper Cassette 102 Network Service and Software Information Application for Configuring Printer Operations Web Config 103 Running Web Config on a Web Browser 103 Running Web Config on Windows 104 Running Web Config on Mac OS 104 Application for Printing Web Pages E Web Print 104 Software Update Tools Software Updater 105 Installing the Latest Applications 105 Installing a PostScript Printer ...

Page 4: ...inter Does Not Print Correctly While Using PostScript Printer Driver 129 Print Quality Is Poor While Using PostScript Printer Driver 129 Printing Is Too Slow While Using PostScript Printer Driver 129 Other Problems 129 Slight Electric Shock when Touching the Printer 129 Operation Sounds Are Loud 129 Forgot Your Password 130 Application Is Blocked by a Firewall for Windows Only 130 Appendix Technic...

Page 5: ...nt and printer settings You can obtain the latest versions of the above manuals with the following methods Paper manual Visit the Epson Europe support website at http www epson eu Support or the Epson worldwide support website at http support epson net Digital manual Start EPSON Software Updater on your computer EPSON Software Updater checks for available updates of Epson software applications and...

Page 6: ...turn to the previous page perform the following operation on your keyboard Windows Hold down Alt and then press Mac OS Hold down the command key and then press Printing only the pages you need You can extract and print only the pages you need Click Print in the File menu and then specify the pages you want to print in Pages in Pages to Print To specify a series of pages enter a hyphen between the ...

Page 7: ...g on the model and settings Operating System References Windows In this manual terms such as Windows 10 Windows 8 1 Windows 8 Windows 7 Windows Vista Windows XP Windows Server 2016 Windows Server 2012 R2 Windows Server 2012 Windows Server 2008 R2 Windows Server 2008 Windows Server 2003 R2 and Windows Server 2003 refer to the following operating systems Additionally Windows is used to refer to all ...

Page 8: ...oft Windows Server 2003 R2 operating system Microsoft Windows Server 2003 operating system Mac OS In this manual Mac OS is used to refer to macOS High Sierra macOS Sierra OS X El Capitan OS X Yosemite OS X Mavericks OS X Mountain Lion Mac OS X v10 7 x and Mac OS X v10 6 8 User s Guide About This Manual 8 ...

Page 9: ...e personnel under the following conditions The power cord or plug is damaged liquid has entered the printer the printer has been dropped or the casing damaged the printer does not operate normally or exhibits a distinct change in performance Do not adjust controls that are not covered by the operating instructions Place the printer near a wall outlet where the plug can be easily unplugged Do not p...

Page 10: ...shake ink cartridges too vigorously otherwise ink may leak from the cartridge Keep ink cartridges and maintenance box out of the reach of children Printer Advisories and Warnings Read and follow these instructions to avoid damaging the printer or your property Make sure you keep this manual for future reference Advisories and Warnings for Setting Up Using the Printer Do not block or cover the vent...

Page 11: ...e paper to be fully ejected Avoid places subject to rapid changes in temperature and humidity Also keep the printer away from direct sunlight strong light or heat sources Do not insert objects through the slots in the printer Do not put your hand inside the printer during printing Do not touch the white flat cable inside the printer Do not use aerosol products that contain flammable gases inside o...

Page 12: ...pecified printer and paper cassette unit Do not climb on the cabinet or place heavy object on it Make absolutely sure both stands are attached securely otherwise the printer may fall Secure the printer or the optional paper cassette unit to the cabinet using the two attachments and screws supplied with the cabinet When using the printer make sure you lock the casters at the front of the cabinet Do...

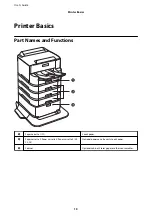
Page 13: ...tions A Paper cassette 1 C1 Loads paper B Paper cassette 2 Paper cassette 3 Paper cassette 4 C2 C3 C4 Optional paper cassette units Loads paper C Cabinet Optional cabinet Stores paper or other consumables User s Guide Printer Basics 13 ...

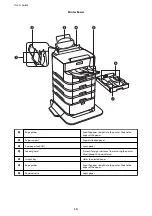
Page 14: ...aper C Rear paper feed B1 Loads paper D Feeder guard Prevents foreign substance from entering the printer Usually keep this guard closed E Output tray Holds the ejected paper F Edge guides Feed the paper straight into the printer Slide to the edges of the paper G Paper cassette Loads paper User s Guide Printer Basics 14 ...

Page 15: ...Control panel Indicates the printer s status and allows you to make print settings B Print head Fires ink C Front cover A Open when removing jammed paper inside the printer User s Guide Printer Basics 15 ...

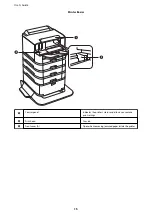
Page 16: ...0 cable otherwise the printer may be damaged A Rear cover 2 D2 Remove when removing jammed paper B AC inlet Connects the power cord C Rear cover 1 D1 Open when replacing the maintenance box or maintenance rollers or removing jammed paper User s Guide Printer Basics 16 ...

Page 17: ...nplug the power cord after checking that the power light is off C Displays the home screen D Displays the Paper Setting screen You can select the paper size and paper type settings for each paper source E Stops the current operation F Applies to a variety of functions depending on the situation G Press l u r and d to select the items Press OK to confirm your selection or run the selected feature H...

Page 18: ...ck and change the current settings This is the shortcut for the following menu Settings General Settings Network Settings Wi Fi Setup The printer is not connected to a wired Ethernet network or unset it The printer is connected to a wired Ethernet network The printer is not connected to a wireless Wi Fi network The printer is searching for SSID unset IP address or having a problem with a wireless ...

Page 19: ...ions or the solutions to problems Indicates that there is additional information Select the icon to displays the message Indicates a problem with the items Select the icon to check how to solve the problem Basic Operations Move the focus using the u d l r buttons to select the items and then press the OK button to confirm your selection or run the selected feature Move the focus to the setting ite...

Page 20: ...o on Note Available icons vary depending on the setting item A Indicates the character count B Moves the cursor to the input position C Switches between upper case and lower case or numbers and symbols You can also switch them by using the button D Switches the character type You can enter alphanumerics and symbols You can also switch them by using the button E Changes the keyboard layout F Enters...

Page 21: ...nd then select the items that you want to view Select How To at the bottom of the operation screen Displays the context sensitive animation A Indicates the total number of steps and the current step number In the example above it shows step 2 from 4 steps B Press l button to return to the previous step C Indicates your progress through the current step The animation repeats when the progress bar r...

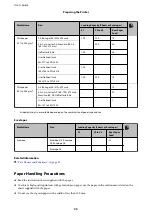
Page 22: ... paper available in your area contact Epson support When printing on genuine Epson paper at a user defined size only Standard or Normal print quality settings are available Although some printer drivers allow you to select a better print quality the printouts are printed using Standard or Normal Paper suitable for printing documents Media Name Size Loading Capacity Sheets C1 C2 to C4 Rear Paper Fe...

Page 23: ...oto Paper Glossy A3 10 A4 13 18 cm 5 7 in 10 15 cm 4 6 in 20 Epson Matte Paper Heavyweight A3 A3 10 A4 20 Epson Photo Quality Ink Jet Paper A3 50 A4 70 Related Information Part Names and Functions on page 13 Technical Support Web Site on page 162 Commercially Available Paper Note 8 5 13 in 8K 270 390 mm 16K 195 270 mm and the half letter sizes are not available when printing with the PostScript pr...

Page 24: ...d mm 100 148 to 297 431 8 Up to the line indicated by the triangle symbol on the edge guide User Defined mm 148 210 to 297 431 8 Up to the line indicated by the triangle symbol on the edge guide 50 2 sided printing is not available depending on the combination of paper type and size Thick papers Media Name Size Loading Capacity Sheets or Envelopes C1 C2 to C4 Rear Paper Feed Thick paper 91 to 150 ...

Page 25: ...lf letter B6 A6 20 User Defined mm 55 127 to 329 1200 1 2 sided printing is not available depending on the combination of paper type and size Envelopes Media Name Size Loading Capacity Sheets or Envelopes C1 C2 to C4 Rear Paper Feed Envelope Envelope 10 Envelope DL Envelope C6 10 Envelope C4 1 Related Information Part Names and Functions on page 13 Paper Handling Precautions Read the instruction s...

Page 26: ...in or paper that has stickers stuck to it Using these types of paper causes paper jams and smears on the printout Make sure you are using long grain paper If you are not sure what type of paper you are using check the paper packaging or contact the manufacturer to confirm the paper specifications Related Information Printer Specifications on page 131 Loading Paper in the Paper Cassette Note If the...

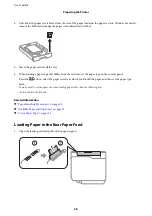
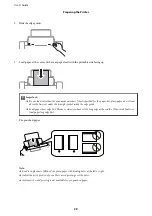
Page 27: ... adjust to the paper size you want to use 3 Load paper with the printable side facing down and then slide the front edge guide to the edge of the paper cImportant Do not load more than the maximum number of sheets specified for the paper For plain paper do not load above the line just under the triangle symbol inside the edge guide User s Guide Preparing the Printer 27 ...

Page 28: ...ype on the control panel Press the button select the paper cassette in which you loaded the paper and then set the paper type Note You also need to set the paper size when loading paper other than the following sizes A3 B4 A4 B5 A5 B6 A6 Related Information Paper Handling Precautions on page 25 Available Paper and Capacities on page 22 List of Paper Type on page 31 Loading Paper in the Rear Paper ...

Page 29: ...iangle symbol inside the edge guide Load paper short edge first However when you have set the long edge as the width of the user defined size load paper long edge first Pre punched paper Note Load a single sheet of defined size plain paper with binding holes at the left or right Adjust the print position of your file to avoid printing over the holes Automatic 2 sided printing is not available for ...

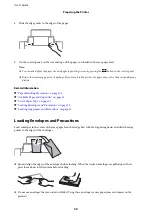
Page 30: ...able Paper and Capacities on page 22 List of Paper Type on page 31 Loading Envelopes and Precautions on page 30 Loading long papers and Precautions on page 31 Loading Envelopes and Precautions Load envelopes in the center of the rear paper feed short edge first with the flap facing down and slide the edge guides to the edges of the envelopes Fan and align the edges of the envelopes before loading ...

Page 31: ...per cannot be held in the output tray Prepare a box and so on to make sure that paper does not fall on the floor Do not touch paper that is being fed or ejected It could injure your hand or cause print quality to decline Related Information Available Paper and Capacities on page 22 Loading Paper in the Rear Paper Feed on page 28 List of Paper Type To obtain optimum printing results select the pape...

Page 32: ...k Paper2 Thick Paper2 Thick Paper2 Thick paper 201 to 256 g m2 Thick paper3 Thick Paper3 Thick Paper3 Thick Paper3 List of Detected Paper Sizes When you enable Paper Size Auto Detect the following paper sizes are detected automatically when they are loaded in thepaper cassette A6 B6 A5 Half letter B5 A4 Letter B4 Legal A3 Ledger Similar paper sizes such as A4 and Letter may not be detected correct...

Page 33: ...nergy efficiency Please consider the environment before making any change Power Off Settings Your product may have this feature or the Power Off Timer feature depending on the location of purchase Power Off If Inactive Select this setting to turn the printer off automatically if it is not used for a specified period of time Any increase will affect the product s energy efficiency Please consider t...

Page 34: ...rity to paper loaded in the rear paper feed A4 Letter Auto Switching Select On to feed paper from the paper source set as A4 size when there is no paper source set as Letter or feed from the paper source set as Letter size when there is no paper source set as A4 Auto Select Settings Select On for settings to automatically print on paper from any source containing paper that matches your paper sett...

Page 35: ...nt Configuration options you want to use for PCL or PostScript printing Common Settings Paper Size Select the default paper size for PCL or PostScript printing Paper Type Select the default paper type for PCL or PostScript printing Orientation Select the default orientation for PCL or PostScript printing Quality Select the print quality for PCL or PostScript printing Ink Save Mode Select On to sav...

Page 36: ... font source and the font number settings are automatically replaced with the default value IBM US Form Set the number of lines for the selected paper size and orientation This also causes a line spacing VMI change and the new VMI value is stored in the printer This means that later changes in the page size or orientation settings cause changes in the Form value based on the stored VMI CR Function...

Page 37: ...cted there may be no difference in the printer s noise level Ink Drying Time Select the ink drying time you want to use when performing 2 sided printing The printer prints the other side after printing one side If your printout is smeared increase the time setting PC Connection via USB Select Enable to allow a computer to access the printer when connected by USB When Disable is selected printing t...

Page 38: ...us Print Status Sheet Connection Check Checks the current network connection and prints a report If there are any problems with the connection see the report to solve the problem Advanced Make the following detailed settings Device Name TCP IP Proxy Server IPv6 Address NFC Link Speed Duplex Redirect HTTP to HTTPS Disable IPsec IP Filtering Disable IEEE802 1X Web Service Settings Select the menus o...

Page 39: ...nu on the control panel as described below Settings General Settings System Administration Administrators use this feature See the Administrator s Guide for details Menu Options for Print Counter Select the menus on the control panel as described below Settings Print Counter Displays the total number of prints B W prints and color prints from the time you purchased the printer Menu Options for Sup...

Page 40: ... there are still some torn pieces of paper inside the printer even after removing jammed paper The printer makes more space between the print head and the surface of the paper to easily remove the torn pieces of paper Maintenance Roller Information Maintenance Roller Status Displays the status of the maintenance rollers for the selected paper cassette Reset Maintenance Roller Counter After replaci...

Page 41: ...available for a PostScript printer PCL Font List Print a list of fonts that are available for a PCL printer Network Displays the current network settings Saving Power The printer enters sleep mode or turns off automatically if no operations are performed for a set period You can adjust the time before power management is applied Any increase will affect the product s energy efficiency Please consi...

Page 42: ...f Settings Power Off If Inactive or Power Off If Disconnected and then make settings Select Sleep Timer or Power Off Timer and then make settings Note Your product may have the Power Off Settings or Power Off Timer feature depending on the location of purchase User s Guide Preparing the Printer 42 ...

Page 43: ...n Hardware and Sound Right click on your printer and select Printing preferences Windows Vista Windows Server 2008 Click the start button and select Control Panel Printers in Hardware and Sound Right click on your printer and select Select printing preferences Windows XP Windows Server 2003 R2 Windows Server 2003 Click the start button and select Control Panel Printers and Other Hardware Printers ...

Page 44: ...explanations of the setting items Right clinking an item displays Help When you select Print Preview you can see a preview of your document before printing 6 Click OK to close the printer driver window 7 Click Print Note When you select Print Preview a preview window is displayed To change the settings click Cancel and then repeat the procedure from step 2 Related Information Available Paper and C...

Page 45: ...ting is available when EPSON Status Monitor 3 is enabled However it may not be available when the printer is accessed over a network or is used as a shared printer Note To enable EPSON Status Monitor 3 click Extended Settings on the Maintenance tab and then select Enable EPSON Status Monitor 3 1 On the printer driver s Main tab select an option from 2 Sided Printing 2 Click Settings make the appro...

Page 46: ...ions Related Information Printing Basics on page 43 Main Tab on page 60 Printing Several Pages on One Sheet You can print two or four pages of data on a single sheet of paper Print Settings On the printer driver s Main tab select 2 Up or 4 Up as the Multi Page setting Related Information Printing Basics on page 43 Main Tab on page 60 User s Guide Printing 46 ...

Page 47: ...ment You can reduce or enlarge the size of a document by a specific percentage or to fit the paper size you loaded in the printer Print Settings On the printer driver s More Options tab select the document size from the Document Size setting Select the paper size you want to print on from the Output Paper setting Select Reduce Enlarge Document and then select Fit to Page or Zoom to When you select...

Page 48: ...s of paper You can create a larger poster by taping them together Print Settings On the printer driver s Main tab select 2x1 Poster 2x2 Poster 3x3 Poster or 4x4 Poster as the Multi Page setting If you click Settings you can select the panels that you do not want to print You can also select the cutting guide options Related Information Printing Basics on page 43 Main Tab on page 60 User s Guide Pr...

Page 49: ... make a poster when 2x2 Poster is selected and Overlapping Alignment Marks is selected in Print Cutting Guides 1 Prepare Sheet 1 and Sheet 2 Cut off the margins of Sheet 1 along the vertical blue line through the center of the top and bottom cross marks User s Guide Printing 49 ...

Page 50: ...and align the cross marks then temporarily tape the two sheets together from the back 3 Cut the taped sheets in two along the vertical red line through the alignment markers this time the line to the left of the cross marks User s Guide Printing 50 ...

Page 51: ...rom the back 5 Repeat steps 1 to 4 to tape Sheet 3 and Sheet 4 together 6 Cut off the margins of Sheet 1 and Sheet 2 along the horizontal blue line through the center of the left and right side cross marks User s Guide Printing 51 ...

Page 52: ...7 Place the edge of Sheet 1 and Sheet 2 on top of Sheet 3 and Sheet 4 and align the cross marks and then temporarily tape them together from the back User s Guide Printing 52 ...

Page 53: ...8 Cut the taped sheets in two along the horizontal red line through the alignment markers this time the line above the cross marks 9 Tape the sheets together from the back User s Guide Printing 53 ...

Page 54: ...oter You can print information such as a user name and printing date in headers or footers Print Settings On the printer driver s More Options tab click Watermark Features and then select Header Footer Click Settings and then select the items you want to print User s Guide Printing 54 ...

Page 55: ...r Copy paper Letterhead Recycled paper Colored paper Preprinted paper or High quality plain paper Quality Standard Automatic 2 sided printing Not selected Color Correction Automatic Short Grain Paper Not selected Note You can also add your own watermark or anti copy pattern Print Settings On the printer driver s More Options tab click Watermark Features and then select Anti Copy Pattern or Waterma...

Page 56: ...ted Information Printing Basics on page 43 More Options Tab on page 61 Printing Multiple Files Together Job Arranger Lite allows you to combine several files created by different applications and print them as a single print job You can specify the print settings for combined files such as multi page layout and 2 sided printing Print Settings On the printer driver s Main tab select Job Arranger Li...

Page 57: ...ntouts Color Universal Print is only available when the following settings are selected Paper Type Plain paper Copy paper Letterhead Recycled paper Colored paper Preprinted paper High quality plain paper Quality Standard or a higher quality Print Color Color Applications Microsoft Office 2007 or later Text Size 96 pts or smaller Print Settings On the printer driver s More Options tab click Image O...

Page 58: ...Correction window adjusts the color by analyzing the location of the subject Therefore if you have changed the location of the subject by reducing enlarging cropping or rotating the image the color may change unexpectedly If the image is out of focus the tone may be unnatural If the color is changed or becomes unnatural print in a mode other than PhotoEnhance Related Information Printing Basics on...

Page 59: ...ngs On the printer driver s Maintenance tab click Extended Settings and then select Barcode mode Related Information Printing Basics on page 43 Maintenance Tab on page 61 Canceling Printing You can cancel a print job from the computer However you cannot cancel a print job from the computer once it has been completely sent to the printer In this case cancel the print job by using the printer s cont...

Page 60: ...he paper type you select Color Select the color for your print job 2 Sided Printing Allows you to perform 2 sided printing Settings You can specify the binding edge and the binding margins When printing multi page documents you can select to print starting from either the front or the back side of the page Print Density Select the document type to adjust the print density If the appropriate print ...

Page 61: ...ality options such as Color Universal Print or Fix Red Eye You can also thicken thin lines to make them visible on the printouts Watermark Features Allows you to make settings for anti copy patterns or watermarks Confidential Job Password protect confidential documents when printing If you use this feature the print data is stored in the printer and can only be printed after the password has been ...

Page 62: ...indow To apply the settings close the printer driver and then open it again Software Update Starts EPSON Software Updater to check for the latest version of applications on the Internet Technical Support Allows you to access the Epson technical support website Printing from the PostScript Printer Driver on Windows A PostScript Printer Driver is a driver that outputs printing commands to a printer ...

Page 63: ...elect the paper source from which the paper is fed Select Automatically Select to automatically select the paper source selected in the Paper Setting on the printer Media Select the type of paper on which you print Color Select the color for your print job Layout Tab Orientation Select the orientation you want to use to print Print on Both Sides Allows you to perform 2 sided printing Page Order Se...

Page 64: ...ment Options Advanced Printing Features Allows you to make detailed settings for printing features PostScript Options Allows you to make optional settings Printer Features Color Mode Select whether to print in color or in monochrome Press Simulation You can select a CMYK ink color to simulate when you print by reproducing the CMYK ink color of the offset press Ink Save Mode Conserves ink by reduci...

Page 65: ...o access the print dialog If necessary click Show Details ord to expand the print window 3 Select your printer 4 Select Print Settings from the pop up menu Note On OS X Mountain Lion or later if the Print Settings menu is not displayed the Epson printer driver has not been installed correctly Select System Preferences from the menu Printers Scanners or Print Scan Print Fax remove the printer and t...

Page 66: ...may decline and paper jams may occur Depending on the paper and the data ink may bleed through to the other side of the paper Related Information Available Paper and Capacities on page 22 Print Settings Select Two sided Printing Settings from the pop up menu Select the method of 2 sided printing and then make the Document Type settings Note Printing speed may be reduced depending on the document t...

Page 67: ...eet of paper Print Settings Select Layout from the pop up menu Set the number of pages in Pages per Sheet the Layout Direction page order and Border Related Information Printing Basics on page 65 Menu Options for Layout on page 70 Printing and Stacking in Page Order Reverse Order Printing You can print from the last page so that the documents are stacked in page order User s Guide Printing 67 ...

Page 68: ...Scale to fit paper size Select the paper size you loaded in the printer in Destination Paper Size When reducing the size of the document select Scale down only When printing at a specific percentage do one of the following Select Print from the File menu of the application Select Printer enter a percentage in Scale and then click Print Select Page Setup from the File menu of the application Select...

Page 69: ...s for Color Options on page 71 Canceling Printing You can cancel a print job from the computer However you cannot cancel a print job from the computer once it has been completely sent to the printer In this case cancel the print job by using the printer s control panel Canceling Click the printer icon in the Dock Select the job you want to cancel and then do one of the following OS X Mountain Lion...

Page 70: ...to sets Pages to Print Select to print only odd pages or even pages Page Order Select to print from the top or the last page Scale to fit paper size Prints to fit to the paper size you loaded Destination Paper Size Select the paper size to print on Scale down only Select when reducing the size of the document Menu Options for Cover Page Print Cover Page Select whether or not to print a cover page ...

Page 71: ...ons or Driver Operation Settings of the Mac OS Printer Driver Thick paper and envelopes Prevents the ink from smearing when printing on thick paper However this may reduce print speed Skip Blank Page Avoids printing blank pages Quiet Mode Reduces the noise the printer makes however may reduce print speed Permit temporary black printing Prints only with black ink temporarily High Speed Printing Pri...

Page 72: ...rom the File menu If necessary click Show Details or d to expand the print window 3 Select your printer 4 Select Print Features from the pop up menu 5 Change the settings as necessary See the menu options for the printer driver for details 6 Click Print Related Information Available Paper and Capacities on page 22 Loading Paper in the Paper Cassette on page 26 Loading Paper in the Rear Paper Feed ...

Page 73: ...hod for color adjustment These options adjusts color between the printer and the computer display to minimize the difference in color In Printer Menu Options for Paper Handling Collate pages Prints multi page documents collated in order and sorted into sets Pages to Print Select to print only odd pages or even pages Page Order Select to print from the top or the last page Scale to fit paper size P...

Page 74: ...de Conserves ink by reducing the print density Canceling Printing You can cancel a print job from the computer However you cannot cancel a print job from the computer once it has been completely sent to the printer In this case cancel the print job by using the printer s control panel Canceling Click the printer icon in the Dock Select the job you want to cancel and then do one of the following OS...

Page 75: ...Wi Fi Direct Simple AP connection the printer is connected to the same Wi Fi network SSID as the smart device and the communication is established between them Since the smart device is automatically connected to the other connectable Wi Fi network if the printer is turned off it is not connected to the previous Wi Fi network again if the printer is turned on Connect to the printer s SSID for Wi F...

Page 76: ... 6 Enter the password displayed on the printer s control panel on the smart device 7 After the connection is established select Dismiss or Close on the printer s control panel 8 Close the screen Installing Epson iPrint You can install Epson iPrint on your smart device from the following URL or QR code http ipr to c Printing Using Epson iPrint Start Epson iPrint from your smart device and select th...

Page 77: ...Pod touch running iOS start Epson iPrint after transferring the document you want to print using the file sharing function in iTunes Printing by Touching Smart Devices to the N Mark You can simply connect and print by touching your smart device to the printer s N Mark Make sure that you prepare the following before using this feature Enable the NFC function on your smart device Only Android 4 0 or...

Page 78: ...r documents emails photos and web pages right from your Android phone or tablet Android v4 4 or later With a few taps your Android device will discover an Epson printer that is connected to the same wireless network 1 Load paper in the printer 2 Set up your printer for wireless printing 3 On your Android device install the Epson Print Enabler plug in from Google Play 4 Connect your Android device ...

Page 79: ...es if necessary 1 Load paper in your product 2 Set up your product for wireless printing See the link below http epson sn 3 Connect your Apple device to the same wireless network that your product is using 4 Print from your device to your product Note For details see the AirPrint page on the Apple website Related Information Loading Paper in the Paper Cassette on page 26 Loading Paper in the Rear ...

Page 80: ...n the far right indicates the available space in the maintenance box Checking the Status of the Remaining Ink and the Maintenance Box Windows 1 Access the printer driver window 2 Click EPSON Status Monitor 3 on the Maintenance tab and then click Details Note If EPSON Status Monitor 3 is disabled click Extended Settings on the Maintenance tab and then select Enable EPSON Status Monitor 3 Checking t...

Page 81: ...A3 T04A4 XL T04B1 T04B2 T04B3 T04B4 L T04C1 T04C2 T04C3 T04C4 Note For users in Europe visit the following website for information on Epson s ink cartridge yields http www epson eu pageyield For Asia Product Black Cyan Magenta Yellow WF C8190a T01B1 T01B2 T01B3 T01B4 Ink Cartridge Handling Precautions Read the following instructions before replacing ink cartridges Handling precautions Store ink ca...

Page 82: ... in the cartridge when your printer indicates to replace the cartridge The yields quoted for you do not include this reserve Although the ink cartridges may contain recycled materials this does not affect printer function or performance Specifications and appearance of the ink cartridge are subject to change without prior notice for improvement Do not disassemble or remodel the ink cartridge other...

Page 83: ...er 2 Push the ink cartridge that you want to replace The ink cartridge will pop out slightly 3 Remove the ink cartridge from the printer 4 Remove the new ink cartridge from its package User s Guide Replacing Ink Cartridges and Other Consumables 83 ...

Page 84: ...ox Maintenance box code T6714 cImportant Once a maintenance box has been installed in a printer it cannot be used with other printers Maintenance Box Handling Precautions Read the following instructions before replacing the maintenance box Do not touch the green chip on the side of the maintenance box Doing so may prevent normal operation and printing Do not remove the film on the top of the box o...

Page 85: ...imations displayed on the control panel The need for replacement of the box does not mean that your printer has ceased to operate in accordance with its specifications The Epson warranty does not cover the cost of this replacement It is a user serviceable part Note When it is full you cannot print until the maintenance box is replaced to avoid ink leakage Related Information Maintenance Box Code o...

Page 86: ... are the ones for paper cassette 1 If you attach the wrong rollers the printer may not feed the paper Be careful not to stain the surface of the maintenance rollers If dust collects on the surface of the maintenance rollers clean the rollers by using a soft and moist cloth Using a dry cloth may damage the surface of the rollers 3 Pull out paper cassette 1 4 Turn the printer around and open rear co...

Page 87: ... Slide out the two used maintenance rollers and remove them 8 Insert two new maintenance rollers until they click into place Note Insert the maintenance rollers by rolling them so that you can insert them smoothly User s Guide Replacing Ink Cartridges and Other Consumables 87 ...

Page 88: ...9 Reattach the cover inside the back of the printer 10 Insert rear cover 2 11 Close rear cover 1 12 Release the lever of the paper cassette User s Guide Replacing Ink Cartridges and Other Consumables 88 ...

Page 89: ...e along the slot while it is facing the flat surface at the front 15 Lock the lever 16 Insert the paper cassette 17 Turn on the printer select Settings Maintenance Maintenance Roller Information Reset Maintenance Roller Counter and then select the paper cassette in which you replaced the maintenance rollers Related Information Maintenance Rollers Codes on page 85 User s Guide Replacing Ink Cartrid...

Page 90: ...e paper cassette 1 and paper cassette 2 to 4 are different Check the direction of arrow on the center of the maintenance rollers and make sure the maintenance rollers are the ones for paper cassette 2 to 4 If you attach the wrong rollers the printer may not feed the paper Be careful not to stain the surface of the maintenance rollers If the dust collects on the surface of the maintenance rollers c...

Page 91: ...ull out the paper cassette for which you want to replace the rollers 4 Turn the printer around and then open the printer s cassette unit cover User s Guide Replacing Ink Cartridges and Other Consumables 91 ...

Page 92: ...inter 6 Slide out two used maintenance rollers and remove both of them 7 Insert two new maintenance rollers until they click into place Note Insert the maintenance rollers by rolling them so that you can insert them smoothly User s Guide Replacing Ink Cartridges and Other Consumables 92 ...

Page 93: ...8 Tighten the screws to re attach the cover 9 Close the cassette unit cover User s Guide Replacing Ink Cartridges and Other Consumables 93 ...

Page 94: ... the shaft out of the holder 12 Insert the shaft of the new maintenance roller into the hole in the holder and then slide the shaft on the lever side along the slot while it is facing the flat surface at the front 13 Lock the lever 14 Insert the paper cassette User s Guide Replacing Ink Cartridges and Other Consumables 94 ...

Page 95: ...ximately five days replace the expended ink cartridge as soon as possible Note If EPSON Status Monitor 3 is disabled access the printer driver click Extended Settings on the Maintenance tab and then select Enable EPSON Status Monitor 3 The available period varies depending on the usage conditions Temporarily Printing with Black Ink Control Panel 1 When a message is displayed prompting you to repla...

Page 96: ...e computer cancel using the printer s control panel 2 Access the printer driver window 3 Select plain papers or Envelope as the Paper Type setting on the Main tab 4 Select Grayscale 5 Set the other items on the Main and More Options tabs as necessary and then click OK 6 Click Print User s Guide Replacing Ink Cartridges and Other Consumables 96 ...

Page 97: ...nting setting 5 Access the print dialog 6 Select Print Settings from the pop up menu 7 Select plain papers or Envelope as the Media Type setting 8 Select Grayscale 9 Set the other items as necessary 10 Click Print Conserving Black Ink when the Black Ink Is Low for Windows Only When black ink is running low and there is enough color ink remaining you can use a mixture of color inks to create black ...

Page 98: ...ck ink is also consumed Options Description Yes Select to use a mixture of color inks to create black This window is displayed the next time you print a similar job No Select to continue using the remaining black ink This window is displayed the next time you print a similar job Disable this feature Select to continue using the remaining black ink This window is not displayed until you replace the...

Page 99: ...wait for at least six hours without printing and then run the nozzle check again and repeat the head cleaning if necessary We recommend to turn off the printer If print quality has still not improved contact Epson support To prevent the print head from drying out do not unplug the printer while the power is on Checking and Cleaning the Print Head Control Panel 1 Load A4 size plain paper in the pri...

Page 100: ...e on screen instructions Related Information Loading Paper in the Paper Cassette on page 26 Accessing the Printer Driver on page 43 Checking and Cleaning the Print Head Mac OS 1 Load A4 size plain paper in the printer 2 Select System Preferences from the menu Printers Scanners or Print Scan Print Fax and then select the printer 3 Click Options Supplies Utility Open Printer Utility 4 Click Nozzle C...

Page 101: ...s are smeared or paper does not feed correctly clean the roller inside cImportant Do not use tissue paper to clean the inside of the printer The print head nozzles may be clogged with lint Cleaning the Paper Path for Ink Smears When the printouts are smeared or scuffed clean the roller inside cImportant Do not use tissue paper to clean the inside of the printer The print head nozzles may be clogge...

Page 102: ...rces Related Information Loading Paper in the Paper Cassette on page 26 Cleaning the Paper Path for Paper Feeding Problems Paper Cassette When paper is not fed from paper cassette correctly clean the roller inside 1 Pull out the paper cassette 2 Wipe the roller using a soft moist cloth cImportant Using a dry cloth may damage the surface of the roller 3 Insert the paper cassette User s Guide Mainta...

Page 103: ...xplorer 8 or later Firefox Chrome Mac OS X v10 6 8 or later Safari Firefox Chrome iOS Safari Android 2 3 or later Default browser Chrome OS Default browser Use the latest version Running Web Config on a Web Browser 1 Check the printer s IP address Select the network icon on the printer s home screen and then select the active connection method to confirm the printer s IP address To select an item ...

Page 104: ...button and select Control Panel View devices and printers in Hardware and Sound Windows Vista Windows Server 2008 Click the start button and select Control Panel Printers in Hardware and Sound 2 Right click on your printer and select Properties 3 Select the Web Service tab and click the URL Running Web Config on Mac OS 1 Select System Preferences from the menu Printers Scanners or Print Scan Print...

Page 105: ...are EPSON Software Updater Windows 8 1 Windows 8 Enter the application name in the search charm and then select the displayed icon Windows 7 Windows Vista Windows XP Click the start button and then select All Programs or Programs Epson Software EPSON Software Updater Note You can also start EPSON Software Updater by clicking the printer icon on the task bar on the desktop and then selecting Softwa...

Page 106: ...t Do not turn off or unplug the printer until the update is complete otherwise the printer may malfunction Note You can download the latest applications from the Epson website http www epson com If you use Windows Server operating systems you cannot use EPSON Software Updater Download the latest applications from the Epson website Related Information Software Update Tools Software Updater on page ...

Page 107: ...or network connection A list of available printers in the same network is displayed Select the printer you want to use For USB connection Follow the on screen instructions to connect the printer to the computer 5 Follow the on screen instructions to install the PostScript printer driver Installing a PostScript Printer Driver Mac OS Download the printer driver from the Epson Support website and the...

Page 108: ... printer driver 1 Download the executable file of the driver from the Epson support website http www epson eu Support Europe only http support epson net 2 Double click the executable file 3 Follow the on screen instructions for the rest of the installation Note If you are using a Windows computer and you cannot download the driver from the website install it from the software disc that came with t...

Page 109: ...ge or Uninstall Windows XP Windows Server 2003 R2 Windows Server 2003 Click Change Remove or Remove Note If the User Account Control window is displayed click Continue 7 Follow the on screen instructions Uninstalling Applications Mac OS 1 Download the Uninstaller using EPSON Software Updater Once you have downloaded the Uninstaller you do not need to download it again each time you uninstall the a...

Page 110: ... attachments such as documents or images to an email address assigned to the printer you can print that email and the attachments from remote locations such as your home or office printer Epson iPrint This Application is for iOS and Android and allows you to print from a smart phone or tablet You can print documents images and websites by sending them directly to a printer on the same wireless LAN...

Page 111: ...er off and uninstall For details see your documentation Unsupported optional paper cassette units have been installed Uninstall them by following the reverse steps to installation Cannot print because XX is out of order You can print from another cassette Turn the power off and on again and then reinsert the paper cassette If the error message is still displayed contact Epson support or an authori...

Page 112: ...hen update the root certificate See the Administrator s Guide for details Check that the printer driver is installed on the computer and that the port settings for the printer are correct Make sure the printer port is selected correctly in Property Port from the Printer menu as follows Select USBXXX for a USB connection or EpsonNet Print Port for a network connection Check that the printer driver ...

Page 113: ...aper Follow the on screen instructions on the printer s control panel to locate and remove the jammed paper including any torn pieces The LCD screen displays an animation that shows you how to remove jammed paper Caution Never touch the buttons on the control panel while your hand is inside the printer If the printer starts operating it could cause an injury Be careful not to touch the protruding ...

Page 114: ...orrect direction and slide the edge guides against the edges of the paper Do not open the rear cover while printing This causes a paper jam Related Information Removing Jammed Paper on page 113 Loading Paper in the Paper Cassette on page 26 Loading Paper in the Rear Paper Feed on page 28 Paper Feeds at a Slant Load paper in the correct direction and slide the edge guides against the edges of the p...

Page 115: ...he holding capacity will be reduced Paper is Ejected in an Unexpected Direction If paper is ejected in an unexpected direction when landscape pages and portrait pages are mixed or 2 sided printing and 1 sided printing are mixed enable the Output documents for filing setting in the printer driver This ejects pages in the same direction for easy filing Windows Select Output documents for filing in E...

Page 116: ... Settings and then disable the Power Off Timer setting Note Your product may have the Power Off Settings or Power Off Timer feature depending on the location of purchase LCD Screen Gets Dark The printer is in sleep mode Press any button on the control panel to return the LCD screen to its former state Cannot Operate from the Control Panel When the user feature restriction is enabled a user ID and ...

Page 117: ...ator If the problem cannot be cleared contact your printer administrator Checking the Software and Data Make sure that a genuine Epson printer driver is installed If a genuine Epson printer driver is not installed the available functions are limited We recommend using a genuine Epson printer driver See the related information link below for details If you are printing a large data size image the c...

Page 118: ...top of the window Windows Vista Windows Server 2008 Right click on the Printers folder and then click Run as administrator Server Properties Windows XP Windows Server 2003 R2 Windows Server 2003 From the File menu select Server Properties Click the Driver tab If your printer name is displayed in the list a genuine Epson printer driver is installed on your computer User s Guide Solving Problems 118...

Page 119: ...ine Epson printer driver is installed on your computer Related Information Installing the Latest Applications on page 105 Checking the Printer Status from the Computer Windows Click Print Queue on the printer driver s Maintenance tab and then check the following Check if there are any paused print jobs If unnecessary data remains select Cancel all documents from the Printer menu User s Guide Solvi...

Page 120: ...or a USB connection or EpsonNet Print Port for a network connection Checking the Printer Status from the Computer Mac OS The printer may not print when the user feature restriction is enabled Contact your printer administrator Make sure the printer status is not Pause Select System Preferences from the menu Printers Scanners or Print Scan Print Fax and then double click the printer If the printer ...

Page 121: ...ng the u d l r buttons and then press the OK button 3 Select Print Quality Adjustment 4 Follow the on screen instructions to check the printer to improve print quality If a message is displayed recommending that you clean the print head perform print head cleaning 5 Follow the on screen instructions to print the patterns for print head alignment and then align the print head This pattern allows yo...

Page 122: ...type See the Administrator s Guide for details Printout is Scuffed or Color is Missing If you have not used the printer for a long time the print head nozzles may be clogged and ink drops may not be discharged Perform a nozzle check and then clean the print head if any of the print head nozzles are clogged Related Information Checking and Cleaning the Print Head on page 99 Banding or Unexpected Co...

Page 123: ... page 31 Adjusting the Print Quality on page 121 Blurry Prints Vertical Banding or Misalignment Align the print head using the Print Quality Adjustment feature Related Information Adjusting the Print Quality on page 121 Print Quality Does Not Improve Even After Aligning the Print Head During bidirectional or high speed printing the print head prints while moving in both directions and vertical lin...

Page 124: ...void direct sun light do not use a dryer and do not touch the printed side of paper When printing images or photos Epson recommends using genuine Epson paper rather than plain paper Print on the printable side of the genuine Epson paper Checking the print settings Select the appropriate paper type setting for the type of paper loaded in the printer Print using a higher quality setting If you have ...

Page 125: ... General Settings Printer Settings from the home screen and then enable Thick Paper Windows Click Extended Settings on the printer driver s Maintenance tab and then select Thick Paper and Envelopes If the paper is still scuffed after selecting the Thick Paper and Envelopes setting select Short Grain Paper in the Extended Settings window of the printer driver Mac OS Select System Preferences from t...

Page 126: ...n PhotoEnhance Try another correction mode in PhotoEnhance by selecting an option other than Auto Correct as the Scene Correction setting If the problem continues use any other color correction feature other than PhotoEnhance Related Information Adjusting the Print Color on page 58 The Position Size or Margins of the Printout Are Incorrect Load paper in the correct direction and slide the edge gui...

Page 127: ... Prints When printing images or photos print using high resolution data Images on websites are often low resolution although they look good enough on the display and so print quality may decline Unintentionally Printing on 2 Sides Clear any 2 sided printing settings in the printer driver Windows Select Off from 2 Sided Printing on the printer driver s Main tab Mac OS Select Off from Two sided Prin...

Page 128: ...e setting For 2 sided printing one side of paper is printed and dried and then the other side is printed Because the drying time differs depending on the environment such as temperature or humidity or the print data the printing speed may be slower Printing Slows Down Dramatically During Continuous Printing Printing slows down to prevent the printer mechanism from overheating and being damaged How...

Page 129: ...using a USB interface Set the Output Protocol setting on the Device Settings tab in the printer properties to ASCII or TBCP For Windows select the appropriate substitution fonts on the Device Settings tab in the printer properties Print Quality Is Poor While Using PostScript Printer Driver You cannot make color settings on the Paper Quality tab in the printer driver Click Advanced and then set the...

Page 130: ...ions Supplies Options or Driver Select On as the Quiet Mode setting Forgot Your Password If you forget the administrator s password contact Epson support Related Information Contacting Epson Support on page 162 Application Is Blocked by a Firewall for Windows Only Add the application to the Windows Firewall allowed program in security settings on the Control Panel User s Guide Solving Problems 130...

Page 131: ...r thickness is within this range the paper may not feed in the printer or print result may adversely affected depending on the paper property or quality Printable Area Printable Area for Single Sheets Print quality may decline in the shaded areas due to the printer s mechanism A 3 0 mm 0 12 in B 3 0 mm 0 12 in C 49 0 mm 1 93 in D 54 0 mm 2 13 in Printable Area for Envelopes Print quality may decli...

Page 132: ... Mac OS IPv4 IPv6 UPnP Printing IPv4 Information appliance PictBridge Printing Wi Fi IPv4 Digital camera Epson Connect Email Print Remote Print IPv4 AirPrint iOS Mac OS IPv4 IPv6 iOS 5 or later Mac OS X v10 7 or later Google Cloud Print IPv4 IPv6 Network Scanning Epson Scan 2 IPv4 IPv6 Event Manager IPv4 Epson Connect Scan to Cloud IPv4 AirPrint Scan IPv4 IPv6 ADF 2 sided scanning Fax Send a fax I...

Page 133: ...ASE TX IEEE802 3ab 1000BASE T 1 IEEE802 3az Energy Efficient Ethernet 2 Communication Mode Auto 10Mbps Full duplex 10Mbps Half duplex 100Mbps Full duplex 100Mbps Half duplex Connector RJ 45 1 Use a category 5e or higher STP Shielded twisted pair cable to prevent risk of radio interference 2 The connected device should comply with IEEE802 3az standards Security Protocol IEEE802 1X IPsec IP Filterin...

Page 134: ...e ink cartridges and the power cord Printers with options These are the dimensions of printers with 3 optional paper cassette units and an optional cabinet Dimensions Storage Width 772 mm 30 4 in Depth 873 mm 34 4 in Height 1056 mm 41 6 in Printing Width 772 mm 30 4 in Depth 873 mm 34 4 in Height 1240 mm 48 8in Weight Approx 94 3 kg 207 9 lb Without the ink cartridges and the power cord Electrical...

Page 135: ... the printer within the range shown in the following graph Temperature 10 to 35 C 50 to 95 F Humidity 20 to 80 RH without condensation Storage Temperature 20 to 40 C 4 to 104 F Humidity 5 to 85 RH without condensation You can store for one month at 40 C 104 F Environmental Specifications for Ink Cartridges Storage Temperature 20 to 40 C 4 to 104 F Freezing Temperature 23 C 9 4 F Ink thaws and is u...

Page 136: ...not place the printer in the following locations otherwise a malfunction may occur Subject to direct sunlight Subject to rapid changes in temperature and humidity Subject to fire Subject to volatile substances Subject to shocks or vibrations Near a television or a radio Near excessive dirt or dust Near water Near air conditioning or heating equipment Near a humidifier Use a commercially available ...

Page 137: ...4 bit Windows Vista 32 bit 64 bit Windows XP SP3 or later 32 bit Windows XP Professional x64 Edition SP2 or later Windows Server 2016 Windows Server 2012 R2 Windows Server 2012 Windows Server 2008 R2 Windows Server 2008 Windows Server 2003 R2 Windows Server 2003 SP2 or later macOS High Sierra macOS Sierra OS X El Capitan OS X Yosemite OS X Mavericks OS X Mountain Lion Mac OS X v10 7 x Mac OS X v10...

Page 138: ...alic Bold Italic Univers Condensed Antique Olive Medium Bold Italic Antique Olive Garamond Antiqua Halbfett Kursiv Kursiv Halbfett Garamond Mauritius Marigold Algiers Medium Extra Bold Albertus NimbusSansNo2 Medium Bold Italic Bold Italic Arial Nimbus Roman No9 Medium Bold Italic Bold Italic Times New Roman Nimbus Sans Medium Bold Oblique Bold Oblique Helvetica Nimbus Sans Narrow Medium Bold Obliq...

Page 139: ... Sans Condensed Medium Bold Italic Bold Italic Univers Condensed 3 Antique Olive Medium Bold Italic Antique Olive 3 Garamond Antiqua Halbfett Kursiv Kursiv Halbfett Garamond 3 Mauritius Marigold 3 Algiers Medium Extra Bold Albertus 3 NimbusSansNo2 Medium Bold Italic Bold Italic Arial 3 Nimbus Roman No9 Medium Bold Italic Bold Italic Times New 3 Nimbus Sans Medium Bold Oblique Bold Oblique Helvetic...

Page 140: ...r 9 OCR Barcode Bitmap Font for PCL5 only Font Name Family Symbol Set OCR A 10 OCR B 11 Code39 9 37cpi 4 68cpi 12 EAN UPC Medium Bold 13 Note Depending on the print density or on the quality or color of the paper OCR A OCR B Code39 and EAN UPC fonts may not be readable Print a sample and make sure the fonts can be read before printing large quantities List of Symbol Sets Your printer can access a ...

Page 141: ...ing sections for symbol set details List of Symbol Sets for PCL 5 Symbol Set Name Attribute Font Classification 1 2 3 4 5 6 7 8 9 10 11 12 13 Norweg1 0D Roman Extension 0E Italian 0I ECM94 1 0N Swedis2 0S ANSI ASCII 0U UK 1E French2 1F German 1G Legal 1U 8859 2 ISO 2N Spanish 2S ISO 8859 4 Latin 4 4N Roman 9 4U PsMath 5M 8859 9 ISO 5N WiTurkish 5T MsPublishin 6J VeMath 6M 8859 10ISO 6N DeskTop 7J ...

Page 142: ...10U IBM DN 11U McText 12J PcMultiling 12U VeInternati 13J PcEur858 13U VeUS 14J PiFont 15U PcE Europe 17U Unicode 3 0 18N WiBALT 19L WiAnsi 19U PcBlt775 26U Pc866Cyr 3R Greek8 8G WinGrk 9G WinCyr 9R Pc851Grk 10G ISOCyr 10N Pc8Grk 12G ISOGrk 12N Pc866Ukr 14R Hebrew7 0H 8859 8 ISO 7H Hebrew8 8H Pc862Heb 15H User s Guide Appendix 142 ...

Page 143: ... 579L ZapfDigbats 14L OCR A 0O OCR B 1O OCR B Extension 3Q Code3 9 0Y EAN UPC 8Y Installing the Optional Units Optional Cabinet Code The following is the code for the optional cabinet Optional Cabinet C12C932891 Installing the Optional Cabinet The cabinet can be attached to the printer and the optional paper cassette units User s Guide Appendix 143 ...

Page 144: ...injured When lifting the printer place your hands in the positions shown below If you lift the printer holding other positions the printer may fall or you may trap your fingers when placing the printer 1 Turn off the printer by pressing the P button and then unplug the power cord 2 Disconnect any connected cables Note if the optional paper cassette unit has been installed uninstall it as well 3 Re...

Page 145: ... may differ from this illustration 6 Place the stands inside the cabinet s casters 7 Secure the stands with the attachments and screws cImportant Make absolutely sure both stands are attached securely otherwise the printer may fall User s Guide Appendix 145 ...

Page 146: ...8 Secure the reinforcing bars with the attachments and screws 9 Place the cabinet on a flat surface and lock the casters at the front 10 Seucre the cover to the stands User s Guide Appendix 146 ...

Page 147: ... cassette unit gently onto the cabinet aligning the corners and then secure them with the screws Note Some screws will be left over after assembly 13 Secure the printer or an optional paper cassette unit at the back with the attachments and screws User s Guide Appendix 147 ...

Page 148: ...d disconnect any cables and then perform the installation procedure in reverse Related Information Optional Cabinet Code on page 143 Optional Paper Cassette Unit Code The following is the code for the optional paper cassette unit Optional Cassette Unit C12C932611 Installing the Optional Paper Cassette Units You can install up to 3 paper cassette units User s Guide Appendix 148 ...

Page 149: ...he printer may fall or you may trap your fingers when placing the printer cImportant If you are using the optional cabinet install it under the bottom of the paper cassette unit in advance 1 Turn off the printer by pressing the P button and then unplug the power cord 2 Disconnect any connected cables Note If other optional paper cassette units have been installed uninstall them as well 3 Remove th...

Page 150: ...er cassette unit where you want to set up the printer 7 Pull out the paper cassette 8 If you use multiple optional cassette units stack all optional paper cassette units on top of each other and then secure them with the screws User s Guide Appendix 150 ...

Page 151: ...per cassette aligning the corners and then secure them with the screws Note Some screws will be left over after assembly 10 Secure the optional paper cassette unit and the printer at the back with the attachments and screws User s Guide Appendix 151 ...

Page 152: ...11 Insert a label showing the size of the paper to be loaded in the cassette into the holder 12 Insert the paper cassette 13 Place the sticker indicating the cassette number User s Guide Appendix 152 ...

Page 153: ...sette Unit Code on page 148 Installing the Optional Cabinet on page 143 Setting the Optional Paper Cassette Unit in the Printer Driver To use the installed optional paper cassette unit the printer driver needs to acquire the necessary information Setting the Optional Paper Cassette Unit in the Printer Driver Windows Note Log on to your computer as an administrator 1 Open the Optional Settings tab ...

Page 154: ... Click the start button and select Control Panel Printers and Other Hardware Printers and Faxes Right click on your printer select Property and then click the Optional Settings tab 2 Select Acquire from Printer and then click Get Optional Paper Sources information is displayed in Current Printer Information 3 Click OK Setting the Optional Paper Cassette Unit in the Printer Driver Mac OS 1 Select S...

Page 155: ...opean users Hereby Seiko Epson Corporation declares that the following radio equipment model is in compliance with Directive 2014 53 EU The full text of the EU declaration of conformity is available at the following website http www epson eu conformity B573A For use only in Ireland UK Austria Germany Liechtenstein Switzerland France Belgium Luxemburg Netherlands Italy Portugal Spain Denmark Finlan...

Page 156: ... When carrying the printer lift it using a stable position Lifting the printer using an unstable position may result in injury Because this printer is heavy it should always be carried by two or more people when unpacking and transporting When lifting the printer place your hands in the positions shown below If you lift the printer holding other positions the printer may fall or you may trap your ...

Page 157: ... as the power cord and USB cable 4 If the printer supports external storage devices make sure they are not connected 5 Remove the output tray Caution Do not place the removed output tray on the printer as it is unstable If the output tray falls while the printer is being moved you may be injured 6 Remove all of the paper from the printer 7 Store the paper support The printer is ready to be moved R...

Page 158: ...s Before moving the printer uninstall the cabinet s stands Complete the steps in Preparing to Move the Printer and then perform the steps in the following images Related Information Preparing to Move the Printer on page 156 User s Guide Appendix 158 ...

Page 159: ...cally or turning it upside down otherwise ink may leak Leave the ink cartridges installed Removing the cartridges can dry out the print head and may prevent the printer from printing Leave the maintenance box installed otherwise ink may leak during transporting 1 Follow the steps in Preparing to Move the Printer 2 Uninstall the optional cabinet and the paper cassette units if they are installed No...

Page 160: ...mable products other than those designated as Original Epson Products or Epson Approved Products by Seiko Epson Corporation Seiko Epson Corporation shall not be held liable for any damage resulting from electromagnetic interference that occurs from the use of any interface cables other than those designated as Epson Approved Products by Seiko Epson Corporation 2018 Seiko Epson Corporation The cont...

Page 161: ...cation are permitted provided that this copyright notice and disclaimer are retained THIS SOFTWARE IS PROVIDED BY KALLE KAUKONEN AND CONTRIBUTORS AS IS AND ANY EXPRESS OR IMPLIED WARRANTIES INCLUDING BUT NOT LIMITED TO THE IMPLIED WARRANTIES OF MERCHANTABILITY AND FITNESS FOR A PARTICULAR PURPOSE ARE DISCLAIMED IN NO EVENT SHALL KALLE KAUKONEN OR CONTRIBUTORS BE LIABLE FOR ANY DIRECT INDIRECT INCI...

Page 162: ...the dealer where you purchased your product Epson support will be able to help you much more quickly if you give them the following information Product serial number The serial number label is usually on the back of the product Product model Product software version Click About Version Info or a similar button in the product software Brand and model of your computer Your computer operating system ...

Reviews: