QuadroFXO Manual II: Administrator's Guide
Quadro's Graphical Interface
QuadroFXO; SW Version 5.1.x
37
The same profile name can be used to create profiles for different extensions. This is useful if the profiles have a similar purpose but differ in certain
user-specific settings, such as voice mail greeting, Zero-Out destination number, new voice mail notification options, and so on. Creating multiple
profiles with the same name gives a wide flexibility to have different voice mail settings activated depending on which extension is called.
Please note:
If an extension does not have a profile specified in a call routing rule or the specified profile name is incorrect, the default Voice Mail
Settings of the extension will be used.
The Voice Mail Profiles page contains a table where all Voice Mail Profiles for the corresponding extension are listed. The the following functional
buttons are available:
Add opens the Add Entry page where a new Profile Name should be defined.
Edit opens the Edit Entry page where Voice Mail Profile settings should be defined. For the description of the settings found on this, please refer to
the chapter on
Delete removes the selected Voice Mail Profile(s) from the table.
Attendant Extension Settings
For Attendant extensions, the Extensions Management - Edit Entry page consists of General Settings, Attendant Scenario, SIP Settings and
SIP Advanced Settings pages. The SIP Settings and SIP Advanced Settings pages are the same as for the regular extensions described above.
The General Settings and Attendant Scenario pages are described below:
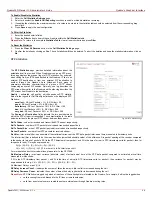
1. General Settings (for attendant extension)
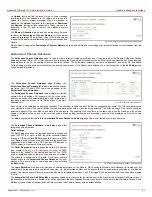
This group requires personal extension information and has the
following components:
Display Name is an optional parameter used to define the Auto
Attendant’s description. Usually the display name appears on
the called party’s phone display when a call is made or a voice
mail is sent.
The Percentage of System Memory drop down list is used to
define the space for the Auto Attendant’s system messages.
The maximum value in the drop down list is equal to the
maximum available space for voice messages on Quadro.
Fig. II-68: Extensions Management - Edit Entry – General Settings for Auto Attendant page
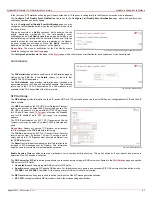
2. Attendant Scenario
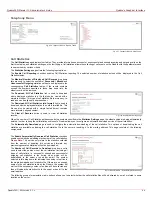
This group is used to select between default and custom attendant functionality scenarios. When the Default scenario is selected, a group of settings
should be adjusted. Here, the user defined Auto Attendant system messages can be uploaded and the list of Friendly Phones can be configured.
For Custom scenario, a scenario script file (in EpygiXML coding, the coding standard can be found at
and the custom voice messages can be uploaded.
The Default manipulation radio button selection enables the
following components:
•
The Send AA Digits to Routing Table checkbox
selection switches the Auto Attendant to the routing
mode. Any inserted digits on the Auto Attendant
prompt will be parsed through the Routing Table on
the Quadro.
•
Redirection on Timeout - this group allows
automatic call redirection in case no action has been
performed by the caller. The group offers the following
options:
Enable Redirection on Timeout checkbox is used to
enable/disable the automatic call redirection.
Recurring Attendant Prompt Repetition Count text
field indicates the number of Recurring Attendant
Prompts to be consecutively played to the caller with
no action from his/her side. When the Recurring
Attendant Prompt is played the number of times
indicated in this text field, the call will be automatically
redirected to the defined destination.
Call Type drop down list includes possible incoming
call types (PBX, PSTN, SIP or Auto). PBX selection
means that the call will be redirected to the local
extension. SIP selection means that the call will be
redirected to the SIP destination correspondingly.
PSTN selection means that the call will be redirected
to the PSTN destination. Auto selection is used for
undefined call types: destination (independent on
whether it is a PBX number, SIP address or PSTN
number) will be reached through Routing.
Fig. II-69: Extensions Management - Edit Entry – Attendant Scenario page


