QuadroFXO Manual II: Administrator's Guide
Quadro's Graphical Interface
QuadroFXO; SW Version 5.1.x
16
The Enable and Disable functional buttons are used to activate or to deactivate the selected route(s). At least one route should be selected to use
these functions, otherwise the error message “No record(s) selected” will appear.
To Add an IP Static Route
1.
Select
the
IP Static Routes link on the Routing Configuration page.
2.
Press
the
Add button on the IP Static Routes page. The Add Entry page will appear in the browser window.
3.
Enter the destination IP address and subnet mask in the Route To text fields. Use the IP-Clip button to select a previously entered IP address.
4.
Enter the router IP address into the Via IP Address text fields.
5.
Press
the
Save button to make the static route with these settings.
To Add an IP Policy Route
1.
Select
the
IP Policy Routes link on the Routing Configuration page.
2.
Press
the
Add button on the IP Policy Routes page. The Add Entry page will appear in the browser window.
3.
Specify the policy routing rule priority in the Priority text field.
4.
Enter the packet source IP address and subnet mask in the From text fields. Use the IP-Clip button to select a previously entered IP address.
5.
Enter the router IP address into the Via IP Address To text fields.
6.
Press
the
Save button to make the policy route with these settings.
To Add a VPN Route
1.
Select
the VPN Routes link on the Routing Configuration page.
2.
Press
the
Add button on the VPN Routes page. The Add Entry page will appear in the browser window.
3.
Choose the VPN connection from the Route Via drop down list.
4.
Enter the destination IP address and the subnet mask into the Route To text fields.
5.
Press
the
Save button to make the VPN route with these settings.
Configuration Management
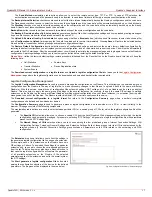
The Configuration Management page assists the administrator with managing the system configuration settings and voice data. For example, the
administrator is able to backup and download the settings to a PC and then upload and restore them back to the Quadro. Additionally, this page
provides the possibility of restoring the factory default configuration settings.
The Backup & Automatically Download all config &
voice data link leads to the Automatically Backup
Configuration Settings page where the automatic backup
of the system configuration and the voice data can be
configured. The service allows you to setup Quadro so it will
automatically backup the system configuration and the voice
data and store it in the specified location.
Fig. II-26
:
Configuration Management page
The Automatically Backup Configuration Settings page
allows you to enable the automatic backup of the system
configuration and the voice data on the Quadro. With this
service, Quadro will automatically backup the system
configuration and the voice data and store it in the specified
location.
This page contains the following components:
The Enable Automatically Backup checkbox enables
automatic backup mechanism on the Quadro.
The following group of manipulation radio buttons allows you
to select whether the backup files will be delivered by email
or stored in some location:
•
The Send via Email radio button is used to send the
automatically backed up files via email. The selection
enables Email Address text field that requires the
email address of the administrating person to receive
the automatically backup files.
•
The Send to Server radio button is used to store the
automatically backup files on a remote server. This
selection enables the following fields to be inserted:
The Server Name requires the IP address or the host
name of the remote server.
Fig. II-27
:
Configuration Management page
The Server Port requires the port number of the remote server.
The Path on Server requires the path on the server to store the backup files in.

