background image

1

10

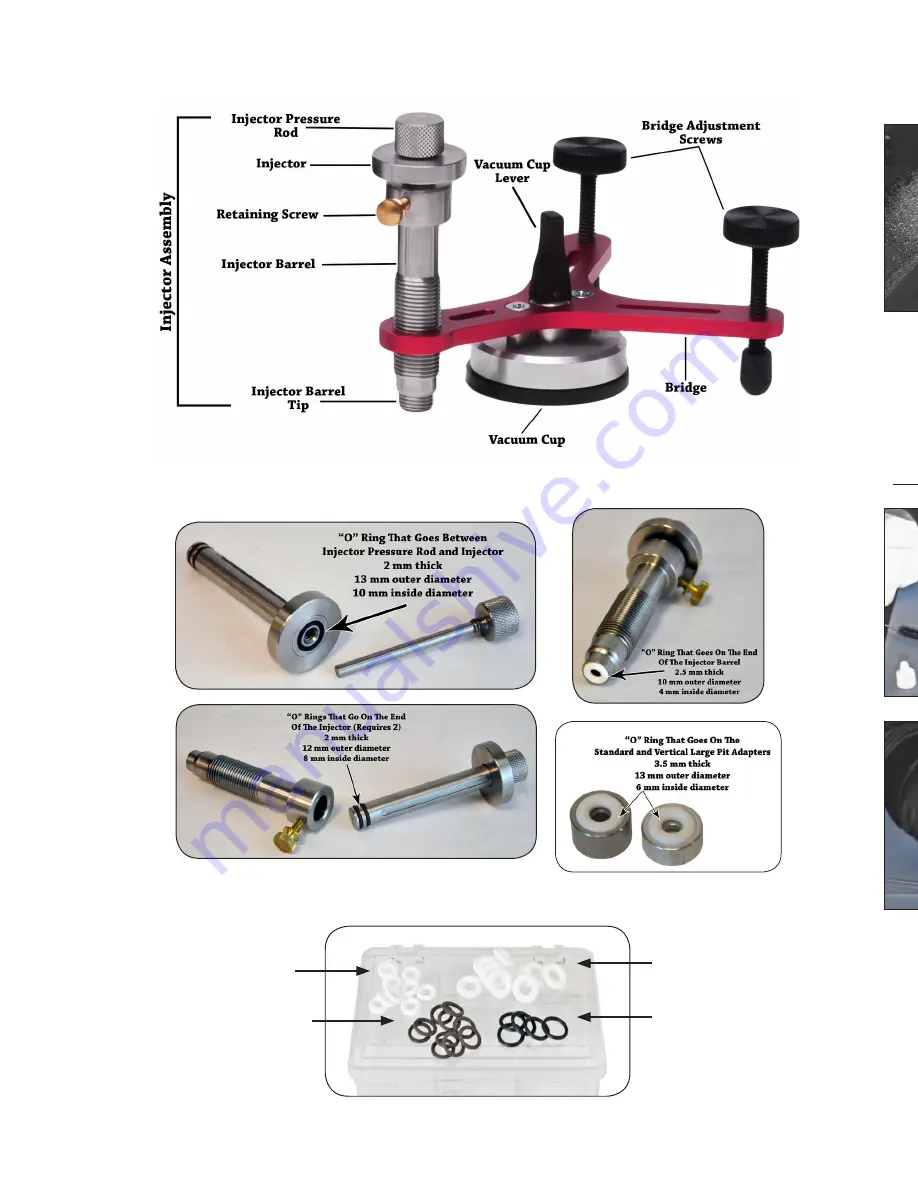
2.5 mm thick

10 mm outer diameter

4 mm inside diameter

2 mm thick

12 mm outer diameter

8 mm inside diameter

2 mm thick

13 mm outer diameter

10 mm inside diameter

3.5  mm thick

13 mm outer diameter

6 mm inside diameter

VOR1468


11.  Clean the area that you have worked on with a good glass cleaner and a paper 

towel.

Cleaning & Maintenance -

1.  Clean the resin off of (and out of) your injector, o-rings and bridge with our 

cleaning solution. *Keeping these items clean and free of build up assures no 
contamination on you next repair, proper functioning of the tools, and will 
increase the longevity of the tools. 

Failure to properly clean and maintain 

these items could result in voiding your warranty!

VBA1443

Summary of Contents for ROCK STAR

Page 1: ...www equalizer com 2012 Equalizer Industries Inc Revision 11 10 17 ROCK STAR Windshield Repair System Part RSR800 User Guide 97...

Page 2: ...m inside diameter 2 mm thick 12 mm outer diameter 8 mm inside diameter 2 mm thick 13 mm outer diameter 10 mm inside diameter 3 5 mm thick 13 mm outer diameter 6 mm inside diameter VOR1468 11 Cle tow C...

Page 3: ...ake sure that the windshield is at the appropriate temperature Ideal temperature is between 65 F to 85 F plus or minus 5 F Preparing the Rock Chip 1 Place the mirror on the inside of the windshield un...

Page 4: ...sider drilling the chip At a slow setting start to drill into the glass but be careful not to drill into the PVB Poly Vinyl Butyral Preparing the Bridge and Injector Assembly 1 Place the injector tip...

Page 5: ...en add the large pit adaptor onto the unit 3 Place a light film of vacuum cup lubricant onto the vacuum cup of the bridge and on the two bridge adjusting screws Once the bridge and injector assembly i...

Page 6: ...break Setting Up the Bridge and Injector Assembly 1 Place the bridge and injector assembly onto the glass so that the injector tip o ring is over the rock chip 2 Secure the bridge by flipping the vacu...

Page 7: ...rea is cool or at sea level use a thinner resin 4 Wet the two o rings on the injector tip using resin 5 Place the injector back into the injector barrel making sure that the groove on the injector lin...

Page 8: ...by loosening the injector pressure rod 11 Then re tighten the injector pressure rod to secure the seal 12 Next loosen the retaining screw and push the injector in a downward motion until the point wh...

Page 9: ...injector pressure rod 2 Release the lever on the vacuum cup 3 Remove the bridge and injector assembly 4 Wipe away any residual resin 5 Apply a drop of pit filler resin 6 Place a mylar square cure shee...

Page 10: ...rocess The outer part of the break might be cured but the actual pit may not be It is very important that it be cured all the way through 8 Remove the mylar square cure sheet 9 With the use of a new r...

Page 11: ...n off of and out of your injector o rings and bridge with our cleaning solution Keeping these items clean and free of build up assures no contamination on you next repair proper functioning of the too...

Page 12: ...52 TRO653 2611 Oakmont Drive Round Rock Texas 78665 Toll Free USA Canada 800 334 1334 International 512 388 7715 Fax 512 388 4188 Email sales equalizer com www equalizer com 20 Revi Additional Accesso...

Reviews: