7
4
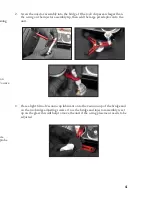
2. Screw the injector assembly into the bridge. If the rock chip area is larger than
the o-ring on the injector assembly tip, then add the large pit adaptor onto the
unit.
3. Place a light film of vacuum cup lubricant onto the vacuum cup of the bridge and
on the two bridge adjusting screws. Once the bridge and injector assembly is set
up on the glass this will help to move the unit if the o-ring placement needs to be
adjusted.
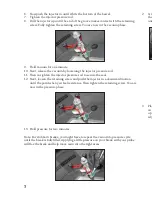
6. Now push the injector in until it hits the bottom of the barrel.
7. Tighten the injector pressure rod.
8. Pull the injector up until the end of the groove makes contact with the retaining
screw. Fully tighten the retaining screw. You are now in the vacuum phase.
9. Hold vacuum for one minute.
10. Next, release the vacuum by loosening the injector pressure rod.
11. Then re-tighten the injector pressure rod to secure the seal.
12. Next, loosen the retaining screw and push the injector in a downward motion
until the point when you feel resistance. Then tighten the retaining screw. You are
now in the pressure phase.
13. Hold pressure for two minutes.
Note: For stubborn breaks, you might have to repeat the vacuum to pressure cycle
until the break is fully filled. Applying a little pressure on your break with your probe
will flex the break and help move resin into the tight areas.


