background image

Erba Lachema s.r.o., Karásek 2219/1d, 621 00 Brno, CZ
e-mail: diagnostics@erbamannheim.com, www.erbalachema.com

Erba Diluent-Diff

Diluent for automated analyzers

Name

Cat. No.

Package volume

Erba Diluent-Diff

HEM00004 20 L

For 

in vitro

 diagnostic use only

INTENDED USE

Erba Diluent-Diff is a buffered, stabilized and micro-filtered 

electrolyte solution for automated dilution of human blood  

samples, quantitative and qualitative determination of ery

-

throcytes (RBC), leucocytes (WBC) and the leucocyte sub

-

populations, thrombocytes (PLT) and measurement of he

-

moglobin (HGB) concentration on hematology analyzers.

Erba Diluent-Diff should be used with only Erba Lachema 

reagents. Erroneous results may be obtained if the reagent 

is applied with third party reagents.

Please refer to the instrument’s User Manual for further in

-

formation.

INGREDIENTS


Sodium chloride       < 1.5 % 

Buffers            < 1.0 %

Preservative         < 0.5 % 

Stabilizers          < 0.5 % 

in ion-free water

HANDLING PRECAUTIONS

-   Erba Diluent-Diff is environmental friendly, azide-free rea

-

gent;  does not  contain  harmful ingredients.

-    Avoid contact with eyes, skin and clothing.

-   In case of eye or skin contact flush eyes with copious 

amounts  of  water  for  several  minutes  or  wash  skin  area 

with water.

-   Keep the reagent container closed when not in use.

-   Wear laboratory gloves when handling the reagent.

-   All  body  fluid  samples  should  be  considered  potentially 

infectious materials. Treat all blood and other potentially in

-

fectious materials with appropriate precautions. Use gloves,  

masks and gowns if blood exposure is anticipated.

-   Use Good Laboratory Practices (GLP) when handling the 

reagents.

SPECIMEN COLLECTION AND PREPARATION


Erba  Diluent-Diff  is  intended  for  use  with  blood  specimens   

collected by vein puncture in EDTA anticoagulant. Specimens  

for hematological analysis may be stored for up to 8 hours at 

(+15 to +30) ºC or up to 24 hours after collection when refri

-

gerated (+2 to +8) ºC.

REAGENT PREPARATION

-   This reagent is ready for use and can be applied straight from 

the container; no special reagent preparation is necessary.

-    Leave the reagent at room temperature for at least 12 hours.

REAGENT REPLACEMENT

-    Person installing the reagent must be a trained laboratory 

professional.

-    Remove the inlet cap from the reagent container to be repla

-

ced. Connect the reagent inlet to the new reagent container.

-    Be sure that the colour  on each  tube, reagent  container 

label and connector in the back of the instrument match.

-    Avoid  any  dust  or  microbial  contamination  of  the  tubing 

and reagents.

-   Prime thoroughly the new reagent and measure backgrounds 

according to the instrument’s User Manual.

-   When installing a new lot of reagent, recalibrate the instru

-

ment as specified in your User Manual.

REAGENT STORAGE, STABILITY AND DISPOSAL


-   Store Erba Diluent-Diff diluent b15 and +30°C.

-   The shelf life of the Erba Diluent-Diff diluent is 36 months 

from date of manufacture, if stored at the prescribed tempe

-

rature range.

-   Do not use reagent beyond the expiration date printed on 

the container label.

-   Discard opened container after 120 days.

-   Do not use reagent once frozen.

-   Dispose of waste product, unused product and contamina

-

ted packaging in compliance with  local regulations.

IVD

Hematology reagents

HEMA/PI/10/17/B 

Date of revision: 25. 7. 2017

See Instruction for Use

i

Catalogue Number

Lot Number

Expiry date

In vitro Diagnostics

Storage 

Temperature 

Content

CONT

Manufacturer

REF

CE Mark - 

Device comply with 

the Directive 98/79/EC

USED SYMBOLS

IVD

50003763

Summary of Contents for ELite 3

Page 1: ...Erba Lachema s r o Kar sek 2219 1d 621 00 Brno CZ ELite 3 Hematology Analyzer USER MANUAL INS00066...

Page 2: ...8 Specifications 14 2 INSTALLATION 15 2 1 General information 15 2 2 Environmental factors 15 2 2 1 Electrical requirements 15 2 2 2 Space requirements 16 2 2 3 Peripherals 16 2 2 4 Reagents and waste...

Page 3: ...ng flags 37 5 2 5 Parameter Limits Normal ranges 39 5 2 6 Blank Measurement 39 5 2 7 Using Pre diluted Mode 40 6 DATABASE 41 6 1 Database services 42 6 2 The Filter Select function 43 6 3 Printing rec...

Page 4: ...tings 60 9 4 Date and Time 61 9 5 Multi user mode 62 10 PRINTING 65 10 1 Printouts 65 11 Troubleshooting 67 11 1 Regular Troubleshooting Procedures 67 11 2 Weekly User Maintenance 67 11 2 1 Cleaning n...

Page 5: ...inter via USB port or can have an optional 58 mm built in thermal printer module Its internal memory is capable of storing 1000 records with full histograms and individual patient data QC measurements...

Page 6: ...nocytes count GRA granulocytes count LYM lymphocytes percentage MON monocyte percentage GRA granulocytes percentage HGB hemoglobin RBC red blood cell count HCT hematocrit MCV mean corpuscular volume M...

Page 7: ...z 1 l HEM00016 Erba Hypoclean 1 l For package insert for reagents and cleaning solutions please see Appendix 1 2 3 Technical Operation As the cell counter is a fully automated instrument operating it...

Page 8: ...s Figures 1 and 2 show front and rear view of the analyzer with controls and connectors Figure 1 Front view Color LCD touchscreen START button Built in thermal printer Sample holder with interchangeab...

Page 9: ...e 9 72 Figure 2 Rear view Instrument label S N manuf data Reagent connectors Power switch USB A connectors External grounding connector USB B connector Built in thermal printer Reagent Lock connector...

Page 10: ...sure it comes out on the front of the printer close the lid making sure that the paper is captured between the lid and the front of the printer The analyzer works with an external power supply The pow...

Page 11: ...sample is aspirated into the sampling needle and mixed with 4 ml of diluent and stored in the chamber MIX dilution b 25 l of the MIX dilution is aspirated into and stored in the needle during WBC mea...

Page 12: ...urrently performing an analysis No new measurement can be started Yellow The analyzer is performing a maintenance process Yellow blinking The instrument is in stand by and display light is off Hit the...

Page 13: ...e approved control material 1 7 Accessories Below is a list of accessories shipped with your analyzer This list can also be referred as the E EL Li it te e 3 3 pack E EL Li it te e 3 3 Hematology Anal...

Page 14: ...tomatic and manual factors calibration of WBC HGB RBC PLT MCV or HCT RDW and MPV User interface Easy to use menu driven user interface with touch screen and separate START button status LED Languages...

Page 15: ...sunlight If kept at a temperature less than 10 C the instrument should be allowed to sit for an hour at the correct room temperature before use Reagents should be stored at a temperature range of 18 3...

Page 16: ...s are not bent broken twisted or blocked in between the desk the instrument is on and the wall behind Such circumstances can result in instrument operation failure DO NOT PLACE the reagents above the...

Page 17: ...is very important 2 2 5 Maintenance The user should check the following components weekly bottom of washing head for salt build up should be wiped off with a damp cloth or wiper tubing system by open...

Page 18: ...made Carefully read all literature accompanying the instrument and its accessories Pay particular attention to the operating procedures for the external printer 3 Keyboard and external printer Attach...

Page 19: ...tube and cap match You can for example place the reagent containers below the desk the analyzer is installed on as the instrument has sufficient power to draw the liquids from a lower location All con...

Page 20: ...following screen is displayed When SW is loaded Main menu is displayed Tap a touch screen item to go activate the menu element CAUTION Wait 5 minutes before initiating any measuring process to allow t...

Page 21: ...DOWN The following screen appears EXIT SHUT DOWN Select Shutdown The analyzer will perform the necessary steps to prevent failure to the pneumatic system and then gives a tone indicating that it is sa...

Page 22: ...the system into the waste container As a next step the analyzer asks you to remove the cleaning tube kit Leave Waste connected When finished the analyzer prompts you to power off the system Remove th...

Page 23: ...on the analyzer Label Meaning Explanation Biohazard Sample and waste are potentially infectious material Corrosive Reagents may cause corrosion or skin irritation Warning General warning of injury Sh...

Page 24: ...the item you want to open activate From any submenu the Home button will go back to Main menu while Back moves one step back in the menu tree 3 1 2 Touch screen calibration In case you experience unc...

Page 25: ...y Pre diluted Factors History Quality control QC1 References QC2 Measure QC3 Diagram QC4 Database QC5 QC6 Diagnostics Device information Self test Reagent status Volumes Settings Printer Device Format...

Page 26: ...ELite 3 User Manual Page 26 72 When you have to enter data an the on screen keyboard appears on the screen It can be a numerical or alphanumeric keyboard depending on the function...

Page 27: ...lume of that particle The volume distribution of the cells are displayed on diagrams WBC RBC and PLT histograms 4 2 Principle of HGB Measurement The lysed sample dilution can be measured by a photomet...

Page 28: ...RBC Mean Corpuscular Hemoglobin Concentration MCHC g dl g l mmol l Calculated from the HGB and HCT values MCHC HGB HCTabsolute Unit of measurement is displayed according to the one chosen for HGB resu...

Page 29: ...the maximum value indicated in the table below pre dilution is recommended See section 5 2 7 of this manual Linearity ranges of primary parameters in normal measuring mode Parameter Linearity Ranges...

Page 30: ...t Make sure to fill sample tubes to at least 7 8 mm height with blood otherwise correct sampling cannot be guaranteed Observe marking on sample tube There is another possibility that can help the user...

Page 31: ...ypes of microtainer tubes used in micro adapter These are only examples given by us you can try to use other type of microtainers as well There must be at least 8 mm sample level for safe sampling Be...

Page 32: ...e in the sample rotor 3 Press START key The sample rotor will turn the vial into the inside of the instrument and needle draws sample from the tube The aspirating needle is retracted while its outer s...

Page 33: ...o not shake as this could damage blood cells and create micro bubbles that cause sampling error 5 2 2 Running a new sample MEASURE This is the screen where you can start measurements Exit will return...

Page 34: ...pcoming sample Sample ID can be defined to identify the sample Type offers a list of profiles to select from Doctor will appear on the printout as well Cancel will return to the measurement screen abo...

Page 35: ...increased 0 1 0 2ml volume if the separation between lysed RBCs and WBC populations is poorly differentiated resulting in increased WBC and LYM counts Select a decreased 0 1 0 2ml volume if the WBC hi...

Page 36: ...trument during operation as the needle can injure you 5 2 3 Results When analysis is complete the following screen is displayed including all measured and calculated parameters as well as the WBC RBC...

Page 37: ...detected during the WBC measurement Either the lyse reagent is not effective enough volume should be increased or the RBC s in the sample are somewhat lyse resistive W WBC 3 part warning Probably larg...

Page 38: ...e the diluent by opening a new tank b RBC blank is high or no RBC blank Same action as in case of warning flag p Table 5 Summary of warning flags related to RBC PLT Measurement conditions when the fla...

Page 39: ...change activated manually from MEASURE MEASURE BLANK menu After the replacement of any hardware component that is closely related to the measuring process aspiration dilution counting rinsing In MEAS...

Page 40: ...measurement mode allows to measure insufficient sample for normal mode or if some parameter is out of the linearity range WBC 300 x 103 cells l Perform an external pre dilution of the sample using cle...

Page 41: ...ayed A filled checkbox indicates that a specific record is selected for further operations The bottom row of the screen shows the status line This line provides information about the number of records...

Page 42: ...Detail Edit When looking at record from the database view some fields are not editable Sample ID sample type These can only be set before running the sample Patient ID tab allows entering further dat...

Page 43: ...earch Sample ID and Patient ID can narrow the search If you enter 5 for sample id then all records whose Sample ID contains the expression 5 in our case will be selected 5 15 451 etc Using Type you ca...

Page 44: ...prints the actual top detail view record If there is more than 1 record selected then you will be able to choose between individual printing Result by result or Table format format if external USB pri...

Page 45: ...checkboxes of all selected records Send will transmit record s to a connected computer A progress bar shows the status of the process Delete will permanently delete selected record s from the database...

Page 46: ...HOME to go to Main menu Press BACK to go back to previous menu Cleaning starts a washing cycle using the system cleaner reagent connected to the analyzer This action is recommended if clogging problem...

Page 47: ...ailable Calibration can be performed in two ways 1 User can enter calibration factors without any calibration measurements using the numerical keypad 2 1 2 3 or more measurements of control blood or c...

Page 48: ...d 7 2 2 Calibration by measurement The analyzer can run calibrator and perform calculation of factors automatically User can decide the number of measurements to use for calibration Maintenance Calibr...

Page 49: ...the START button Exit will abort the operation Calibration runs are saved automatically If you find that a result should not be used use the Discard button to delete the measurement so that it is not...

Page 50: ...e Quality control Select LOT to work on Press HOME to go to Main menu Press BACK to go back to previous menu Maintenance Diagnostics QC1 Press HOME to go to Main menu Press BACK to go back to previous...

Page 51: ...Reference Use Prev and Next to browse among parameters Press Accept to save data Press Cancel to discard changes and return to the previous menu Enter the values as defined on the assay value sheet o...

Page 52: ...ny two parameters 7 3 4 Database This option displays the contents of the QC database You can browse in this view just like in the regular database view Functions selection browsing details printing a...

Page 53: ...rs can be seen on the screen Press EXIT to go back to the previous menu 8 1 2 Self Test Self test is a procedure to verify proper operation of essential components of the instrument Self test should b...

Page 54: ...quid into the system Volume opens up the container volume setup screen If Waste is high it should be disposed of properly see next section for instructions MAINTENANCE REAGENT STATUS Volume Set the vo...

Page 55: ...n for neutralization steps 8 2 2 Neutralization of Waste Waste contains human origin substances representing biohazard These substances are representing potential danger to environment For this reason...

Page 56: ...eport printing Settings Press BACK to go back to MAIN menu Settings Printer settings Settings Printer settings Device Printer Selection between built in or USB printer If the printer is recognized the...

Page 57: ...diagnostic flags appear on the report as well except table format Settings Printer Device Mode Fast modes save ink and provide faster printout Only normal color and fast color printouts will give colo...

Page 58: ...ended text Advances text Press Accept to approve changes made Press Cancel to go back to previous menu keeping the old settings 9 3 Measurement SETTINGS General Sound If enabled the analyzer provide a...

Page 59: ...this range parameters will be flagged or Settings Measurement Normal ranges The Human profile button brings up the profile selection menu Prev and Next allow browsing among parameters Parameter order...

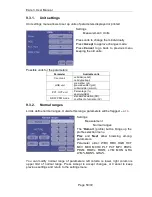
Page 60: ...sults are displayed Auto send will automatically transmit results if a PC is connected Barcode allows setting scanned data to be entered as Sample ID or Patient ID Accept saves changes made Cancel ret...

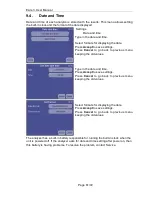
Page 61: ...setting after power on then this battery is having problems To resolve the problem contact Service Settings Date and time Type in the date and time Select formats for displaying the date Press Accept...

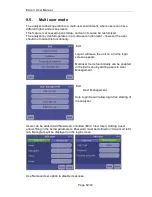
Page 62: ...ot notice this functionality Users can be added Add New User or edited Edit View User Adding a user allows filling in the below parameters Password must be defined on Advanced Info tab Monogram will b...

Page 63: ...hamber Calibration Factors Measure History Pre diluted Factors History Quality control forbidden Diagnostics Device information Self test Service Reagent status Settings forbidden Exit Logout Add new...

Page 64: ...p the analyzer power off Preparing for shipment will drain the unit so that it can be transported Log In brings up the login screen below Login screen with Auto Login Off Touch Login name Select name...

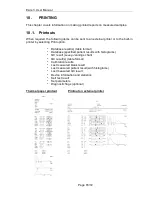
Page 65: ...ter by selecting Print option Database result s table format Database specified patient results with histograms QC result Levey Jennings chart QC result s table format Calibration results Last measure...

Page 66: ...ELite 3 User Manual Page 66 72 Database Table Printout QC graphical printout on built in printer QC graphical printout on external printer...

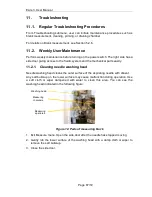
Page 67: ...mechanical parts easily 11 2 1 Cleaning needle washing head Needle washing head cleans the outer surface of the aspirating needle with diluent Any salt build up on the lower surface may cause malfunc...

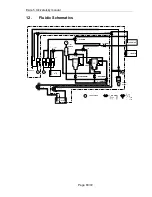
Page 68: ...ELite 5 U ivatelsk manu l Page 68 72 12 Fluidic Schematics...

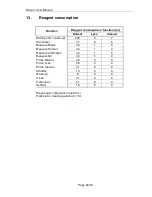
Page 69: ...wake up 200 5 7 Shut down 37 0 6 Measure Blank 34 1 0 Measure Human 34 1 0 Measure Calibration 34 1 0 Measure QC 34 1 0 Prime Diluent 29 0 0 Prime Lyse 26 2 0 Prime Cleaner 31 0 2 Standby 13 0 0 Wake...

Page 70: ...TIME HT WBC HT RBC HT HGB HT HCT HT MCV HT MCH HT MCHC HT PLT HT PCT HT MPV HT PDWc HT RDWc HT LYM HT MON HT GRA HT LYM HT MON HT GRA HT Type HT WARNING HT RBC probe min HT RBC probe max HT WBC probe...

Page 71: ...urer Erba Lachema s r o Kar sek 2219 1d 621 00 Brno Czech Republic Tel 420 517 077 111 e mail diagnostics erbamannheim com Website https www erbamannheim com en product support Contact your local tech...

Page 72: ...ELite 3 User Manual Page 72 72 16 Appendix package inserts for reagents and cleaning solutions Revision 3 0 Date of Revision 07 2017 HEMA PI 14 17 B...

Page 73: ...ARATION Erba Diluent Diff is intended for use with blood specimens collected by vein puncture in EDTA anticoagulant Specimens for hematological analysis may be stored for up to 8 hours at 15 to 30 C o...

Page 74: ...ent is intended for use with blood specimens collected by vein puncture in EDTA anticoagulant Specimens for hematological analysis may be stored for up to 8 hours at 15 to 30 C or up to 24 hours after...

Page 75: ...peci mens collected by vein puncture in EDTA anticoagulant Specimens for hematological analysis may be stored for up to 8 hours at 15 to 30 C or up to 24 hours after collection when refrigerated 2 to...

Page 76: ...s intended for use with blood specimens collected by vein puncture in EDTA anticoagulant Specimens for hematological analysis may be stored for up to 8 hours at 15 30 C or up to 24 hours after collect...

Page 77: ...i als Treat all blood and other potentially infectious materials with appropriate precautions Use gloves masks and gowns if blood exposure is anticipated Please refer to the MSDS associated with the r...

Reviews: