25
24
NOTE:
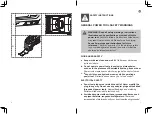
Attach the accessories at the desired orientation for the task at
hand. The shaft is configured so that the accessory can be attached at 30°
intervals around the shaft, from 0° to 330°.
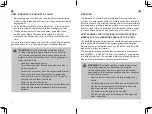
ATTACHING SANDING SHEETS (C)
Align the sanding sheet(14) with the sanding pad(12).
Press the sheet firmly in place.
To remove the sheet, simply pull it off
If one point has become worn, peel off the sanding sheet, turn it 120° and attach again.
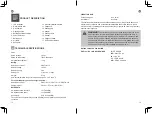
USING ADAPTOR (D)
NOTE:
The adaptor can be used to install branded accessories.
Put the “Adaptor” (13) on the accessory attachment plate. Place correct branded
accessory on top of adaptor.
With your gloved hand holding the accessory, insert and depress the flange bolt (11) until
you hear a click indicating that the accessory is secured. Press and turn the flange bolt (11)
anticlockwise for 90°.
USE
01
INTENDED USE
This product is intended for sanding (not for plaster/drywalls) and scraping, as well as
for cutting wood, plaster,plastics and soft (non-ferrous) metals, by using appropriate
accessories. It should not be used for working on materials that are dangerous to health.
02
OPERATION
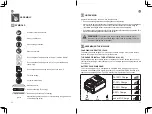
VARIABLE SPEED CONTROL (E)
The variable speed feature of this tool enables the speed to be adjusted according to the
accessory being used and material being cut, scrapped or sanded.
The speed dial (9) is numbered “1” to “6”, with position “1” being the lowest speed and
position “6” being the highest speed.
ON/OFF SWITCH (F)
To turn the tool ON, push the on/off switch (3) forward. To turn it OFF, push the switch
backward.
LED WORK LIGHT (G)
The LED work light (1) will automatically illuminate when you turn the tool ON, and will
turn off after you turn the tool OFF. This provides additional light on the surface of the
workpiece for operation in lower light situations.
Sanding
WARNING!
Do not continue to use the tool with a sanding sheet that is
over worn or damaged.
Do not use the same sanding sheet for wood and metal.
Metal particles become embedded in the sanding sheet and will scour a wooden surface.
The removal rate and the sanding pattern are determined by the choice of sanding sheet
and the work surface.
Apply uniform sanding pressure to extend the life of the sanding sheets.
Intensifying the sanding pressure does not lead to an increase of the sanding capacity,
but instead it increases wear on the machine and the sanding sheet.
Use only the tip or an edge of the sanding sheet for precise sanding of edges, corners
and hard to reach areas.
When selectively sanding on one spot, the sanding sheet can heat up considerably.
Remove the tool from the surface periodically to permit the sanding sheet to cool down.


