background image

Note:

  Do  not  over-tighten  the  screws.  Leave 

enough scope for the foam rubber mat to devel-
op a good absorbing effect.

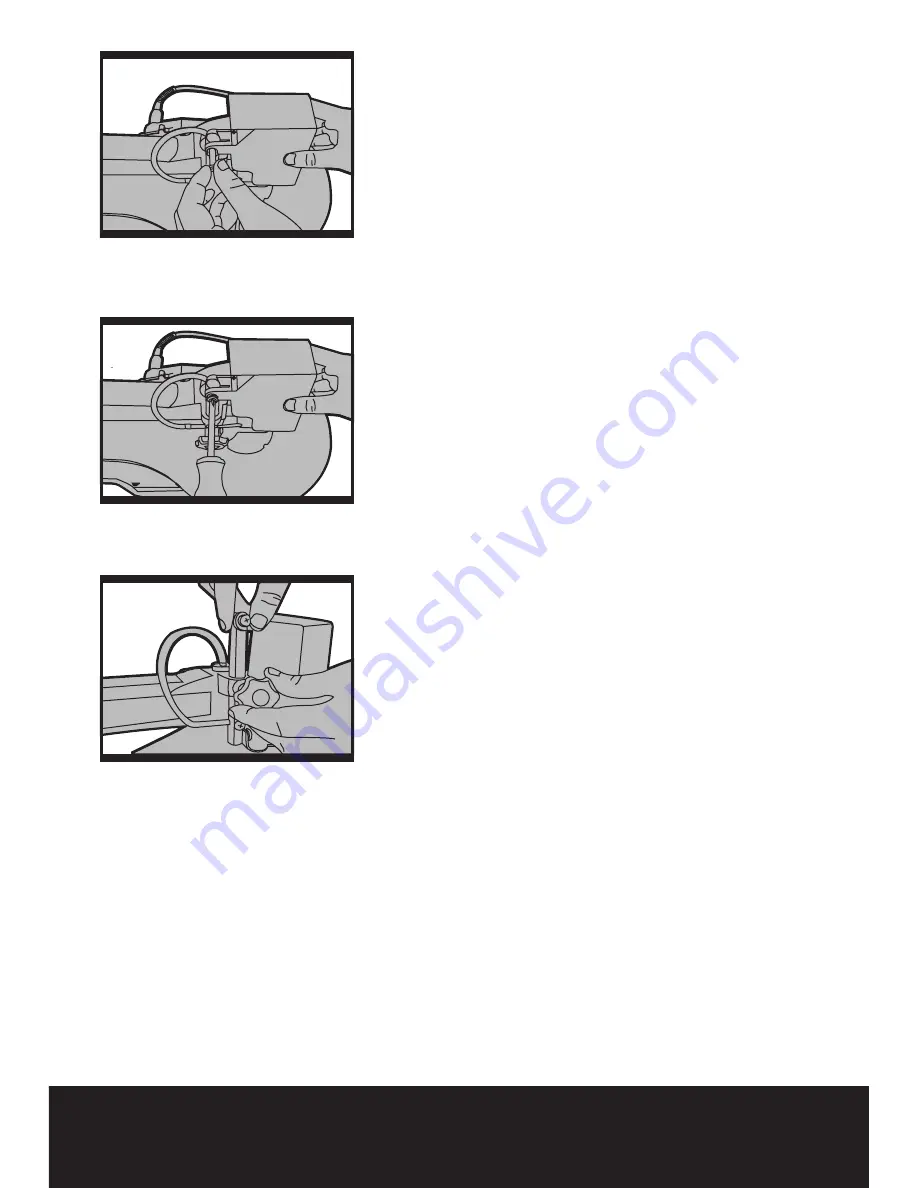
2. Mounting the saw blade guard 

(see Fig.B1—Fig.B3)

Slide the saw blade guard (2) onto the retention 
bolt (e). Insert the screw through the bore hole of 
the retention bolt (e) and the saw blade guard (2). 

(Fig.B1)

Use the nut to secure the screw from falling out. 

(Fig.B2)

The  saw  blade  guard  can  be  fixed  at  various 
heights with the lock knob (f). 

(Fig.B3)


Fig.B1

Fig.B2

Fig.B3

Summary of Contents for ERB110SSW

Page 1: ...70W SCROLL SAW ERB110SSW WARRANTY YEARS...

Page 2: ......

Page 3: ...of the goods Thisguaranteedoesnotaffectyourstatutoryrights ThisguaranteeisonlyvalidintheUK For further technical advice spare parts or repair service outside of guarantee please contact the customer h...

Page 4: ...ight tool Do not force small tools to do the job of a heavy duty tool Do not use tools for purposes not intended for example do not use circular saws to cut tree limbs or logs 8 Dress properly Do not...

Page 5: ...the tool if the switch dose not turn it on and off 21 Warning The using of any accessory or attachment other than those recommended in this instruction manual may present a risk of personal injury 22...

Page 6: ...al which is irregular in cross section which could pinch the blade before the cut is completed A piece of moulding for example must lay on the table and not be permitted to rock while being cut Use ca...

Page 7: ...61029 Work mode description 1 with exible shaft Vibration emission value ah 0 14 m s Uncertainty K 1 5 m s The declared vibration emission value should be used as a minimum level should be used with...

Page 8: ...vibration exposure risk ALWAYS use sharp chisels drills and blades Maintain this tool in accordance with these instructions and keep well lubricated where appropriate Avoid using tools in temperatures...

Page 9: ...iece press plate 5 Dust blower tube 6 Blade 7 Table insert 8 Blade speed regulator 9 On Off switch 10 Dust extraction outlet 11 Table tilt lock knob 12 Angle adjustment scale 13 Flexible shaft 14 Saw...

Page 10: ...epth of throat 406 mm Table bevel 0 45o Blade length 130 mm Flexible shaft length 1100 mm Flexible shaft speed 1650 4800 min Weight 15 5 kg ACCESSORIES Flexible shaft including collet 1pc Flexible sha...

Page 11: ...5 2 3 1 Diamond cutter taper 3 9x6 6 4 3x8 5 2 3 3 1 1 1 Twist drill bit 3 2x27 3 2 1 Twist drill bit 2 3x24 2 3 1 Collet chrome plated 2 3 2 4 5 5 Grinding wheel 9 8x10 3 1 1 Grinding wheel 20x3 3 1...

Page 12: ...eel 4 5X17 1 Large felt wheel 25 5x6 3 Small felt wheel 13x7 5 Cut off wheel bre glass 32x1 2 8 Dressing stone SI carbide 9 8x9 8x25 1 Cut off wheel grit 120 24x0 6 30 Cut off wheel grit 280 20 2x0 4...

Page 13: ...ctly tted and that the machine s moving parts run smoothly ASSEMBLY Caution Always disconnect the tool from the mains supply before carrying out any adjustment ser vicing or maintenance 1 Mounting the...

Page 14: ...blade guard see Fig B1 Fig B3 Slide the saw blade guard 2 onto the retention bolt e Insert the screw through the bore hole of the retention bolt e and the saw blade guard 2 Fig B1 Use the nut to secur...

Page 15: ...1 to cut in line with the radial arm Use slot 2 to cut at right angles to the radial arm Fig C3 Tension the blade by turning the blade tension knob 15 clockwise right hand thread Note Do not over tigh...

Page 16: ...pped with a magnetic switch to prevent it being switched on again ac cidentally after a power failure 2 Blade speed regulator 8 see Fig E The blade speed regulator allows you to set the blade speed ap...

Page 17: ...Attaching the blade adaptors to plain end blades for side cutting Fig F4 a Remove both setscrews from each blade adap tor thread them into the opposite holes in the blade adaptor perpendicular to the...

Page 18: ...g H4 Remove the spindle lock OPERATING THE FLEXIBLE SHAFT Follow these guidelines when operating the tool Always allow the tool to operate as it was de signed Never force the exible shaft Secure the w...

Page 19: ...s Lubricate the arm bearings with oil after 10 hours of use Re oil after every 50 hours of use or whenever there is a squeak com ing from the bearings To Lubricate Turn saw on its side Squirt a genero...

Page 20: ...ades for cutting thin wood tight corners and and curves Use wide blades for thicker wood and large curves Reduce side pressure on blade check blade tension Vibration there is al ways a certain amount...

Page 21: ...plug follows the instruction below IMPORTANT The wire in the mains lead are coloured in accordance with the following code Blue Neutral Brown Live The wire that is coloured blue must be connected to t...

Page 22: ...Electromagnetic Compatibility Directive 2004 108 EC Restrictions of the Use of Certain Hazardous Substances in Electrical and Electronic Equipment 2002 95 EC Standards and technical speci cations ref...

Page 23: ...70W SCROLL SAW...

Page 24: ......

Reviews: