background image

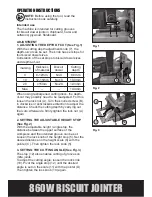
4. DUST EXTRACTION (See Fig.4)

1) Internal dust extraction with dust bag (13).

For small cutting jobs, the dust bag can be used. 

Connect it with the dust extraction adapter and 

Insert to the dust outlet (8). 

Empty the dust bag regularly.

2) External dust extraction 

Connect a suitable vacuum cleaner to the dust 

outlet (8) through the dust extraction adapter (18)

.

STARTING OPERATION

Warning:


When working with the machine, always hold 

it firmly with both hands and provide for a 

secure stance. 

The power tool is guided more 

secure with both hands. Hold the routing motor 

with one hand and the auxiliary handle with the 

other hand.

•  Keep your hands away from the cutting area 

and the cutting disc. 

•  Apply the machine to the workpiece only 

when switched on.

 Otherwise there is danger 

of kickback when the cutting tool jams in the 

workpiece.

1. SWITCHING ON AND OFF 

To switch on the machine, push the On/Off switch 

forward and press it down at the front to lock on.

To switch off the machine, press down the On/Off 

switch at the rear so that the switch springs back to 

the off position.

2. MARKING THE WORKPIECES (See Fig.5)

Before starting operation, the workpieces must be 

marked as following. 

Place the two workpieces, which must be 

connected, on top of each other. Fasten the 

workpieces and mark the centre of the groove. 

Smaller workpieces don’t have to be marked.

3. SELECTION OF THE BISCUIT DOWEL (See 

Fig.6)

For a solid connection, use the largest possible 

biscuit dowel. Appropriate biscuit dowels are 

recommended to use according to Fig.6.

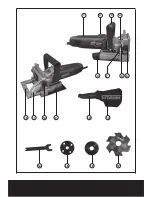
Fig. 1

Fig. 4

Fig. 3

A

Fig. 5

Fig. 8

Fig. 9

Fig. 7

Fig. 6

12

11

18

13

8

4

10

7

5

6

B

C

D

E

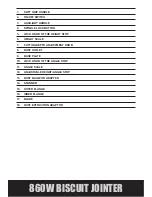
Fig. 2

Summary of Contents for ERB372BJC

Page 1: ...860W BISCUIT JOINTER ERB372BJC...

Page 2: ...Original Instructions Version 2 0...

Page 3: ...he goods This guarantee does not affect your statutory rights This guarantee is only valid in the UK For further technical advice spare parts or repair service outside of guarantee please con tact the...

Page 4: ...er modify the plug in any way Do not use any adapter plugs with earthed grounded power tools Unmodified plugs and matching outlets will reduce risk of electric shock b Avoid body contact with earthed...

Page 5: ...adjusting key or wrench before turning the power tool on A wrench or a key left attached to a rotating part of the power tool may result in personal injury e Do not overreach Keep proper footing and...

Page 6: ...aged have the power tool repaired before use Many accidents are caused by poorly maintained power tools f Keep cutting tools sharp and clean Properly maintained cutting tools with sharp cutting edges...

Page 7: ...re is danger of kickback when the cutting tool jams in the workpiece 7 Keep your hands away from the cutting area and the cutting disc Hold the auxiliary handle with your second hand When both hands h...

Page 8: ...plug when the cable is damaged while working Damaged cables increase the risk of an electric shock 17 Always use the auxiliary handle supplied with the machine Loss of control can cause personal inju...

Page 9: ...Advice can be found at www hse gov uk Vibration total values triax vector sum determined according to EN 60745 Vibration emission value ah 4 77m s2 Uncertainty K 1 5m s The declared vibration emissio...

Page 10: ...instructions and keep well lubricated where appropriate Avoid using tools in temperatures of 10 C or less Plan your work schedule to spread any high vibration tool use across a number of days Health...

Page 11: ...Wear ear protection Wear eye protection Wear dust mask Waste electrical products should not be disposed of with household waste Please recycle where facilities exist Check with your Local Authority or...

Page 12: ...3 5 4 2 6 7 8 9 10 11 12 13 18 14 1 15 16 17...

Page 13: ...TTON 5 LOCK KNOB OF THE HEIGHT STOP 6 HEIGHT SCALE 7 CUTTING DEPTH ADJUSTMENT KNOB 8 DUST OUTLET 9 BASE PLATE 10 LOCK KNOB OF THE ANGLE STOP 11 ANGLE SCALE 12 ADJUSTABLE HEIGHT ANGLE STOP 13 DUST BAG...

Page 14: ...otection class II Machine weight 3 0kg NOISE AND VIBRATION DATA A weighted sound pressure LPA 85dB A KPA 3dB A A weighted sound power LWA 96dB A KWA 3dB A Wear ear protection when sound pressure is ov...

Page 15: ...eed to be readjusted For this loosen the lock nut A Turn the knurled screw B in clockwise or anticlockwise direction to adjust the distance Check the cutting depth by carrying out trial cuts Afterward...

Page 16: ...isc Apply the machine to the workpiece only when switched on Otherwise there is danger of kickback when the cutting tool jams in the workpiece 1 SWITCHING ON AND OFF To switch on the machine push the...

Page 17: ...ss the spindle lock button and keep it pressed Loosen and remove the outer flange with the two pin spanner Take out the old cutting disc and replace with a new one on the inner flange Important Make s...

Page 18: ...Wipe clean with a dry cloth Always store your tool in a dry place Keep the motor ventilation slots clean ENVIRONMENTAL PROTECTION Waste electrical products should not be disposed of with household wa...

Page 19: ...ws The wire which is colored blue must be connected to the terminal which is marked with N The wire which is colored brown must be connected to the terminal which is marked with L Warning Never connec...

Page 20: ...ctions of the Use of Certain Hazardous Substances in Electrical and Electronic Equipment 2011 65 EU Waste Electrical and Electronic Equipment WEEE 2012 19 EU Standards conform to EN 60745 1 2009 A11 2...

Page 21: ......

Page 22: ......
Reviews: