background image

PLUG REPLACEMENT 

(UK & IRELAND ONLY)

If you need to replace the fitted plug then follow the 

instructions below.

IMPORTANT

The  wires  in  the  mains  lead  are  coloured  in 

accordance with the following code:

BLUE =NEUTRAL

Brown = Live

As the colours of the wires in the mains lead of this 

appliance  may  not  correspond  with  the  coloured   

markings  identifying  the  terminals  in  your  plug, 

proceed as follows. The wire which is coloured blue 

must be connected to the terminal which is marked 

with N. The wire which is coloured brown must be 

connected to the terminal which is marked with L.

Warning:

Never connect live or neutral wires to the earth 

terminal of the plug. 

Only fit an approved 13AMP  

BS1363/A plug and the correct rated fuse. 

Note:

  If  a  moulded  plug  is  fitted  and  has  to  be 

removed  take  great  care  in  disposing  of  the  plug 

and severed cable, it must be destroyed to prevent 

engaging into a socket.


13 Amp fuse approved

to BS 1363

Connect

Blue to N

(neutral)

Outer sleeve

firmly clamped

Brown L(live)

Cable grip

Summary of Contents for ERB566CSW

Page 1: ...1500W 190mm Circular Saw ERB566CSW ERB566CSW ...

Page 2: ...Original Instructions Version 1 0 ...

Page 3: ...use of the goods This guarantee does not affect your statutory rights This guarantee is only valid in the UK For further technical advice spare parts or repair service outside of guarantee please con tact the customer helpline number on 0345 607 6380 Congratulations on your purchase of a quality power tool from Erbauer UK Ltd This product should give you reliable service but for your peace of mind...

Page 4: ...ver modify the plug in any way Do not use any adapter plugs with earthed grounded power tools Unmodified plugs and matching outlets will reduce risk of electric shock b Avoid body contact with earthed or grounded surfaces such as pipes radiators ranges and refrigerators There is an increased risk of electric shock if your body is earthed or grounded c Do not expose power tools to rain or wet condi...

Page 5: ...move any adjusting key or wrench before turning the power tool on A wrench or a key left attached to a rotating part of the power tool may result in personal injury e Do not overreach Keep proper footing and balance at all times This enables better control of the power tool in unexpected situations f Dress properly Do not wear loose clothing or jewellery Keep your hair clothing and gloves away fro...

Page 6: ...ing tools sharp and clean Properly maintained cutting tools with sharp cutting edges are less likely to bind and are easier to control g Use the power tool accessories and tool bits etc in accordance with these instructions taking into account the working conditions and the work to be performed Use of the power tool for operations different from those intended could result in a hazardous situation...

Page 7: ...he saw if the guard system does not function correctly Never lock the moving guard open The guard must move freely 13 Never use saw blades made from high speed steel HSS 14 Always check walls floors and ceilings to avoid hidden power cable and pipes 15 After long working periods external metal parts and accessories could be hot 16 Do not cut material containing asbestos 17 Do not use metal or ston...

Page 8: ...ng hardware of the saw will run eccentrically causing loss of control h Never use damaged or incorrect blade washers or bolt The blade Warning of explosive to dust washers and bolt were specially designed for your saw for optimum performance and safety of operation FURTHER SAFETY INSTRUCTIONS FOR ALL SAWS KICKBACK CAUSES AND RELATED WARNINGS Kickback is a sudden reaction to a pinched bound or misa...

Page 9: ...piece as the saw is restarted d Support large panels to minimise the risk of blade pinching and kickback Large panels tend to sag under their own weight Supports must be placed under the panel on both sides near the line of cut and near the edge of the panel e Do not use dull or damaged blades Unsharpened or improperly set blades produce narrow kerf causing excessive friction blade binding and kic...

Page 10: ...one of the at risk groups within this because of the dust that they breathe silica dust is not just a nuisance it is a real risk to your lungs Silica is a natural mineral present in large amounts in things like sand sandstone and granite It is also commonly found in many construction materials such as concrete and mortar The silica is broken into very fine dust also known as Respirable Crystalline...

Page 11: ...res varies depending upon how often you do this type of work To reduce your exposure to these chemicals Work in a well ventilated area Work with approved safety equipment such as those dust masks that are specially designed to filter microscopic particles VIBRATION The European Physical Agents Vibration Directive has been brought in to help reduce hand arm vibration syndrome injuries to power tool...

Page 12: ...ng cycle such as the times when the tool is switched off and when it is running idle in addition to the trigger time Note The use of other tools will reduce the users total working period on this tool Helping to minimise your vibration exposure risk ALWAYS use sharp chisels drills and blades Maintain this tool in accordance with these instructions and keep well lubricated where appropriate Avoid u...

Page 13: ...ear ear protection Wear eye protection Wear dust mask Wear safety gloves Waste electrical products should not be disposed of with household waste Please recycle where facilities exist Check with your Local Authority or retailer for recycling advice yyWxx Manufacturing date code Year of manufacturing 20yy and week of manufacturing Wxx ...

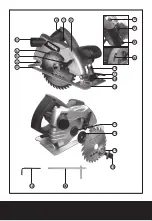
Page 14: ...1 8 2 3 21 22 12 20 7 18 19 4 5 6 9 11 10 13 17 14 16 15 ...

Page 15: ...EVER 6 SAW BLADE 7 BASE PLATE BEVEL LOCK 8 LOCK OFF BUTTON 9 SPINDLE LOCK BUTTON 10 DEPTH ADJUSTMENT LEVER 11 DEPTH SCALE 12 HEX KEY 13 DUST EXTRACTION OUTLET 14 INNER FLANGE 15 BLADE BOLT 16 OUTER FLANGE 17 SPINDLE 18 BEVEL SCALE 19 CUTTING GUIDE NOTCH 20 PARALLEL GUIDE 21 VACUUM ADAPTOR 22 PARALLEL GUIDE TIGHTEN SCREW ...

Page 16: ...Base plate Machine weight 66mm 47mm Aluminium 4 4Kg NOISE INFORMATION A weighted sound pressure LpA 75dB A KpA 3 0dB A A weighted sound power LwA 86dB A KWA 3 0dB A Wear ear protection when sound pressure is over 80dB A ACCESSORIES Blade Ø190xØ30x24T 1pc Parallel guide 1pc Vacuum adapter for 35mm hose interface only 1pc Hex key 6mm 1pc TECHNICAL DATA ...

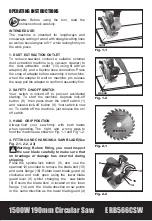
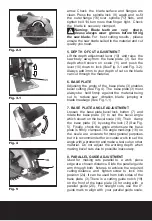
Page 17: ...the machine depress lock off button 8 then press down the on off switch 1 and release lock off button 8 Your switch is now on To switch off the machine just release the on off switch 3 HAND GRIP POSITION Always hold your saw firmly with both hands when operating The right and wrong ways to hold the machine are shown in Fig 1 1 and Fig 1 2 4 FITTING AND CHANGING A SAW BLADE See Fig 2 1 2 2 2 3 Warn...

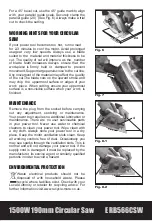
Page 18: ...lade breakage See Fig 1 1 7 BASE PLATE ANGLE ADJUSTMENT Loosen the base plate bevel lock button 7 and rotate the base plate 3 to set the bevel angle which shown on the bevel scale 18 Then clamp the base plate 3 by using the lock 7 See Fig 5 Finally check the angle and ensure the base plate is firmly clamped The angle markings 18 on the scale are accurate for most general purposes but it is recomme...

Page 19: ... is a non visible surface when your work is finished MAINTENANCE Remove the plug from the socket before carrying out any adjustment servicing or maintenance Your power tool requires no additional lubrication or maintenance There are no user serviceable parts in your power tool Never use water or chemical cleaners to clean your power tool Wipe clean with a dry cloth Always store your power tool in ...

Page 20: ...e which is coloured blue must be connected to the terminal which is marked with N The wire which is coloured brown must be connected to the terminal which is marked with L Warning Never connect live or neutral wires to the earth terminal of the plug Only fit an approved 13AMP BS1363 A plug and the correct rated fuse Note If a moulded plug is fitted and has to be removed take great care in disposin...

Page 21: ...romagnetic Compatibility Directive 2004 108 EC Restrictions of the Use of Certain Hazardous Substances in Electrical and Electronic Equipment 2011 65 EU Waste Electrical and Electronic Equipment WEEE 2012 19 EU Standards and technical specifications referred to EN 55014 1 EN 55014 2 EN 61000 3 2 EN 61000 3 3 EN 60745 1 EN 60745 2 5 Authorised Signatory and technical file holder Date 05 01 15 Signa...

Page 22: ......

Reviews: