background image

18V IMPACT DRIVER 

     ERI604IPD

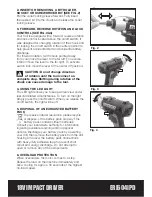
2. INSERT OR REMOVING  A BIT HOLDER, 

SOCKET OR SCREWDRIVER BIT (SEE FIG .2)

Pull the collet locking sleeve forward. Fully insert 

the desired bit into the chuck and release the collet 

locking sleeve. 

3. FORWARD, REVERSE ROTATION AND LOCK 

CONTROL (SEE FIG .3&4)

Your tool is equipped with a forward, reverse rotation 

and lock control located above the on/off switch. It 

was designed for changing rotation of the chuck and 

for locking the on/off switch in the center position to 

help prevent accidental start and accidental battery 

discharge. 

For forward rotation, (with chuck pointed away 

from you) move the lever to the far left. For reverse 

rotation move the lever to the far right. To activate 

switch lock move the lever to the center off position. 


CAUTION:


Do not change direction 

of rotation until the tool comes to a 

complete stop. Shifting during rotation of the 

chuck can cause damage to the tool.

4. USING THE LED LIGHT 

The LED light allows you to keep a clear view under 

less illuminated circumstances. To turn on the light 

simply press the on/off switch. When you release the 

on/off switch, the light will be off.

5. DISPOSAL OF AN EXHAUSTED BATTERY 

PACK

To preserve natural resources, please recycle 

or dispose of the battery pack properly. This 

battery pack contains Lithium batteries. 

Consult your local waste authority for information 

regarding available recycling and/or disposal 

options. Discharge your battery pack by operating 

your drill, then remove the battery pack from the drill 

housing and cover the battery pack connections 

with heavy-duty adhesive tape to prevent short 

circuit and energy discharge. Do not attempt to 

open or remove any of the components.

6. OVERLOAD PROTECTION

When overloaded, the motor comes to a stop. 

Relieve the load on the machine immediately and 

allow cooling for approx. 30 seconds at the highest 

no-load speed.

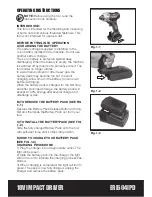
Fig. 1-1

Fig. 1-2

Fig. 1-3

Fig. 2

Fig. 3

Fig. 4

Summary of Contents for ERI604IPD

Page 1: ...18V IMPACT DRIVER ERI604IPD ERI604IPD...

Page 2: ...Original Instructions Version 1 0...

Page 3: ...of the goods This guarantee does not affect your statutory rights This guarantee is only valid in the UK For further technical advice spare parts or repair service outside of guarantee please contact...

Page 4: ...rom heat oil sharp edges or moving parts Damaged or entangled cords increase the risk of electric shock e When operating a power tool outdoors use an extension cord suitable for outdoor use Use of a c...

Page 5: ...power tool repaired before use Many accidents are caused by poorly maintained power tools f Keep cutting tools sharp and clean Properly maintained cutting tools with sharp cutting edges are less like...

Page 6: ...ipping surfaces when performing an operation where the fastener may contact hidden wiring Fasteners contacting a live wire may make exposed metal parts of the power tool live and could give the operat...

Page 7: ...ns high pressure containers or on induction cookware 14 If you intend to store a battery for a period without use then store battery at room temperature 19 C to 25 C charged to about 30 50 of capacity...

Page 8: ...ing by using the best sizes of building products 2 Use a less powerful tool e g a block cutter instead of angle grinder 3 Using a different method of work altogether e g using a nail gun to direct fas...

Page 9: ...ed value depending on the ways in which the tool is used dependant on the following examples and other variations on how the tool is used How the tool is used and the materials being cut or drilled Th...

Page 10: ...with these instructions and keep it well lubricated where appropriate 6 Plan your work schedule to spread any high vibration tool use across a number of days Familiarise yourself with the use of this...

Page 11: ...their doctor and the medical implant manufacturer before operating this product Important note Be sure the supply is the same as the voltage given on the rating plate for the charger The charger is fi...

Page 12: ...tes that this battery contains lithium This battery shall be brought to your shop to be recycled Wear ear protection Wear eye protection Wear dust mask Do not dispose of batteries Return exhausted bat...

Page 13: ...N AND LOCK CONTROL 2 BELT CLIP 3 BATTERY PACK 4 BATTERY PACK RELEASE BUTTON 5 ON OFF SWITCH WITH VARIABLE SPEED CONTROL 6 LED LIGHT 7 COLLET LOCKING SLEEVE Not all the accessories illustrated or descr...

Page 14: ...r Output 14 4 20V 3000mA Machine weight 1 1kg Battery capacity 2 0Ah Li ion battery NOISE AND VIBRATION DATA A weighted sound pressure LpA 76dB A KPA 3 0dB A A weighted sound power LwA 87dB A KWA 3 0d...

Page 15: ...w time for the battery to cool down before recharging When the battery pack is charged for the first time and after prolonged storage the battery pack will accept a 100 charge after several charge and...

Page 16: ...e new battery pack displays the same problem as the original Battery Pack have the charger tested at an authorized service center Indicator ON OFF flash Status Red on Charging Red flash Defective Batt...

Page 17: ...top Shifting during rotation of the chuck can cause damage to the tool 4 USING THE LED LIGHT The LED light allows you to keep a clear view under less illuminated circumstances To turn on the light sim...

Page 18: ...ER NOT TURN ON WHEN YOU PRESS THE SWITCH The forward reverse rotation control which is on top of the trigger is positioned in the lock function Unlock the forward reverse rotation control by putting i...

Page 19: ...ower tool in a dry place Keep the motor ventilation slots clean Keep all working controls free of dust Occasionally you may see sparks through the ventilation slots This is normal and will not damage...

Page 20: ...re which is coloured blue must be connected to the terminal which is marked with N The wire which is coloured brown must be connected to the terminal which is marked with L Warning Never connect live...

Page 21: ...irective 2004 108 EC Restrictions of the Use of Certain Hazardous Substances in Electrical and Electronic Equipment 2011 65 EU Waste Electrical and Electronic Equipment WEEE 2012 19 EU Standards and t...

Page 22: ......

Page 23: ......

Page 24: ......

Reviews: