SQUIDS
®
BARCODE
SCANNER LANYARD
WWW.ERGODYNE.COM // 800 225 8238
The Squids® Barcode Scanner Lanyard Harness is designed for ease-of-use when reducing
the risk of dropped barcode scanners (refer to Using A Tethering System instructions).
WARNINGS: ALL WARNINGS AND INSTRUCTIONS MUST BE READ AND UNDERSTOOD
BEFORE USING THIS PRODUCT. FAILURE TO DO SO MAY RESULT IN PROPERTY
DAMAGE, SERIOUS INJURY, OR DEATH.
• Never exceed the allowable weight capacity for any Tool Lanyard.
• Always inspect Tool Lanyards prior to, and after, each use (refer to INSPECTION
instructions).
• Do not wrap a Tool Lanyard around sharp or rough edges.
• Never modify or alter your Tool Lanyard.
• Never modify a tool that could result in manufacturer guideline deviation.
• Do not use this product if it interferes with the tool’s safe working condition.
• Use extra precaution around moving machinery or parts, electrical hazards, chemical
hazards or other apparent hazards.
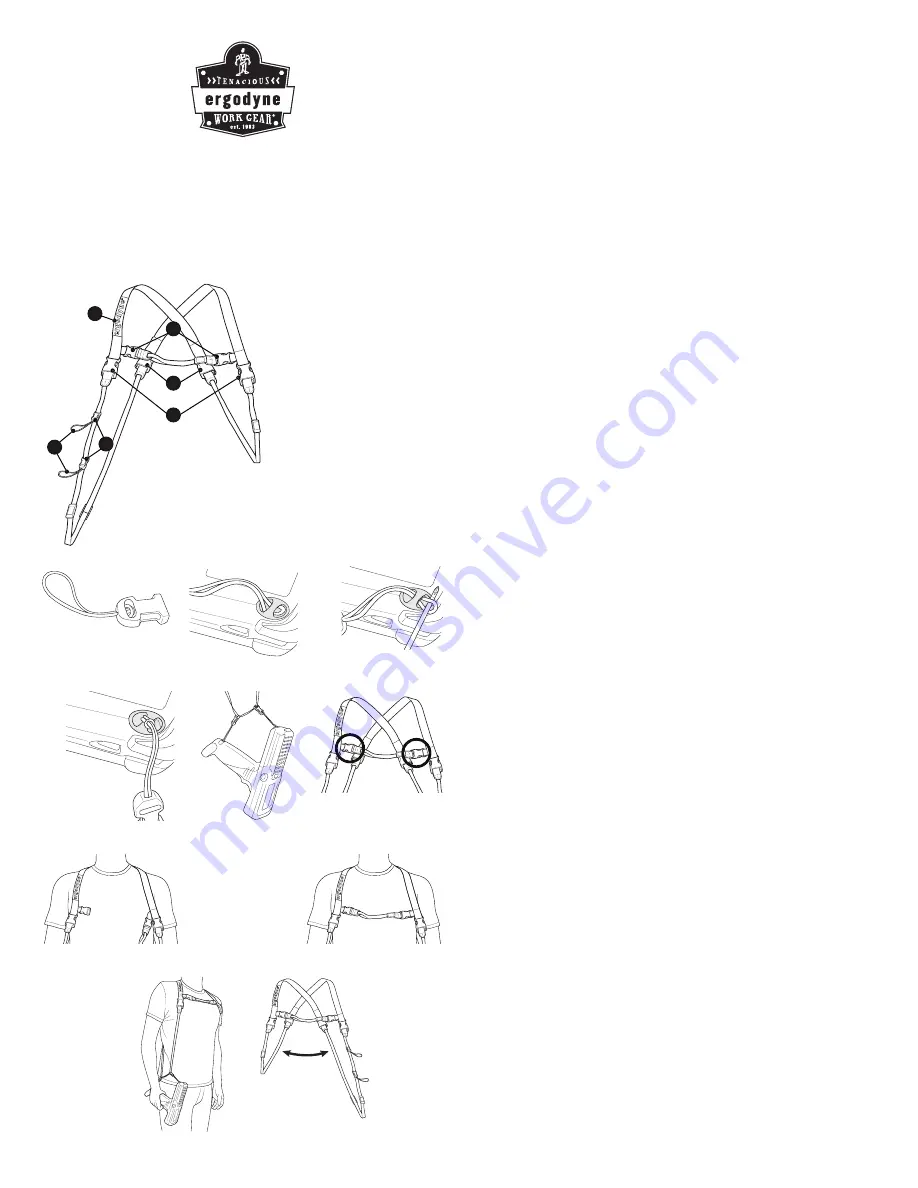
CONNECTION POINT MAP
A:
Male End of Modular Buckle
B:
Female End with Connective Loop
C:
Chest Strap Buckles
D:
Front Lanyard Attachment Buckles
E:
Ergodyne Branding (Always on Right Shoulder)
F:
Back Side Lanyard Attachment Buckles
INSTRUCTIONS FOR ATTACHING BARCODE SCANNER
LANYARD HARNESS TO BARCODE SCANNER
1. The barcode Scanner Lanyard attaches to the barcode scanner with the two small
loop connectors on the end of the modular female buckles [B]. Detach the female
buckle end of the loop connector from the rest of the barcode scanner lanyard for
installation [fig. 1]
2. Take the small loop connector on the modular female buckle and thread it through
the captive hole in the bottom of the barcode scanner gun. [fig. 2]
- If necessary, use a small screwdriver or hex key to help thread the loop connectors
through the captive hole on the barcode scanner [fig. 3]
3. Cinch the loop connector to the captive hole in the barcode scanner by pulling the
female buckle end through the loop and pulling the loop tight to remove slack. [fig. 4]
4. Repeat steps 2 and 3 using the captive hole located near the rear bottom of the
barcode scanner [fig. 5, Connection Point B]. Attaching both loop connectors
provides extra barcode scanner gun stability.
INSTRUCTIONS FOR ATTACHING BARCODE SCANNER
LANYARD HARNESS TO BODY
1. To orient the product correctly for donning the harness, hold the body of the
barcode scanner lanyard harness with the Ergodyne label facing towards you. Place
the Ergodyne logo label near your left hand and grab the side opposite from the label
with your right, pulling the slack out of the barcode scanner lanyard. Disconnect one
of the chest strap modular buckles circled in figure 6. [fig. 6, Connection Point C]
2. Place the Barcode Scanner Lanyard Harness on shoulders [fig. 7]. The “Ergodyne”
logo should always sit on the right shoulder when wearing [Connection Point E].
3. Reconnect the chest strap buckles to secure the Barcode Scanner Lanyard Harness
to the worker’s body. [fig. 8]
4. Attach the barcode scanner by connecting the small loop ends of the modular female
buckles [Connection Point B] to the open male buckles on the Barcode Scanner
Lanyard Harness [Connection Point A] to complete your tethering system. [fig. 9]
AMBIDEXTROUS FUNCTION
The Barcode Scanner Lanyard Harness can easily be reconfigured for right or left-handed
people. To reconfigure orientation, simply disconnect both under arm straps and reverse
the long strap with the small strap. Reconnect the small underarm strap and long barcode
scanner attachment strap to the opposite side. [fig. 10, Connection Points D & F].
* For further instructions, watch the product video on www.ergodyne.com.
INSPECTING A BARCODE SCANNER LANYARD HARNESS
Inspect a tethering system before and after each use. All equipment should be regularly
inspected by a competent person. Ensure the tethering system is properly attached to the
tool and is not damaged. Before each use, check the following:
• Examine webbing, stitching and other soft materials for cuts, tears, heat trauma, frays
or other damage.
STORAGE AND CARE
Store tool attachments in a clean, dry location, away from direct sunlight.
Clean attachments using mild soap and water, and then air dry.
DISCLAIMER
In no event, shall Tenacious Holdings, Inc., be liable for any direct, indirect, punitive,
incidental, special, or consequential damages arising out of, or associated with, the
misuse of Squids® tethering system components (tool lanyards or attachments).
WARRANTY
We stand behind everything we make and guarantee our products are free of defects in
materials and workmanship to the original purchaser for the product’s lifetime. Damage,
abuse, and/or normal wear are not covered. Questions? Call Ergodyne at +1-651-642-9889
(8 a.m. - 5 p.m. CST) or 800-225-8238.
CONNECTION POINT MAP
MAPA DE PUNTOS DE CONEXIÓN
LOCALISATION DES POINTS D’ATTACHE
ANSCHLUSSPUNKTE
OVERZICHT AANSLUITPUNTEN
MAPPA DEI PUNTI DI CONNESSIONE
OVERSIGT OVER PÅSPÆNDINGSPUNKTER
SCHEMA FÖR ANSLUTNINGSPUNKTER
MAPA DOS PONTOS DE CONEXÃO
OVERSIKT OVER TILKOBLINGSPUNKTER
KIINNITYSPISTEIDEN SIJAINTI
FIG. 1
FIG. 2
FIG. 3
FIG. 4
FIG. 5
FIG. 6
FIG. 7
FIG. 8
FIG. 9
FIG. 10
A
C
E
D
F
B


