background image

12 


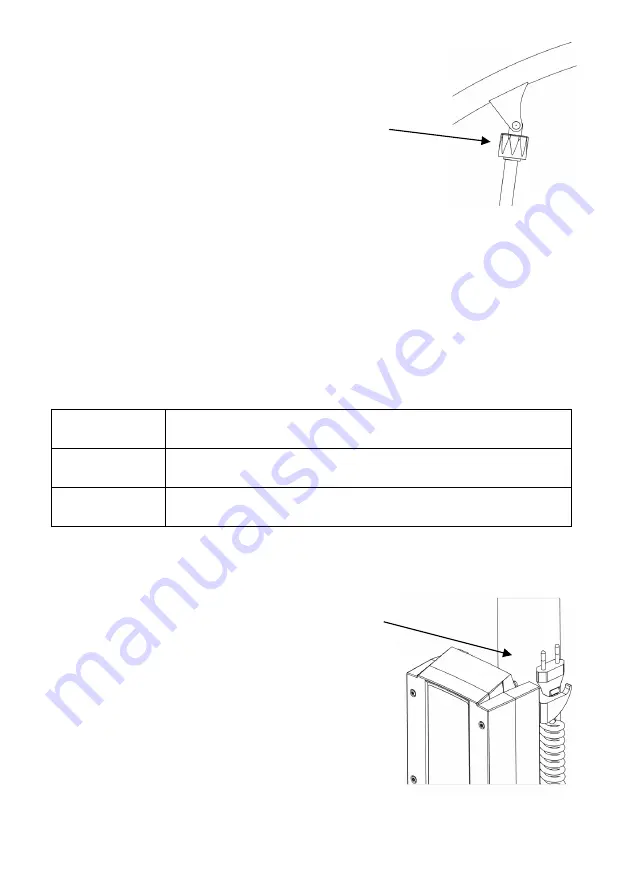
Emergency lowering: 

This function is only to be used in an emergency, where it 

is necessary to safely lower a patient. The emergency 

lowering is placed on the lifting actuator and is activated 

by turning the red knob clockwise, the lifting arm will then 

be lowered. (Fig 2.3B). 


Fig. 2.3B 

Applies for both functions: 

If the emergency button/lowering knob has been activated due to an emergency, the Solar 

must not be used again before a check has been made and any defect repaired. 

In any doubt, please contact Winncare Nordic.


2.4 Charging 

The  Solar  is equipped with a battery that requires regular charging. Winncare Nordic 

recommends that the battery is charged when the Solar/185 is not in use or every night. The 

Solar can be charged from the mains (wall outlet).  

There are 3 symbols on the hand control, which indicate the power level in the battery. 


Battery 25% 

An audible battery alarm will alert, when there is a 25% capacity 

remaining in the battery. 

Battery 50% 

Recommend charging to avoid low battery. 

Full battery 

The hoist is ready for use. 

Warning! – 

If low battery. The battery must IMMEDIATELY be put on charge. In this situation 


remain on charge for 24 hours.


Note: 

The Solar cannot be overcharged. 

Charge directly from the wall outlet 

1)


Remove the mains plug, placed in the bracket on the 

side of the control box and plug into the wall socket. 

2)


The cable from the charger to the mains must be loose  

3)


On the control box there is a diode, that lights yellow 

during charging. 


Note:

 Solar cannot be used during charging. 

Note:

 Re-place the mains plug in the bracket before using. 


The Solar battery can also be charged in the external wall 

charger (see the accessories list). Remove the battery from 

the lift and place it in the charger. 


Summary of Contents for Solar/185

Page 1: ...on Important information This user instruction must be read before the Solar 185 is used This user instruction is intended for technicians installers therapists and other personnel in connection with...

Page 2: ...2...

Page 3: ...3 Safety functions 11 2 4 Charging 12 2 5 Transport 13 3 Use 13 3 1 Using the Solar 13 3 2 Using the control box 13 4 Maintenance 14 4 1 Cleaning 14 4 2 Storage 14 4 3 Special environments 14 5 Check...

Page 4: ...cific information about which models can be used The Solar is intended for indoor use under normal temperatures 2 C to 40 C 36 F to 104 F and relative humidity 40 90 1 2 Safety instructions Important...

Page 5: ...d the hand control If the checks or the use of the Solar generate unusual noises then the Solar must not be used before a qualified technician has carried out a safety check on the Solar Check the lif...

Page 6: ...pair or annual check Content of the box 1 Base with legs and leg spreading 2 Mast with actuator and lifting arm 3 Spreader bar 4 Hand control 5 Control box 6 Handles 7 Battery 8 Tools Allen key spanne...

Page 7: ...the bolt nut Fig 1 6D Put the cap on the nut Fig 1 6D 4 Assembly the handles on the mast with two screws and tighten with the Allen key Fig 1 6E Fig 1 6E 5 The hand control lifting arm and electrical...

Page 8: ...ox Fig 1 6G 7 Attach the spreader bar Rotate the attachment point so it is pointing upwards insert the spreader bar and rotate 90 clockwise while pressing down firmly Fig 1 6H Note A firm press must b...

Page 9: ...der bar Winncare Nordic accepts no responsibility if slings are attached incorrectly it is always the onus of the carer helper to ensure that the sling is correct for the situation needs and is correc...

Page 10: ...Connecting plug electrical leg spreading 4 Connecting plug power supply 5 ON indicates that main supply is on 6 Charge indicates charging on the battery see section 2 4 7 Lift up down The up down func...

Page 11: ...reading Press and the leg spreading moves together Press and the leg spreading will spread outwards 2 3 Safety functions Emergency stop This function is only to be used in an emergency e g if the Sola...

Page 12: ...ere are 3 symbols on the hand control which indicate the power level in the battery Battery 25 An audible battery alarm will alert when there is a 25 capacity remaining in the battery Battery 50 Recom...

Page 13: ...e counters Battery state Overload information Service visit reports To access this information a readout tool is required This service data tool can be purchased from Winncare Nordic or your local dea...

Page 14: ...lease contact your local dealer or Winncare Nordic 5 CHECK SERVICE DATA AND TROUBLESHOOTING 5 1 Annual check The manufacturer Winncare Nordic stipulates that a qualified and authorised person MUST che...

Page 15: ...Release the emergency stop see section 2 3 Possible cause Defect hand control Solution Try using another hand control Alternative is to get a new hand control from the dealer Possible cause Flat batte...

Page 16: ...ty cycle 10 max 2 min 18 min Manually emergency lowering Yes Electronically lowering Yes Electrical details Power supply Input 100 240 VAC 50 60 Hz max 0 4 A Output voltage 24V Control box Output 250...

Page 17: ...gs spread 360 mm 14 in g Max reach at 600 mm reference height 580 mm 23 in h Max reach from base 600 mm 24 in i Reach from base with legs spread to 700 mm 180 mm 7 in j Base height 120 mm 5 in k Floor...

Page 18: ...nvironment if not handled in an environmentally responsible way 7 2 Battery The Solar is equipped with one battery which may be returned either to the local recycling station or to Winncare Nordic at...

Page 19: ...r bar 2 points 48 cm spreader bar 3 points spreader bar Spreader bars with weigh scale 017 00117 017 00144 017 00143 2 points 58 cm spreader bar with weigh scale 2 points 48 cm spreader bar with weigh...

Page 20: ...3 4 2 E F C L A S S I E N I S O 1 0 5 3 5 Phone 45 70 27 37 20 Fax 45 70 27 37 19 Email Info winncare dk www winncare com Manufacturer Winncare Nordic ApS Taarnborgvej 12 C 4220 Korsoer Denmark 910 00...

Reviews: