background image

Cleaning and maintenance 


38/76 


7.7


Cleaning and maintenance work  
preparation 

7.7.1


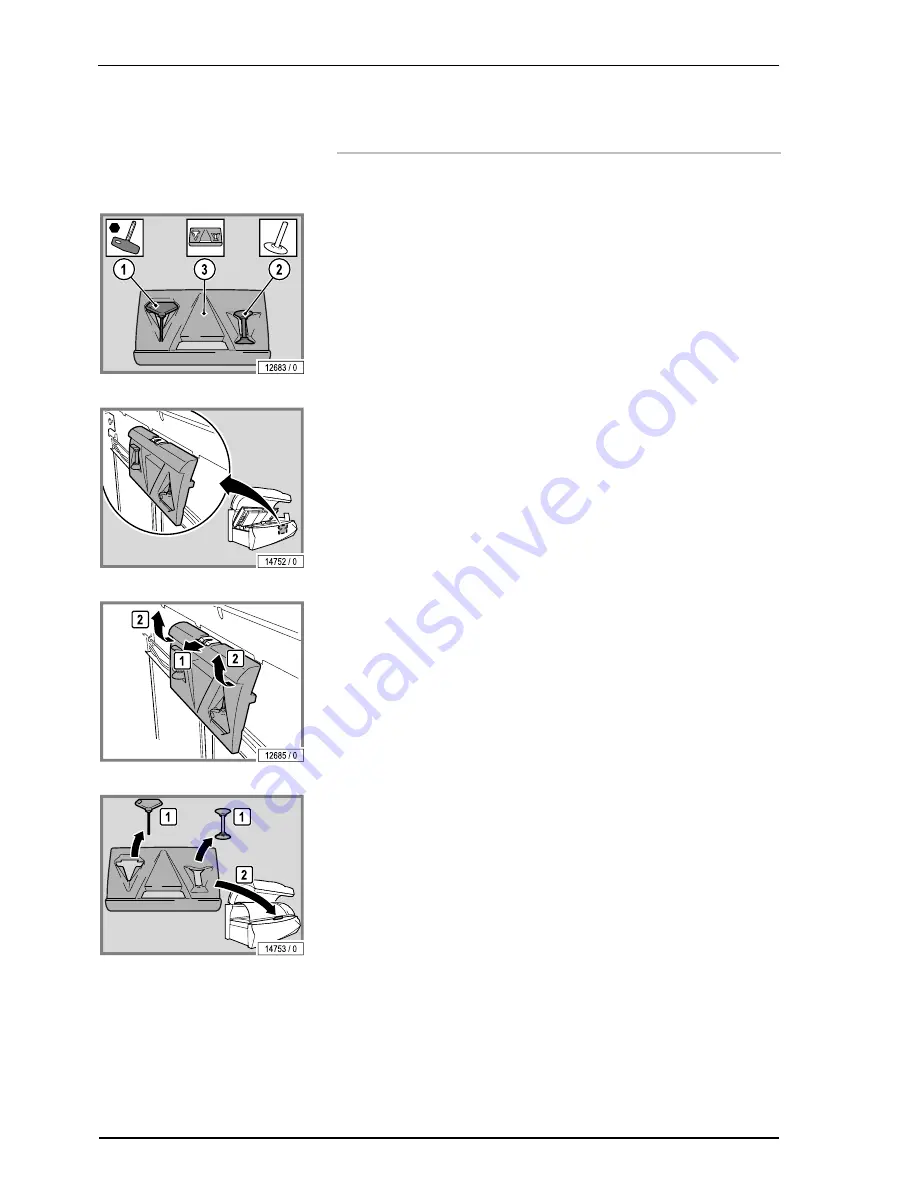
Service kit 

1.


Allen-key 

2.


Suction cup for filter panels and partition 

3.


Scratch prevention for the entry area (canopy panel support cushion) 


The service kit is fitted on the inside of the front panel. 


Opening the bed base: see page 42. 


Remove service kit from holder. 


Remove the Allen-key and suction cup. 


Summary of Contents for SUN SELECT 1400

Page 1: ...SUN SELECT 1400 INTELLIGENT PERFORMANCE OPERATING INSTRUCTIONS Face Cooling S O UR P X E E T E I M 10 min ...

Page 2: ......

Page 3: ...Operating instructions 1014906 00 us 10 2013 SUN SELECT 1400 INTELLIGENT PERFORMANCE ...

Page 4: ...e environment For the safety of yourself and others read and observe all instructions contained herein before operating the tanning system Please make the instructions and additional information available to anyone who operates or services the tan ning system Copyright The copyright remains with JK Holding GmbH The contents may not be duplicated in whole or part distributed or utilized for competi...

Page 5: ...o operator 12 4 1 Intended use 12 4 2 Foreseeable misuse 12 4 3 Obligations of the studio operator 12 4 4 Staff training 13 4 5 Guidelines 13 4 6 Installation location 13 4 6 1 Ventilation 13 4 7 Export 13 4 8 MP3 music 14 4 9 Disposal 14 4 9 1 Environmental regulations disposal of lamps 14 4 10 Instruction signs on the device 14 4 11 Technical modifications 14 5 Description 15 5 1 Scope of delive...

Page 6: ... 38 7 7 1 Service kit 38 7 7 2 Lift up the acrylic panel and remove the partition 39 7 7 3 Remove the canopy panel 40 7 7 4 Remove the side section panel 41 7 7 5 Open the bed base 42 7 8 Instructions for replacing the lamps 43 7 8 1 Changing the chip card 43 7 8 2 Low pressure lamps 44 7 8 3 Starter 45 7 8 4 High pressure lamps and filter panels 45 7 9 Cleaning or replacing UV lamps in the base 4...

Page 7: ... 2 Dimensions 60 8 3 Lamp configuration 61 8 3 1 SUN SELECT 1400 INTELLIGENT PERFORMANCE 61 8 4 Spare parts and accessories 62 9 JK Products Inc Limited Warranty 63 9 1 Limited Acrylic Warranty 64 9 2 Warranty Claims 64 9 2 1 Policy Procedures 64 9 2 2 Labor Warranty Claim Credit Procedures 65 9 3 Limited Lifetime Warranty 66 10 Appendix 69 10 1 Signs and stickers on the device 69 11 Index 73 ...

Page 8: ... Often referred to as Average complexion gets moderate sunburns and tans about average Skin type IV Brown Seldom gets sunburns tans easily and above average with each exposure Skin type V Dark Brown This individual s system rarely gets sunburns tans easily and substantially 1 2 Tanning times This product is in conformity with performance standards for sunlamp products under 21 CFR 1040 Adhere to t...

Page 9: ...ll as general maintenance work and who instruct the users in the operation of the devices Electrician A person with suitable professional training knowledge and experience which enables them to identify and avoid the dangers which can arise from working with electricity Authorized trained and qualified staff Qualified staff from an external company who have been trained and author ized by the manu...

Page 10: ...rning notices damage to persons WARNING Type and source of danger e g WARNING hot surface Description of the consequences e g You can burn your hand skin face Countermeasures Do not touch hot parts and nearby surfaces Wait until hot parts and surfaces have cooled down Caution notices damage to property CAUTION The word Caution with this label points out that danger for devices materials and the en...

Page 11: ...mfort develops discontinue use and consult a physician A person who does not tan in the sun most likely will not tan from the use of this device Persons with very sensi tive skins skin type I must not use the unit as their skin may be too sensitive for the lowest dosage Damage to the skin e g sunburn may occur Individuals with acute sunburn individuals who have had or have skin cancer or individua...

Page 12: ...dian or after consulting a physician Check with your state regarding tanning laws for mi nors While there is no immediate clinical evidence of UV exposure and its effects upon expectant mothers it is strongly advised that expectant mothers be discouraged from using the tanning unit WARNING Infections can be transferred through skin contact All items equipment components with which the user can com...

Page 13: ...so requires an extension of the exposure time radiation time After a certain degree of tanning has been achieved a further intensification is not possible The session time may not be extended to exceed the scope of the permissible radiation doses Only a certain degree of tanning dependent on the skin type can be achieved without endangering your health Inform users about proper tanning 3 3 Instruc...

Page 14: ...e dangers involved 4 2 Foreseeable misuse The following uses of the device are explicitly prohibited Multiple people may not use the device at the same time People with body weight of more than 300 lb 135 kg may not use the device Exceeding the specified tanning times may result in burns and long term skin damage When the device is in use no other people may remain in the room This includes both c...

Page 15: ...ing after every use Please ensure that your staff provide your customers with appropriate advice in particular regarding tanning times possible risks and the oper ation of the device 4 5 Guidelines This product is in conformity with the performance standards for sunlamp products under 21 CFR 1040 20 FDA and listed with ETL and CAN CSA 22 2 No 224 4 6 Installation location 4 6 1 Ventilation CAUTION...

Page 16: ...ered as accessories for a JK audio system are also subject to payment obligation for commercial usage 4 9 Disposal 4 9 1 Environmental regulations disposal of lamps UV low pressure lamps and UV high pressure lamps contain fluorescent ma terials and other waste containing mercury According to the national waste disposal laws and in accordance with the municipal waste regulations proof must be provi...

Page 17: ... for error codes and default settings and additional documentation 5 1 1 Optional Central exhaust air socket 5 2 Equipment Device equipment varies depending on the model In this description all standard and optional components functions are taken into account which must be observed during operation and or when perform ing maintenance The control panel also differs according to the varying equipmen...

Page 18: ...d MP3 connection 5 Acrylic panel base 6 Partition 7 UV low pressure lamps base 8 Body cooling air nozzles foot end 9 UV low pressure lamps side section 10 UV low pressure lamps canopy 11 Interior lighting LED 12 Nozzles AQUA AROMA SYSTEM 13 Body cooling air nozzles 14 Operating handle 15 Display unit 16 Control center 17 Accent lighting canopy LED 18 Accent lighting front panel LED 19 Enclosed tan...

Page 19: ... This is due to the different strength UV lamps and the different UV A and UV B proportions of the UV radiation The UV A proportion primarily generates a superficial tan which appears rapidly and is intensive but also fades more rapidly the UV B radiation is primarily responsible for more long term tanning results The disadvantage of the UV B radiation is that the tan does not be come visible unti...

Page 20: ... similar devices that allows contactless data exchange Communication is also possible between an NFC device and an unpowered NFC chip The NFC point of this tanning device for example may be used to store basic settings on a chipcard These settings can be read for the next session and may be changed if necessary ...

Page 21: ...ail ure to do so may result in overexposure A tanning system is not a toy You cannot vary the strength of the lamps in your unit Should you have any questions regarding the proper use of your tanning system contact Global Service USA at Phone 800 445 0624 toll free Mon Fri 8 00 a m to 7 00 p m CT Sat 8 00 a m to 3 00 p m CT WARNING Danger of skin injuries and skin diseases The tanning device must ...

Page 22: ...wning is in the skin not on it Therefore you cannot wash it off Treat your skin to a moisturizing cream after showering Are medications and the tanning device compatible It is known that some medications increase the skin s sensitivity to UV light This probability is particularly high with antibiotics sulphonamides psychiatric drugs tranquillizers anti diabetes treatments and diuretics Sun creams ...

Page 23: ...panel and operating handle 1 START STOP button 2 Navigation unit 3 Temptronic indicator 4 Body fan indicator 5 Facial fan indicator 6 Display Functions 7 Facial tanner indicator 8 AROMA indicator 9 AQUA SYSTEM indicator 10 Volume indicator 11 Audio system channel indicator 12 Voice Guide indicator ...

Page 24: ...selection This button s availability is displayed on the Control Center depending on the function that has been selected Select device function Functions or settings can be activated deactivated or changed NFC point Data transfer via near field communication individual set tings may be stored on a chipcard and be reloaded for the next session Information about the setting options can be found in t...

Page 25: ...or progress bar display e g regulating the temperature Change music title or studio channel from default mode The availability of these buttons is displayed on the screen depending on the function that was selected All of the indicators displayed on the screen are illuminated in default mode after the tanning device starts up The relevant indicator will start to flash after a device function has b...

Page 26: ...nning session 3 Temptronic Regulate the temperature levels 1 9 The acrylic panel will be cooled with out adjustment control if the auto matic air conditioning Temptronic fails The user can only switch the cooling system on or off in this case 3 Air conditioning Temptronic failure Switch the air conditioning off hold button down Switch the air conditioning on 4 Body fan Regulate the body fan levels...

Page 27: ...Switch AQUA SYSTEM off the individual program points can be deactivated The AQUA SYSTEM head and body nozzles can be switched on individu ally one after another or both at the same time with Head Body 10 Volume Volume control 11 Audio system Select audio system A Own music MP3 player B Track selection Music SD card C Studio channels externally connected system e g CD DVD player Example Select the ...

Page 28: ...nd skin type fair The default setting after each tanning session is also tanning level 1 and skin type fair NOTE The SUNSELECT setting can be changed within two minutes after starting the tanning session The SUNSELECT settings adjust the exposure rate and not the tanning time The tanning time is set as usual and must correspond to the times given in the exposure label see page 6 The unit emits the...

Page 29: ...ype by pressing the button Select the desired tanning level by pressing the button Example A person with average skin type but without existing tan chooses skin type average and tanning level 1 to minimize the risk of sunburns After several tanning sessions the person may choose tanning level 3 NOTE This unit is equipped with soft touch buttons Reset SUNSELECT Press the hidden button next to for m...

Page 30: ...e glasses Contact lenses can be worn under the protective goggles Put on the protective goggles Lie down on the bed surface Close the canopy Press the START STOP button Settings on start up UV lamps Facial tanner Shoulder tanner Body cooling Facial cooling Audio system Voice Guide 6 6 2 Interrupt or end tanning session The tanning session ends automatically after the preset time has run down The i...

Page 31: ...see the documentation from the manufacturer of the MP3 player or smartphone Connecting Insert the MP3 cable stereo jack plug in the audio system Plug the MP3 cable into the MP3 player or smartphone Select the music title and then start Where necessary set the volume level on the MP3 player or smartphone so that the sound signal from the MP3 player or smartphone is recog nized by the audio system C...

Page 32: ...dental reactivation can result in serious accidents Immediately after deenergizing secure all switches or fuses used for deenergizing against be ing switched on again Lock the fuse box with a padlock In case of circuit breakers which cannot be unscrewed a strip of adhesive tape may be applied over the actuation lever with the wording Do not switch danger A prohibition sign with the text Work in pr...

Page 33: ...e being switched off and opened lamps and housing parts may be hot Before replacing lamps or other spare parts wait until lamps and metal parts of the device have cooled down sufficiently WARNING Danger of pinching When opening and closing the panels and covers you can pinch your fingers 7 2 Faults Error codes are output to the display to simplify troubleshooting If a fault occurs the error code f...

Page 34: ...ct must be allowed to remain in contact with the surface being disinfected for a specified amount of time Follow the manufacturer s instruc tions for use 7 3 2 Cleaning of surfaces Acrylic panel CAUTION Do not rub with a dry cloth danger of scratching For hygienic proper cleaning of acrylic surfaces use a specially developed disinfectant cleaner Other cleaning agents especially concentrated disin ...

Page 35: ...vered by the warranty During cleaning a slight discoloration of the cloth by the rubber seals should be expected for production related reasons Prevent damage to the acrylic and plastic surfaces Remove rings watches bracelets etc before starting cleaning work 7 3 3 Filter panels and lamps UV low pressure lamps and filter panels can be cleaned with a damp cloth without additional cleaning agents wh...

Page 36: ...an 32 4 6 Filter X Remove and clean filter 53 7 Filter X Remove and clean filter 51 10 Filter X Remove and clean filter 52 NOTE If desired you may set the unit to require that cleaning be confirmed after each tanning session by pressing the START STOP button when the cool down time for the main fan has finished 7 5 Maintenance Maintenance and care play a major role in deciding the devices performa...

Page 37: ...on know how the presence of minor spots air bubbles or streaks in the acrylic panels is una voidable In addition hairline cracks can occur on the acrylic panel during operation These occurrences are material related and are unavoidable in processing However they have no significant effect on use and are therefore not accept ed as defects Over the course of time the acrylic panel will become discol...

Page 38: ...UV high pressure lamps Facial tanner UV B low pressure lamps TYPE B X X Replace Replace 47 48 47 48 2 Shoulder tanner UV high pressure lamps X Replace 49 3 UV low pressure lamps base X Replace 47 8 UV low pressure lamps side section X Replace 47 9 UV low pressure lamps canopy X Replace 48 1 Starter UV low pressure lamps facial tan ner X Replace 48 5 Acrylic panel X Replace 35 4 Partition X Replace...

Page 39: ...ase tank hinge lift mechanism X Replace 4 Cylinders X Inspect and replace as necessary Cylinders X Replace 5 Chassis and associated fasteners X Inspect and replace as necessary Chassis and associated fasteners X Replace 6 Wiring and associated plugs termi nal connections X Inspect and replace as necessary 7 Acrylic panels2 X Inspect and replace as necessary Acrylic panels2 X Replace 8 Acrylic supp...

Page 40: ... kit 1 Allen key 2 Suction cup for filter panels and partition 3 Scratch prevention for the entry area canopy panel support cushion The service kit is fitted on the inside of the front panel Opening the bed base see page 42 Remove service kit from holder Remove the Allen key and suction cup ...

Page 41: ...on Lift up the acrylic panel The acrylic panel will be held in place automatically by the acrylic sup ports Remove the lamp covers at the head and foot ends Remove the partition The assembly is the same process in reverse order When assembling the device please note You must ensure that the recesses are at the foot end when you fit the partition Remove fingerprints and other soiling carefully ...

Page 42: ...ne hand so that it does not fall down Carefully lower the canopy panel Use foam or something similar to pro tect the base acrylic see 1 The assembly is the same process in reverse order When assembling the device please note Support the canopy panel with one hand so that it does not fall down Replace and retighten the screws Replace the middle screw first and then the outer screws Remove fingerpri...

Page 43: ... Operating instructions 41 76 7 7 4 Remove the side section panel Remove the screws Open the panel and lay it down carefully When assembling the device please note Replace and retighten the screws Remove fingerprints and other soiling carefully ...

Page 44: ...ning and maintenance 42 76 7 7 5 Open the bed base Press the bed base gently downwards Release the lock at the head end Lift up the bed base Close the bed base You should hear the bed base click into place ...

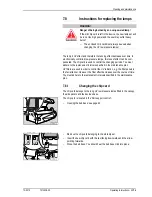
Page 45: ... the changing periods You must adhere to the replacement intervals specified in the maintenance plan UV filters are used in order to control the UV radiation e g the filter panels in the facial tanner However the filter effect decreases over the course of time You must adhere to the replacement intervals specified in the maintenance plan 7 8 1 Changing the chip card The chip card belongs to the lo...

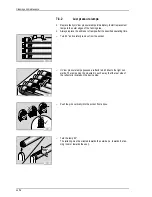
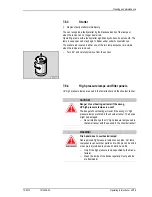
Page 46: ...specified operating time Turn 90 and carefully remove from the socket UV low pressure lamps possess a reflector which directs the light out wards The lamps must be mounted in such a way that the rear side of the reflector is located on the device side Push the pins vertically into the socket from above Turn the lamp 90 The lettering must be oriented towards the outside i e towards the tan ning roo...

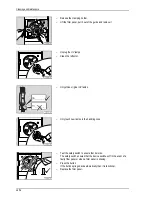
Page 47: ...d filter panels UV high pressure lamps are used in the facial tanner and the shoulder tanner CAUTION Danger of overheating will exist if the wrong UV high pressure lamps are used The danger of overheating will exist if the wrong UV high pressure lamps are fitted in the shoulder tanner The device might be damaged Never interchange the UV high pressure lamps used in the facial tanner with those used...

Page 48: ...ctor Only utilize original UV lamps Only touch new lamps in the handling zone Test the safety switch to ensure that it works The safety switch ensures that the device switches off in the event of a faulty filter panel or when a filter panel is missing Press the button If the button springs back automatically then it is functional Replace the filter panel ...

Page 49: ... assembly is the same process in reverse order When assembling the device please note You must ensure that the recesses are at the foot end when you fit the partition Lift the acrylic up slightly and then close it 7 10 Cleaning or replacing the UV lamps in the side section Removing the side section panel see page 41 Remove the lamp cover Replacing lamps UV low pressure lamps see page 44 UV high pr...

Page 50: ...e following components listed in the maintenance plan are fitted in the canopy UV low pressure lamps see page 44 Facial tanner UV high pressure lamps and filter panels see page 45 Facial tanner filter panels Facial tanner UV low pressure lamps and the associated starters Changing the chip card see page 43 The facial tanner s UV low pressure lamps must be removed first so that the UV high pressure ...

Page 51: ...please note Support the canopy panel with one hand so that it does not fall down Replace and retighten the screws Replace the middle screw first and then the outer screws 7 12 Cleaning or replacing the UV lamps and filter panels in the shoulder tanner If an enclosed tanning tunnel is fitted Remove the screws and then re move the tanning tunnel Remove one screw from each one Remove both housings an...

Page 52: ...o be fitted in the shoulder tanner Each of the high pressure lamps in the shoulder tanner is fitted with 2 different filter panels The two filter panels are secured in place inside the housing Remove the screws Use the suction cup to lift the upper filter panel Pull out the holder Use the suction cup to remove the two filter panels CAUTION Do not interchange filter panels The shoulder tanner is fi...

Page 53: ...13 1014906 00 Operating instructions 51 76 Fit the new filter panels in the correct sequence The assembly is the same process in reverse order 7 13 Cleaning the filters in the base Opening the bed base see page 42 Remove the filters ...

Page 54: ...e cleaned filters must be dry before they are replaced Reinstall the cleaned and dried filters Close the bed base You should hear the bed base click into place 7 14 Cleaning the canopy filter mats Remove the filter mats fitted at the back of the canopy Dry or moist clean the filter mats or replace with new ones Dry cleaning Vacuum cleaner depending on the degree of soiling Moist cleaning Water and...

Page 55: ... condensation tank and clean the filter CAUTION Damage to the device through soiled filters and cooling fins Regularly check the filter grill and cooling fins on the air conditioning system and clean if necessary We recommend using the specially manufactured fin comb art no 15720470 to clean the cooling fins Opening the bed base see page 42 Bring the condensation tank forwards Disconnect the hose ...

Page 56: ...y cleaning Vacuum cleaner depending on the degree of soiling Moist cleaning Water and detergent Do not clean in the dish washer Remove the filters from the holder Cleaning the filters when wet or dry Dry cleaning Vacuum cleaner depending on the degree of soiling Wet cleaning Use water and detergent or put in a dish washer ...

Page 57: ...The device may be damaged by moisture The cleaned filters must be dry before they are replaced Reinstall the cleaned and dried filters Ensure that the filters are correctly positioned in the holder Attach the cover Connect the condensation tank to the hose Refit the condensation tank Close the bed base You should hear the bed base click into place ...

Page 58: ... must never fill the AQUA SYSTEM canister with tap water or other liquids Only replace the AQUA SYSTEM canister with a genuine canister Do not add any liquid that remains in the old canister to the new canister Ensure that the maximum temperature specified is not exceeded during transport and storage Note the expiration date on the canister This AQUA AROMA SYSTEM also includes the RELAX fragrance ...

Page 59: ... click into place 7 16 2 Replacing the AQUA SYSTEM canister Opening the bed base see page 42 Remove the canister Unscrew the lid on the new canister Remove the lid with the hose from the old canister Screw the lid with the hose onto the new canister Push the hose well down so that it touches the bottom of the canister Put the canister back in the device Close the bed base You should hear the bed b...

Page 60: ...required Go to the Professional Setup Manager Activate the fill mode in the AQUA FRESH AROMA menu Close the canopy The system will now be ventilated for 1 minute AQUA SYSTEM liquid will be released from the nozzles during this period Test the AQUA SYSTEM function afterwards Repeat the ventilation process if it does not work ...

Page 61: ...CT 1400 INTELLIGENT PERFORMANCE Nominal power consumption 17 800 W Rated frequency 60 Hz Rated voltage 230 V 3 phase 230 V 1 phase Rated fuses 70 amp 3 pole 110 amp 2 pole Noise level at 1 m distance from the device without exhaust air 62 9 dB A Noise level in device 81 dB A Load on the acrylic panel max 300 lb 135 kg Weight approx 1500 lb 680 kg ...

Page 62: ...50 mm B2 8 1 16 in 205 mm H5 2 3 16 in 56 mm L 93 11 16 in 2 380 mm H6 74 in 1 879 mm L1 86 5 8 in 2 200 mm H7 78 13 16 in 2 002 mm L2 69 1 8 in 1 756 mm H8 87 3 16 in 2 215 mm L3 9 1 4 in 235 mm H9 92 15 16 in 2 360 mm L4 9 9 16 in 243 mm X 50 4 16 in 1 277 mm L5 34 1 8 in 867 mm Y 28 1 16 in 712 mm L7 44 1 8 in 1 120 mm Z 88 3 16 in 2 240 mm Ø 11 13 16 in 300 mm TK 90 9 16 in 2 300 mm BK 98 7 16...

Page 63: ...11526 b 2 2 2 UV high pressure lamps Ergoline ULTRA S1500384 Filter panels Ultra Performance 912 blue Filter panels uncoated 250 W 250 W 0 W 1500384 1500635 1500160 c 3 3 UV low pressure lamps Ergoline VHP B POWER Starter S10 4 65 W 12 3 16 in 0 31 m 8 W 8 W 0 W 1507918 10047 d 20 UV low pressure lamps Ergoline VHP10 INTELLIGENT PERFORMANCE 200 W 71 in 1 80 m 200 W 80 200 W 1507905 e 8 UV low pres...

Page 64: ...561 2 1 Partition 1500540 3 4 Filter 52104 4 1 Filter 5 1 Filter 51937 6 1 Filter 55567 7 1 AQUA SYSTEM 1 59 gal 6 l 1010506 8 a b 1 AROMA 3 38 fl oz 100 ml CABIN RELAX 701358 701357 9 2 Filter 843150 1 Protective goggles 0085006152 1 MP3 cable 4630911001 1 Allen key 83828 1 Chipcard of lamp set 1507844 ...

Page 65: ...in 10 days after purchase to insure valid registration and coverage for potential claims If the warranty card is not registered proof of purchase from JK Products Inc or its authorized dealer or distributor will be required prior to any consideration on warranty claims This could result in service delays This warranty is extended to the individual or legal entity whose name ap pears on the warrant...

Page 66: ...te of purchase of the bed in which the acrylic will be used There are no warranties which extend beyond the description on the face hereof There is no express or implied warranty of fitness or mer chantability The remedies provided in this limited warranty are the exclusive reme dies provided to the purchaser by Global Service USA and are provided in substitution of all other remedies Consequentia...

Page 67: ...supply you with the part s and proper instructions to return your unit to working or der Each dealer distributor has their own internal procedure for handling Warranty Claims and credits NOTE JK Products Inc the manufacturer does not involve itself in the direct handling of a Warranty Claim except where miti gating circumstances apply and where required by law NOTE If part returned to Global Servi...

Page 68: ...s only applicable to the original pur chaser named on a completed and registered warranty record at JK Products Inc headquarters JK Products Inc obligations do not include transportation charged on the shipping of new components to the customer or on the return of defective components of the manufacturer All freight charges must be paid by the customer There are no warranties which extend beyond t...

Page 69: ...JK Products Inc Limited Warranty 10 2013 1014906 00 Operating instructions 67 76 ...

Page 70: ...JK Products Inc Limited Warranty 68 76 ...

Page 71: ...1 Signs and stickers on the device Signs which warn of danger areas are attached to the device The signs shown below are examples Ensure that the instruction signs are always clearly recognizable and easily legible Any missing instruction signs or stick ers must be replaced ...

Page 72: ...he interior side of the canopy It contains important information for identifying the device e g the serial number Serial No and the conformity mark 2 Module plate 3 OEM Parts sticker 801138 The sticker is mounted on the bottom edge at the front of the bed base ...

Page 73: ...0 Operating instructions 71 76 4 Exposure label 5 Air conditioning sticker 1002243 13435 0 The sticker is mounted on the air conditioning 6 Ballast support warning sticker 1003399 The sticker is mounted on the power unit support ...

Page 74: ...onnections sticker 843147 The sticker is mounted on the controller support 8 USA mains connection sticker The sticker is mounted on the rear panel at the left 9 Canada warning sticker 801371 The sticker is mounted on the rear panel ...

Page 75: ...als 34 Cleaning overview 34 Cleaning the filter 52 53 Connect MP3 player 30 Contact lenses 20 Copy protection 14 D Definitions 7 Description 16 Device description 16 Dimensions 61 Disinfection 33 Disposal 14 E Electric shock 9 Electrical specifications 60 Electrician 7 Empty the condensation tank 54 Equipment 15 Exhaust air ventilation 13 Export 13 Eye damage 19 F Facial tanner Cleaning replacing ...

Page 76: ...ce work 31 Q Qualified staff 7 R Recycling 14 Remove the canopy panel 41 Remove the side section panel 42 Replace the UV low pressure lamps 45 Replacing the AQUA SYSTEM canister 58 Replacing the lamps 44 Risk of injury 19 S Safety notices 9 Scope of delivery 15 Service kit 39 Setup 13 Sickness 19 Skin types 6 Spare parts 36 63 Staff 7 Staff training 13 Start tanning 29 Start up settings 29 Sunburn...

Page 77: ...Index 10 2013 1014906 00 Operating instructions 75 76 ...

Page 78: ...Index 76 76 ...

Page 79: ......

Page 80: ... JK Products Services Inc 1 Walter Kratz Drive Jonesboro AR 72401 Phone 800 643 0086 Toll free Fax 870 935 3618 Website www jkamerica com E Mail ergoline sunergoline com SUN SELECT 1400 INTELLIGENT PERFORMANCE ...

Reviews: