background image

13 

Protection 


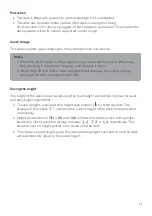
This desk is fitted with systems to prevent damage if it is overheated.  


This desk has a current limiter in place if the desk is in danger of being  
short-circuited or if a device is plugged in that causes an overcurrent. This ensures the 
desk operates within its normal supported current range.  

Quick charge 

This desk supports quick charging for many smartphones and devices.  

Saving the height 

The height of the desk can be saved using the four height save buttons to allow for quick 
and easy height adjustment.  


To save a height, press and hold height save button 1 (   ) for three seconds. The 
display will then show ‘      ’ indicating the current height of the desk has been saved 
successfully.  


Height save buttons 2 (    ), 3 (

3

), and 4 (

4

) all have the same function and operate 

identically. Once saved, the display will show ‘        ’, ‘       ’ or ‘       ’ respectively. This 
allows for up to 4 height profiles to be saved onto the desk. 


To activate a saved height, press the corresponding height save button and the desk 
will automatically adjust to the saved height.  


Notes: 


When the desk’s height is being adjusted, any connected device will temporarily 
stop charging. It will resume charging once the desk is static.  


If both the USB and USB-C ports are used simultaneously, the output voltage 
will cap at 5V with a maximum of 22.5W.  

Summary of Contents for ELSTDUSBNWA

Page 1: ...ET150 SERIES STANDING DESK WITH USB PORT ELSTDUSBWWA ELSTDUSBNWA...

Page 2: ...2 Safety Warnings 3 Components List 4 Overview 6 Assembly 8 Operation 12 Cleaning Care 15 Specifications 15 Troubleshooting 16...

Page 3: ...hrow the plastic packaging away after assembling as the plastic bags used may lead to a choking hazard for children Be aware and remove any potential hazards around the area when the desk will be used...

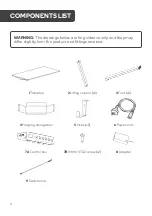
Page 4: ...2 4 Hanging storage box 5 Hook x2 6 Power cord 7A Control box 7B 19mm ST4 2 screw x2 8 Adapter 9 Switch cord COMPONENTS LIST WARNING The drawings below are for guidance only and they may differ slight...

Page 5: ...5 Hardware A ST4 2 screw x6 B Cable tie x1 and x3 spare C 12mm M6 screw x4 D 30mm M6 screw x8 E Allen key...

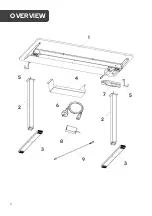
Page 6: ...6 OVERVIEW 1 5 4 7 5 2 6 8 3 9 3 2...

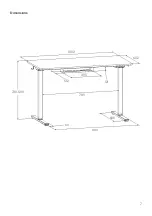
Page 7: ...7 Dimensions 730 1210 60 889 600 789 121 395 132 1002 602...

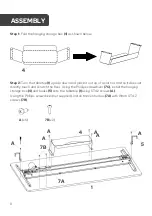
Page 8: ...mat so it does not directly touch and scratch the floor Using the Phillips screwdriver 7C install the hanging storage box 4 and hooks 5 onto the tabletop 1 using ST4 2 screws A Using the Phillips scr...

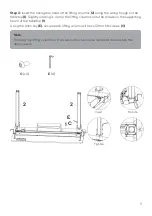
Page 9: ...otating it clamp the lifting columns onto the screws on the supporting beam of the tabletop 1 Using the Allen key E secure each lifting column with two 12mm M6 screws C C x4 E x1 Note Rotating the lif...

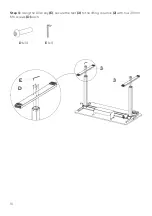
Page 10: ...10 Step 4 Using the Allen key E secure the feet 3 to the lifting columns 2 with four 30mm M6 screws D each D x8 E x1 3 3 E D...

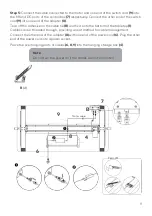
Page 11: ...e cable tie B and fix it onto the bottom of the tabletop 1 Cables can be threaded through providing a neat method for cable management Connect the other end of the adapter 8 with one end of the power...

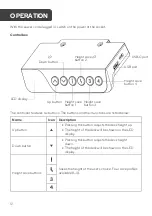
Page 12: ...esk height up The height of the desk will be shown on the LED display Down button Pressing this button adjusts the desk height down The height of the desk will be shown on the LED display Height save...

Page 13: ...ess and hold height save button 1 for three seconds The display will then show indicating the current height of the desk has been saved successfully Height save buttons 2 3 3 and 4 4 all have the same...

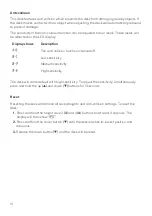
Page 14: ...i collision function is turned off Low sensitivity Medium sensitivity High sensitivity The desk will come default with high sensitivity To adjust the sensitivity simultaneously press and hold the up a...

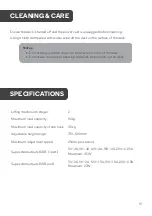
Page 15: ...d capacity of one hook 4 5kg Adjustable height range 730 1210mm Maximum adjustment speed 25mm per second Supported outputs USB C port 5V 3A 9V 3A 12V 3A 15V 3A 20V 2 25A Maximum 45W Supported outputs...

Page 16: ...ct help Kogan com for assistance The display is showing E01 Turn off the power and restart after 18 minutes The display is showing E02 Turn off the power and restart after 18 minutes The display is sh...

Page 17: ...17 NOTES...

Page 18: ...18...

Page 19: ...19...

Page 20: ...tion We hope that this user guide has given you the assistance needed for a simple set up For the most up to date guide for your product as well as any additional assistance you may require head onlin...

Reviews: