7
DESK CLAMP
FLEXCHARGE4-DSK
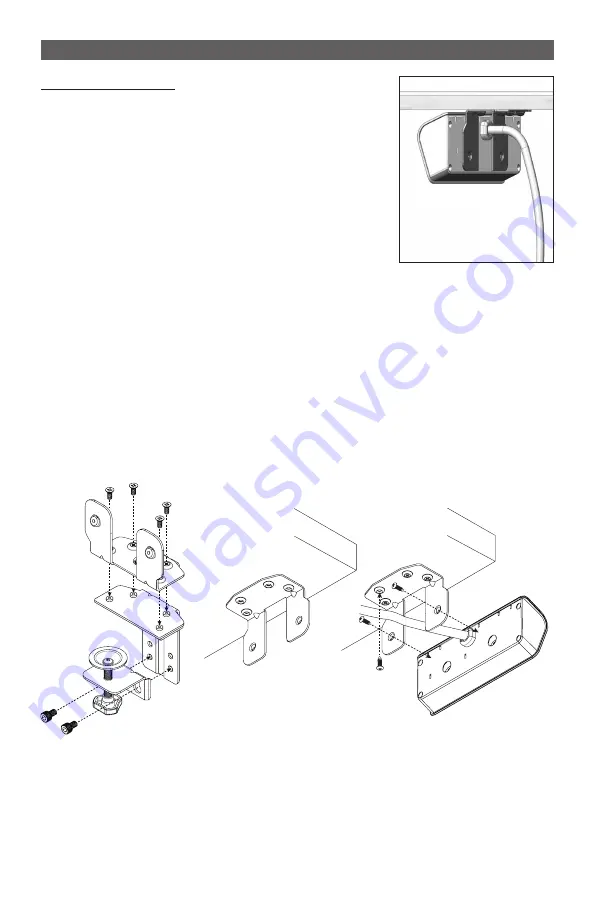
Under-Desk Mount
With this method, the top bracket is turned upside-
down so that it can be mounted to the underside of
the worksurface with M4x14 wood screws. As with the
other methods, the power module is mounted to the
bracket using two M3x12 panhead screws.
Drill Pilot Holes
• Use the top bracket as a template to mark where
to drill four pilot
holes.
• Drill
1
/
2
" deep pilot holes using a
1
/
8
" drill bit.
CAUTION:
Be careful not to not drill through the top of the worksurface.
Remove the Desk Clamp
• Loosen the M5x8 socket cap screws using the M4 Allen key.
• Remove the bottom bracket by loosening the #6-32x1/4” flathead screws
using a Phillips screw driver
Attach Bracket to Underside of Work Surface
• Route the power cord through the opening in the top bracket.
• Attach the bracket in the desired location (typically at the front of the work
surface on the left or right side) using the four M4x14 wood screws. Tighten
securely.
Attach Power Module to Bracket
• Route the power cord through the opening in the top bracket.
• Attach the power module to the bracket using the two M3x12 panhead
screws. Tighten securely.
YOU ARE NOW READY
to use the two AC power outlets and two USB charging
Top Bracket
Power
Module
M3x12
M4x14
Top
Bracket
Bottom
Bracket
#6-32x¼
M5x8
Clamp


