background image

PAINT BORER 518 USB  


BAE 518 USB  


3.1  Commissioning / driver and software installation 


3.1.1  Minimum system requirements 

  PC laptop or tablet with WIN7, VISTA, WIN8, WIN8.1 or WIN10 

  Unused USB-2 port or USB-2 hub 

  4 GB of free space 

  Graphics: 1280 x 800 


3.1.2  Camera driver 

  Connect the PC to the internet. 

  Connect the camera to a free USB-2 port.  

 
The driver will be automatically downloaded and installed from the internet; follow the 
instructions from your operating system if necessary. 

 
Install the software after the message 

Device can be used

 is displayed. 


3.1.3  Software installation 

We have deliberately omitted an installer program to simplify file access and to minimize 
OS dependencies.  

  Copy the 

Erichsen

 file (from the supplied USB flash drive) onto the C: drive or another 

Windows partition. 

  Open the 

Erichsen

 folder. 

  Open the 

518

 folder. 

  Open the 

bin141

 folder. 

  Select the 

518.exe

, right click and select "Send to -> Desktop (Create Shortcut)". 


  Repeat this procedure with the folder 

Protocols

 in the same directory. 

 
The software program can be started directly from the desktop and the data can be 
viewed by double-clicking on it. 
 

If there is a network/software administrator at your company, contact him or her 
for help.


The software runs directly from the included USB flash drive.  
The space for logs is limited to the size of the USB flash drive. 


Summary of Contents for 518 USB

Page 1: ... 518 USB NOTICE Please read and precisely follow this operating manual before commissioning the instrument Country of origin Germany Status X 2016 Operating Manual Layer Thickness Measuring Instrument PAINT BORER Model 518 USB ...

Page 2: ...tallation 9 3 1 1 Minimum system requirements 9 3 1 2 Camera driver 9 3 1 3 Software installation 9 3 2 Commissioning and calibration 10 3 3 Power supply 14 3 4 Lighting and auxiliary lighting 14 3 3 Setting the image focus 15 3 4 Slider mechanism 16 3 5 Wedge cut drill 16 4 Program functions 17 4 1 Menu and screen components 17 4 2 Information about the sample 19 4 3 Selection of drill and image ...

Page 3: ...PAINT BORER 518 USB 3 BAE 518 USB 7 Logs 29 8 Special measuring problems 31 8 1 Delamination 31 9 Maintenance and care 32 Declaration of Conformity page 33 ...

Page 4: ...erature ranges 1 4 Safety information The generally applicable laws and regulations concerning accident prevention and environmental protection are applicable 1 5 Copyright protection The copyright of this operating manual is kept by ERICHSEN GmbH Co KG D 58675 Hemer Germany This manual is intended only for the operator and their staff It contain regulations and instructions that may not be fully ...

Page 5: ...rker silver 1 screwdriver 1 rechargeable battery 9 V 1 power supply 100 240 VAC 47 63 Hz 1 software 1 calibration template 1 operating manual 1 plastic case 2 2 2 Additional accessories must be ordered optionally Drill No 2 for layer thickness to 200 microns order number 910927241 Drill No 4 for layer thickness to 500 microns order number 910927741 Drill No 3 for layer thickness to 1000 microns or...

Page 6: ...olated Lighting eight white LEDs adjustable PC interface USB 2 0 or 3 0 Magnification 50x Image format PNG Operating system Windows2000 XP Vista 7 8 10 Menu language English German 2 3 2 Wedge cut drill Table Characteristics of the wedge cut drill Drill No 2 1 No 5 2 No 4 1 No 3 1 No 1 1 Measurement range up to 200 microns up to 300 microns up to 500 microns up to 1000 microns up to 2000 microns S...

Page 7: ...INT BORER 518 USB 7 BAE 518 USB 3 Commissioning Operations Handling Drill Digital microscope Adjustment for the image sharpness the sharpness is pre set Knurled ring for adjusting the lighting brightness ...

Page 8: ...PAINT BORER 518 USB 8 BAE 518 USB Battery compartment Button additional lighting Power supply socket ...

Page 9: ... installation We have deliberately omitted an installer program to simplify file access and to minimize OS dependencies Copy the Erichsen file from the supplied USB flash drive onto the C drive or another Windows partition Open the Erichsen folder Open the 518 folder Open the bin141 folder Select the 518 exe right click and select Send to Desktop Create Shortcut Repeat this procedure with the fold...

Page 10: ...is only required for the initial commissioning and after the optical focusing Start the program main screen Click on the Grab image button live image Align the standard plate with the calibration circle in the middle The image must appear sharp focus the sharpness before the calibration ...

Page 11: ...1 BAE 518 USB Click on the Grab image button again The image is now stored for calibration Click on the Configuration button The configuration window opens Click on the Calibration button the button will now be colored red ...

Page 12: ... the main window correct wrong wrong If the first attempt is not successful you may retrace the circle with the left mouse button until it is correct Click on the calibration button again The calibration is finished Close the configuration window The calibration can be checked to see if it was successful from the control monitor ...

Page 13: ...approximately 5 5 microns per pixel This can vary from 5 to 6 microns depending on the focus adjustment of the lens The calibration of the USB microscope results in an average achievable resolution for depth measurements of Drill 1 0 2000 microns 5 5 microns Drill 2 0 200 microns 0 55 microns Drill 3 0 1000 microns 2 75 microns Drill 4 0 500 microns 1 375 microns Drill 5 0 300 microns 0 825 micron...

Page 14: ... intensity can be adjusted in both directions lighter or darker if needed When working with certain coatings it may be helpful to also use indirect lighting For additional sample illumination a white light emitting diode LED with diffuse light is used The green button at the rear of the instrument can be pressed to activate the side lighting When switched on the LED can be adjusted to three bright...

Page 15: ... off automatically after 60 seconds Example Grey plastic coating without additional lighting with additional lighting White top coating without additional lighting with additional lighting Colored coatings or multi colored coating systems provide a higher contrast so that side lighting is not necessary 3 3 Setting the image focus The image focus is pre set If you still need to adjust the focus the...

Page 16: ... USB includes a boring tool for the measurement range of 300 microns the No 5 drill Additional drills are available as accessories for up to 200 microns drill number 2 500 microns drill number 4 1000 microns drill number 1 and 2000 microns drill number 3 Drill number 1 has a single edge cutting profile Drills numbered 2 3 4 and 5 have a two edge cutting profile so that they can make proper conical...

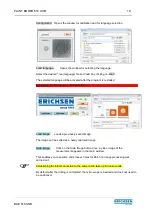
Page 17: ...E 518 USB 4 Program functions 1 Double click on to open the program 2 The Main screen is shown below 4 1 Menu and screen components Quit Exits the program Green Connection to the camera is established Red there is no connection ...

Page 18: ...bration Refer to page for instructions Load image Loads a previously saved image The image can be edited as a newly captured image Grab image Click on the Grab Image button once a video image of the measurement appears in the main window This enables you to position and process holes for which no image processing was carried out Establishing the initial connection to the camera can take up to five...

Page 19: ...essing and can be measured Measurement is discussed separately on page 23 in section 5 3 Save button the measurement is saved and the log file is created 4 2 Information about the sample Measurement date and time cannot be changed the time setting is taken from the system Sample can be edited Material can be edited Comment can be edited ...

Page 20: ...the delivery 4 3 2 Image color There are four modes available for displaying the image and image contrast optimally False colors There are 13 different variations that can be chosen from the list of numbers It is very important to choose the proper drill for the measurement If the wrong drill is selected for the measurement the incorrect angle will result in a false measurement result ...

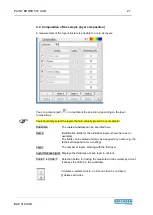
Page 21: ...bstrate can be specified here Name Identification fields for the individual layers shown here as an example The fields can be edited and may be assigned any name e g the technical designation for a coating Layer The number of layers starting with the first layer Layer thickness μm Displays the thickness of each layer in microns Circle 1 to Circle 7 Selection button for tracing the measured circles...

Page 22: ...PAINT BORER 518 USB 22 BAE 518 USB ...

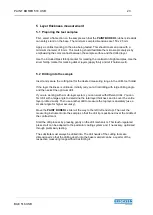
Page 23: ...ss is unknown initially carry out a trial drilling with large drilling angle and then select the optimum drill If you are working with a multi layer system you can work with different drills You can first drill with a large angle to determine the total layer thickness and to cover the entire layer profile visually Then use another drill to measure the top layer separately use a smaller angle for h...

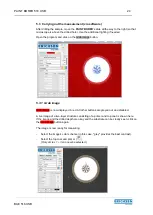
Page 24: ...utton 5 3 1 Grab image Grab image is now displayed in red All other buttons are greyed out and disabled A live image of a two layer structure consisting of a primer and top coat is shown here If the image and the drilled depth are okay and the substrate can be clearly seen click on the Grab image button again The image is now ready for measuring Select the image s color scheme in this case grey pr...

Page 25: ...the circle and align it accurately then release the mouse button Select the Circle 2 Draw a circle on the outer edge of the primer and position it Click on the Circle 3 Draw a circle on the outer edge of the top coat and position it Click with the right button to finish after the last circle All circles and circle buttons should now be red If the positioning is not successful then select the circl...

Page 26: ...le 2 Circle 3 The measured layer thickness is displayed immediately This procedure is the same when processing a multi layer coating structure only the number of circles number of layers changes When the measurement is okay click on the Save button to save and to create the log file ...

Page 27: ...st be a PNG image with a max size of 70 KB and max dimensions of 450 x 160 The image should be copied into the folder Erichsen 518 bin 141 with the name Customer png Make sure this is the exact name of the logo file If different logos are used we recommend renaming the logos and leaving them in the same directory ...

Page 28: ...PAINT BORER 518 USB 28 BAE 518 USB ...

Page 29: ...tocols folder Day folder Hour folder The hour folders contain all logs from measurements that have been carried out and saved within that hour PDF PNG Raw image if saved All information about the sample and an image of the real test are listed separately in the PDF document The PNG file is a screen shot of the measurement The second PNG file is a raw image of the sample and can be reloaded for ano...

Page 30: ...PAINT BORER 518 USB 30 BAE 518 USB PDF document ...

Page 31: ...adhering coatings The delamination issue is especially acute when the drill bit just penetrates the boundary between the coating and substrate Therefore it is better to drill as deeply as possible into the substrate Always drill intermittently Do not drill in a single stroke Blow away the residue chips between the individual drilling strokes This interrupted drilling method is especially important...

Page 32: ...r to avoid corrosion and malfunctions The hard metal carbide drill bits should be regularly checked for wear using a 10x magnifying glass and replaced if necessary Contact the manufacturer if you experience technical problems ERICHSEN GmbH Co KG Am Iserbach 14 D 58675 HEMER Germany Telephone 49 2372 9683 0 Fax 49 2372 6430 E mail info erichsen de Internet http www erichsen de We reserve the right ...

Page 33: ... measuring instrument Modell Model 518 USB konform ist mit den Bestimmungen folgender Richtlinien complies with the provisions of the following directives EMV Richtlinie 2014 30 EU EMC Directive Niederspannungsrichtlinie 2014 35 EU Low Voltage Directive Angewandte Normen Applied Standards DIN EN 61000 6 2 VDE 0839 6 2 2006 03 Bevollmächtigter für die Zusammenstellung der technischen Unterlagen Age...

Reviews: