background image

© 2001 – Ericsson Amplifier Technologies Inc.

iv

RETURN FOR REPAIR

FIELD OPERATION SUMMARY SHEET

Please make a copy of this sheet, and complete the following questionnaire.  If necessary, attach
additional sheets.  This information will assist in expediting repairs to the equipment, and is used for fault
trend analyses and ongoing product improvement.

FIELD TECH NAME:_______________________________  DATE: _____________________________

EQUIPMENT LOCATION (CELL SITE NUMBER): ___________________________________________

____________________________________________________________________________________

MODEL NUMBER: ____________________________________________________________________

SERIAL NUMBER: ____________________________________________________________________

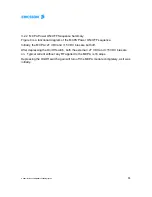
FREQUENCY OF OPERATION:  A:__________________________  B:  _________________________

CARRIER POWER:____________________________________________________________________

MAXIMUM NUMBER OF CARRIERS: _____________________________________________________

LED INDICATOR STATUS:

LED DESCRIPTION

LED ON

Check 

þ

LED OFF

Check


þ

DC ON:

o

o

ENABLE:

o

o

FAN ALARM:

o

o

LOOP ALARM:

o

o

VSWR ALARM:

o

o

POWER SUPPLY
ALARM:

o

o

TEMPERATURE ALARM:

o

o

OVER POWER ALARM:

o

o

UNIT SURFACE TEMPERATURE: _______________________________________________________

POWER SUPPLY MODEL OR CAPABILITY: _______________________________________________

____________________________________________________________________________________

OTHER DETAILS OF PROBLEM REPORTED:______________________________________________

____________________________________________________________________________________

____________________________________________________________________________________

Summary of Contents for 1/KRB 101 1108

Page 1: ...on A PREPARED May 23 2001 NOTICE PROPRIETARY AND PRIVATE The information contained in this document is the property of Ericsson Amplifier Technologies Inc Company and shall be kept in strict confidence Except with the written permission of the Company such information shall not be published or disclosed to others or used for manufacture or sale or for any other purpose This document shall not be d...

Page 2: ... manual at any time without notice Every effort has been made to ensure the accuracy and completeness of this technical manual however it may contain technical inaccuracies or typographical errors Changes are made periodically to the information contained herein These changes will be incorporated into new editions of this technical manual Ericsson Amplifier Technologies is interested in receiving ...

Page 3: ..._______ FREQUENCY OF OPERATION A __________________________ B _________________________ CARRIER POWER ____________________________________________________________________ MAXIMUM NUMBER OF CARRIERS _____________________________________________________ LED INDICATOR STATUS LED DESCRIPTION LED ON Check þ LED OFF Check þ DC ON o o ENABLE o o FAN ALARM o o LOOP ALARM o o VSWR ALARM o o POWER SUPPLY AL...

Page 4: ...nections 8 2 9 Verify DC Supply Voltage 8 3 OPERATING INSTRUCTIONS 9 3 1 Safety Precautions 9 3 2 Controls and Indicators 10 3 2 1 Local Controls and Indicators 10 3 2 2 MCPA Power ON OFF Sequence Summary 13 3 2 3 Remote Control Status Interface 15 3 3 Initial Turn On Procedure 15 3 4 Normal Operation 16 3 5 Shut Down Procedure 16 4 PRINCIPLES OF OPERATION 17 4 1 Introduction 17 4 2 RF Input Signa...

Page 5: ...formance Tests 26 5 3 Troubleshooting Procedures 27 5 4 Fan Assembly Replacement Procedure 27 List of Figures Figure 1 Ericsson Amplifier Technologies Inc Multi Carrier Power Amplifier 2 Figure 2 Outline Installation Drawing Ericsson Amplifier Technologies MCPA 6 Figure 3 MCPA Local Controls and Indicators 11 Figure 4 MCPA Power ON OFF Sequence 14 Figure 5 Block Diagram MCPA Power Amplifier 24 Fig...

Page 6: ...PA Figure 1 is a microprocessor controlled linear multi carrier power amplifier MCPA which operates over the frequency range of 869 to 894 MHz with a rated output power of 120 watts total average At rated output the amplifier provides intermodulation products of better than 63 dBc The design of the MCPA is entirely solid state providing trouble free operation and a minimum of maintenance The MCPA ...

Page 7: ...r Technologies Inc 2 Figure 1 Ericsson Amplifier Technologies Inc MCPA Power Amplifier 1 4 Equipment Functional and Physical Specifications Table 1 lists the functional and physical specifications of the MCPA power amplifier ...

Page 8: ... RH non condensing Storage Humidity 20 to 95 RH non condensing Dimensions 17 88 H x 5 12 D x 16 5 D 45 4 cm H x 13 cm W x 41 9 cm D Optional Configuration Available RF DC and I O interface Blind mate 24W7 Sub miniature connector OSP LED Status Monitoring Loop Alarm VSWR Alarm Temperature Alarm Power Supply Alarm Fan Alarm Over Power Alarm and DC On 1 5 Mechanical Description The MCPA is contained ...

Page 9: ...s future service and maintenance of the MCPA without the necessity for removing power to the entire site 2 3 Receiving Unpacking and Inspection The MCPA has been tested and calibrated at the factory prior to shipment No additional readjustment is required prior to installation The MCPA is shipped in a single container Check the exterior of the shipping container for any visible signs of damage If ...

Page 10: ...a single connector on the rear panel for all RF DC and I O interface connections The following paragraphs provide installation details 2 6 1 Recommended Tools The following tools are recommended to assist in the installation of the amplifier 1 and 2 Phillips screwdrivers Slotted screwdrivers 1 8 and 1 4 A 5 16 or 3 5mm open end wrench A multi meter with probes 2 6 2 Blind Mate Configuration Mounti...

Page 11: ... 2001 Ericsson Amplifier Technologies Inc ...

Page 12: ...orporated into a 24W7 Blind Mate D sub miniature connector J1 Connections are as shown in Table 2 RF output is via an OSP Blind Mate connector J2 Table 2 J1 Blind mate 24W7 D Sub miniature Connector J1 Connector Pin Signal Name Description A1 RF In PKZ26 A2 A7 No Connection No Connection A3 A4 DC Power In A5 A6 DC Power Return 1 6 No Connection No Connection 7 RS 232 RXD_PS Data Out 1 8 RS 232 TXD...

Page 13: ... The DC supply voltage must be 27 VDC 0 5 VDC In addition the power supply circuit breaker rating must be 75 amperes minimum Refer to Section 3 for operating instructions CAUTION DO NOT OPERATE MCPA WITH A DC SUPPLY VOLTAGE OUTSIDE OF THESE LIMITS DAMAGE WILL OCCUR TO THE MCPA FROM IMPROPER SUPPLY APPLICATION NOTE When 27VDC is initially connected and applied to the MCPA all of the LED s on the fr...

Page 14: ...M LIVE CIRCUITS Operating personnel must observe all safety regulations at all times Do not make adjustments inside equipment with hazardous voltages present Do not operate the amplifier without proper RF termination DO NOT SERVICE OR ADJUST ALONE Under no circumstances should any person reach within or enter any enclosure for purposes of servicing or adjustment without the immediate presence and ...

Page 15: ...all output load conditions including open and short circuit conditions it is recommended to connect an appropriate RF load to the output port of the MCPA prior to application of RF power CAUTION Maintain proper RF input to the MCPA Damage to the MCPA may occur if excessive RF input is applied 3 2 Controls and Indicators The MCPA is equipped with local controls and indicators on the front panel and...

Page 16: ...1 Ericsson Amplifier Technologies Inc 11 Figure 3 MCPA Local Controls and Indicators ENABLE LED FAN LED LOOP LED VSWR LED PWR SPLY LED OVER PWR LED DC ON OFF SWITCH AND INDICATOR TEMP WARN LED ENABLE SWITCH ...

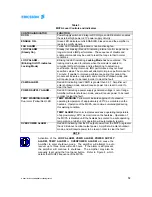
Page 17: ... Amplifier will enter shutdown mode and will require power to be reset in order to clear the fault POWER SUPPLY ALARM Red LED indicating a power supply generated voltage is out of range Amplifier will enter shutdown mode and will require power to be reset in order to clear the fault TEMP WARNING ALARM Dual color Yellow Red LED TEMP WARNING Yellow color indicates approach of excessive operating tem...

Page 18: ...he MCPA Power ON OFF sequence Initially the MCPA 27 VDC and 15 VDC bias are both off After depressing the On Off switch both the external 27 VDC and 15 VDC bias are on Typical current without any RF applied to the MCPA is 18 amps Depressing the On Off switch again will turn off the MCPA module completely as it was initially ...

Page 19: ...raw approximately 18 amps OFF OFF OFF DISABLED DC ON LED STATUS ENABLE LED STATUS INTERNAL POWER SUPPLY STATUS MCPA STATUS DC ON OFF DEPRESS ON ON ON ENABLED DC ON LED STATUS ENABLE LED STATUS INTERNAL POWER SUPPLY STATUS MCPA STATUS DC ON OFF DEPRESS OPERATING STATUS OPERATING STATUS NOTE If resetting power to the MCPA does not clear the fault condition contact Ericsson Amplifier Technologies or ...

Page 20: ... FROM IMPROPER OPERATION a Verify that all connections to the MCPA have been properly made in accordance with Section 2 of this manual and the outline and installation drawing Figure 2 NOTE When 27VDC is initially connected and applied to the amplifier all of the LED s on the front panel except for the DC ON will illuminate momentarily This is a normal condition b With no RF applied to the MCPA pr...

Page 21: ... MCPA requires minimum attention during normal operation Monitoring of the status output provides an overall indication of MCPA health 3 5 Shut Down Procedure a Reduce RF input signal level to minimum 60 dBm b Press the PWR ON OFF switch once to disable the bias voltage and to disable 27 VDC to the internal amplifier module The DC ON indicator will be extinguished WARNING THE DC ON OFF SWITCH DOES...

Page 22: ...ifier contains the DC ON OFF switch and the status LEDs The amplifier operates from a 26 28 VDC input power source and provides a rear panel input output I O control and status interface to report all faults and alarms Relay dry contacts are provided for the following fault conditions OVERPWR Relay dry contact closure provided for remote notification in the event that the MCPA output is greater th...

Page 23: ...w of its operation Figure 5 is a functional block diagram of the MCPA The amplifier is comprised of the following internal functional elements Carrier Cancellation Main Error Driver Amplifier Main Amplifier Error Amplifier DC DC Function Microprocessor Control Loop Processor Pre distorter The main amplifier employs class AB amplification for maximum efficiency and low intermodulation distortion Th...

Page 24: ...n will again be restored The cause of any TEMP WARNING or TEMP ALARM condition should be investigated as soon as possible to ensure continuous uninterrupted MCPA operation 4 4 2 Error Amplifier The main function of the error amplifier is to amplify the distortion products generated by the main amplifier These distortion products are amplified and precisely phase shifted 180 with those at the outpu...

Page 25: ...the MCPA Refer to Maintenance section 5 4 for fan assembly replacement and ordering instructions 4 5 Power Distribution The amplifier employs a DC DC converter to regulate the amplifier sub circuits to the required voltage based on a 26 28 VDC input The power supply board converts the input voltage to 5V and 15V used by the loop processor and microprocessor Internal monitoring circuitry monitors t...

Page 26: ...e MCPA amplifier has turned itself off for protection All alarm indications are latched and the amplifier is shutdown The amplifier can be reset by pressing the DC switch If the alarm still exists the amplifier will re enter the shutdown mode 4 7 6 ALC Mode Blinking OVER PWR LED The module supports power limiting to mitigate an overdrive condition When the OVER PWR LED blinks the module has entere...

Page 27: ...the alarm conditions and expected operation during each Refer also to Table 3 for a description of the alarm indications NOTE Activation of the LOOP ALARM VSWR ALARM POWER SUPPLY ALARM TEMP ALARM or OVERPOWER ALARM will cause the MCPA to shut down The fault condition may be reset by re setting power to the MCPA Refer to Figure 4 for sequence 4 8 1 LOOP Alarm Indicates control loops can no longer m...

Page 28: ...D indicates a fault in a power supply generated voltage The module will enter the shutdown mode requiring re initialization power up sequence in order to reset the fault condition 4 8 5 FAN Alarm This LED indicates that a fan is not operating or has been removed 4 8 6 OVER PWR Alarm This LED indicates that output power from the amplifier is above 52 8 dBm The amplifier will enter the shutdown mode...

Page 29: ... 2001 Ericsson Amplifier Technologies Inc ...

Page 30: ...semblies Further damage will result from improper repairs NOTE Do not break the seals on the equipment as this will void the warranty 5 2 Periodic Maintenance Periodic maintenance tasks and recommended intervals are listed in Table 4 Table 4 Periodic Maintenance Tasks CATEGORY TASK RECOMMENDED INTERVAL MAINTENANCE ACTION Cleaning Fans Air Inlets Outlets 30 Days Inspect and clean in accordance with...

Page 31: ...outlet areas 5 2 2 Test Equipment Required Table 5 lists the test equipment required for evaluating MCPA performance Suitable equivalents may be substituted Table 5 Test Equipment Required NOMENCLATURE QTY MANUFACTURER MODEL Signal Generator 1 H P ESG Attenuator 40 dB 250 Watt 1 Weinschel S3 40 43 Attenuator 20 dB 20 Watt 2 Weinschel AT20 Spectrum Analyzer 1 H P 8560E Directional Coupler 30 dB 1 R...

Page 32: ...e warranty 5 4 Fan Assembly Replacement Procedure The fan assemblies are mounted to the rear of the MCPA Replacement is accomplished by unlocking the 2 quick disconnects which secure the fan to the rear panel Disconnect fan wiring harness connector Reconnect the fan wiring harness connector to the replacement fan Mount replacement fan to rear panel by inserting the tabs and locking the 2 quick dis...

Page 33: ...wer to MCPA If secure contact Ericsson Amplifier Technologies for assistance or return MCPA for service Yes Attempt to reset fault circuits by resetting power to the MCPA as shown in Figure 5 If fault returns contact Ericsson Amplifier Technologies for assistance or return MCPA for service Is the FAN ALARM LED illuminated Yes Yes No No Continue to sheet 2 Is there air flow through both fans of the...

Page 34: ...n MCPA for service No Is the TEMP ALARM LED illuminated Yes Attempt to reset fault circuits by powering MCPA OFF ON and then apply ENABLE command If fault returns contact Ericsson Amplifier Technologies for assistance or return MCPA for service Yes No No Is there air flow through the front of the MCPA Replace fan Remove 4 screws which secure it to the rear panel Disconnect fan harness connector In...

Reviews: