Replacement of a surface mounted IC is best completed
using a hot-air soldering system. The IC can easily be re-
moved and installed using hot air. See the manufacturers
instructions for complete details on tip selection and other
operating instructions unique to your system.
If a hot-air system is not available, the service technician
may wish to clip the pins near the body of the defective IC
and remove it. The pins can then be removed from the PWB
with a standard soldering iron and tweezers and then the new
IC can be installed. It should not be necessary to "tin" any of
the IC pins before the installation process.
MODULE REPLACEMENT
The modules, all of which are located on the RF Board,
are very reliable devices. Before replacing any of the mod-
ules, check the associated circuitry thoroughly to insure there
is not a problem elsewhere. If replacement is necessary,
follow the below procedures.
All of the component lead holes for the modules on the
RF Board are plated through from the top to the bottom of
the board. This allows for easy removal and replacement of
the modules as long as appropriate soldering techniques are
observed. Always observe static precautions when handling
the board.
To remove the PA module, it is first necessary to remove
the hardware which supports it. Two (2) Torx screws and a
support bracket secure the module to the eggcrate casting.
To remove a module, position the RF Board in a work
vise (face down, chip components up) and remove the solder
from the plated-through points at the appropriate pins. If a
hot-air system is employed, use an appropriate tip that will
localize the heat on the pins and not on surrounding chip
components. Solderwick
or a vacuum de-soldering iron
will also remove the solder if a hot-air station is not available.
When all solder has been removed or liquefied, the module
should drop out of the eggcrate casting.
To install a module, clean any solder from the plated-
through holes and clean all flux from the board. Next, install
the replacement module making sure that all pins align in the
proper holes. Resolder the pins to the board. Clean the flux
from the board using an approved solvent. Clip any excess
lead length.
INTERNAL LITHIUM BATTERY
REPLACEMENT
All personality data is stored in RAM IC U1 on the
Control Board. This data includes TX and RX operating
frequencies, Channel Guard tones, CCT information, Track-
ing Data, etc.. The lithium battery on the Control Board
supplies keep-alive power to this RAM IC when the radio is
turned off. This battery should be changed every 3 to 5 years.
Before replacing the battery, copy the radio’s personal-
ity data to the PC computer. The battery can be replaced
without losing the personality data stored in the radio by
following the below procedure.
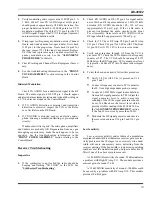
1.
Remove the Control Board. See the "DISASSEM-
BLY/REASSEMBLY" instructions for details. Use
caution when handling the board; do not short the con-
nections between the lithium battery, D2 and the RAM
IC. Also observe static handling precautions.
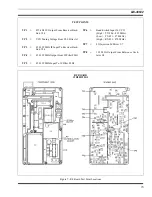
2.
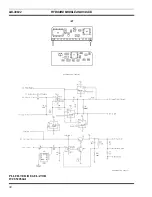
Using clip leads, apply power (7.0 - 9.0 Vdc) to the
Control Board at the bottom mounting holes. OBSERVE
POLARITY. See Figure 12.
3.
Remove the plastic cover from the lithium battery. This
battery’s case is positive polarity, opposite of what
would be expected.
4.
Unplug and remove the battery from the support and
contact.
5.
Carefully install the new battery in the support, plugging
the negative terminal into the contact. Record installa-
tion date.
6.
Install the plastic cover over the new battery.
7.
Remove power from the board.
8.
Reassemble the radio and test for proper operation.
WEATHERPROOF INTEGRITY
The MTL radio is designed to meet the MIL-810C & D
environmental specifications. The internal circuitry is pro-
tected from moisture by appropriate seals. Rear Cover As-
sembly seals include the Front/Rear Cover Assembly gasket
and the antenna insert gaskets. Front Cover Assembly seals
include the speaker/microphone seal, the battery plate seal,
and the volume and channel control seals. The UDC/Monitor
Button/PTT Assembly is also designed to seal out moisture.
LBI-38632
26

