background image

Sump Cleaner

3

Safety Information

1.  To avoid possible injury, before operating this 

cleaner, read this manual for full operating 
instructions. Also see the pump manufacturer's 
manual provided with your cleaner.

2.  Always block the wheels of the cleaner to prevent 

unintentional rolling. Even when empty, some 
models weigh more than 1,500 pounds. Accidental 
rolling could cause injury or property damage.

3.  Wear eye goggles to protect your eyes from 

splashing liquids. This is important, even when 
you know the fluids themselves are not caustic or 
otherwise harmful. Metal particles suspended in 
the liquid could still cause serious eye injury.

4.  Check hose, nozzle, cleaning tool and hose cap 

connections for leaks. To minimize chances 
of spilling, handle cleaning tools and hoses 
carefully during operation.  Replace hoses before 
deterioration results in leaks.

5.  Immediately clean up any spilled coolant to avoid 

slippery floors and dangerous falls.

6.  If it is necessary to use the cleaner in an aisle or 

other traffic area, position it so as to minimize the 
likelihood of being struck by trucks, forklifts or 
other equipment in transit. Exercise a reasonable 
lookout for such hazards during operation.

7.  Whenever removing or reseating the filter basket 

(maximum capacity is 800 pounds), keep hands 
and fingers out from under the basket lip.

8.  Keep clear from beneath the basket when  

opening the trapdoor.  Use tools of appropriate 
strength and length to let you perform these 
operations safely.

9.  Frequently check the basket’s hoisting rings for 

signs of rust. If the rings are heavily corroded, 
replace the basket with a new one.

10. Be sure the suction inlet ball valve is fully closed 

before operating the cleaner in the discharge 
mode. The tank is pressurized in this mode, 
sometimes to as much as 7 PSI.

11. After operating engine-driven units (LP gas or 

gasoline) in the discharge mode and before 
stopping engine, turn the SUCTION/DISCHARGE 
lever to the SUCTION position. The engine will 
“SPEED UP” momentarily and then “SLOW 
DOWN”.  When the engine has slowed down and 
begun to “labor”, the engine switch may be turned 
OFF and the suction inlet ball valve opened.

12. Observe “NO SMOKING” rules when operating  

a gasoline or LP gas engine model. Operate only 
in adequately ventilated areas.

13. DO NOT use this unit for solvents, flammable  

(low flash point), or other volatile liquids. Use it 
only for water-soluble coolants and for cutting  
or grinding oils.

14. PRESSURIZATION SAFETY ISSUES. Your 

Sump Cleaner unit is designed to operate under 
pressure when discharging fluids. The optimal 
safe operating pressure is 5 to 7 PSI and your unit 
was set at the factory to operate in this range. 
Your unit should never be operated at pressures 
in excess of 15 PSI. Tanks or vessels which 
are pressurized beyond 15 PSI require special 
certification as “High Pressure Vessels” and this 
Sump Cleaner has not been certified for such high 
pressure operation. Operating a Sump Cleaner at 
pressures above 15 PSI creates a serious risk of 
injury to workers and damage to property. 

Modifying or intentionally altering these important 

safety features will constitute the intentional 

misuse of the equipment, voiding all warranties.

15. Temperature limit is 150°F (the limit of the suction 

and discharge hoses).

16. “Push-around” units (those equipped with large 

diameter wheels in the middle of the tank and 
swivel casters at both ends) are NOT designed 
for towing. If they must be moved long distances 
within a plant, pick up the unit with a forklift truck 
using the brackets provided on the sump cleaner.

 WARNING

Altering Or Modifying Safety Regulating 

Features May Result In The Tank Becoming Over 

pressurized.  Over pressurization May Cause 

The Explosive Rupture Of The Tank Resulting In 

Serious Injury Or Death To Workers And Damage 

To property. 

Summary of Contents for FJ-310A

Page 1: ...eaner 1 Installation Operation and Maintenance Instructions FJ 310A Sump cleaner ERIEZ MAGNETICS HEADQUARTERS 2200 ASBURY ROAD ERIE PA 16506 1402 U S A WORLD AUTHORITY IN SEPARATION TECHNOLOGIES P C 7...

Page 2: ...E FEATURES 4 SUMP CLEANER WARRANTY 5 ASSEMBLY 6 OPERATING TIPS 7 LP MODELS 8 LP GAS DUAL TANK MODELS OPERATION 10 AIR OPERATED MODELS 11 AIR VENTURI DUAL TANK OPERATION 15 120V MODELS 13 120V DUAL TAN...

Page 3: ...fter operating engine driven units LP gas or gasoline in the discharge mode and before stopping engine turn the SUCTION DISCHARGE lever to the SUCTION position The engine will SPEED UP momentarily and...

Page 4: ...eak proof round cleanout doors are faster and easier to remove and replace than the oval internal manholes used by other manufacturers The thick pliable gasket bonded to the cleanout door virtually el...

Page 5: ...turers for purpose of pursuing warranty claims or making service arrangements or any other purpose Copies of such third party sub assembly manufacturers specific warranty information will be shipped w...

Page 6: ...ake out the following items A Filter basket factory assembled with sleeve B Discharge hose with nozzle C Suction hose D Cleaning tool E Spare filter sleeve or filter bags F LP bottle brackets on LP mo...

Page 7: ...th water soluble coolants and another for use with cutting oils If you must use one unit for both the sump cleaner must be thoroughly cleaned when switching products If at all possible purchase a filt...

Page 8: ...n Release key when the engine starts and move choke to the OFF position Figure 3 Pull out for CHOKE Figure 4 Turn key to START 5 Vacuum coolant and chips from the sump 6 As soon as fluid stops passing...

Page 9: ...of fluid in the bottom of the compartment This is unimportant if the compartment is used for one type of coolant only If different coolants are involved remove the compartment s drain plug to empty it...

Page 10: ...suction and discharge hoses to the proper fittings on that tank compartment Cap off all other fittings 5 For dirty fluid suction operation Activate the Pull out for CHOKE Turn key to START float swit...

Page 11: ...d operation closed discharge open suction Failure to do so will allow particulate to enter the valve seat and seize the valve D As soon as fluid stops passing through the hose release pressure by shif...

Page 12: ...mit switch bypasses the float switch needed to prevent overfilling during the suction operation but is not required for discharge operation The engine won t start in the discharge mode if sump cleaner...

Page 13: ...eded Inspect tank for sludge buildup clean as needed Check blower oil level add SAE 40 non detergent oil as needed Grease blower use 2 bearing grease 500 hours Check engine air filter replace as neede...

Page 14: ...uld be taken out of service immediately until the parts are repaired or replaced DO NOT eliminate the safety release valve or replace it with a release valve rated higher than 15 PSI DO NOT reset the...

Page 15: ...tower during removal position the lifting power source e g crane directly over the center of the basket D Hoist the basket Keep hands and fingers clear If the basket is binding and unable to lift free...

Page 16: ...harge nozzle D Attach the nozzle end of this hose to the clean coolant supply tank Turn on the compressed air and reattach the discharge nozzle to the hose when full Close vacuum valve V2 The compress...

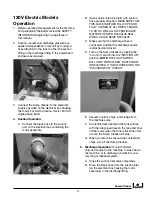
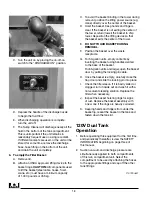
Page 17: ...ON position NOTE THE FLOAT SWITCH WILL ONLY WORK WHEN SUCTION ON IS SELECTED IT IS NOT WIRED INTO THE DISCHARGE ON CIRCUIT 3 Connect the Sump Cleaner to the electrical supply specified on the electri...

Page 18: ...eposition the lifting device so that the basket exits the center of the tower E DO NOT TOUCH BASKET DURING REMOVAL F Position the basket over the waste receptacle G For 50 gallon units empty contents...

Page 19: ...containing the motor assembly C Close valve S 1 D Attach the 1 1 2 hose to the clean coolant compartment inlet port and remove the discharge nozzle F Attach the nozzle end of this hose to the clean c...

Page 20: ...cuit to drop out at a predetermined liquid level in the tank preventing overfilling and pump damage The discharge circuit has no such float switch therefore the sump cleaner must be plugged into outle...

Page 21: ...center of the tower return lower basket to the sump cleaner tower Reposition the lifting device so that the basket exits the center of the tower E DO NOT TOUCH BASKET DURING REMOVAL F Position the bas...

Page 22: ...valve V1 attach the 1 1 2 hose to the discharge port place the discharge nozzle in the machine sump push the DISCHARGE button and depress the discharge hose nozzle valve A Be sure the suction inlet ba...

Page 23: ...ce Schedule 9 To discharge clean fluid to refill a machine sump close the suction inlet ball valve V1 attach the 1 1 2 hose to the discharge port place the discharge nozzle in the machine sump push th...

Page 24: ...of the tank Remove these periodically by opening the drain plug and with the filter basket out of the sump cleaner flush the tank with a water hose 6 Periodically while the basket is out of the tank c...

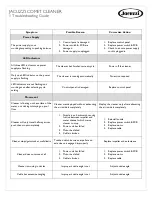
Page 25: ...Check for obstructions physically remove 2B Check for cracks or holes replace 3 Air leakage 3 Check all hose connections for tightness make sure female quick disconnect fittings have gaskets in place...

Page 26: ...l coolant supplier for corrective action LP Engine Stalls During Discharge or Suction 1 Engine 1 Check engine RPM adjust as necessary 2 Regulator 2 Pressure or vacuum regulator could be out of adjustm...

Page 27: ...Sump Cleaner 27...

Page 28: ...0 345 4946 Fax 814 838 4960 International Fax 814 833 3348 Web Site http www eriez com e mail eriez eriez com Manufacturing Facilities AUSTRALIA BRAZIL CANADA CHINA INDIA JAPAN MEXICO SOUTH AFRICA UNI...

Reviews: