8
>>>
When carrying out maintenance operations, the follo-
wing requirements must be met:
•
Insert the original key into the left-hand clamp, keeping it
a distance of 2 to 3 mm from the edge of the clamp.
See Figure 8.
•
Tighten up the clamp, keeping the back of the key proper-
ly pressed against the base of the clamp.
•
Insert the key blank to be cut into the right-hand clamp
and, before tightening up the clamp, raise the gauge (C)
and align the two keys. Ensure that the two pointers of
the gauge are resting firmly up against the top shoulders
of both keys. Finally, tighten up the clamps.
•
Both the original key and the key blank to be cut should
be inserted in the left-hand side of the respective clamps.
•
Withdraw the gauge (C). Start the machine and release
the slide (as explained in point 3.1.2). Move the keys
towards the tracer point (I) and the milling cutter (F).
•
Remember that you have to work from left to right. Rest
the original key against the tracer point and start to work,
moving the slide from right to left, using the arm (B),
ensuring that the pressure exercised on the tracer point is
that required by the spring that acts on the slide shaft.
•
Once the key has been cut, return the slide to its initial
position, as explained in chapter 3.1.2. . Then remove the
keys by undoing the clamps.
•
If the key cutting operation has left any burrs on the cut
key, these can be removed with the plane that the machi-
ne has been fitted with for this purpose.
Do not try and start or handle the machine until all
safety matters, installation instructions, operator gui-
des and maintenance procedures have been fulfilled
and understood.
Always switch off the power supply before carrying
out any cleaning or maintenance operation.
Always keep the machine as well as its surroundings
clean.
Work with dry hands.
Use safety glasses, even if the machine is fitted with
guards.
Ensure that the machine is earthed.
3.2.1 Cutting keys with narrow blades.
Side 2 of the clamp.
To cut this type of key, and so that the milling cutter
reaches the maximum cutting depth, side 2 of the
clamp must be used to obtain greater cutting depth.
3.2.2 Cutting keys without shoulders
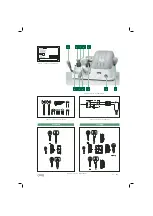
Insert the two wedges (2)
(see Figure.10)
into the
vertical slots (R) of each clamp, depending on the
length of the key to be cut.
Rest the tips of the keys against the wedges (2).
The keys are now adjusted. Then tighten up the
clamps. Before starting to cut the key, it is advisa-
ble to remove the wedges.
3.2.3 Cutting cross-shaped keys.
Side 1 of the clamp
This type of key must be inserted into the clamps from
left to right. Place the wedges (5)
(see Figure.11)
with the
opening or recess facing upwards, in one slot or the
other (R), depending on the length of the key to be cut.
The teeth of the key can be cut in three operations, by
turning and locking the shoulder of the key against the
wedge (5) each time.
Never carry out any maintenance operation with the
machine switched on.
Unplug the machine.
The indications in this manual must be strictly adhe-
red to.
Use original spare parts.
3
1
2
4
3
1
2
4
5
6
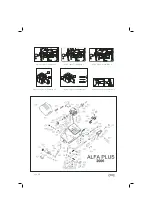
Undo the two milling cutter guard screws and remove
the guard.
To change the milling cutter: With the help of the two size
18 spanners, lock the milling cutter shaft and undo the
nut (K) – left-hand thread – securing the milling cutter (F).
Then replace the milling cutter and finally put the milling
cutter guard back into place.
See Figure.12
.
To change the plane: Lock the milling cutter shaft with
the help of a size 18 spanner. Undo the screw (R) with the
help of an allen key. Replace the plane and finally put the
milling cutter guard back into place.
-
Move the tracer point forwards or backwards until
the milling cutter turns freely and rubs gently
against the adjustment key. Then tighten the tracer
point screw (L).The machine is now in perfect wor-
king order.
3.2 KEY CUTTING OPETATION
Maintenance and safety
4
4.1 CHANGING THE MILLING
CUTTER OR PLANE
4.2 SAFETY RECOMMENDATIONS
ENGLISH
>>>
Summary of Contents for ALFA PLUS
Page 23: ......

