background image

Models 110X, 210X, 310X, 360X, 410X 

Safety and operating instructions 


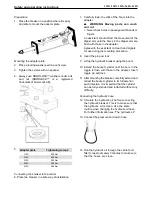
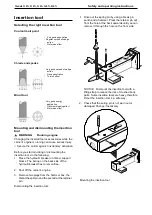
Checking and reducing the gas pressure 

1.  Always use the gas hose (C) and the pressure 

gauge (D) when checking the gas pressure. 

2.  Connect the gas hose to the pressure gauge. 

3.  Remove the plug from the charge valve (G). 

4.  Press the nozzle of the gas hose into the charge 

valve and read the pressure. 

5.  Reduce the pressure by repeatedly inserting and 

removing the nozzle. 

NOTICE 

Only  the  nozzle  may  be  used  to  reduce 

the pressure. Never use pins, screwdrivers etc. as 
these can damage the charge valve. 


Every second hour 


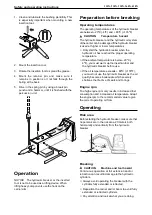
Regularly lubricate the insertion tool, the tool 
retainer and the bushings. 

Lubricating with a grease gun 


WARNING 

Hot insertion tool during 

operation and a period of time after use. 

► 

Avoid contact with the insertion tool. 


WARNING 

Hot hydraulic breaker 

during operation and a period of time after 
use. 

► 

Avoid contact with the hydraulic breaker. 


CAUTION 

Skin eczema 

Grease can cause eczema when it comes in contact 
with the skin. 

Avoid getting grease on your hands. Wash 

thoroughly after contact. 

1.  Press the insertion tool against the piston so 

that  the  space  between  the  piston  and  the 
insertion tool does not fill with grease. 


2.  Lubricate the insertion tool's shank plentifully 

while pressing the insertion tool against the 
surface to avoid filling the cavity with grease. If 
the cavity is filled with grease when the hydraulic 
breaker is started, the lower seals may be 
damaged. 

When the insertion tool shank is exposed to high 
pressure and high temperatures a standard type of 
grease will melt and run. To avoid this always use a 
genuine insertion tool grease from your supplier. 

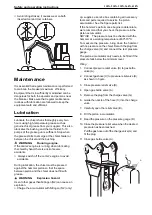
Central lubrication system 

We recommend central lubrication


carrier, 

grease is pumped continuously from a lubrication 
container on the carrier to the breaker when the 
breaker is activated. This increases the life of the tool 
bushings and insertion tools considerably.


Every day 


Check the tool retainer and split  pin. 


Check that hoses, couplings and accumulator are 
in a good condition. 


Check that bolts and connections are free from 
damage and properly tightened. See tightening 
torques in the spare parts list. 


Summary of Contents for 110X

Page 1: ...Safety and operating instructions Hydraulic breakers Models 110X 210X 310X 360X 410X ...

Page 2: ...d with it or them be liable for incidental or consequential damages or injuries including but not limited to the loss of profit rental or substitute equipment or other commercial loss Purchaser s sole and exclusive remedy being as provided here in above Erskine Attachments LLC must receive immediate notification of defect and no allowance will be made for repairs without our consent or approval Th...

Page 3: ...Overview 11 Design and function 11 Main parts 11 Labels 11 Transport 12 Installation 12 Hoses and connections 12 Hydraulic oil 13 Pressure adjustment 13 Assembly 13 Insertion tool 15 Operation 16 Preparation before breaking 16 Operating 16 Maintenance 18 Lubrication 18 Every second hour 19 Every day 19 Every week 20 Every year 20 Storage 20 Disposal 21 Technical data 22 Machine data 22 Capacities ...

Page 4: ...110X 210X 310X 360X 410X Safety and operating instructions ...

Page 5: ...tions is to provide you with knowledge of how to use the hydraulic breaker in an efficient safe way The instructions also give you advice and tell you how to perform regular maintenance on the hydraulic breaker Before using the hydraulic breaker for the first time you must read these instructions carefully and understand all of them ...

Page 6: ... the Safety and operating instructions DANGER WARNING CAUTION Indicates ahazardous situation which if not avoided will result in death or serious injury Indicates a hazardous situation which if not avoided could result in death orserious injury Indicates a hazardous situation which if not avoided could result in minor or moderate injury Testing Testing of the hydraulic installation must only be ca...

Page 7: ...ry Immediately consult a doctor if hydraulic oil has penetrated the skin Never use your fingers to check for hydraulic fluid leaks Keep your face away from any possible leaks WARNING Hydraulic oil Spilled hydraulic oil can cause burns accidents due to slippery conditions and will also harm the environment Take care of all spilled oil and handle it according to your safety and environmental regulat...

Page 8: ...elevant governmental authority Work in a well ventilated area If the machine has an exhaust direct the exhaust so as to reduce disturbance of dust in a dust filled environment Operate and maintain the machine as recommended in the operating and safety instructions Select maintain and replace consumables inserted tools other accessory as recommended in the operating and safety instructions Incorrec...

Page 9: ... in place and in good working condition Always use hearing protection Use damping material to prevent work pieces from ringing Maintenance precautions WARNING Involuntary start An involuntarystart of the hydraulic breaker can lead to severe injuries Follow the instructions in the carrier manual to prevent involuntary start of the hydraulic breaker Installation of a start circuit on the hydraulic b...

Page 10: ...ons Storage precautions WARNING Hydraulic breaker and working tool are heavy If they topple over or fall down it can result in material damage and personal injury Store the hydraulic breaker and the working tool so that falling or rolling down is prevented ...

Page 11: ...permitted The hydraulic breaker is operated from the driver s cab of the carrier using the carrier s hydraulic system The breaker frequency is controlled by the oil flow from the carrier Main parts E C B A Hammer box B Percussion unit C Gas filling valve D Tool retainer E Split pin Labels The machine is fitted with labels containing important information about personal safety and machine maintenan...

Page 12: ...for the hydraulic breaker it may lead to broken insertion tools and increased wear See Technical data for choosing suitable carrier The safety equipment in the hydraulic system must be checked for quality CE mark etc suitabilityand function ability by a professional or authorized supervisor before use Hoses and connections Read through the overhaul instructions carefully before servicing or chargi...

Page 13: ...for changing oil and oil filter It is common to change the oil filter more frequently when a hydraulic breaker is installed NOTICE When themachine is delivered it contains somemineral based hydraulic oil Before connecting to the carrier s hydraulic system check which type of hydraulic oil the carrier is using Mixing different types of hydraulic oil may destroy the lubrication quality which can lea...

Page 14: ... hydraulic breaker using the boom 10 Extend the bucket cylinder until the bore in the toggle is flush with those in the adapter Insert toggle pin and lock 11 After mounting the breaker carefully extend and retract the bucket cylinder to its full extent in each direction It is important that the cylinder can be fully extended and retracted without any difficulty Connecting the hydraulic hose 12 Cir...

Page 15: ... to reduce the risk of crushed body parts Some insertion tools are heavy therefore lift out the insertion tool in a safe way 2 Check that the spring pin is not worn out or damaged Change if necessary Mounting and dismounting the insertion tool WARNING Running engine Changing the inserted tool or accessories while the carrier s engine is running can cause serious injury Secure the carrier against i...

Page 16: ...ust warm up the insertion tool and the hydraulic breaker before use If the oil temperature exceeds 80ºC 176ºF you must not use the hydraulic breaker as the oil quality becomes inadequate which severely shortens the life time of seals and O rings Engine rpm Too high engine rpm only results in increased fuel consumption and increased oil temperature Adapt the engine rpm to the recommended value to g...

Page 17: ...t and the vibrations are at a minimum Also the wear on the bushing and inserted tool is kept to a minimum Listen to the sound from the hydraulic breaker The sound changes if there is any bending between the inserted tool and bushing Never run the breaker with the boom cylinders at their end positions It may cause damage to the carrier Start near the edge and work your way in towards the middle Nev...

Page 18: ...sel does not fill with grease WARNING Explosion hazard Use of other gases than Nitrogen N2 can cause an explosion Charge the accumulator with Nitrogen N2 only QA supplies a service box containing all necessary tools and parts required to service the piston accumulator See the Spare parts list If the hammer s performance begins to deteriorate we recommend that you check the pressure in the piston a...

Page 19: ...tact with the skin Avoid getting grease on your hands Wash thoroughly after contact 1 Press the insertion tool against the piston so that the space between the piston and the insertion tool does not fill withgrease 2 Lubricate the insertion tool s shank plentifully while pressing the insertion tool against the surface to avoid filling the cavity with grease If the cavity is filled with grease when...

Page 20: ...y never be sharpened by forging Sharpening must only be performed by milling grinding or turning Wear limits A mm B mm 110X 45 39 210X 55 49 310X 65 59 360X 73 67 410X 83 77 Replacing the insertion tool bushing The insertion tool bushing is kept in place by the tool retainer A new bushing has a slip fit 1 If a worn out bushing is stuck use a sliding hammer to removeit 2 Carefully clean the bore an...

Page 21: ...breaker in an upright position if stored for a long time Disposal A used machine must be treated and scrapped in such a way that the greatest possible portion of the material can be recycled and any negative influence on the environment is kept as low as possible Before a used machine is scrapped it must be emptied and cleaned from all hydraulic oil The remaining hydraulic oil must be deposited an...

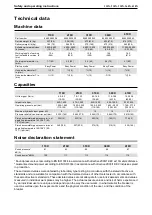
Page 22: ...r kW 8 12 14 18 23 Pressure relief valve on carrier psi bar 2 320 160 2 465 170 2 465 170 2 465 170 2 610 180 Piston accumulator gas pressure min at operating temperature 140 158 F 60 70 C psi bar 203 14 232 16 203 14 160 11 174 12 Piston accumulator gas pressure max at 268 18 5 297 20 5 276 19 218 15 239 16 5 operating temperature 140 158 F 60 70 C psi bar Noise declaration statement 110X 210X 31...

Page 23: ...ing instructions Erskine Attachments LLC cannot be held liable for the consequences of using the declared values instead of values reflecting the actual exposure in an individual risk assessment in a work place situation over which we have no control ...

Page 24: ...h herebydeclare that the machines listed below conform to the provisionsof EC Directive 2006 42 EC Machinery Directive and 2000 14 EC Noise Directive Hydraulic breaker Guaranteed sound power level dB A Measured sound power level dB A Pmax bar Weight kg 110X 109 108 130 75 210X 111 110 140 120 310X 113 112 140 168 360X 114 113 140 214 410X 115 114 150 300 ...

Page 25: ...Models 110X 210X 310X 360X 410X ...

Page 26: ...OOL BIT MOIL PT 410X 1 311836 TOOL BIT BLUNT 210X 1 311837 TOOL BIT BLUNT 310X 1 311838 TOOL BIT BLUNT 360X 1 311860 TOOL BIT BLUNT 410X 4 1 311526 SPRINGHOSEHOLDERPNT 311523UNPNT OLD STYLE ONLY 5 1 13207 BOLT HEX 1 2 X 1 1 4 NC GR 5 OLD STYLE ONLY 6 1 33012 WASHER FLAT 1 2 OLD STYLE ONLY 7 1 37214 NUT REV LOCK 1 2 NC OLD STYLE ONLY 8 6 11507857 BOLT M16X60MM 8 8 CLASS 210X MODELS ONLY 6 11103431 ...

Page 27: ...NEW STYLE HYDRAULIC BREAKER PARTSINFORMATION ...

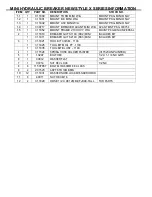
Page 28: ... MOUNT PKG MINI UNIVERSAL 2 1 311810 BREAKER GUTS 110X RX2 MINI INCLUDES BIT 1 311811 BREAKER GUTS 210X RX3 MINI INCLUDES BIT 3 1 311821 TOOL BIT CHISEL 110X 1 311825 TOOL BIT MOIL PT 110X 1 311835 TOOL BIT BLUNT 110X 4 1 311526 SPRING HOSE HOLDER PAINTED 311523 UNPAINTED 5 1 13207 BOLT HEX 1 2 X 1 1 4 NC GR 5 6 1 33012 WASHER FLAT 1 2 7 1 37214 NUT REV LOCK 1 2 NC 8 6 11507857 BOLT M16X60MM 8 8 C...

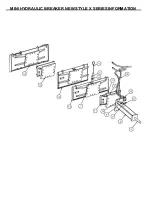
Page 29: ...MINI HYDRAULIC BREAKER NEW STYLE X SERIESINFORMATION ...

Page 30: ...NOTES ...

Page 31: ...NOTES ...

Page 32: ...2012 05 No 9800 1050 01b Copyright ERSKINE ATTACHMENTS LLC ...

Reviews: