

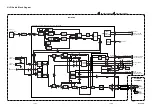


1-9-1
TD945TEST
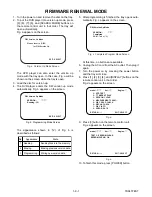
FIRMWARE RENEWAL MODE
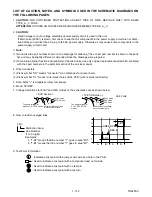
1. Turn the power on and remove the disc on the tray.
2. To put the DVD player into version up mode, press
[9], [8], [7], [6], and [SEARCH MODE] buttons on
the remote control unit in that order. The tray will
open automatically.
Fig. a appears on the screen.
The DVD player can also enter the version up
mode with the tray open. In this case, Fig. a will be
shown on the screen while the tray is open.
3. Load the disc for version up.
4. The DVD player enters the F/W version up mode
automatically. Fig. b appears on the screen.
The appearance shown in (*2) of Fig. b is
described as follows:
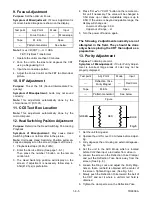
5. After programming is finished, the tray opens auto-
matically. Fig. c appears on the screen.
At this time, no buttons are available.
6. Unplug the AC cord from the AC outlet. Then plug it
again.
7. Turn the power on by pressing the power button
and the tray will close.
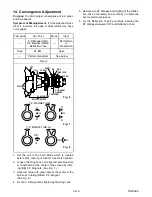
8. Press [1], [2], [3], [4], and [DISPLAY] buttons on the
remote control unit in that order.
Fig. d appears on the screen.
9. Press [3] button on the remote control unit.
Fig. e appears on the screen.
10.To finish this mode, press [POWER] button.
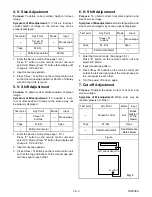
F/W Version Up Mode
Please insert a DISC
for F/W Version Up.
EXIT: SELECT
Fig. a Version Up Mode Screen
Fig. b Programming Mode Screen
F/W Version Up Mode
VERSION : ********
Reading...(*2)
EXIT:
SELECT
Appearance
No.
State
Reading...
Sending files into the memory
Erasing...
Erasing previous version data
Programming...
1
2
3
Writing new version data
Fig. c Completed Program Mode Screen
F/W Version Up Mode
VERSION : ********
Completed
SUM : 7abc (*3)
Fig. d
model: ******
Ver: ****
Region: **
1: VFD TEST
2: TT REPEAT PLAY
3: EEPROM CLEAR
4: MEASUREMENT SERVO
5: DISC READ CHECK
6: MECHA CHECK
7: DISC INFO
8: ERROR RATE
EXIT: SELECT
RETURN: -----
Fig. e
model: ******
Ver: ****
Region: **
TEST 3: EEPROM CLEAR
EEPROM CLEAR: OK
EXIT: SELECT
RETURN: -----
Summary of Contents for EC720E
Page 2: ...EC720E T1008UJ 2004 06 22 ...
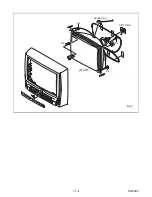
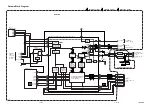
Page 22: ...1 7 4 TD900DC S 4 S 4 S 4 S 4 4 CRT Anode Cap CRT CBA Fig 3 ...
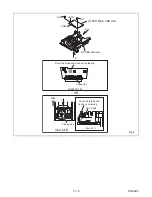
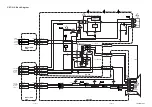
Page 93: ...2 4 8 TD951DA Fig DM16 41 42 43 L 13 44 45 P 9 Slide Fig DM17 ...
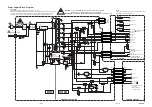
Page 97: ...3 1 3 TD900PEX S4 S1 X1 TAPE X5 X4 X2 X3 S3 S6 S7 S2 PACKING TAPE Packing ...
Page 119: ...Printed in Japan 2003 08 25 HO 6720FDD TD900UA ...


