80
sEctIoN 4
opEratIoN
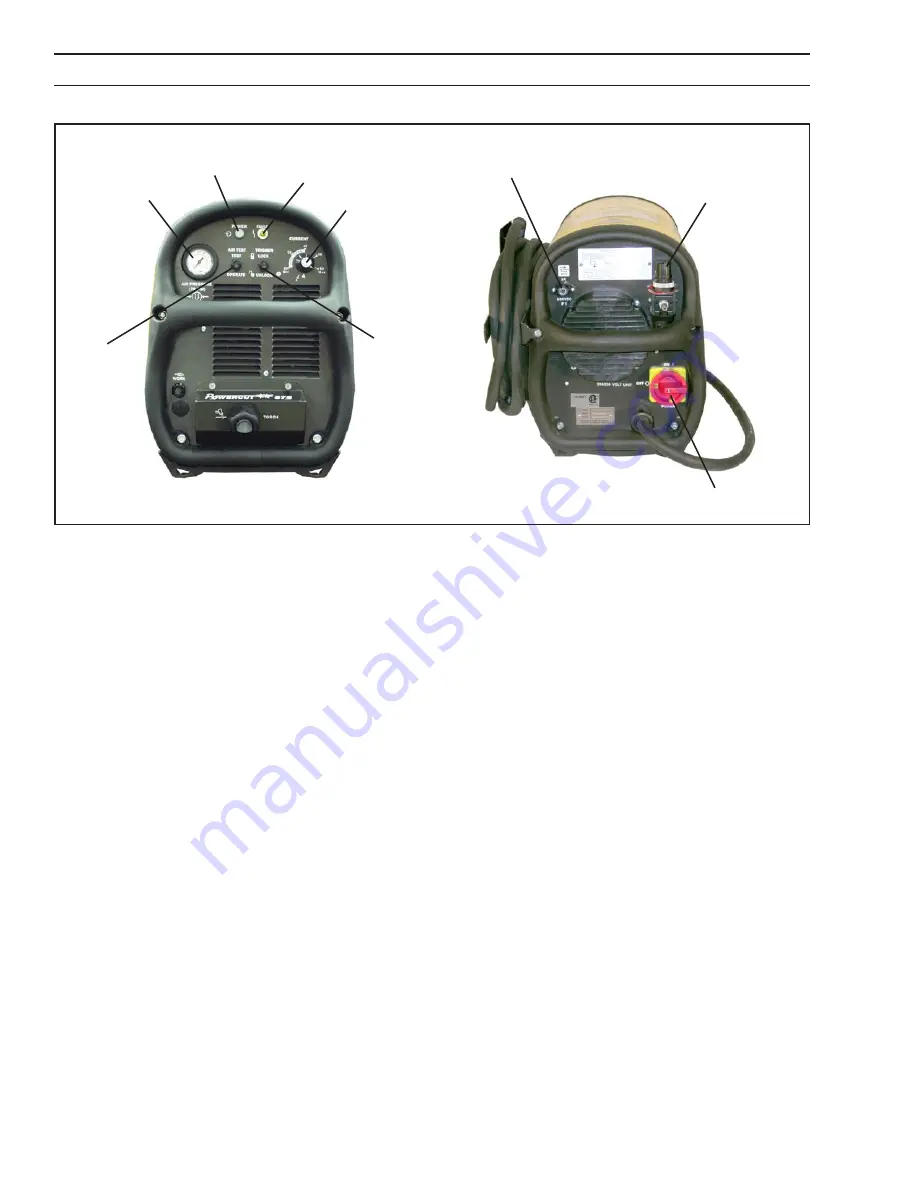
figure 4-1. powercut 875 controls
rEar VIEW
AIR REGULATOR
CONTROL KNOB
FAULT LIGHT
(AMBER)
POWER LIGHT
(WHITE)
AIR
PRESSURE
GAUGE
AIR TEST
SWITCH
TRIGGER LOCK
SWITCH
CURRENT
CONTROL
KNOB
POWER ON-OFF
(I-O) SWITCH
FUSE (3A)
4.3 cuttINg WIth thE pt-32Eh
Use the following procedures to cut with the PT-32EH torch
(Figure 4-4).
A.
Hold the torch nozzle approximately 3.2mm to 4.8mm (1/8" to 3/16") above the work and tilted at about 15 - 30°. This
reduces the chance of spatter entering the nozzle. If the PT-32EH's standoff tool (P/N 0558002393) is being used, the
difference between the electrode and workpiece is approximately 4.8mm (3/16").
B.
Depress the torch switch. Air should flow from the torch nozzle.
C.
Two seconds after depressing the torch switch, the pilot arc should start. The main arc should immediately follow, al-
lowing the cut to begin. (If using the trigger LOCK mode, torch switch may be released after establishing the cutting
arc.)
D. After starting the cut, the torch should be maintained at a 5-15° forward angle (Figure 4-2). This angle is especially
useful in helping to create a "drop" cut. When not using the standoff guide, the nozzle should be held approximately
6.4mm (1/4 ") from the work.
E.
When ending a cut, the torch switch should be released (press and release if using trigger LOCK mode) and lifted off
the workpiece just before the end of the cut. This is to prevent the high frequency from reigniting after cutting arc
extinguishes and causing damage to the nozzle (double arcing).
Summary of Contents for Powercut 875
Page 4: ...4 table of contents ...
Page 8: ...8 OBSAH ...
Page 18: ...18 ODDÍL 3 INSTALACE ...
Page 24: ...24 ODDÍL 4 OBSLUHA ...
Page 28: ...28 INDHOLDSFORTEGNELSE ...
Page 38: ...38 SEKTION 3 BETJENING ...
Page 44: ...44 SEKTION 4 BETJENING ...
Page 48: ...48 INHOUDSOPGAVE ...
Page 58: ...58 HOOFDSTUK 3 INSTALLATIE ...
Page 64: ...64 HOOFDSTUK 4 BEDIENING ...
Page 68: ...68 table of contents ...
Page 78: ...78 SECTION 3 INSTALLATION ...
Page 84: ...84 SECTION 4 OPERATION ...
Page 88: ...88 SISUKORD ...
Page 98: ...98 OSA 3 PAIGALDAMINE ...
Page 104: ...104 OSA 4 KASUTAMINE ...
Page 108: ...108 SISÄLLYSLUETTELO ...
Page 118: ...118 KAPPALE 3 ASENNUS ...
Page 124: ...124 KAPPALE 4 KÄYTTÖ ...
Page 128: ...128 table DES MATIÈRES ...
Page 138: ...138 SECTION 3 INSTALLATION ...
Page 144: ...144 SECTION 4 FONCTIONNEMENT ...
Page 148: ...148 INHALTSANGABE ...
Page 158: ...158 ABSCHNITT 3 INSTALLIERUNG ...
Page 164: ...164 ABSCHNITT 4 BEDIENUNG ...
Page 168: ...168 TARTALOMJEGYZÉK ...
Page 178: ...178 3 SZAKASZ ÖSSZESZERELÉS ...
Page 184: ...184 4 SZAKASZ MŰKÖDÉS ...
Page 188: ...188 INDICE ...
Page 198: ...198 SEZIONE 3 INSTALLAZIONE ...
Page 204: ...204 SEZIONE 4 FUNZIONAMENTO ...
Page 216: ...216 section 6 replacement parts ...
Page 217: ...217 section 6 replacement parts ...
Page 218: ...218 section 6 replacement parts ...
Page 219: ...219 section 6 replacement parts ...
Page 220: ...220 section 6 replacement parts ...
Page 221: ...221 section 6 replacement parts ...
Page 222: ...222 section 6 replacement parts ...
Page 223: ...223 section 6 replacement parts ...
Page 224: ...224 section 6 replacement parts ...
Page 225: ...225 section 6 replacement parts ...
Page 226: ...226 section 6 replacement parts ...


