81
F.
For rapid re-starts, such as grate or heavy mesh cutting, do not release the
torch switch. In the postflow mode, the arc can be re-started immediately
by depressing the torch switch. This avoids the 2-second preflow portion
of the cutting cycle.
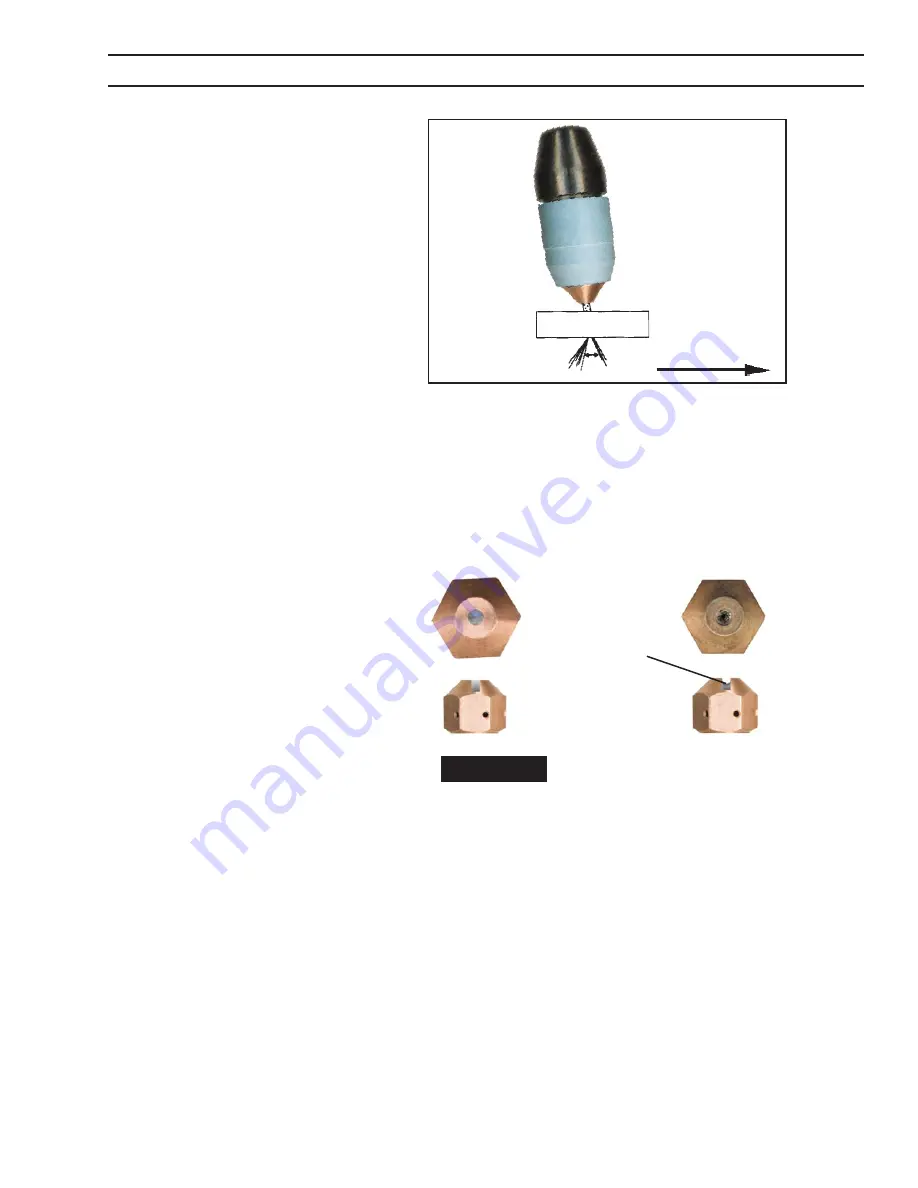
figure 4-3. Electrode Wear limit
4.3.1. Drag cutting with the pt-32Eh / powercut 875 system
If dragging cutting is desired, attach ESAB's standoff guide (P/N 0558002393).
Then follow steps in Section 4.3. If drag cutting is desired for thin material,
under 9.5mm (3/8"), remove 70 amp nozzle from torch head, insert ESAB's 40
amp nozzle (P/N 0558002908). Lower current level to 40 amps or lower,
(see
Auto Drag Scale on front panel)
. Then follow steps in Section 4.3. Also refer to
PT-32EH Instruction Manual 0558003746.
rEplacE ElEctroDE BEforE pIt-
tINg BEcoMEs DEEpEr thaN 1.6
MM (0.06")
Replace when eroded beyond
1.6mm (0.06") depth.
NEW
WORN
cut
DIrEctIoN
figure 4-2. recommended torch angle of 5° to 15°
sEctIoN 4
opEratIoN
NOTE:
When replacing the nozzle, always inspect the
electrode for wear. If more than 1.6mm (.06")
of electrode Hafnium has eroded, replace the
electrode. If the electrode is used beyond this
recommended wear limit, damage to the torch
and power source may occur. Nozzle life is also
greatly reduced when using the electrode below
the recommended limit. Refer to Figure 4-3.
CAUTION
Summary of Contents for Powercut 875
Page 4: ...4 table of contents ...
Page 8: ...8 OBSAH ...
Page 18: ...18 ODDÍL 3 INSTALACE ...
Page 24: ...24 ODDÍL 4 OBSLUHA ...
Page 28: ...28 INDHOLDSFORTEGNELSE ...
Page 38: ...38 SEKTION 3 BETJENING ...
Page 44: ...44 SEKTION 4 BETJENING ...
Page 48: ...48 INHOUDSOPGAVE ...
Page 58: ...58 HOOFDSTUK 3 INSTALLATIE ...
Page 64: ...64 HOOFDSTUK 4 BEDIENING ...
Page 68: ...68 table of contents ...
Page 78: ...78 SECTION 3 INSTALLATION ...
Page 84: ...84 SECTION 4 OPERATION ...
Page 88: ...88 SISUKORD ...
Page 98: ...98 OSA 3 PAIGALDAMINE ...
Page 104: ...104 OSA 4 KASUTAMINE ...
Page 108: ...108 SISÄLLYSLUETTELO ...
Page 118: ...118 KAPPALE 3 ASENNUS ...
Page 124: ...124 KAPPALE 4 KÄYTTÖ ...
Page 128: ...128 table DES MATIÈRES ...
Page 138: ...138 SECTION 3 INSTALLATION ...
Page 144: ...144 SECTION 4 FONCTIONNEMENT ...
Page 148: ...148 INHALTSANGABE ...
Page 158: ...158 ABSCHNITT 3 INSTALLIERUNG ...
Page 164: ...164 ABSCHNITT 4 BEDIENUNG ...
Page 168: ...168 TARTALOMJEGYZÉK ...
Page 178: ...178 3 SZAKASZ ÖSSZESZERELÉS ...
Page 184: ...184 4 SZAKASZ MŰKÖDÉS ...
Page 188: ...188 INDICE ...
Page 198: ...198 SEZIONE 3 INSTALLAZIONE ...
Page 204: ...204 SEZIONE 4 FUNZIONAMENTO ...
Page 216: ...216 section 6 replacement parts ...
Page 217: ...217 section 6 replacement parts ...
Page 218: ...218 section 6 replacement parts ...
Page 219: ...219 section 6 replacement parts ...
Page 220: ...220 section 6 replacement parts ...
Page 221: ...221 section 6 replacement parts ...
Page 222: ...222 section 6 replacement parts ...
Page 223: ...223 section 6 replacement parts ...
Page 224: ...224 section 6 replacement parts ...
Page 225: ...225 section 6 replacement parts ...
Page 226: ...226 section 6 replacement parts ...


