background image

4

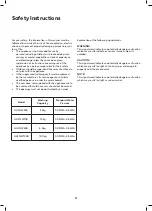
For your safety, the information in this manual must be 
followed to minimize the risk of fire or explosion, electric 
shock, or to prevent property damage, personal injury or 
loss of life.
•  This appliance is not intended for use by 

persons(including children) with reduced physical, 
sensory or mental capabilities or lack of experience 
and knowledge unless they have been given 
supervision or instruction concerning use of the 
appliance by a person responsible for their safety.

•  Children should be supervised to ensure that they do 

not play with the appliance.

•  If the supply cord is damaged, it must be replaced 

by the manufacturer, its service agent or similarly 
qualified persons in order to avoid a hazard.

•  The new hose-sets supplied with the appliance are to 

be used and that old hose-sets should not be reused.

•  The openings must not be obstructed by a carpet.

Model

Washing 

Capacity

Standard Water 

Pressure

GGSTLW55B

5.5kg

0.03MPa~0.8MPa

GGSTLW70B

7.0kg

0.03MPa~0.8MPa

GGSTLW80B

8.0kg

0.03MPa~0.8MPa

GGSTLW100B

10.0kg

0.03MPa~0.8MPa

Explanation of the following signal words: 

WARNING!

This signal word indicates a potentially dangerous situation 
which may result in death or serious injuries unless it’s 
avoided.

CAUTION!

This signal word indicates a potentially dangerous situation 
which may result in slight or minor injuries or damage to 
property and the environment.

NOTE!

This signal word indicates a potentially dangerous situation 
which may result in slight or minor injuries.

Safety Instructions

Summary of Contents for GGSTLW100B

Page 1: ...E S S E N T I A L S F O R L I F E User Manual MODEL S GGSTLW55B GGSTLW70B GGSTLW80B GGSTLW100B V6 2 1221 Top Load Washing Machine ...

Page 2: ...our appliance when cleaning our Support Team are here to help You can use our online Support Centre at anytime by visiting http support residentiagroup com au or you can contact us via calling us on 1300 11 HELP 4357 It is important that you read through the following use and care manual thoroughly to familiarise yourself with the installation and operation requirements of your appliance to ensure...

Page 3: ...ications 21 Purchase Details 21 Attach Your Receipt 22 Warranty Information Customer Care Sôlt recommends the use of original spare parts When contacting our customer service team please ensure that you have the following information at hand which can be found on your appliances rating plate Model Number Serial Number T 1300 11 4357 E support residentiagroup com au ...

Page 4: ...similarly qualified persons in order to avoid a hazard The new hose sets supplied with the appliance are to be used and that old hose sets should not be reused The openings must not be obstructed by a carpet Model Washing Capacity Standard Water Pressure GGSTLW55B 5 5kg 0 03MPa 0 8MPa GGSTLW70B 7 0kg 0 03MPa 0 8MPa GGSTLW80B 8 0kg 0 03MPa 0 8MPa GGSTLW100B 10 0kg 0 03MPa 0 8MPa Explanation of the ...

Page 5: ... explosive substances such as wax oil paint gasoline degreasers dry cleaning solvents kerosene etc This may result in fire or explosion Before hand thoroughly rinse items of washing by hand CAUTION INSTALLING THE PRODUCT This washing machine is for indoor use only It isn t intended to be built in using The openings must not be obstructed by a carpet Washing machine shall not be installed in bath r...

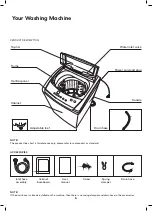
Page 6: ... If the drain hose is already installed on the machine then there is no spring clamper and drain hose in the accessories Top lid Water inlet valve Handle Drain hose Adjustable feet Power cord and plug Frame Inlet hose assembly Cabinet baseboard User manual Screw Spring clamper Drain hose Control panel Cabinet Your Washing Machine ...

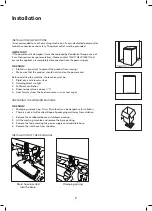
Page 7: ...the power cord Before installing the machine the location must be 1 Rigid dry and a level surface 2 Avoiding direct sunlight 3 Sufficient ventilation 4 Room temperature is above 0 C 5 Kept far away from the heat resources such as coal or gas UNPACKING THE WASHING MACHINE WARNING Packaging material e g Films Styrofoam can be dangerous for children There is a risk of suffocation Keep all packaging w...

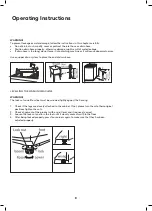
Page 8: ...stem to place the end of drain hose LEVELLING THE WASHING MACHINE WARNING The lock nuts on all four feet must be screwed tightly against the housing 1 Check if the legs are closely attached to the cabinet If not please turn them to their original positions tighten the nuts 2 Check alignment of the product with a spirit level and if required correct 3 Loosen the lock nut and turn the feet until it ...

Page 9: ...inary faucet a Loosen clamp nut to show 5mm thread tap with threads and inlet hose e Press slide bushing insert inlet hose into connecting base b Loosen four bolts special tap for washing machine f Connection finished c Set connecting base on tap and tighten bolts evenly g After connection and installation check if there is water leakage d Tighten clamp nut Screw tap Special washing machine tap ...

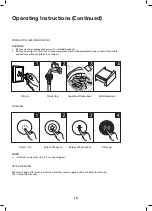
Page 10: ...of the whole procedures without clothes in as follows WASHING NOTE If default is selected step 2 3 can be skipped AFTER WASHING Buzzer will beep after washing finished and the power supply will be cut off automatically Then unload the laundry Plug in Power On Open tap Select Program Load and Close door Select Water Level Add detergent Start up Operating Instructions Continued ...

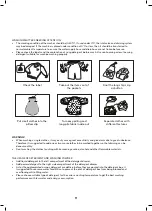
Page 11: ...g can be done smoothly Don t washing the clothes touching with kerosene gasoline alcohol and other flammable materials THE USAGE OF DETERGENT AND WASHING POWDER Add liquid detergent to the left compartment of the detergent drawer Add power detergent to the right side compartment of the detergent drawer As for the agglomerated or ropy detergent or additive before they are poured into the detergent ...

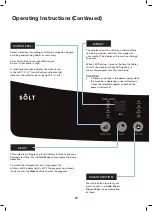
Page 12: ...s Start Pause to commense the delay operation To switch the delayed start off simply press the button until the delay light is off If the program has already started press the Power button to reset the program WATER LEVEL DELAY WASH FUNCTION The display shows the settings estimated time remaining options and status messages for your washer The display will remain on through the cycle When LED flas...

Page 13: ...s this button to turn your washing machine On or Off Press this button to select your desired amount of times to rinse Press this button to select your water temperature When both the Hot and Cold indicators are lit your washing machine will be set to use Warm water Press this button to select your wash program A solid indicator indicates the modes to the left whereas a flashing indicator indicate...

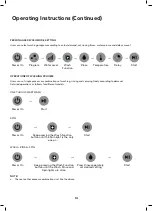
Page 14: ... as follows for different models ONE TOUCH SMART WASH SPIN WASH RINSE SPIN NOTE There are other process combinations just like the above Power On Power On Power On Power On Program Water Level Wash Function Keep pressing the Wash Function button until the Spin light is the only one on Keep pressing the Wash Function button until the Wash Rinse and Spin lights are all on Rinse Press Rinse separatel...

Page 15: ...othes and summer clothes QUICK CLEAN Start up Quick Clean Power on select Normal Soft Mix Strong Jeans program then press the Quick Clean button combinations Cancellation of Quick Clean function The function can be cancelled by pressing Quick Clean combination buttons Mode and Temperature or Power off FUZZY WEIGHTING The washing machine will select the water level automatically according to the lo...

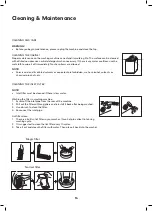
Page 16: ...alcohol solvents or chemical products etc CLEANING THE INLET FILTER NOTE Inlet filter must be cleaned if there is less water Washing the filter in washing machine 1 Screw off the inlet pipe from the rear of the machine 2 Pull out the filter with long pliers and reinstall it back after being washed 3 Use a brush to clean the filter 4 Reconnect the inlet pipe Lint filter clean 1 There is a built in ...

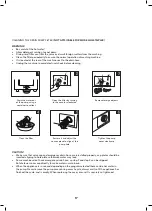
Page 17: ...be inserted aligning to hole plates otherwise water may leak Some machines don t have emergency drain hose so step 2 and step 3 can be skipped Rotate lower cover cap directly to make water run into basin When the appliance is in use and depending on the program selected there can be hot water in the pump Never remove the pump cover during a wash cycle always wait until the appliance has finished t...

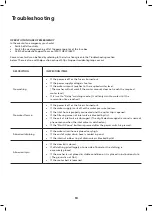
Page 18: ...ntil the reservation time reached No water flows in If the power is off or the fuse is burned out If the water supply is cut off or the water pressure too low If the inlet hose is properly connected and the water tap is opened If the filtering screen of inlet valve is blocked by dirt If the coil of inlet valve is damaged The slight electromagnetic sound is normal phenomenon when the inlet valve is...

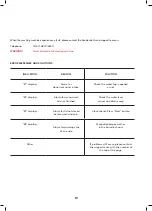
Page 19: ...m for abnormal water intake Check the water tap is opened or not E2 displays Alarm for water drain has not finished Check the water level sensor and drain pump E3 displays Alarm for lid not closed before wash and spin Close the lid Press Start button E4 displays Alarm for washing stay at one side Manually balance clothes in the barrel by hand Other If problems still occur please contact the suppor...

Page 20: ...es Rated Voltage 230 240V 230 240V 230 240V 230 240V Rated Frequency 50Hz 50Hz 50Hz 50Hz Maximum water pressure permitted in the water inlet 0 03MPa 0 03MPa 0 03MPa 0 03MPa Minimum water pressure permitted in the water inlet 0 8MPa 0 8MPa 0 8MPa 0 8MPa NOTE This product is subject to continuous improvement specification are subject to change without prior notice This product was tested in accordan...

Page 21: ...formation which can be found on the rating plate and the date of purchase which can be found on your sales invoice STORE DETAILS STORE NAME ADDRESS TELEPHONE PURCHASE DATE PRODUCT DETAILS MODEL NO SERIAL NO Purchase Details Attach your receipt to this page ...

Page 22: ...Appliance during the Warranty Period g Warranty Period means i where the Appliance is used for personal domestic or household use i e normal single family use as set out in the instruction manual the Appliance is warranted against manufacturing defects for 24 months following the date of original purchase of the Appliance h you means the purchaser of the Appliance not having purchased the Applianc...

Page 23: ...and the relationship between you and Residentia Group are governed by the law applicable where the Appliance was purchased 9 To the extent permitted by law Residentia Group excludes all warranties and liabilities other than as contained in this document including liability for any loss or damage whether direct or indirect arising from your purchase use or non use of the Appliance 10 For Appliances...

Page 24: ...T 1300 11 4357 E support residentiagroup com au E S S E N T I A L S F O R L I F E An initiative by Residentia Group www solt house ...

Reviews: